 中文 (台灣)
  English
 Українська
 Español
 Deutsch
 Français
 日本語
日本語 Русский
 한국어
한국어 Polski
 中文 (中国)
 Português
 Italiano
 Suomi
Suomi Svenska
 Dansk
Dansk Slovenčina
 Türkçe
 Nederlands
 Magyar
 ไทย
ไทย हिन्दी
 Ελληνικά
 Tiếng Việt
 Lietuviškai
 Latviešu valoda
 Eesti
Eesti Čeština
 Română
 Norsk Bokmål
当然,任何好的工具都比看起来更重要。重新拓扑工具也不例外。您可以在Retopo工作区的顶部工具栏中找到网格和烘焙菜单。下面列出了此菜单中的所有功能。
Retopo网格菜单
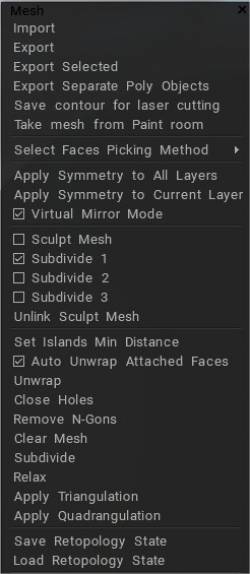
Import:Import外部网格以继续创建在另一个 3D 建模程序中启动的拓扑。
Export:导出retopo网格以继续在外部 3D 应用程序中工作。
Export选定项:仅导出retopo网格的选定面。
Export分离的多边形 (Retopo) 对象:将每个Retopo组导出为单独的文件。每个生成的文件的名称将包含组名称。
Save Contour for laser cutting:导出UV island 的连接边界,以方便激光或 CNC 切割。
Take Mesh From Paint Room:将网格从 Paint Room 移动到Retopo Room。在这种情况下,对象将被着色;颜色将用于烘焙和合并到场景中。
编辑场景比例:编辑在 Sculpt 房间中导入网格并按“是”时定义的场景比例。
选择面拾取方法:根据以下选项选择面:三角形、四边形、多边形和星形,以及改进四边形拓扑。
将对称应用于所有层:使所有Retopo组的所有对称操作永久化,允许它们“烘焙”到 Paint Room 中并在UV Room 中“Unwrapped”。
Apply symmetry to the current layer:仅使选定的Retopo Group 永久对称以进行合并和展开。
虚拟镜像模式:此选项仅在启用对称时适用。在这种模式下,您应该只在对称的一侧创建拓扑。相反的一面将显示为镜子中没有实际创建的多边形。您只需要在网格的一侧工作。
Virtual mirror should work for you, whether you have deleted half of your model or not. Even though things might not look perfectly symmetrical in the editing process, using "Apply symmetry..." from the "Retopo" menu should rectify that and produce perfectly mirrored geometry.
完成后,您可以“Apply symmetry”使对称拓扑永久化。如果关闭此模式,将在对称的两侧自动创建多边形。
旁注:要使其始终有效,您必须选择图层并单击“选择该图层的所有面”按钮。这样,“应用对称”总是完美的。
Working w/ Symmetry(Retopo/ UVs) :该视频继续介绍了使用 Symmetry 的方法,重点是Retopo Room 和UVs)。
雕刻网格:
细分 1、2、3:
取消链接雕刻网格
Set Islands Min Distance:设置岛屿最小距离。
Auto unwrap attached faces:选中此选项可自动创建UVs 。自动展开在已展开的岛屿附近创建的面孔。每次切换新工具时都会执行解包。
展开:将所有岛屿放入UV贴图。它与工具面板的“UV工具”部分中的命令相同。
Close holes:一个有价值的选项,它试图修复导入的Retopo网格中的孔 – 特别是密集的扫描网格。
移除 N-Gons:移除 N-Gons
清除网格:从选定的Retopo Group 中清除整个网格。
细分:使用一次迭代从当前Retopo组细分整个网格。
retopo室中的 Catmull-Clark 细分。两个命令是“细分选定”和“细分整个组”。
放松:放松Retopo网格以帮助捕捉到参考表面 – 对于当前选定的Retopo组。
Apply Triangulation:将所有可见的retopo网格作为一个整体进行三角测量。
Apply Quadrangulation:Quadrangulation 所有可见的retopo网格作为一个整体。
Save Retopology State:将重新拓扑状态存储在单独的文件中。
Load Retopology State:从单独的文件中恢复retopology状态。
烤
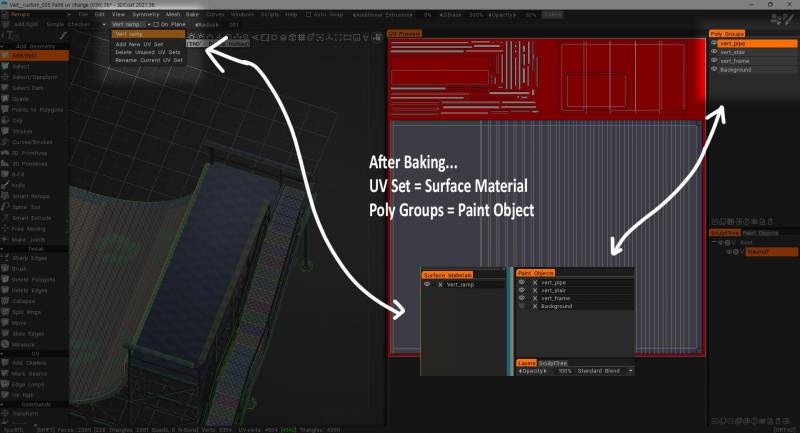
您应该了解3DCoat中对象的良好组织(对于 Max 和Maya也是如此)。
– 对象只是一组多边形;它独立于UV集。
– 材料也是多边形的集合。通常,一个UV集包含多种材质。
– UV集对应于纹理。通常,它们独立存在于对象上。
– 图层存在于所有对象和UV集中。
因此,如果您从重retopo房间合并油漆房间中的对象,它会创建一个对象、对应于多边形组的材质和对应于retopo房间中的UV集的UV集。每次合并retopo→绘制都会创建这个集合。所以物体和UV集可能是相关的,但不是1:1的对应关系。
如果你做一些简单的retopo和bake,你会得到一个物体、一种材质和一套UV 。如果至少UV集具有唯一的名称,那就更好了。如果您从“文件”菜单bake对象,它还会创建其他对象、材质和UV集。
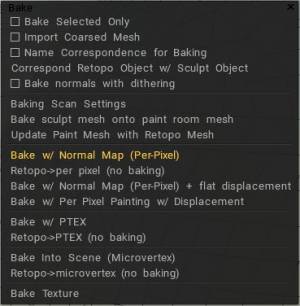
Bake selected only:在 Paint Room 中只烘焙当前选中的那些面。
Import粗化网格:在 Paint Room 中烘焙一个具有指定多边形数量的网格。
Use name correspondence for baking:确保只有与其Voxel层对应物具有相同名称的Retopo Groups 被烘焙到 Paint Room 中。如果Retopo对象的名称对应于 Sculpt Object 名称,您可以使用此选项来简化 Sculpt Object Baking 。如果选中该选项,则每个Retopo对象将仅使用同名的 Sculpt 对象及其子项进行烘焙。
对应具有雕刻对象的Retopo对象:此功能将帮助找到具有相应雕刻对象的Retopo对象。如果有任何具有相似名称的对应对象, Retopo Object 将仅bake具有相同名称的 Sculpt Object 的细节。
用抖动烘烤法线:
快速入门: Retopo Baking :该视频演示了Retopo Baking工具集。
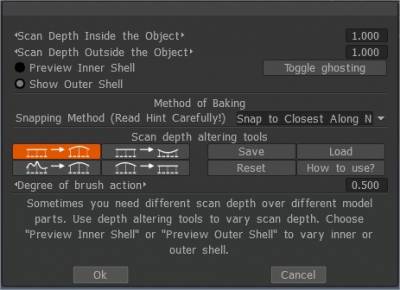
Baking扫描设置
为Per PixelPaintingImport对象
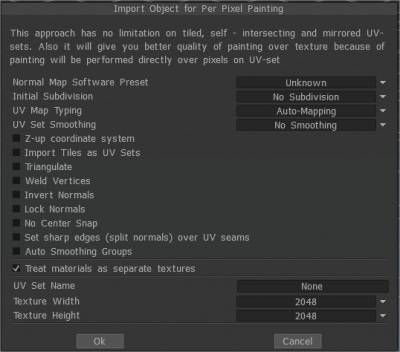
法线贴图软件预设:
初始细分:设置对象的初始细分以获得更平滑的外观(如果需要)。
UV-mapping类型:保留原始UV或选择自动映射。
UV设置平滑:此选项仅在您在import期间细分模型时有效。
Z-up 坐标系基于 Z-up 的坐标系,用于与Rhino、3DS-Max 和其他 Z 轴向上的应用程序兼容。
将瓷砖Import为UV集。将单独的UV平铺Import为单独的UV集。
Triangulate:三角化网格以避免UV故障。
焊接顶点 焊接空间中同一点的单独顶点。
反转法线
锁定法线 不要重新计算法线;直接从目标文件中使用法线。如果细分网格,此选项将被忽略。
Don’t Snap Subdivision Vertices to Surface:此选项有助于避免将细分网格捕捉到高多边形网格的表面。它使 Layer0 网格非常平滑。在这种情况下,所有位移(法线贴图)都将放置在更高层上。如果您export低多边形网格和displacement map,此选项非常有用。
默认情况下,没有中心捕捉3D-Coat尝试将模型的边界框移动到场景的原点。如果您想要按原样import模型,而不进行任何居中,请选中此框。
在UV接缝上设置锐边(法线分割)
自动平滑组:此选项允许自动创建平滑组。通过在“最大角度”选项中指定一个值来负责当边缘变得锐利时面之间的最大角度,有必要激活自动平滑组选项。要使用此选项,请打开自动平滑组。
Treat Poly Groups as Paint Objects:在这种模式下,无论初始UV集如何,对象的每种材质都将被视为单独的UV集(单独的纹理)。如果取消选择“将多边形组视为绘画对象”,则您的绘画对象或多边形组图层将转换为表面材质。您现在只有一个油漆对象,但具有多种表面材质。将您的 Paint 对象重命名为所有 Poly Groups 图层的组合名称。
UV集名称:输入UV集名称。
纹理宽度:设置纹理宽度。
贴图高度:设置贴图高度。
• 注意:如果您的视频卡的 Vram 小于 2GB,则应避免使用大于 2000 x 2000 的纹理。
Baking选项
Bake sculpt mesh onto paint room mesh:此命令会将 Sculpt 房间对象中的更改bake到 Paint Room 对象,并在此过程中更新绘画层。以前的绘画层将被保留(只要可能),而新烘焙的贴图将被分配新层。此命令将绘制场景对象作为retopo网格,并将雕刻场景中的细节和颜色烘焙到绘制对象。
使用Retopo Mesh 更新 Paint Mesh:此命令将用可见的Retopo Mesh 替换当前可见的 Paint Room 对象。
它允许更新与体积相关的法线贴图和颜色层。请注意,雕刻网格上的绘制区域将覆盖油漆室对象上的绘制区域。它仅适用于per-pixel绘画方法。所以要小心避免丢失数据。
需要UV集,但如果您尚未分配UV集,它将自动生成。
层将被保留,但retopo网格的UV -s 应该类似于油漆室网格。该操作不可撤销,因此我们建议您在尝试替换几何体之前保存场景。
Bake with Normal Map ( Per-Pixel) :将Retopo网格从当前选定的Retopo Group 烘焙到 Paint Room 和“Objects”面板中,使用“Per-Pixel ”方法进行纹理化。细节被烘焙为特殊层上的法线贴图。位移不会被烘烤。
出现一个对话框,允许为Per PixelPaintingImport对象。
Retopo → per pixel (无烘焙):仅烘焙Retopo几何体,而不将细节投射到 Paint Room 和 Objects Panel 中进行per-pixel绘画。
Bake w/ Normal Map (Per Pixel) + Flat Displacement:烘焙对象以进行per-pixel绘画,并在特殊图层上bakenormal map贴图。
位移将被烘焙为每个三角形的平面位移。 “FlatDisplacement”层将被隐藏并可用于export。
Bake w/ Per Pixel Painting w/ Displacement:Bakingper pixel绘画的位移在某些情况下可能会产生错误的结果,因为per pixel绘画不适用于深度位移。
使用Ptex烘焙:获取在Retopo Group 中为对象定义的网格,并将其烘焙到 Paint Room 和“Objects”面板中,使其准备好使用Ptex方法进行纹理操作。
Retopo →PTEX(无烘焙):仅将 Retopoed 对象的外部“外壳”烘焙到 Paint Room 和 Objects 面板中,以使用Ptex方法进行纹理化。
Bake Into Scene (Microvertex) :将补丁烘焙到场景中。此操作需要UV集。补丁将被投影(烘焙)到旧网格上,层结构将被保留。使用“微顶点”方法为纹理准备网格。
Retopo → microvertex (无烘焙):使用“Micro-Vertex”方法准备Retopo网格进行纹理化,但仅使用网格的“原始”形式并且不执行“烘焙”操作。将结果合并到 Paint Room 和“Objects”面板中。
导出置换贴图:一个分步视频,展示了如何引入低多边形UV对象并在其上雕刻额外的细节,然后如何bakedisplacement map并将其查看到 Industry Tuts 的低多边形模型上.
纹理Baking工具
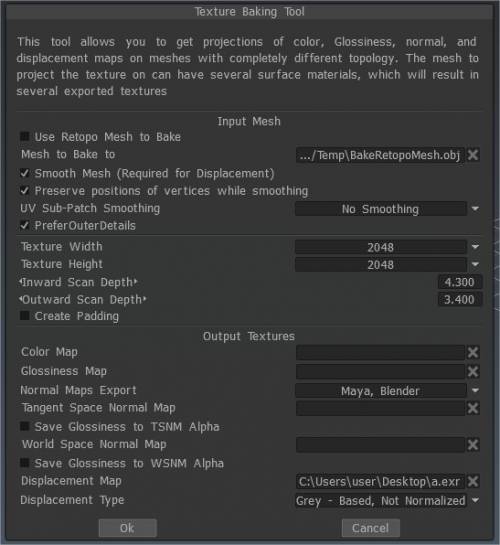
烘焙纹理(已弃用):调用纹理Baking工具,它允许您将已应用于“烘焙” Retopo网格的漫反射、镜面反射、法线和置换纹理bake到类似的外部多边形网格文件上。
纹理Baking工具:这个旧视频演示涵盖了3DCoat V4(目前已过时)的一些纹理烘焙改进/添加。
纹理Baking:该视频开始演示3DCoat中的纹理Baking过程。一般性地解释该过程通常如何工作,包括顺序纹理Baking。
V4 的烘焙设置对话框旧版本:该视频继续演示纹理Baking/合并到 Paint Room 过程。它详细介绍了“Bake Scan Settings”对话框,在哪里可以找到“Happy Baking Guide”pdf,以及在重新尝试bake时清除 Paint Room(以防止重复的网格和绘画层)。
编辑:从 build 4.0.10 开始,在将局部“区域”应用到模型时不再需要退出烘焙设置对话框来切换UV贴图。