 Svenska
  English
 Українська
 Español
 Deutsch
 Français
 日本語
日本語 Русский
 한국어
한국어 Polski
 中文 (中国)
 Português
 Italiano
 Suomi
Suomi 中文 (台灣)
 Dansk
Dansk Slovenčina
 Türkçe
 Nederlands
 Magyar
 ไทย
ไทย हिन्दी
 Ελληνικά
 Tiếng Việt
 Lietuviškai
 Latviešu valoda
 Eesti
Eesti Čeština
 Română
 Norsk Bokmål
Splinekurvor
Den låter dig placera splinepunkter direkt i din scen eller applicera en pensel längs en kurva .
Text
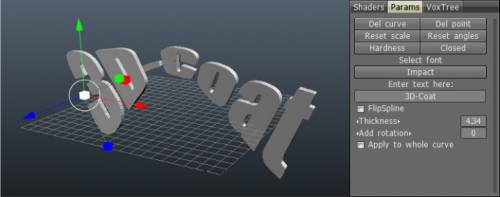
Text: Detta låter dig placera text längs en splinekurva och skapa text i voxelform. Dess parametrar är identiska med Curves-verktyget, så du bör redan vara bekant med det efter att ha läst avsnittet ovan. Den har några unika egenskaper:
Du kan välja ett typsnitt för din text, du kan naturligtvis skriva in den text du vill göra volymetrisk och du kan justera tjockleken på denna volymetriska text.
Vox lager
Skapa ett tunt lager runt det frusna området av den aktuella volymen. Måla med frysen för att markera området och tryck på Applicera efteråt.
Täcka
Detta verktyg tillåter tillsats av beläggning över lagret på ett oförstörande sätt. Det liknar VoxLayer, men du kan definiera området med hjälp av kurvor och ändra hörnpunkter senare.
Rör/Array
Rör På Kurva.
Böj volym
Böj föremålet runt kurvan.
Svep med Guide
Den svepande ytan kommer att genereras genom att profilen flyttas längs den valda kurvguiden. När du har visat dialogrutan Verktygsalternativ måste du välja profilkurva. Det nya objektet i VoxTree kommer att skapas och nätet kommer att placeras där. Välj motsvarande objekt i VoxTree för att kunna ändra parametrar som tjocklek, vinkel, vridvinkel, etc. Ta bort motsvarande VoxTree-element för att sluta fylla kurvan.
Revolutionens yta
Den valda profilens varv runt den valda kurvaxeln genererar rotationsytan. Efter visas “Verktygsalternativ dialogrutan visas,” Du måste välja kurvaxeln. Det nya objektet i VoxTree kommer att skapas och nätet kommer att placeras där. Välj motsvarande objekt i VoxTree för att kunna ändra parametrar som tjocklek, Angle, Twist Angle, etc. Ta bort motsvarande VoxTree-element för att sluta fylla kurvan.
Polyeder
Polyedern kommer att genereras genom att rotera och flytta den valda profilen runt den valda kurvaxeln. Efter visas “Verktygsalternativ dialogrutan visas,” Du måste välja kurvaxeln. Det nya objektet i VoxTree kommer att skapas och nätet kommer att placeras där. Välj motsvarande objekt i VoxTree för att kunna ändra parametrar som tjocklek, Antal facetter och utjämning. Ta bort motsvarande VoxTree-element för att sluta fylla kurvan.
Rotera yta: Den roterande ytan kommer att genereras av den valda profilens varv runt den valda kurvaxeln. Efter visas “Verktygsalternativ dialogrutan visas,” Du måste välja kurvaxeln. Det nya objektet i VoxTree kommer att skapas och nätet kommer att placeras där. Välj motsvarande objekt i VoxTree för att kunna ändra parametrar som tjocklek, Angle, Twist Angle, etc. Ta bort motsvarande VoxTree-element för att sluta fylla kurvan.
Swept 2 Guide
Svepytorna kommer att genereras av den rörliga profilen längs två kurvstyrningar. När dialogrutan Verktygsalternativ visas måste du välja två kurvor: guidekurva och kurvprofil. Det nya objektet kommer att skapas i VoxTree, och nätet kommer att placeras där. Välj motsvarande objekt i VoxTree för att kunna ändra parametrar som tjocklek, antal ytor och utjämning. Ta bort motsvarande VoxTree-objekt för att sluta fylla kurvan.
Swept 2 Gener
Svepytan kommer att genereras genom att flytta två profiler längs den valda styrkurvan. Efter visas “Verktygsalternativ dialogrutan” Du måste välja den andra guiden och kurvprofilen. Det nya objektet i VoxTree kommer att skapas och nätet kommer att placeras där. Välj motsvarande objekt i VoxTree för att kunna ändra parametrar som tjocklek, Antal facetter och utjämning. Ta bort motsvarande VoxTree-element för att sluta fylla kurvan.
Swept N Gener
Svepytorna kommer att genereras genom att flytta N profiler längs två kurvledare. När du har visat dialogrutan Verktygsalternativ måste du välja den andra guiden och kurvprofilerna. Det nya objektet i VoxTree kommer att skapas och nätet kommer att placeras där. Välj motsvarande objekt i VoxTree för att kunna ändra parametrar som tjocklek, Antal facetter och utjämning. Ta bort motsvarande VoxTree-element för att sluta fylla kurvan.