 English
  Українська
 Español
 Deutsch
 Français
 日本語
日本語 Русский
 한국어
한국어 Polski
 中文 (中国)
 Português
 Italiano
 Suomi
Suomi Svenska
 中文 (台灣)
 Dansk
Dansk Slovenčina
 Türkçe
 Nederlands
 Magyar
 ไทย
ไทย हिन्दी
 Ελληνικά
 Tiếng Việt
 Lietuviškai
 Latviešu valoda
 Eesti
Eesti Čeština
 Română
 Norsk Bokmål
There are only two categories of export that can be performed while working in the Painting Workspace:
1. Export of the polygonal model as defined in the UV Workspace.
2. Export all of the Painted Textures created in the Painting Workspace.
Without UVs there are no textures to export.
A UV layout defines how a 2D image or texture map is wrapped onto a 3D surface. UVs usually only become necessary when you begin painting textures or you want to bake out normal maps.
All Texture Painting Data is contained within the various Layers which have been created in the Painting Workspace. This data exists in the form of the five basic channels that are created at the same time you Paint that information onto your mesh.
Separate maps are saved for each of the five categories of texture that you have created by painting onto your model: Diffuse Color, Glossiness Color, Emissive Intensity, Normal (bump) information, and Displacement information.
As is the case when exporting data from the UV Workspace, on Textures > Export UV: Export the object without textures. This command is best used with the ‘Import UV-set’ option. This combination allows you to export a UV-set without textures, that can be used as morph target on other apps.
Color Profile for export textures
3DCoat uses the device’s color profile (instead of its own), so if that profile is wrong, the issue happens. The solution is to, inside of Photoshop, go under Edit > Assign Profile and select the incorrect profile your computer was using, then when done with doing final touch-ups to the texture in PS simply export it and PS will convert it to a sRGB making it look correct in other apss (as Sketchfab).
To prevent this from happening again in the future, make sure the device’s color profile is correct before texturing.
Export Constructor Presets
When you choose a preset, then changing settings doesn’t matter, the preset settings override the export settings that are on Preferences.
So things may change from one preset to another even if the exported normal map type is the same, because Triangulation method, Normals Calculation Method or the Tangent space may be different from one preset to another and these three settings are included in every preset, plus some presets have settings set for Swap TB and Denormalized TB, which changes things too.
Activate the Export constructor command to see export presets
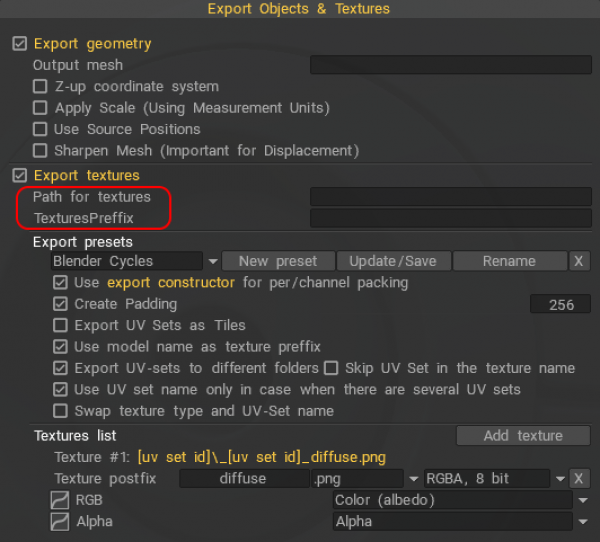
Export Diffuse or Albedo ?
In 3DCoat, the difference between Diffuse, Color (Albedo), and Base Color primarily comes down to whether the texture contains baked-in lighting information (like ambient occlusion or shadows) and the intended rendering workflow (PBR vs. legacy).
Here is the breakdown of the differences:
- Albedo / Base Color (Modern PBR): Represents the pure color of a surface without any lighting, shadows, or highlights. It is designed for Physically Based Rendering (PBR) workflows where the shader engine handles lighting calculations dynamically.
- Diffuse (Legacy/Older Workflows): Refers to a map that often includes baked-in ambient occlusion, shadowing, and lighting information. It is used in older, non-PBR, or specular workflows to simulate lighting when the engine cannot do it in real-time.
Key Differences Summary
| Feature | Albedo / Base Color | Diffuse |
|---|---|---|
| Workflow | Modern PBR (Metallic/Roughness) | Legacy / Older (Specular) |
| Lighting Data | None (pure color) | Baked-in shadows/AO |
| Accuracy | High (physics-accurate) | Lower (artistic approximation) |
| Usage in 3DCoat | Default for smart materials | Used for old game engines |
Important Considerations for 3DCoat
- Best Practice: Use Albedo for most modern workflows. Adding baked shadows (Diffuse) to a PBR shader can make objects look incorrect because the rendering engine will apply lighting on top of your already-present shadows.
- Metalness: In an albedo map, metallic regions are often represented as black or very dark, because the metallic map controls the reflection color instead.
- Interchangeability: While technically different, in 3DCoat’s Export menu, “Color” and “Albedo” are often used interchangeably to represent the pure color map, while “Diffuse” explicitly implies the legacy format.
Export Collada file
3DCoat is unable to export Collada correctly when there are multiple “faces” (uv-sets in retopo room, surface materials in paint room).
The solution always used is this :
– Export collada only from 3dCoat only for simple objects that have only one surface material
– In other cases always export as .obj which you then import in Blender and export as collada from there.
Exporting a Displacement Map
A step-by-step video showing how to bring in a low poly UV’d object and sculpt additional details onto it, then how to bake out a displacement map and view it onto the low poly model by Industry Tuts.
Displacement is exported using the difference between a vertex’s position and its position on Layer 0.
Vertice positions will be taken from Layer 0. This is the preferred option for low-poly export.
Displacement is always based on Layer 0. But the positions of vertices on exported OBJ file depend on your choice. It is better to use such combinations of export checkboxes:
– Set 1: Use it if Layer 0 is not distorted.
[x] Use source positions
[ ] Pick positions from Layer0
[ ] Coarse…
– Set 2: Use it if Layer 0 is distorted. Pick from layer 0 will save new positions, coarse will prepare it for further subdivision.
[ ] Use source positions
[x] Pick positions from Layer0
[x] Coarse…
But if Layer X was not normally distorted, just displacement export would not help.
You need to re-bake the mesh to get normal displacement or use vector displacement.
Export to Unreal example
3DC setup:
– Roughness/Metalness is selected under the textures menu.
– View Menu. GGX Burley 12 (Unreal4).
– File menu > Export objects and textures > Export panel > Unreal5
(For Unreal 4.27 or 5) Select the fbx and the texture files to import. The normal map will be correctly imported by Unreal. No work is needed.
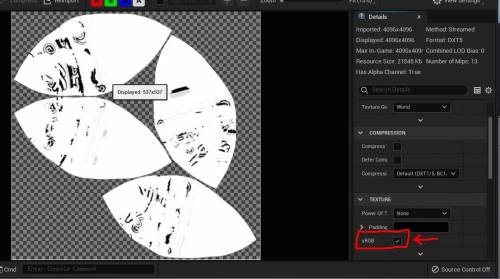
The Metalness and Roughness are imported as sRGB. Open the image editor for each image and deselect sRGB.
Save the image. Now they will be linear maps and will render correctly. They will be listed as linear in the Material editor.
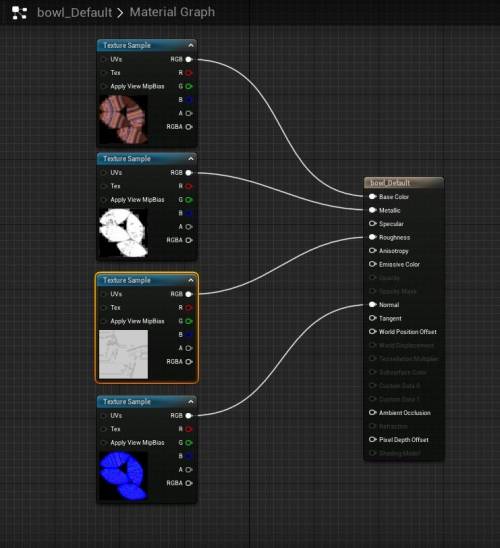
You should have a default material already created, double-click on it to open.
Drag all the texture files into the default material editor and input them into the correct slots.
Apply and save.
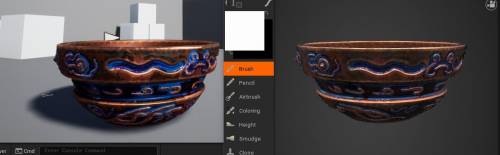
Of course, the lighting is different in this simple setup. The colors are correct, and the metalness and roughness match closely to 3DC.
PBR reacts, as you know to different lighting setups correctly, so the lighting is different in the unreal scene and 3DC.
Tutorials
New Export Dialog: In this video we explore the new export option dialogue