 English
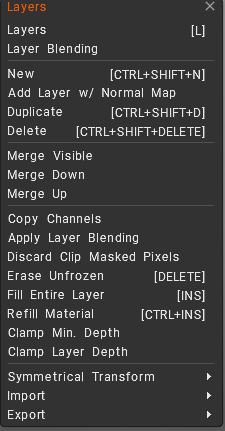
Layers: open the Layers Panel.
Layer Blending: open the Layer Blending Panel.
New: Add a new layer. It is automatically made current.
Add Layer w/ Normal Map: Adds a new Paint Layer with the blend mode automatically set to Normal Map. This is for use with normal maps generated outside 3DCoat.
Duplicate: Duplicates the selected layer.
Delete: Delete the current Layer.
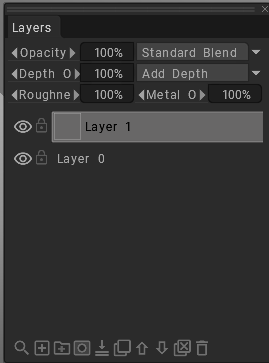
Merge Visible: Merges all of the visible Paint Layers into one layer.
Merge Down/Up: Merges the selected Layer up/down.
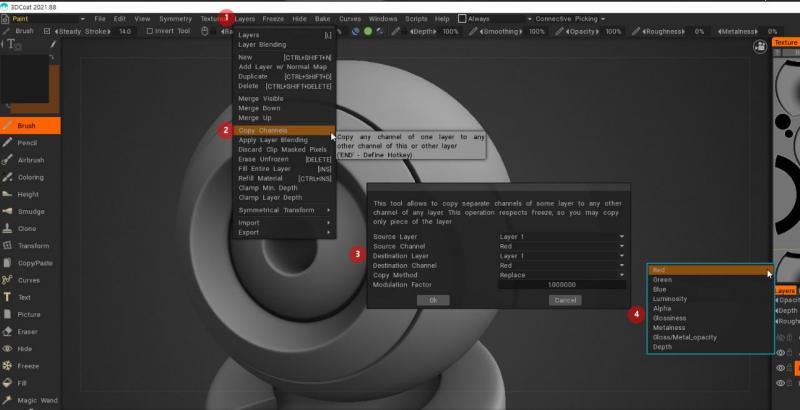
Copy channels: Allows you to copy specific channels or mask from one layer to another.
Apply Layer Blending: This applies the current layer blending as the default and resets the blend mode to Standard Blend.
Discard Clip Masked Pixels: Discard areas clipped by another layer in the current layer. Making the masked areas transparent.
Erase Unfrozen: Delete unfrozen parts of the current layer. Enable or disable the depth, color, and Glossiness channels to restrict this action to a specific channel.
Fill Entire Layer: Fill the entire layer using the current material and color.
Refill Material: Re-fill non-transparent areas of this layer with current material. It is convenient to change the material used to fill the layer.
Clamp Min. Depth: Clamps the depth of a layer by performing a minimum depth scan based on the parameter you specify. Good for removing “spikes” created while texture painting a depth map.
Clamp Layer Depth: Clamp/Plateau depth of the layer with a minimum and maximum value.
Symmetrical Transform
If you don’t have Topological Symmetry active, These functions below activate the Topological Symmetry tool. Read more about it by clicking the link.
- Flip Layers and Duplicate: Duplicate the layer, then flip it using topological symmetry.
- Flip Layer: Flip the layer using topological symmetry.
- Copy blue to Red: This option copies the blue parts of the mesh to the red areas. Define the blue and red areas first with the ‘Topological symmetry’ tool.
- Copy Red to Blue: This option copies the red parts of the mesh to the blue areas. Define the red and blue areas first with the ‘Topological symmetry’ tool.
Import
- Layers Color: Import the color channels from a PSD file to all layers.
- Roughness: Import an image to be used as Roughness monochrome channel.
- Metalness: Import a Metalness map file into the current layer.
- Depth: Import a depth image map into the current layer.
Export
- Color: Export color information in the current layer to a file.
- All Layers Color: Export the color channel to a PSD file from all layers.
- Roughness: Save only the Glossiness channel as a greyscale image.
- Metalness: Export a Metalness map file as a greyscale image.
- Depth: Export a depth image map file.
Layers in 3DCoat change function depending on whether you are working in the Sculpt, Paint, or Retopo room.
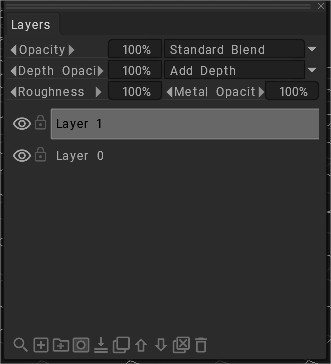
The Layers Panel changes depending on which Room you are working in, Paint room or Sculpt room.
They manage volumetric objects (VoxTree), non-destructive surface sculpting passes, or Photoshop-style multi-channel 2D/3D textures.
A layer is not per object base but is a kind of scene layer.
On Paint Room, the layer Menu open the operators for Pixel painting mode for UV maps texturing, Vertex paint on Surface sculpt objects, Morph target on Surface Mode and Voxel paint on Voxel sculpt objects.
Layers
Opens the Layers Panel.
Voxel volumes and Surface models support Layers.
Voxels for voxel paint and surface for vertex paint.
Paint Room Layers
- Channel Control: Manages color, specular, gloss, metalness, and displacement/depth channels per layer.
- Smart Materials & Masks: Supports attaching smart materials, layer masks, and clipping masks to isolate paint effects non-destructively.
- Adjustments: Modifies hue, saturation, lightness, and gamma correction on isolated layers.
Sculpt Room Layers (VoxTree)
- Object Hierarchy: Acts like an outliner, holding multiple independent volumes or primitive elements within parent-child trees.
- Sculpting Layers: Enables non-destructive detail passes (like pores or wrinkles) added on top of a base mesh, with adjustable depth opacity.
- Ghosting & Visibility: Isolates, hides, or ghosts specific volumetric parts to control complex scenes.
Retopo Room Layers – Polygroups
- Mesh Separation: Organizes individual retopologized parts (such as body, clothes, and accessories) into separate manageable layers for clean exporting and baking
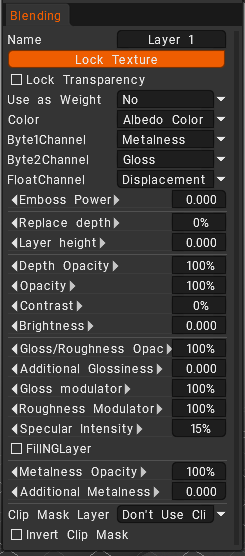
Layer Blending
Invokes the Layer Blending panel.
3DCoat layer blending manages how paint, normal, and depth channels interact across stacked layers via specific panels and modes. Access controls by hovering over a layer and clicking the downward arrow or going to Window > Popups > Layer Blending.
Blending Panel Controls
- Lock Texture: Keeps color and depth textures fixed regardless of resolution changes.
- Lock Transparency: Paints on a layer without altering its alpha or transparent boundaries.
- Weight Map: Converts greyscale paint values to custom percentages for export. [1]
Depth and Normal Blending
- Add Depth: Standard mode that sums the layer’s displacement with previous layers.
- Subtract Depth: Recedes displacement relative to underlying layers.
- Max Depth: Applies the highest displacement value found between the current layer and cumulative lower layers.
- Magnify / Suppress: Exponentially scales the amplitude of surface displacement up or down
Copy channels
Allows you to copy specific channels or mask from one layer to another.
First select the Layer and then the source channel to be copied.
You can select Red, Green, Blue, Luminosity, Alpha, Glossiness & Depth to the same or any other channel on the target layer.
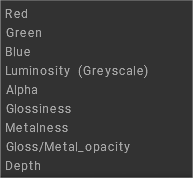
As destination select first the layer destination and then the channel of the destination layer that will be the copy destination.
Option to RGB/Mask copy the source channel to the RGB channels of the destination layer in case of the usual layer and to the “mask” if the mask is chosen.
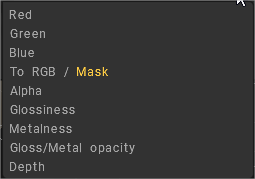
This tooltip refers to the mask being ‘chosen’, you select between the layer and its mask.
If select the mask (which is on another layer), it ends up on the layer’s regular RGB channels.
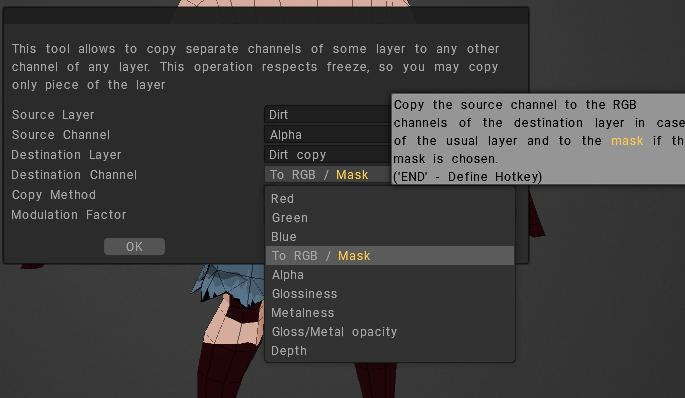
To copy the mask you need to select the name of the mask into the Destination Channel.
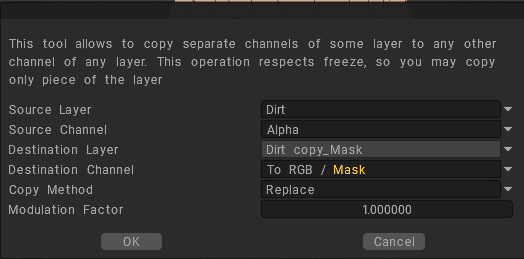
For more advanced functionality, you can also set the copying method to Replace, Move, Blend, Add & Subtract.
Tutorials
Copy Channels: This video demonstrates the usage of the Copy (Paint Layer) Channels feature in 3DCoat
Layer and Clipping Masks: This video provides an overview of the New Photoshop-style Layer & Clipping masks. They are also compatible with Layer Masks in Photoshop.