 English
  Українська
 Español
 Deutsch
 Français
 日本語
日本語 Русский
 한국어
한국어 Polski
 中文 (中国)
 Português
 Italiano
 Suomi
Suomi Svenska
 中文 (台灣)
 Dansk
Dansk Slovenčina
 Türkçe
 Nederlands
 Magyar
 ไทย
ไทย हिन्दी
 Ελληνικά
 Tiếng Việt
 Lietuviškai
 Latviešu valoda
 Eesti
Eesti Čeština
 Română
 Norsk Bokmål
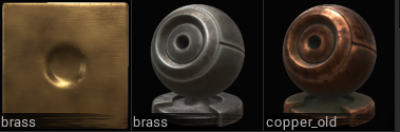
Smart Materials allow you to paint with physically accurate materials (PBR), as well as create them.

They can be projected upon your mesh with various methods and allow for advanced textures to be painted very quickly.
Where to save PBR Library downloads
Version 2021+ added completely new folders structure.
Almost all is split between two folders – data and UserPrefs.
As it is logical, UserPrefs is user-created content. Data is sort of temporary stuff.
The folder in documents changed, now it is Docs/3DCoat
– As soon as 3DCoat detects some files copied to the location in Documents, it will convert the files to the new structure.
– Also, if you will install 3dcpack it will be installed correctly (except presets that use old tools that are not present in the toolset).
So, you may copy it from download folder to Docs/3DCoat.
Or in Documents\3DCoat\UserPrefs\SmartMaterials\corresponding PBR folder name
How apply materials in different objects of the same model ?
- 3DCoat lets you do that through its layer system automatically. If you want something to only apply to a specific part, hide some paint objects or mask the layer.
This is the main strength of 3DCoat as opposed to other programs.
- 3DCoat will let the user pick the objects (contiguous meshes) and fill them with a Smart Material using the FILL tool.
You can also click on individual UV shells/islands in the 2D Texture Editor if you prefer to work that way. There are other options as well, such as filling everything (visible in the scene) on a single layer, filling by UV Map, etc.
– Naming Smart Materials in the materials list.
Stencil & Smart Material Preview Options
Preview options: If you choose to display mask/material in at least one of the channels (depth and/or, colors and/or glossiness, see more detail about them below) a new panel shows up on top.
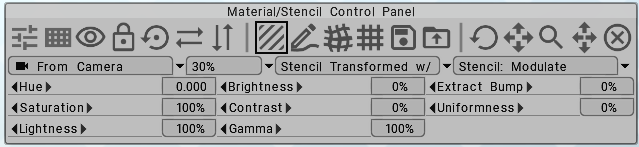
This panel contains all of the editable functions for both Smart Materials and Stencils and can be turned ON/OFF on Edit > Preferences > Viewport > Hide Material Preview.
The top section -from left to right- are controls to Material or Stencils manipulation. Here you can choose what will be manipulated using the navigation panel: either the stencil or the Smart Material.

Toggle Between Compact and Extended Forms: Pay attention that all extended controls are acting only on the fitrst texture used in material, so it is mostly useful for simple projective materials. All extended controls do not act on stencils.
Click to switch between tiled and non-tiled mode for stencils. This option is for stencils only, Smart Materials will be tiled anyway.
Show or hide the full-screen texture preview.
Toggle between two lock modes: First – lock texture scale to the object scale near the pivot point, second – scale object and texture separately.
Place texture in viewport center position.
Flip the texture mirror-like across the horizontal axis.
Flip the texture mirror-like along the vertical axis.
Paint using Smart Material or stencil.
Edit the material/stencil image directly, paint over the image. Press “E” to choose stroke mode. Use CTRL to erase.
Distort Smart Material or stencil with alpha to fit it to the object in the best way.
Clear distortion: Delete all distortion from current Smart Material or stencil.
Save Distortion: Save Smart Material/stencil distortion to file.
Load Distortion: Load distortion state from file.
Rotate the material/stencil, RMB to reset.
Move the material/stencil, RMB to reset.
Scale the material/stencil, RMB to reset.
Change the aspect ratio, RMB to reset.
Close the Material preview panel.
The bottom section -from left to right- show the control from paint projection.
Use preview Projection Mappings (Cube, UV, Cylindrical, Spherical) to get visual feedback while tuning them and without the Smart Material Preview.

Preview opacity: how to overlay materials onto the object.
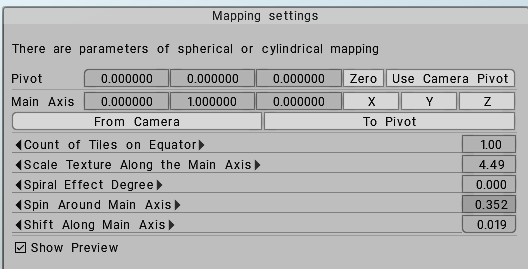
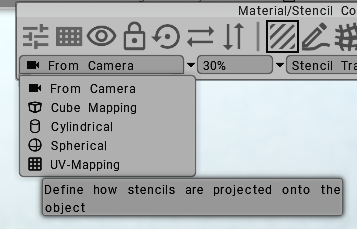
Projection mapping settings: It define how stencils are projected onto the object: projection type.
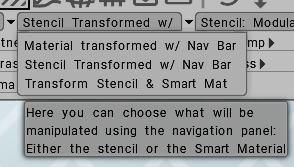
Stencil Transformed w/ Nav Bar: Here you can choose what will be manipulated using the navigation panel: either the stencil or the Smart Material.
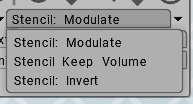
Working on Stencils, there is 3 way to project the black and white stencils:
Modulate: In this mode mask will modulate all effects, the brighter mask – the bigger effect.
Keep volume: Mask application will keep volume in average. Brighter areas will push surface forward, black – backward so that average level or the surface will be approximately kept. Pay attention that this method may not work in voxel mode
Invert: Invert Stencil Action.
The preview window renders at a Higher quality. You would need a 8k map in the smart material to closely match it.
You will be limited by the resolution of the smart material images that are used to make the smart material and your final texture resolution for your image maps.
Also is how well you are using the UV space, that is how your uv-islands are filling up the uv space.
Painting With Smart Materials
All 3 Paint Channels, when enabled, will react with any Smart Material that is currently selected from the Smart Materials Panel.
Every Smart Material can contain a separate texture for each of its channels: Color, Depth, and Glossiness.
If no Smart Material is selected (disable the use of Materials by clicking the large “X” in the Materials Panel), then each Paint Channel will respond based upon which Brush Alpha has been selected.
Smart Materials allow you to create and paint with Physically Based Rendering Smart Materials. These materials consist of multiple parameters to achieve realistic or physically accurate results.
New Materials can be added to an existing Smart Materials folder simply by clicking on the large “+” icon in the Material Panel.
The thumbnail image of each new material is created based on which texture image you select for that Material’s “Color” channel.
New Material Folders can be created or loaded by pressing the small “Down Arrow” at the top right of the Material Panel and selecting either the “Add new folder” or “Add existing folder” options.
Smart Material RMB panel

Delete: delete current smart material selected
Share item: Save the smart material to be exported to another computer.
Share item folder: Share the items folder as a 3dcpack – file to share with other users.
Duplicate: Duplicate current Smart Material.
Attach to the current layer: Right Click on a Shader in the panel. Choose to attach to the current layer.
Refill Material: Re-fill non-transparent areas of this layer with current material. It is convenient to change material used to fill the layer.
Fill Entire Mesh: Fill entire layer using current material and color.
Refresh Preview:
For all materials: Global parameters to change default mapping type.
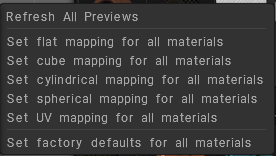
Move Items to…: Move the smart material to another folder.
Set as Factory Defaults (Entire Folder):
Set as Factory Default:
Restore Factory Default :
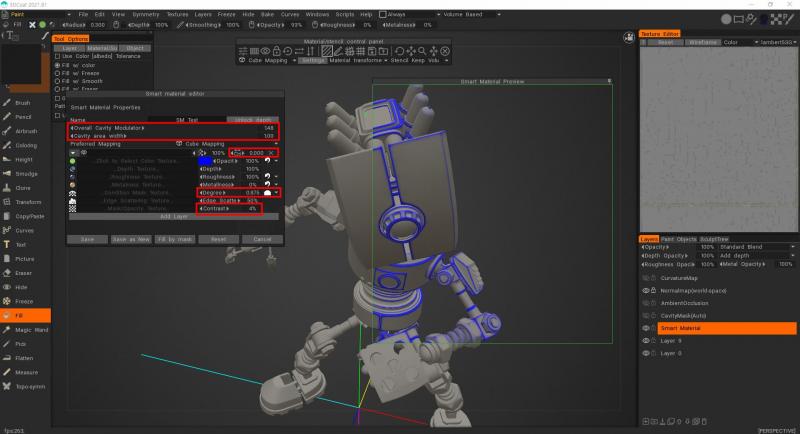
Smart Materials Editor
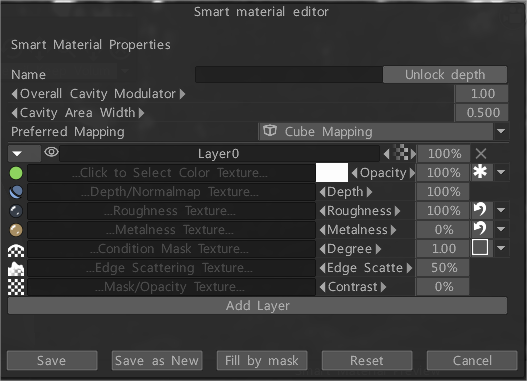
As many layers as you like can create Smart Materials, allowing for quite complex materials. There are also a number of parameters for these layers; let’s take a look at those Smart Material Properties now.
Name: Name of current Material.
Overall Displacement Scale:
Overall Cavity Modulator: Determines the overall area of effect for the material.
Preferred Mapping: Use various mapping types to apply your material. Cube Mapping is the recommended mapping type used with seamless textures.
Layer: Assign Texture to Layer hierarchy or create new ones.
Color: Specify a diffuse or albedo texture or color.
Depth: Specify a greyscale image for depth.
The Depth channel icon in Smart Materials may look like it’s for a Normal Map, but it’s not. It’s strictly for greyscale Displacement/Height maps.
Glossiness: Specify a greyscale image for glossiness.
Metalness: Specify a greyscale image for metalness.
Condition Mask: Specify the area to which the material layer is applied. There are various conditions, which are listed below.
Edge Scattering: Specify with an image how the edges of the condition are treated. Is used to add variation and detail to the edges of your material.
This can help create a more realistic and worn look by simulating how materials might naturally wear or scatter at the edges. You can adjust the settings for edge scattering to achieve the desired effect on your material.
Opacity Mask: Masks with an image of the areas that are and are not covered.
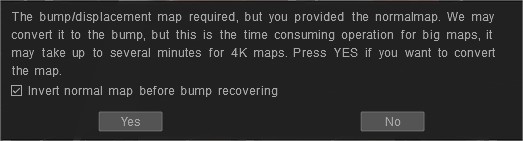
If you will provide a normal map for the Smart Material the 3DCoat will offer to convert it to the bump-map because materials require bump. This is a non-trivial operation, so it may take some time to convert for big maps.
Why 3DCoat need depth ?
Because you may paint with different materials over each other even on same layer and 3DCoat may mix them. To mix them 3DC need depth.
From that summary depth it generate normalmap that you see as the final render. So, if you have depth channel, use depth for the smart material.
Smart Materials have a number of aspects in 3DCoat:
There is the viewport Shading, Import/Export of Smart Material Texture maps, and Smart Materials for painting physically accurate materials.
Adjust the following options to control the painting area using the Curvature Map
Starting from 3DCoat 2021.53 the RGB cavity was introduced as the default calculation method in Texturing.
This is a significant feature for the PBR Painting over the Texture/Mesh.
- First, you need to make sure that the RGB cavity version is enabled. To do this, go to Edit >Preferences go to the Tools section, and select use RGB cavity as the default cavity calculation method.
- After enabling the function, go to the Texture Menu and select the Calculate Curvature option. In order for the Calculation to be made, you need to wait a bit.
- Now we can see how a Cavity map (RGB) appeared in the layers.
If you like to edit the RGB Curvature map on Smart material Editor

1. First, you need to add Conditions to Degree value (more on convex like example) to see “vase” options.
2. Focus on a new edit icon -it looks like a vase-, this was added and did not exist before, and it is with the spin edges that the update function is configured. It is the additional cavity width: The 0 value means that the cavity is taken from the materials settings as-is.
Values less mean sharper cavity, more than 0.5 – widening of the cavity. Or course, you need an RGB cavity layer in the scene to vary the cavity width.
It works only on such conditions: more on concave, more on convex, less on concave, less on convex, more on flat, and more on curved (you can use any of these modes).
3. The new parameter is responsible for the radius cavity. It is also affected by degree and contrast adjustments.
– Overall Cavity Modulator
– Cavity area width
– Additional Cavity width
– Degree
– Contrast
Physical Base Rendering
More Information on PBR can be found in the following resources:
https://www.marmoset.co/toolbag/learn/pbr-practice
https://docs.google.com/document/d/1Fb9_KgCo0noxROKN4iT8ntTbx913e-t4Wc2nMRWPzNk/edit
Tutorials
PBR Smart Materials: This is just a quick video I made showing some of 3D-Coat’s new and awesome PBR materials. You can create all new materials from scratch, but it comes with a bunch of pre-made ones, and they have a ton of functions you can adjust to change the way it looks. By Phil Nolan.
Restoring Material Preview Window: This Quick Tip video demonstrates how to restore the Material Preview Window in the event a user accidentally closes it (a semi-permanent action).
Links to some noteworthy 3rd party assets.
Improved Brush Engine & Flat Material Thumbnails
PBR (Smart) Materials by Phil Nolan: This is just a quick video I made showing some of 3DCoat’s new and awesome PBR materials. You can create all new materials from scratch, but it comes with a bunch of pre-made ones, and they have a ton of functions you can adjust to change the way it looks.
Misted glass: Video process misted glass in real-time by Roman Makarenko.