How alpha works
The Alpha is a grayscale intensity map that controls the shape of the brush.

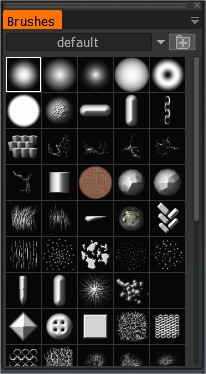
Use the “T” key quickly access the Alpha Panel. This panel list by folders brushes within 3DCoat.

In alphas panel, when you import a new brush Brushes Panel (+ icon), there is an option “Positive alpha” that means: “If enabled, the top left pixel value will not be subtracted from the alpha depth.” This improve alpha handling and brush engine capabilities addressing issues where 16-bit TIF alphas were being converted to 8-bit or causing errors in external editors.
If your alphas are only grayscale, and you won’t add color, then using the 1 channel since the channel will be converted to Alpha and Height and you don’t need to worry about it and then you shouldn’t have any trouble with them and you you can edit them on any software if necessary, which is the easiest way since it is only 1 channel, and if you need color for whatever reason for 16 bits, you can use the RGBA.
If you want to add color, then convert it to RGB, but then you are limited with just that and you have to add the Alpha channel in GIMP, because if not, you will only use RGB that means that Green channel (3 CH: 1, 2, 3 = RGB, 2= A, H) would be the one in charge with the Alpha and the Height, which makes it awkward because in the end, only colors that are on the Green would be displayed on 3DCoat and depending on how much green it has or not, it will vary on heightmap and the alpha on it, so other colors might look faded and weird.
So using the Alpha channel would make it easier (4 CH: 1, 2, 3 = RGB, 4 = A, H)
- Alphas imported from images (including exr) may be mixed positive and negative, it allows making more realistic skin details. Negative alphas work for draw/extrude-like brushes in sculpt room.
Additional option: Alphas may be imported as rounds with accurate falloff, it simplifies making alphas from the raw textures a lot. This option available in alphas palette or using drag&drop.
- You can add your own brushes in TGA, PSD, or ABR format (the pen format used in Adobe Photoshop).
- Press on the “Folder” icon to add it. The brush added will appear in the list of brushes available.
You can also use a 3D model as a brush. - A brush can be 8 bit depth color, and provided image could contains an alpha channel. In this case, the alpha channel will be used as a mask for depth.
- If you use the Edit Ext. option, when you return to 3DCoat, will automatically convert your 16-bis alpha into 8-bits. 3DCoat can not manage 16bit /per channell, but can manage 16bit/alpha as Tiff only.
- If you want to work with 16 alpha bit, use TIF only. To modify the alpha use edit as 16-Bit TIF.
- All other extensions like PSD, JPG, etc will be automatically converted to 8-bits. 3DCoat only accepts TIF, PNG, EXR to maintain the 16-bits.
Many software can not full support Tiff layer channels. Only Photoshop and Gimp can manage Tiff alpha as brush editor.
Sequence paint with multi-alpha
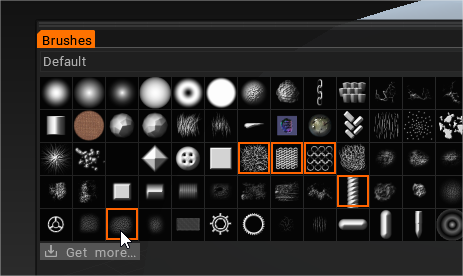
You can use the Shift or Ctrl key to select multiple alphas for the brush to use one at a time.
You will need to manually select each alpha from the Brushes Panel to do multi-alpha painting.
The order in which you shift+select them matters.

Select several brushes at the same time (shift+LMB) and paint to sequence paint.
Using CTRL or SHIFT to select several pens, you will see several pens selected in the preview.
Brush radius
In order to change the Brush radius, use keys “[“ and “]” or the mouse wheel (provided the correspondent adjustments were made in the Preferences menu).
If you wish to rotate brush by mouse instead by hotkey, can set it in “Camera->Customize Navigation->ActionType: Start Pen Rotation”. This can be any combination you want, even “SHIFT+mouse move”.
Depth Pressure
To change depth, press “-” and “+” or the mouse wheel (provided the corresponding adjustments were made in the Preferences menu). You can do the same using sliders in the top pen panel.
Smooth
First, press SHIFT and draw again. You will see the surface getting smoothed.
Change the smoothing intensity using the “Smoothing” slider.
Straight Lines
First, press and hold on LMB, then press SHIFT and draw again. Then you are able to draw very straight lines, just like the way in Photoshop. Click CTRL and draw – Cavities are drawn.
Rotate a Brush
You can see the red line rotating on the Brush cursor when “(“ or “)” is pressed. If you choose an asymmetrical Brush shape, then this rotation shows the Brush orientation.
You may use hot keys “(“ and “)” or the mouse wheel (under correspondent settings in the Preferences menu) to rotate the pen counterclockwise or clockwise accordingly. Parameters of rotation range from 1 to 360 degrees.
The Brush (or Alpha) panel allows you to select images that can be used to create different brush profiles.
These are “profiles” that affect both the depth of the Brush application and the shape of the “bristles”.
Each 8 bit brush includes 4 Layers as Painting channels
In 3DCoat, 8 bit Alphas consist of four painting channels, and each “Brush” includes 4 Layers that arrange themselves into Color-Transparency, HeightMap, Specular and EraseMask.
Read all the specifications on this document.
The order of these Layers in the external editor is important. Looking at each of these individually:
- Color/Transparency
- Height/Depth
- Specular
- Erase Mask
So each Brush can paint multiple channels at the same time if you choose to. Making them less of an “Alpha” and more of a multi-channel image brush tip.
We maintain the term “Alpha” to keep with the industry standard terms.
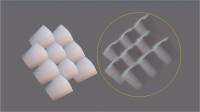
Brush Alphas can also be built from 3D object files, extracting the height map based on the model view.
Choose a Brush you like from the list of icons. Press on the “Folder” icon to add more.
You can add your own Brushes in TGA, PSD, or ABR format (the format used in Adobe Photoshop).
The Brush added will appear in the list of Brushes available. You can also use a 3D model as a pen.
A brush can be 8 bit colored, provided the image contains an alpha channel.
In this case, the alpha channel will be used as a mask for depth. Use CTRL or SHIFT to select several brushes, you will see several brushes selected in the preview, these will be used randomly.
Brush Right-Click Options
Right-clicking on any unselected Brush alpha invokes a comprehensive list of alpha editing functions.
Brush Options Opens the “Brush Options” panel.
Delete Brush: Deletes the selected Brush.
Save to PSD/TIF: Saves the selected Brush alpha to either file format.
.PSD is more intuitive, while .TIF is more precise, giving you more channels to save and manipulate elsewhere.
.TIF can contain seven channels – RGB, alpha, height, specular, and the “Erase mask”.
Load from PSD/TIF: This replaces the alpha that has been right-clicked on with an of your choice, save in either the .psd or .tif formats.
Edit in the external editor: Creates a “live” connection between 3DCoat and the external editor you have specified in the “Preferences” section (The default editor is Photoshop).
Selecting this option opens the specified editor, and any changes you make and save from the editor are automatically loaded back into 3DCoat.
Edit as 16-bit TIF: This allows you to save in 16-bit format rather than 8-bit. Using this option causes the Brush to be saved as a .psd file, allowing it to be reloaded automatically each time it is edited and saved in the external editor.
Brush Drop-Down Menu

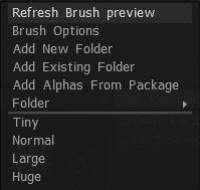
On the right side of the tab, you’ll see an arrow pointing down. This opens a set of functions allowing you to view and change the current Brush Settings, Add and Create new Brush Folders, Add Brush “Packages” as well, and choose a display size for your Brush.
- By clicking this, there will be many more advanced options:
Refresh Brush Preview: Refreshes the Alpha icon.
Brush Options Panel: Opens Brush Options Panel.
Add New Folder: This allows you to choose a pre-defined folder of alpha shapes to be added to the “Folder” list.
This option will allow you to copy the Brush (that you right-click on), to a folder named in the “Folder List” you have previously defined. All the “New folder” names you have defined will appear here.
Add Existing Folder: Allows you to choose a single brush from a folder, thus adding all the brushes in the folder to be included in the folder, now with the name of the chosen file, which is then listed in the “Folder” selection list.
Add pictures from an existing folder: A new Brushes/Strips folder with the same name will be created. Select at least one file to automatically add all the files from the folder to the list.
Add Brushes from package: Adds Brushes that have been packaged into a “Penpack” file format.
If you want to create your own package and share your custom Brushes, please RMB and use the command create .penpack.
Folder: Select a folder with Brushes. A selection list of all folders you have enabled 3DCoat to access. The icons from this chosen folder will be visible in the “Brushes Panel”.
Icon Size: You can also change the size of the icons to the size specified.
- Tiny: Sets the alpha icon set to a very small size.
- Normal: Sets the alpha icon set to the default size, as seen when the program opens for the first time.
- Large: Sets the alpha icon to a size larger than the default size.
- Huge: Sets the alpha icon set to a bigger size.
Tutorials
Replicating Objects on Model Surface: This video begins a demonstration of various techniques one can use to create an object in 3DCoat, and either generate a 3D Brush alpha from it or replicate instances of it along the surface of another object.
How drag your alphas in 3DCoat: A quick explanation of how to use alphas in 3DCoat.
Brush Preview Options: This video demonstrates Brush Preview options in 3DCoat.
Creating Custom Brush Curves & Move Stamp Brush: This video demonstration covers two new features in 3DCoat. Including the ability to create your own brush alpha using a Curve Profile Editor and then the new Move Stamp Brush (in the E-Panel). This allows you to preview the result yet move it about the model until you’re happy with the placement.
Custom clipped decals: quick video tutorial about a neat little feature texturing and painting.
Basically you can create especially Alpha cropped decals of any kind for texture painting.
Basically what you got to do is it’s not like a regular PNG or Targa or whatever that you would load in as a 512×512 or 1024×1024 image, you actually have to set up a multi layered PSD in Photoshop.
Square Brush Alpha Support: This video demonstrates the support for square brush alphas in 3DCoat. When loading images/brush alphas in for the first time, you don’t need additional steps.
This video focuses on getting previously loaded brush pallets to utilize the new support.
Hotkey access to Brushes and Panels: This video demonstrates the ability to use hotkeys to bring panels and pallets directly to your cursor and how to keep 3DCoat from switching to different brush packs when choosing a different brush or tool.
Installing Brush Alphas: This video is part 1 of 2 that covers the various methods of installing Brush alphas, individually or as brush packs. This includes a brief demonstration of creating your own brush alpha with a 3D model.
 English
  Українська
 Español
 Deutsch
 Français
 日本語
日本語 Русский
 한국어
한국어 Polski
 中文 (中国)
 Português
 Italiano
 Suomi
Suomi Svenska
 中文 (台灣)
 Dansk
Dansk Slovenčina
 Türkçe
 Nederlands
 Magyar
 ไทย
ไทย हिन्दी
 Ελληνικά
 Tiếng Việt
 Lietuviškai
 Latviešu valoda
 Eesti
Eesti Čeština
 Română
 Norsk Bokmål