 English
  Українська
 Español
 Deutsch
 Français
 日本語
日本語 Русский
 한국어
한국어 Polski
 中文 (中国)
 Português
 Italiano
 Suomi
Suomi Svenska
 中文 (台灣)
 Dansk
Dansk Slovenčina
 Türkçe
 Nederlands
 Magyar
 ไทย
ไทย हिन्दी
 Ελληνικά
 Tiếng Việt
 Lietuviškai
 Latviešu valoda
 Eesti
Eesti Čeština
 Română
 Norsk Bokmål
When you select any UV tool, category are expanded in two groups showing commands related to UV creation.
Selected
by Vertex

Clear: Clear the selection.
Invert: Invert selected elements.
Rotate CW: Rotate clockwise.
Rotate CCW: Rotate counterclockwise.
Flip U: Flip selected faces horizontally.
Flip V: Flip selected faces vertically.
Relax: Relax selected vertices (in UV Preview Window).
Cloth Relax: Relax UV islands so that opposite edges on edges in quads will get almost the same relation between edges length in space and edge length in UV space. This may be useful for making real things – cloth and soft toys. So, this relaxation type minimizes the edge-length trash.
By Edges

Clear: Clear the selection.
Invert: Invert selected elements.
Rotate CW: Rotate clockwise.
Rotate CCW: Rotate counterclockwise.
Flip U: Flip selected faces horizontally.
Flip V: Flip selected faces vertically.
To Line: Place selected edges along the line.
Equidistant: Place selected edges along the line and set equal distance between points.
Horizontal: Put edges along the horizontal lines.
Vertical: Put edges along the vertical line.
Edge Loop: Select edge loop (in UV Preview Window).
Edge Ring: Select edge ring (in UV Preview Window).
Set Seams: Mark selected edges as seams (in UV Preview Window).
Delete UV Seams: Delete seams over selected edges (in UV Preview Window).

by Faces

Clear: Clear the selection.
Invert: Invert selected elements.
Rotate CW: Rotate clockwise.
Rotate CCW: Rotate counterclockwise.
Flip U: Flip selected faces horizontally.
Flip V: Flip selected faces vertically.
Relax: Relax selected vertices (in UV Preview Window).
Cloth Relax: Relax UV islands so that opposite edges on edges in quads will get almost the same relation between edges length in space and edge length in UV space. This may be useful for making real things – cloth and soft toys. So, this relaxation type minimizes the edge-length trash.
Hide: Hide selected faces.
Inv. Hidden: Invert hidden faces.
Unhide: Show (unhide) selected faces.
Unhide All: Unhide all hidden faces.
HD Expand: Expand hidden area.
HD Contract: Contract hidden area.
By Islands (on UV editor)

Clear: Clear the selection.
Invert: Invert selected elements.
Rotate CW: Rotate clockwise.
Rotate CCW: Rotate counterclockwise.
Flip U: Flip selected faces horizontally.
Flip V: Flip selected faces vertically.
Relax: Relax selected vertices (in UV Preview Window).
Cloth Relax: Relax UV islands so that opposite edges on edges in quads will get almost the same relation between edges length in space and edge length in UV space. This may be useful for making real things – cloth and soft toys. So, this relaxation type minimizes the edge-length trash.
To ABF: (Angle Based Flattening). Use ABF for unwrapping selected islands. Is best suited for organic meshes.
To GU: Unwrap selected islands with 3DCoat’s proprietary Globally Uniform UV unwrapping method. This method minimizes the polygons square trash but may lead to bigger angular trash.
To LSCM: (Least Squares Conformal Maps). Use LSCM for unwrapping selected islands. May be more compatible with external 3D applications.
To Planar: Use planar projection for unwrapping selected islands.
To Stripe: This method is intended to unwrap the stripe of polygons into the straight line.
Hide: Hide selected faces.
Inv. Hidden: Invert hidden faces.
Unhide: Show (unhide) selected faces.
Unhide All: Unhide all hidden faces.
HD Expand: Expand hidden area.
HD Contract: Contract hidden area.
Copy UV: Copy island to clipboard (use CTRL+C). You may select other island and paste it there. In so way you will exactly put one island over other one.
Paste UV: Paste UV island that was previously copied. You need to select one island, press CTRL+C, then select other island that has the same topology, press CTRL+V. In so way you will put exactly first island over the second one.
Commands

UV Settings: Setup islands packing area and minimal distance between islands.

Clear Clusters: clear the clusters.
Clear Seams: clear the seams.
Auto Seams: Clicking this option creates all the required seams automatically, using a best guess approach based on the shape of the object. Newly created seams can still be selected or removed using the ‘Mark seams’ work mode.
Sharp Seams: make selected seams sharp.
Unify UV: Move all faces to the current UV-set. If need you may delete remaining empty UV-sets using “Delete unused UV-Sets”.
Unwrap: Fit all islands onto the UV map.
Auto-Map: This is exactly same method of unwrapping as used in import dialog for auto-mapping. It is planar mapping with test of clusters self-intersection. This method is most stable and eats any (even nonmanifold) geometry but creates too many islands.
Pack UV: Pack current set of clusters on the UV-plane. No unwrapping performed, only packing will be done. Press CTRL to shuffle.
Shuffle/Pack: Pack the current set of UV islands in the UV set, overlapping islands will be shuffled. No unwrapping performed, only packing will be done.
PackUV2: Pack UV islands without rotation and flipping. They will be only scaled and moved to for better packing. Press CTRL to shuffle.
Auto Scale: Auto scale all islands to have equal proportion between square in space and square in UV-set.
Intersections: Check if there are any self-intersections within the islands over the current UV set, separate the intersecting piece, and re-pack the whole UV set.
Upd. Islands: Update island connectivity. It you have marked or erased several seams on the mesh UV-Map will not be broken into islands immediately. You need to update islands to split or connect existing islands.
Restore UV: Restore the UV’s from the mesh in Painting room. This synchronizes both rooms.
Apply UV-set: Apply the currently defined UV-set to the model.
Save: Save UV information to a file. This option saves the marked or unmarked seam and cluster information in the current scene so it can be edited later. It does not export the final UV-Map. Use the ‘Import/Export textures’ dialogue in the File menu for that.
Load: Load previously saved UV information from a file.
Save Contour: This command allows to save contour in real scale as EPS or DXF for further laser cutting. Length of lines corresponds to geometrical length. It is helpful if you want to cut shape using laser cutter and glue parts together.
StemCell: Automatic functions have been added to help you make your 3D model compatible with the StemCell 3D modeling specification on Turbosquid.

https://resources.turbosquid.com/stemcell/stemcell-3d-modeling-specification/
These functions are implemented as a C++ script inside the 3DCoat program. When you click a certain button, the process of checking the 3D model in different 3DCoat rooms for compliance with the corresponding certificate is started. This process runs in a semi-automatic mode. When the script sees a discrepancy with the StemCell certificate, it stops, issues the appropriate messages, and offers you to take manual actions to correct the necessary errors. After you correct the errors at this stage, you need to restart the entire process from the very beginning. In this way, you go through all the stages of checking the 3D model and at the end you get a set of files that need to be uploaded to Turbosquid, so that your model receives the status StemCell Certified.
Expand: Expand the area of selected elements.
Contract: Contract the area of selected elements.
Transform: Transform selected faces/vertices. If nothing is selected, the entire mesh will be transformed.
Smart Extrude: Extrude face or edge in any direction. Hitting the ENTER key creates a new extrusion. You can also scale (RMB + Drag) and rotate (SHIFT + Drag) selected faces or edges, interactively.
Intrude: Intrude selected faces.
Inset: Add polygons to Selected poligons.
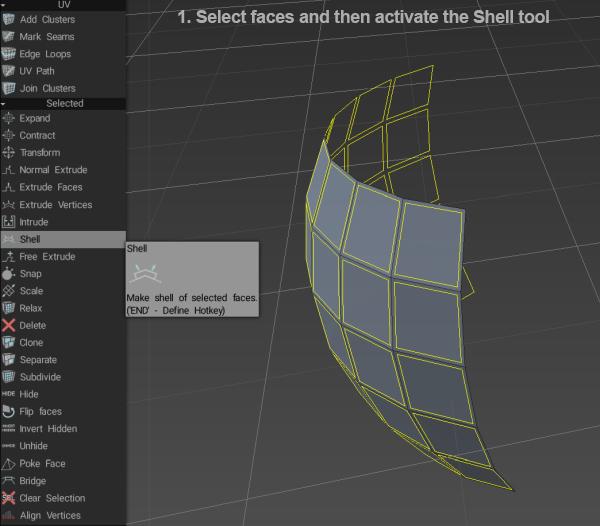
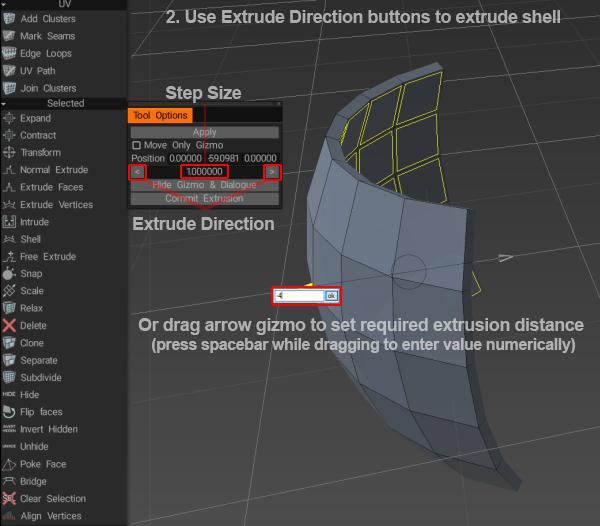
Shell: Make a shell of selected faces. Fluffy said: First, select the faces you want to “solidify”, then activate the Shell tool…
then use the buttons in the Tool Options window or the arrow gizmo to set the amount of extrusion…
Snap: Snap retopo mesh vertices to the surface. It helps if you have changed the object’s state in the scene and want to re-snap retopo mesh. Only selected vertices will be affected if you are in the “Select” tool in vertex mode.
Scale: Scale selected or entire mesh. Each connective cluster will be transformed separately.
Relax: Relax the entire retopo mesh or subset. Only selected vertices will be affected if you are in the “Select” tool in vertex mode.
Smooth Selection CC: Subdivide and smooth selected faces using the Catmull-Clark algorithm.
Delete: Use the DELETE key to delete selected edges.
Clone: Clone selected faces. Transform new mesh piece and press ENTER.
Separate: Clone selected faces to the new group. Boundaries of separated faces cluster will be split from neighbour faces so that you may transform the cluster independently.
Subdivide: Use the INSERT key to subdivide selected faces.
Hide: Hide selected faces.
Flip Faces: Flip selected faces normals. Be careful! Flipping face adjacent to other face may lead to non-manifold surface and elimination of the face.
Invert Hidden: Invert hide state of all faces.
Unhide: Unhide all faces.
Poke Face: Poke of the selected Face.
Bevel: Bevel edges.
Bridge: By selecting two chains of open edges, you can connect them with faces. You can also select two groups of faces.
Align Verts/Faces: Alignment Vertex by Plane. You can see the direction of movement of the vertices. If selected Faces, Alignment can occur by circle (You can edit the center of the circle and the radius), cylinder or sphere.
Alignment by Plane Orthogonal to Normal is implemented.
Clear Selection: Clear Selection.
Entire Mesh

Transform: Transform selected faces/vertices. If nothing is selected entire mesh will be transformed.
Snap: Snap retopo mesh vertices to the surface. It helps if you have changed the object’s state in the scene and want to re-snap retopo mesh. If you are in “Select” tool in vertex mode, then only selected vertices will be affected.
Scale: Scale selected or entire mesh. Each connective cluster will be transformed separately.
Relax: Relax the entire retopo mesh or subset. If you are in “Select” tool in vertex mode then only selected vertices will be affected.
Import: Import retopo mesh.
Export: Export retopo mesh.
Subdivide: Subdivide poly mesh.
Smooth (CC): Subdivide and smooth the current group with the Catmull-Clark subdivision.
Delete Mesh: Delete poly mesh.
Symmetry: Apply symmetry to the mesh.
Store Selection: Store Selection.
Load Selection: Load Selection.
Clear Selection: Clear current Selection.