
Jedná se o nástroje podobné hlíně, které jsou často paralelní se stejnými nástroji, které se nacházejí v čistém prostoru Voxel .
Štětce na povrchy od Anton Tenitsky.
Clay : Surface Clay umožňuje rychle a plynule nanášet hmotu na sochu voxela. Rozdíl mezi tímto nástrojem a štětcem Carve je v tom, že také současně vyhladí povrch poté, co jste jej okartáčovali, což mu dodává autentický hliněný vzhled.
Vyrovnejte povrch a vytlačte pomocí alfa a šablony. Upravte parametry štětce a nastavte parametry štětce podle svých potřeb. Štětec můžete duplikovat pomocí RMB a vytvořit si předvolbu štětce.
Clay Fast: Je podobný hlíně, ale pracuje rychleji, protože nedochází k žádné dodatečné relaxaci povrchu.
Draw: Nástroj Draw je skvělý pro rychlé přidávání spontánních detailů, je skvělý pro rychlé vyřezávání rohů nebo čehokoli podobného. Je podobný nástroji Airbrush, ale funguje pouze na povrchu objemového předmětu.
Nástroj pro kreslení je skvělý pro rychlé vyřezávání rohů nebo čehokoli podobného. Je to velmi podobné nástroji airbrush. Funguje však pouze na povrchu objemového objektu. Pomocí LMB zvedněte oblast pod kurzorem. CTRL+LMB odsadí povrch a SHIFT+LMB vyhladí geometrii.
Zploštit: Vyrovná oblast pod štětcem na základě velikosti a intenzity štětce.
Tento režim zplošťuje povrch pod kurzorem zvednutím nebo snížením bodů do společné roviny na základě velikosti a intenzity štětce.
Výška a úhel jsou zprůměrovány z bodu přímo pod středem kurzoru a efekt se rozšíří tak, aby vyplnil celou oblast kurzoru.
Adaptivní úprava
Plochý lesk
Dláto: Podobný nástroji Flatten, ale jeho účinek je méně extrémní, a když budete štětcem tahat po objektu, bude se „sekat“ od povrchu.
Funguje jako škrábání, ale mírně se ponoří do povrchu. Je velmi praktický pro vytváření ostrých hran. Pro inverzní akci použijte CTRL.
Loutna: Tento nástroj vám umožňuje vyplnit dutiny, jako byste pracovali s loutnou. Začněte plnit nižším tlakem a skončete větším, abyste získali přesné výsledky. Zkombinujte tento nástroj s vyhlazováním, abyste dosáhli dokonalého výsledku.
Výplň: Výplň povrchu je skvělý způsob, jak vyplnit malé dutiny, dutiny a mezery ve vašich objektech. Je zvláště efektivní ve velmi vysokých nastaveních.
Použijte CTRL pro invertování akce – pro odstranění „embossování“.
Buildup: Podobné jako nástroj „Build“ v místnosti Voxel .
Chová se jako nástroj „Clay“, ale staví povrch bez omezení (nejen jednu vrstvu jako u hlíny).
Vysunutí povrchu: Roztáhne všechny vrcholy směrem ven, rovnoměrně, na daný poloměr podél povrchu pod štětcem, na základě nastavení velikosti pera, hloubky a směru vysunutí. V levém horním rohu rozhraní jsou nastavení směru vysunutí. To umožňuje uživatelem definovatelné vysunutí.
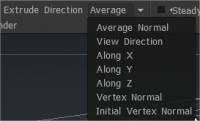
Tato nastavení metod vytlačování jsou jedinečná pro následující tři nástroje:
Průměrná normála, Směr pohledu, Podél osy (X, Y nebo Z), Normální vrchol a Počáteční normála vrcholu.
Změňte mezery a přidejte podél tahů alfa stopy.
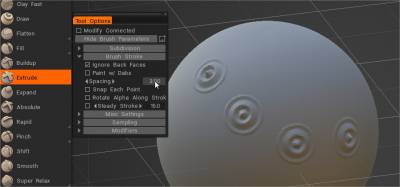
Nástroj Extrude také podporuje VDM alpha . 3-kanálové, 32bitové EXR jsou považovány za VDM. Později bude rozšířen (vybírání VDM z libovolného surového povrchu, barvy, vytváření VDM z libovolného modelu, podpora VDM ve voxlech a ve všech štětcích).
Pick & Paste (Vybrat a vložit): Vyberte vektorovou mapu posunutí z nezpracovaného povrchu a vložte ji do panelu Alphas nebo ji duplikujte po povrchu.
Nástroj Pick & Paste Surface Sculpt Tool, který se nachází poblíž vysunutí, vám umožňuje uchopit prvek z nezpracovaného povrchu, vytvořit mapu vektorového posunu (VDM) a použít ji s vysunutím k duplikování prvku. K uchopení prvku nevyžaduje rovný nebo pěkný povrch; automaticky se rozbalí a zploští okraj. Soubory VDM můžete také export jako soubory EXR a použít je v jiných aplikacích. Navíc můžete do panelu Alpha přidat externí VDM alfa (3 kanály, 32-bit, EXR/TIFF) a použít je v Surface Extrude.
Expand : Vytažení povrchu podél normálního směru vrcholu.
Absolute: Vysune povrch na základě vašeho nastavení Velikost Brush , Hloubka a Směr vysunutí, přičemž také zachová detaily a topologii podkladového povrchu. Absolutní vytlačení je relativní vzhledem k původnímu tvaru povrchu.
Rapid: Název tohoto nástroje je velmi popisný, protože je to jeden z nejrychlejších nástrojů v 3DCoat pro vyřezávání obecných tvarů. Nerespektuje Alfa Brush , ale pouze Velikost a Intenzitu štětce. Další skvělá věc na tomto nástroji je, že pokud máte ve výřezu dva objekty, které jsou od sebe odděleny v prostoru, pokusí se vytvořit mezi nimi most (svaří je dohromady jako jeden objekt). Je velmi rychlý pro rychlé vytváření tvaru.
Rapid Smooth Scratches: Poskytuje podobný efekt, jaký používají hlinění sochaři k rychlému „zdrsnění“ povrchových prvků. Nakreslete škrábance podél tahu. Škrábance vyblednou stávající geometrii jako hlína.
Simuluje skutečný sochařský nástroj hrabání a vytváří škrábance podél tahu. Skvělé pro vytváření svalových vláken a dalších podobných vzhledů. Tento nástroj nerespektuje štětcové Alpha. Rozdíl mezi Scratches a Scratches2 je v tom, že Scratches2 vyhlazuje okraje tahu štětcem, zatímco Scratches nikoli.
Bahno: Zajímavý efekt povrchové textury poskytující drsné hrany. Velmi podobné Rapidu. Tento nástroj má však také parametr hluku, který můžete upravit, abyste byli různě naraženi a pohlazení, podobně jako rychlé nanášení hlíny na skutečnou sochu, aniž byste ji uhladili vodou, abyste získali ten „blátivý“ vzhled. Když máte ve výřezu vidět více než jeden objekt VoxTree, tento nástroj udělá vše pro to, aby vyřezal na aktuální vrstvě, ale vytvoří objem, jako by vyřezával na obou jako na jedné vrstvě. Tento nástroj nerespektuje štětcové Alpha.
Štípnutí: Toto je velmi skvělé pro vytváření velmi pěkných těsných hran, dutin a vrcholů. Surface Pinch je identický s nástrojem Voxel Pinch, ale je rychlejší a funguje pouze na povrchu objemového objektu.
To je velmi skvělé pro vytváření velmi pěkných těsných hran, dutin a vrcholů. Lépe to uvidíte na obrázcích níže. Je shodný s nástrojem Vox Pinch. Funguje však pouze na povrchu objemového objektu. Tato možnost vykreslí plochu blíže k radiálnímu středu kurzoru. Pomocí CTRL roztáhněte plochu směrem ven ze středu kurzoru.
Inteligentní sevření: Inteligentní sevření se pokusí sevřít povrch směrem k chytře vybrané čáře. Nástroj vybere dva body: jeden na levé a jeden na pravé straně štětce. Potom z těchto bodů vytvoří dvě roviny a přichytí povrch k nejbližší rovině. Také to přidává trochu špetky k podcenění ostrosti úhlu.
Střešní sevření: pokusí se sevřít povrch směrem k chytře vybrané linii. Rozdíl oproti chytrému sevření spočívá v tom, že tento nástroj udržuje povrchový šum namísto zploštění. Nástroj vybere dva body, jeden na levé a druhý na pravé straně štětce. Potom z tohoto bodu vytvoří dvě roviny a přitlačí povrch k průsečíku roviny.
Shift: Tento nástroj táhne topologii povrchu spolu se štětcem. Je skvělý na vytváření vrásek na postavě nebo na výrobu látky. Je identický s nástrojem Vox Follow, ale funguje pouze na povrchu objemového objektu.
Posouvá/přetahuje geometrické body topologie povrchu podél pohybu tahu vzhledem k prostoru obrazovky pomocí štětce. Je to skvělé pro vytváření vrásek a tak dále postavy nebo bytosti nebo pro výrobu látky. Je identický s nástrojem Vox Follow. Funguje však pouze na povrchu objemového objektu.
Hladké nástroje
Smooth : Produkuje mnohem dramatičtější vyhlazení, než jaké lze dosáhnout se standardním ekvivalentem Voxel .
– Hladká konkávní
– Hladké konvexní
– Super Relax Jedná se o výkonný relaxační kartáč nezávislý na valenci. Převede povrch na běžnou mřížku, uvolní se a poté jej upeče zpět.
– Tangenta
Dříve se při držení klávesy SHIFT dalo vyhladit za chodu… ale bylo použito pouze standardní vyhlazování. Nyní může uživatel přiřadit různé (vyhlazovací) rutiny a související funkce klávese SHIFT, stejně jako kombinaci CTRL + SHIFT, včetně dynamického místního dělení nebo zmenšení.
Můžete provádět nejen standardní plynulé akce, ale používat knihovnu dalších hladkých možností, které vám usnadní práci.
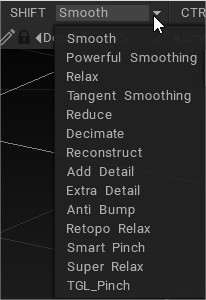
Nové možnosti vyhlazení nástroje .
Malá, ale velmi užitečná nová funkce pro použití v tandemu s “Conform Retopo Mesh” je Retopo Relax. Umožňuje umělcům použít jejich základní importovaný model jako cílovou síť pro pečení (Retopo) a nechat ji 3DCoat udržovat v souladu se všemi úpravami sochařství provedenými na modelu v pracovním prostoru Sculpt. Retopo Relax jim umožňuje rychle a snadno vyladit/vyhladit síť Retopo , kdykoli je to potřeba, pouhým podržením klávesy SHIFT nebo CTRL + SHIFT, čímž ji aktivujete za chodu.
Zaostřit:
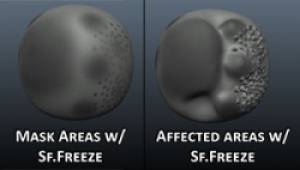
Freeze : Velmi užitečný nástroj pro maskování, který umožňuje definovat oblasti pro zmrazení částí povrchu, kterým se lze vyhnout pomocí sochařských nástrojů nebo převrátit, aby se staly oblastí zaměření pro vyřezávání.
Běžné zkratky jsou CTRL+D pro vymazání zmrazených částí a CTRL+SHIFT+I pro obrácení zmrazení.

Freeze ⮞ Vrstva: Uložte do vrstvy.
Click&pick ⮞ Freeze: Vyvolání zmrazeného stavu výběrem vrstvy ze scény. Pro sčítání/odečítání použijte SHIFT/CTRL.
Aktuální vrstva ⮞ Freeze: Vyvolá zmrazený stav z krytí aktuální vrstvy. Pro sčítání/odečítání použijte SHIFT/CTRL.
Skrýt povrch : Funguje jako maska pro skrytí části sítě povrchu modelu. Pomocí možnosti „Invertovat skrýt“ skryjete vše kromě maskované oblasti. Pomocí Brush nebo režimu kreslení Stroke skryjte části vybraného objektu VoxTree. Chcete-li odkrýt, vyberte tuto možnost z nabídky Geometrie.
Skryjte mnohoúhelníky, aby je nebylo možné vidět nebo upravovat přetažením po určité oblasti. Všechny polygony, které jsou pod vaším štětcem, budou skryté. Po skrytí některých polygonů pomocí kombinací klávesových zkratek CTRL+D odkryje skrytí a CTRL+SHIFT+I převrátí skryté polygony s viditelnými polygony.
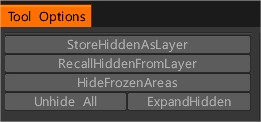
Máte možnost uložit skrytý stav do vrstvy a získat jej zpět a také skryté rozbalení.
Hadí jíl :
Kopírovat hlínu: Tento nástroj zkopíruje plochy povrchu. Ukažte na oblast, kterou chcete zkopírovat, a klikněte na LMB. Vše, co je v rámci průměru štětce, bude zkopírováno. Přesuňte štětec do oblasti, kde chcete použít kopii, a znovu klikněte na LMB. Pokud chcete zkopírovat novou oblast, klikněte na „Vymazat data“.
Vrstvy:
Zvětšit vrstvy : Zvětšit hodnoty hloubky na základě předchozích tahů štětcem (nahoru nebo dolů od povrchu) na aktuální vrstvě vyřezávání. Nalezeno ve verzi Sculpt Layer.
Erase Layers: Vymazání hodnot hloubky na aktuální vrstvě Sculpt. Nalezeno ve verzi Sculpt Layer.
Tutoriály
The Dissolve Tool : Toto video demonstruje použití nového nástroje Dissolve -Smoother- Tool, který umožňuje umělci malovat, vybrat oblast modelu a rychle na ni aplikovat vyhlazování.
Rychlý tip: Vyčistit síť na povrchu : Toto video je rychlý tip, který ukazuje několik nástrojů a metod k rychlému odstranění problémů v sítích v režimu povrchu, se kterými se člověk může setkat ve vzácných případech.
Tangent Smoothing čistí za chodu bez degradace povrchových detailů nebo tvarů.
Powerful Smoothing také opraví díry nebo nedokonalosti povrchu, ale s mnohem agresivnějším vyhlazením.
Stisknutím klávesy ENTER v režimu povrchu dočasně voxelizujete a znovu síťujete objekt a poté se vrátíte do režimu povrchu, vše v jednom rychlém kroku.
Vylepšený Pinch Brush : Toto video demonstruje vylepšení Pinch Brush v Surface Mode Sculpting.
Subdivide Brush : Toto video demonstruje nový Subdivide brush.
The Angulator Brush : Toto video demonstruje nový Angulator brush (pouze režim Surface), který aplikuje efekt sevření/zvrásnění podél malovaného výběru.
Lute Tool : Toto video demonstruje nový štětec Lute, nový typ štětce Fill ve vyřezávání v režimu Surface.
Zmrazovací masky : Toto staré video pojednává o vytváření a používání zmrazovacích masek.
Možnost Rekonstruovat vyhlazování : Toto video ukazuje použití možnosti Rekonstruovat vyhlazení mezi nabídkami akcí SHIFT a CTRL + SHIFT v režimu Plocha. Umožňuje uživateli rozpustit zatoulané kusy modelu, podobně jako to dělá vyhlazování v režimu Voxel .
 Čeština
  English
 Українська
 Español
 Deutsch
 Français
 日本語
日本語 Русский
 한국어
한국어 Polski
 中文 (中国)
 Português
 Italiano
 Suomi
Suomi Svenska
 中文 (台灣)
 Dansk
Dansk Slovenčina
 Türkçe
 Nederlands
 Magyar
 ไทย
ไทย हिन्दी
 Ελληνικά
 Tiếng Việt
 Lietuviškai
 Latviešu valoda
 Eesti
Eesti Română
 Norsk Bokmål