Transform
Transform: This tool lets you rotate, scale, and translate your selected Layer. By grabbing one of the gizmo handles, you can constrain to whatever axis you click on.
- Transform gizmo got the possibility to separate (if needed) scale, rotate, and translate using keys (QWER), or droplist.
- Gizmos got some “invisible thickness” for ease of capturing.

You can also manually transform an object with a gizmo by entering precise parameters. For that, place the mouse pointer on one of the manipulator elements. When it highlights yellow, the slider can be moved with the LMB pressed.
You can rotate the object in 45-degree increments if you press (hold) Ctrl and LMB.
If you need to change the parameters precisely, place the pointer at the manipulator element, hold it with the LMB click, and press the Space bar on the keyboard while holding the LMB pressed. Enter the parameters in the window that has just opened.
See also:
Transform VoxTree Layer Objects Separately
Transform Tool Improvements
Transform Gizmo Updates.
You can also perform a screen-based rotation using the large outer circle. The options for this tool are:
- Move only gizmo: This lets you make adjustments exclusively to the gizmo. This helps when you need to place the gizmo in another location.
- Leave rotated axis: This is great when you rotate an object multiple times while retaining its previous rotations.
- Position & Axes (1,2 & 3): These parameters let you manually key in the position and rotational coordinates.
- Scale (X, Y & Z): These parameters allow you the manually key in scalar modulations.
- Reset axis/space: These two functions let you reset an object’s axis or local space.
– Use navigation rules to transform: Pressing the N key, you can use mouse navigation to transform objects.
In this mode, you may use regular navigation rules to transform objects. Turn it off to navigate instead of the transform. Navigation through the navigation zone/icons may not be used for transforms, it navigates anyway.
If the Gizmo’s transform navigation bars or circles are not visible, it could be due to have hidden Gizmo Elements on “Tool Options > Edit Gizmo Elements”.
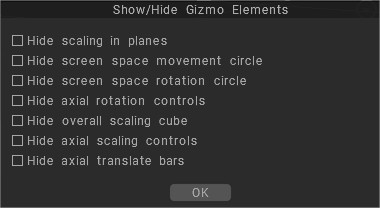
You access to “Edit Gizmo Elements” pressing the wrench located right to “Move only Gizmo” command.
On this new panel unhide the different options, as “Hide axial rotation controls”, “Hide screen space rotation circle”, etc.
Transform without Gizmo
Edit > Transform without gizmo let you to make mesh transform using hotkeys.
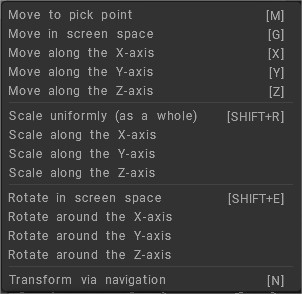
In 3DCoat, you can constrain scaling and rotation to a specific axis by using the following hotkeys:
- X key: Constrain to X axis
- Y key: Constrain to Y axis
- Z key: Constrain to Z axis
- G key: Move
- Shift+R: Scale
- Shift+E: Rotate
Use the SHIFT key to constrain the rotation to 5-degree increments.
For scaling, you can use the CTRL key to scale uniformly.
Press the key once to activate the constraint, and press it again to deactivate it.
Turn QWER ON/OFF

* Object Gizmo and Gizmo Less Transform: by Anton Tenitsky.
Instancer
A memory-saving method of making duplicates of your voxel objects.
Instances consume far less memory than duplicates. You can “Clone” an instance (Right Click menu) and “Merge” new objects as instances. Negative volumes can also be instances.
This tool will help to make instances. Instances are references to existing objects, so they take almost zero memory. If you have some element that may be used multiple times in a separate volume, you may use it as an instance. For example, it may be brick or some mechanical detail. You may create mirrored instances, for example, left and right arms.
Move
Move: This tool is one of the most powerful and versatile tools in the voxel arsenal. Not only can it “adjust” any shape, large or small, but it also can act as an “Extrusion/Intrusion” tool.
Drag with the “LMB” to move the surface within the area of the cursor relative to the screen view. Hold the “Ctrl” key to move the surface along the normal. The “Move” tool also interacts with Brush Alphas, providing various effects.
ThroughAllVolumes (TransPose & Move Tool Changes): This video covers changes made to the Pose & Move tools.
– Option: Conform Retopo Mesh to Sculpt
- Conform Retopo Mesh to Sculpt: This video demonstrates an update to the “Conform Retopo Mesh” feature in 3DCoat’s Sculpt workspace, which allows the user to see the Retopo Mesh (in the Sculpt Workspace) while making large-scale edits with the Pose, Move, or Transform tool.
It also covers some additional tips for making the Retopo mesh conform after making edits with Sculpting brushes.

Voxelize immediately: As soon as the move is finished, the surface will be voxelized immediately. Turn this checkbox off if you want to make multiple moves and voxelize as soon as you switch to any voxel tool.
Topological move: Move only connected to the center parts. Use it to close up holes and move what you want to move and not everything under the brush. It is a very helpful brush for sculpting close details, like lips, eyes, and fingers.
Infinite Move: Modify your brush to apply details to anything that is directly in line with the brush icon.
Pose
3DC 2023 added Soft Selection feature for the Pose tool in the Sculpt workspace.

Pose: This tool is great for quickly changing the rotation, scale, and translation of a selection. You can determine the selection in several ways. You can use a line, ring, or sphere, and you can even paint on it with a Brush or an object. Check the Airbrush mode when using “Select with a pen” to increase the selection area smoothly.
After a selection is made, a special posing gizmo will appear.
Switching off Regular Gizmo, the tool has three states: Rotate, Scale, and Translate.
You can switch modes by clicking on the long red rectangular bar at the base of the gizmo. In each state, the gizmo has a set of parameters in the Tool Options Panel.
Finally, as with all tools in 3DCoat, the pose tool respects symmetry, as well as all selection modes, like drag rectangle, lasso, etc. Now, the Pose tool works on all visible objects (through all volumes).
Let’s now take a look at some of the Transpose Mode parameters:
- Freeze/Pose visibility: The opacity of the pose or freeze selection.
- Pose Action:
- Move by Gizmo.
- Normal Extrude.
- Line: This mode lets you draw a line-based gradient for use with the pose tool gizmo. It starts with your initial LMB click and ends with the release of the LMB.
- Ring: This selects a ring-based gradient. It starts with your initial LMB click and ends with the release of the LMB.
- Sphere: This selects a spherical gradient. It starts with your initial LMB click and ends with the release of the LMB.
– Snap to Angle: Activate if you need a Snap to Angle selection.
- Paint Select: Selecting with pen mode lets you directly brush on your selection. The pen size directly affects the selection area. Furthermore, you can also smooth your selected area by holding “Shift + LMB”. This is a great way to select things quickly if you just need tiny little details selected.
Note: “Paint Select” mode is very useful. With the Pose tool, you can use almost any selection method in the “E” Panel, like drag rectangle, lasso, etc. You can also subtract your selection by using the normal tool while holding the CTRL key.
- Airbrush mode: Activate airbrush mode. You can also smoothly select areas instead of having a hard-edged selection. It makes for tidy deformations around the edges of your selection.
- Select Object: This mode can come in handy if you have multiple objects in your Sculpt Tree. Simply click on the object you want to deform using the Pose tool, which will place the entire volume as your selection.
- Clear Selection:
- Invert Selection: Invert pose selection.
- Save Selection: Save pose selection to the file. It is recommended to use this in surface mode. If the mesh structure is changed due to voxelization, you will not be able to apply the previous store selection.
- Load Selection: Load poses selection from the file. If the mesh structure is changed, you cannot restore selection, so use it in surface mode whenever possible.
- Smooth Selection: Smooth Pose Selection.
- Store selection to the Layer: Store Pose Selection As Layer.
- Pick selection from the Layer: Recall Selection By Click.
Use Free Form:
This feature allows a lattice to deform the selected Pose area.
Select from several lattice shapes to transform the Pose selection.
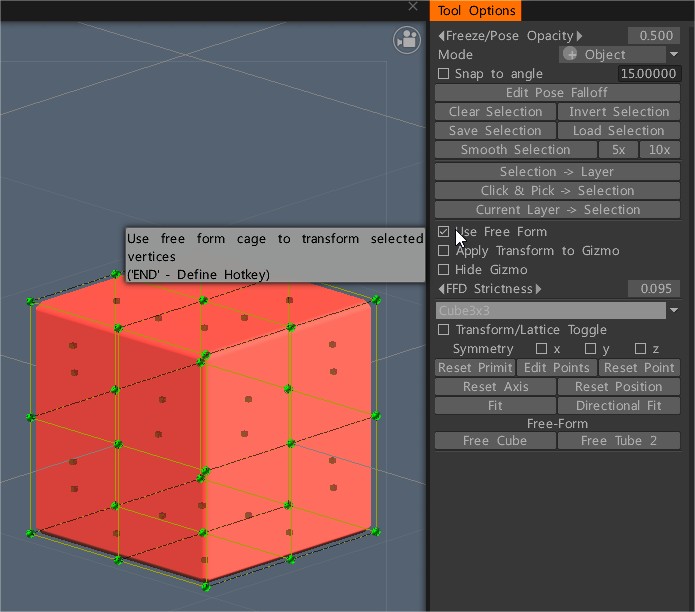
Apply Transform to Gizmo.
- Regular Gizmo: Use a regular gizmo instead of a line-based one.
- Hide Gizmo:
- Adjust Transition Area: Adjust the area that joins un-selected and completely selected areas. It allows to make bending more accurate and natural.
- Move Only Gizmo: Move the gizmo but don’t transform the object.
- Leave Rotated Axes: After rotating, axes will remain in the final state. Otherwise, they will return to X, Y, and Z orientation.
- Pick Pivot: Click to pick the pivot point from the surface.
- Pick Position Only: Pick the position and Y-axis from the pen’s normal and position X and Z axis from the pen’s orientation.
- Pick Normal & Position: Pick the position and Y-axis from the pen’s normal and position, X and Z axis from the pen’s orientation.
- Pick View Direction & Position: Pick gizmo position from the pick point, Y axis from the forward direction, X – right, Z – upper.
- Reset Axis.
- Reset Space: Reset the object’s local space so it will be scaled uniformly along all axes, and local axis directions will orient to global X, Y, and Z.
- Center in Local Space: Center gizmo in local space. Axis will be oriented along the local axis if you check “Leave rotated gizmo”.
- To Main Axis: Direct gizmo axis along the main geometrical axis of the object.
- To Center Mass: Move the gizmo to the center of mass.
- To Bound Center: Move the gizmo to the center of the bound box.
- Align to View:
- Apply to Transform to Gizmo: Apply to transform to the entire gizmo.
TransPose Tool Poly Groups: This video demonstrates a few new feature additions to the Pose Tool in 3DCoat 4.9. One is angle snapping for precise linear selections. The other is Poly Group functionality built into the Pose tool.
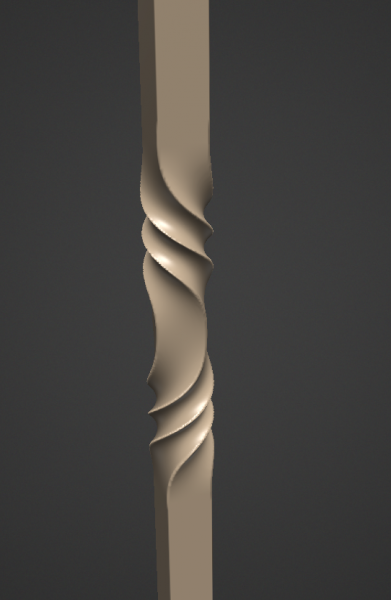
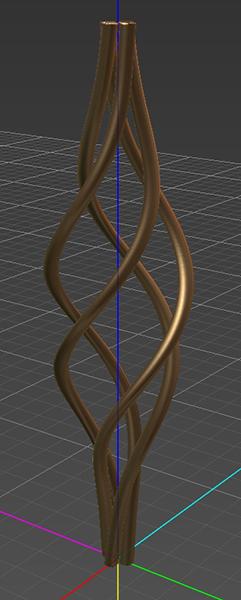
How to make these types of twists
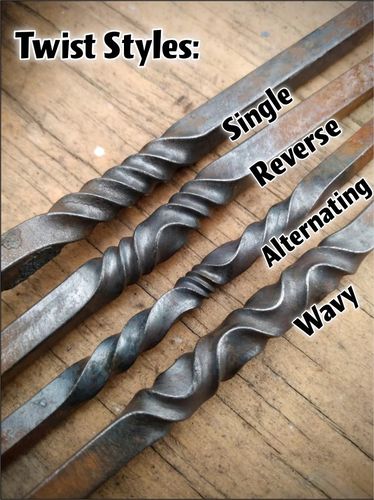
Philnolan3d: You could play with the Pose tool to get different designs. I just quickly did this with the Ring selection mode. Just by dragging my selection along the length near the middle, then looking down the length, I rotated the gizmo.
Bend
Bend the object around the axis, which will bend or wrap the current Layer around the base of the gizmo.
Tool Options:
- Preview the rotating axes: It is important because, without that axis, nothing understood what happens there.
- Preview Immediately: Preview warping action immediately.
- Bending radius:
- Gizmo is the deformation center: The gizmo axis is the central axis of deformation.
- Max bending angle: The maximal angle of bending the object.
- Bending method: Bend both ends, Bend one side, and Bend another side.
- Position: Translation on XYZ axis. Press X to restart the position to Global Space 0,0,0.
- Rotate: You can rotate More in Screen Space or selectively rotate on the XYZ axis.
- Reset Axis: Restart gizmo rotation on Local Place.
- Align to view: Align to the current view space view.
- Apply: apply all transformations.
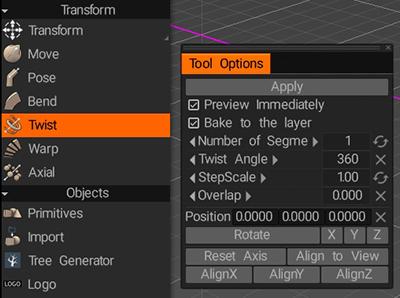
Twist
In a twist or linear array, the object will rotate the current Layer around its pole.
Tool Options:
- Number of Segments: Segments to be placed along a circle or segment. Increases/Decreases.
- Twist angle: Twists the current object around the gizmo.
- Step Scale: The distance between steps.
- Overlap: Tapers each segment where they meet each other, simultaneously increasing/decreasing the space between each spiral.
- Position: Translation on XYZ axis. Press X to restart the position to Global Space 0,0,0.
- Rotate: You can rotate More in Screen Space or selectively rotate on the XYZ axis.
- Reset Axis: Restart gizmo rotation on Local Place.
- Align to view: Align to the current view space view.
- Apply: apply all transformations.
Warp
Warp: It lets you twist and bend the currently selected object Layer in the Voxtree.
Tool Options:
- Number of Segments: Segments to be placed along a circle or segment. Increases/Decreases the number of segments.
- Start/Final Angle: Start angle of the segment.
- Forward Step: Create a “spiral staircase” look: it will spiral the object upward.
- Step Scale: The distance between steps.
- Overlap: Additional overlapping between segments. This tapers each segment where they meet. The effect will vary depending on the object.
- Position: Translation on XYZ axis. Press X to restart the position to Global Space 0,0,0.
- Rotate: You can rotate More in Screen Space or selectively rotate on the XYZ axis.
- Reset Axis: Restart gizmo rotation on Local Place.
- Align to view: Align to the current view space view.
- Apply: apply all transformations.
Array
Array: Create an array of objects. Linear, radial, spiral, or along a path.
Any Voxel Layer can be duplicated and rotated in number and angle from a central axis.
You can merge these copies as separate instances if you desire.

You can set the number of copies in the Array Count tab. The gizmo operates just like all the other gizmos, so you shouldn’t be any stranger to it. Move the translate handler to get an idea of similar things you can do with it.
Surface Array
Surface array: This tool is added to make an array of objects on the created surface or on the selected faces of the low-poly mesh.

Build surface on sculpt mesh. Then you can put the model on the Surface.
1) The tool allows you to place a poly model (or volume object) on the surface. You can build a surface or select an existing one. Instead of a surface, you can use poly mesh. First you need to select the faces.
A surface can be constructed in several ways by drawing splines on the surface
-Loft
-Strip
-Polygon.
2) Load Low poly Model from file or select it from window “Poly Models” or “Sculpt Models”.
3) Adjust parameters.
How to make these types of twists?
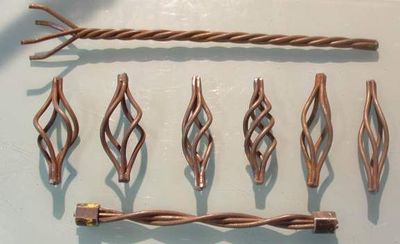
Circular array
Fluffy: For twisted objects consisting of multiple parts like the ones in the above image, you can try using the following method…
First, create one piece of the object and offset it from the center of the scene, then go to the Array tool (in the Transform section of the tools panel) and set up circular the number of additional parts you want and the position and orientation of the axis along which to generate the copies, remember to enable the Instance option.

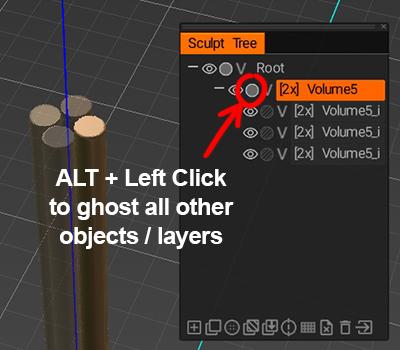
Once you’ve applied the Array tool, you may find it helpful to ghost the newly created layers to make it easier to work on the original object; you can do this by ALT+left-clicking the ghost icon on the parent object layer.
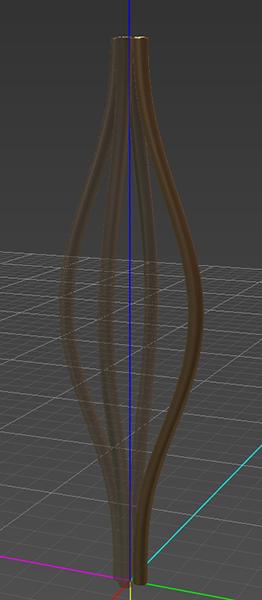
Having done that, you can use the Move tool (also located in the Transform section of the tools panel) to add the required gap between the objects.
Since all the other objects are instances of the object you are working on, any changes you make will affect all copies of the object.
Finally, use the Twist tool (again located in the Transform section of the tools panel) to add the desired amount of twist to the object(s)…
at which point, you should end up with a result similar to this…
 中文 (中国)
  English
 Українська
 Español
 Deutsch
 Français
 日本語
日本語 Русский
 한국어
한국어 Polski
 Português
 Italiano
 Suomi
Suomi Svenska
 中文 (台灣)
 Dansk
Dansk Slovenčina
 Türkçe
 Nederlands
 Magyar
 ไทย
ไทย हिन्दी
 Ελληνικά
 Tiếng Việt
 Lietuviškai
 Latviešu valoda
 Eesti
Eesti Čeština
 Română
 Norsk Bokmål