 English
  Українська
 Español
 Deutsch
 Français
 日本語
日本語 Русский
 한국어
한국어 Polski
 中文 (中国)
 Português
 Italiano
 Suomi
Suomi Svenska
 中文 (台灣)
 Dansk
Dansk Slovenčina
 Türkçe
 Nederlands
 Magyar
 ไทย
ไทย हिन्दी
 Ελληνικά
 Tiếng Việt
 Lietuviškai
 Latviešu valoda
 Eesti
Eesti Čeština
 Română
 Norsk Bokmål
The Sculpt Workspace contains one of the largest sets of functions of any of the 3DCoat Workspaces. Many of these may, at first, seem obscure and hard to understand. This section will make these clear.
The Geometry Menu contains most of these functions, which include surface clean-up, creating proxy versions, resampling voxel resolution, voxel decimation, memory management, and many more.
Foundational Commands
Like most other major Tabs (or Rooms, as they are also called), there is an accompanying menu. We have already covered most of these options in previous sections.
Any repeated functions are here only for your convenience. Let’s take a look at them:
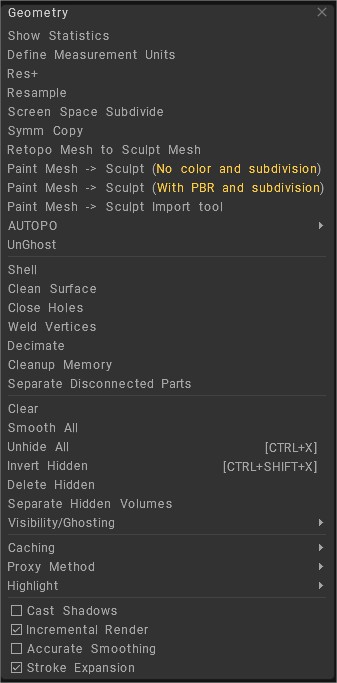
Show statistics: Show many lesser-known statistics of the current layer, scene statistics such as volume, square, dimensions, holes count, etc
Define measurement units: Define the measurement of units on the real-world scale and how many voxels density per this axis.
Edit scene scale: on version 2024 was reforged to “Edit > Scene Scale Master”.
Res+: Increases the resolution of the current object. Increasing the resolution will effectively double the number of voxels the current object layer has. This allows for a layer to have much more detail at higher resolutions.
You can view the resolution of a layer, in the Sculpt Tree, directly before the layer’s name. If it has just the name, then you will know that it is at its base resolution and has not been increased.
Resample: Allow upgrade or downgrade of the current layer’s resolution.
Screen Space Subdivide: Subdivides the surface visible on the screen so that the triangles are approximately the specified pixel size in screen space.
Symm copy: Symmetrical copy. Symmetry must be active for this function to work. This tool uses the most recently painted side of the object as a source and copies the source features to the other side. If you have sculpted on one side of a volume object, you can use this icon to copy all of that to the other side of the object. It works on any axis, so long as you have symmetry turned on along the preferred axis.
Retopo mesh to Sculpt mesh: Bring a copy of visible meshes from Retopo Workspace and place it/them into the Sculpt Workspace as new Sculpt Objects.
Paint Mesh -> Sculpt (No color and subdivision): Bring a copy of mesh or meshes from the Paint Workspace into the Sculpt Workspace as new Sculpt Objects. The mesh will be brought without textures or subdivisions.
Paint Mesh -> Sculpt (With PBR and subdivision): Bring a copy of mesh or meshes from the Paint Workspace into the Sculpt Workspace as new Sculpt Objects. The mesh will be brought with textures and subdivisions.
Paint Mesh -> Sculpt Import tool: This option creates a copy of visible Paint Meshes from the Paint Workspace and brings them into the Sculpt Workspace into the Import tool.
AUTOPO: For convenience the Autoretopo commands were added to Geometry menu.
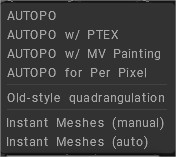
- AUTOPO: Create edge loops with AUTOPO: This routine creates surface topology based on your specifications in the following dialogs and places the resulting polygonal mesh in the Retopo Room.
- AUTOPO with Ptex: Runs the routine mentioned above and places the resulting mesh in the Paint Room for painting using Ptex. UV seams and Maps are created automatically.
- AUTOPO with MV Paint: Runs AUTOPO and places the result in the Paint Room for painting with the “Micro-vertex” method. UV seams and Maps are created automatically.
- AUTOPO for Per Pixel: Runs AUTOPO and places the result in the Paint Room for painting with the “per-pixel” method. UV seams and Maps are created automatically.
Unghost: Unghost the mesh on selected layer.
Surface Commands
Only available for sculpting layers currently in Surface Mode.
Shell: Creates a hollow shell or skin of a designated thickness from the current voxel layer.
Clean Surface: Re-optimizes surface mesh structure.
Close holes: Heals any holes found in a surface. Very valuable for fixing imported scanned meshes.
Weld Vertices: Welds any vertices occupying the same point in space.
Decimate: Performs an optimized reduction of polygons for the current layer.
Cleanup Memory: Optimizes mesh memory allocation.
Remove Self Intersections Parts: When two meshes intersect, this command will extract the intersecting surface from the current and designated layer placing this intersecting part on its layer while leaving the original layers intact.
Separate Disconnected Parts: Any disconnected objects found on the same layer will be removed from this layer and placed on their layers.
Basic Commands
Clear: This command clears the current Layer in the VoxTree of all voxels. It is useful when you wish to keep the current Layer’s name and resolution but not the voxels.
This will clear the selected object layer in the Sculpt Tree of any voxels. It performs like the “Clear” tool on the left side toolbar in the Commands section.
Smooth all: This command uniformly smooths (or relaxes) all of the voxels of the currently selected object Layer in the Sculpt Tree. Will uniformly smooth (or relax) all of the voxels of the selected object layer in the Sculpt Tree.
Unhide all: Unhides any hidden voxels.
Invert hidden: Invert any hidden voxels.
Delete hidden: Deletes any portions of the mesh that are currently hidden.
Separate Hidden Volumes: Creates a new Layer in the Sculpt Tree and places the previously hidden voxels into the newly created Layer.
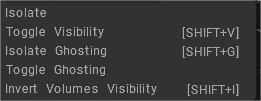
Visibility/Ghosting: Hide and ghost voxel layers selection.
- Visibility and Ghosting Options: This video takes an updated look at Visibility and Ghosting Options.
- Isolate: Isolate the current layer. The same can be achieved by using ALT+LMB on the layer you wish to isolate in the Sculpt Tree.
- Toggle Visibility: Toggle current volume visibility.
- Isolate Ghosting:
- Toggle Ghosting:
- Invert Volumes Visibility: This function inverts all object visibility. If the child was invisible, it becomes visible the parent becomes ghosted. Ghosted volumes become visible. In this way, this operation is exactly reversible but vanishes initial ghosting.
Advanced Commands
Caching
- Toggle proxy mode: Toggles on/off proxy mode.
- Uncache visible volumes: Will recover the high-resolution voxel sculpt previously cached into voxel surface mode. (This is a redundant feature). Toggle proxy mode or the icon for the said feature will achieve the same result).
- Cache visible volumes: Caches the current high-resolution voxel sculpt. (This is a redundant feature) using Toggle proxy mode or the icon unit scale.
- Clear all caches: Clears all cache information from memory, thus releasing it for other tasks. It cannot be undone.
Proxy Method: Selects the resolution of the proxy mesh and how downgraded the mesh is (You can downgrade/decimate from 2x, 4x, and 8x).
Highlight: Toggles highlighting; if it is turned on for your selected VoxTree object will be highlighted a different color. This is a toggle for highlighting; if turned on, your currently selected object layer will be highlighted in a different color. When turned off, there will be no visible change.
Supplemental Commands
Cast shadows: Enables shadow casting based on the global light inside the viewport. It is purely aesthetic.
Incremental render: Renders only the parts of the object that have changed since your previous render, thus giving a large boost in performance. This option is off when shadows are on, as shadows are dynamic and change the appearance of the rendered object. This option will only render parts of the object that have changed since your last render, giving a large boost in performance. This option is turned off when shadows are turned on, as shadows are dynamic and change the look of the object for rendering.
Accurate smoothing: Provides more accurate smoothing at the expense of performance. This provides more accurate smoothing at the cost of performance.
Stroke expansion: (Grow on pen motion) When this is enabled, only relevant operations are performed unless the pen is in motion.
RMB Menu
This menu has many functions unique to the Sculpt Room and can only be accessed by RMB clicking on an object in the Sculpt Tree or directly on an object in the 3D viewport. Let’s take a look at these functions.
Show All Hidden Volumes
If any VoxTree objects are hidden, this command will make them visible.
Show Hidden Volumes in Sub-Tree
If any children VoxTree objects are hidden from the object you RMB click on, invoking this command will unhide them.
Delete
Deletes the VoxTree object.
Add Child
Creates a child VoxTree Object.
Rename
Renames the object.
Decrease Objects 2X
It decreases the size of the objects but also increases the density twofold.
Increase Object 2X
It increases the size of the objects but also decreases the density twofold.
To Global Space
Sets the VoxTree objects space to be set to world space at 0 on X, Y & Z axes.
To Uniform Space
Transform the scale along the axis and make the axis orthogonal to make space uniform.
Resample
This function allows you to change the polygonal count of the entire selected object. You can even specify an exact polygonal count with this function.
Radial Array
Allows you to duplicate the geometry in a VoxTree object radially, with any number of slice counts to the array. The geometry will remain in the same VoxTree object it was originally in. The geometry can also be created as instances of their objects in the VoxTree, instead of the original by turning on “Instance” in the Tool Options panel. Let’s look at the tool options.
To X/Y/Z: Aligns the Rod Transform gizmo to the specified axis.
Begin/End: Allows you to specify the exact coordinates numerically of the beginning and end of the Rod Transform gizmo.
Gizmo Length: Numerically specify the length of the Rod Transform gizmo.
Screen-Based: Sets the size of the gizmo to be relative to the viewport.
Array Count: The number of radial slices of the array.
Instance: Create instanced VoxTree objects instead of duplicating the geometry to the same object.
Extrude: Perform an extrusion on an object.
Thicken
This function allows you to thicken a VoxTree object. Handy for imported objects that have open areas (not watertight).
Close Holes in Surface
Closes any holes that may be in the current VoxTree object.
Objectify Disconnected
Creates an object in the VoxTree for each separated piece of geometry and places the geometry into those objects.
Save Volume as 3B
Saves the current VoxTree object as its own .3B file.
Save Volume w/ Sub-Tree as 3B
Saves the current VoxTree object and its children’s objects as a .3B file.
Import 3B File
Imports another 3B file into the current scene.
Edit Shader Settings
It lets you edit the selected VoxTree object’s current shader.
Import
Two functions reside in this menu.
Import Point Cloud: Prompts with a file select to choose a point cloud source on disk, then activates the Import tool.
Import Object: Prompts with a file selector to choose a mesh file on disk, then activates the Import tool.
Export
Various functions for Exporting reside in this menu.
Export Scene: Exports a multi-object file. Each object in your scene will be a mesh object in your exported file.
Export selected Object: Exports only the selected object to a file.
Save to Meshes Panel: Saves a preset file to disk and automatically places it into the Meshes panel.
Save to Splines Panel: Saves a preset file to disk and automatically places it into the Splines panel.
Export to UE5.
Export to UE5 as…
Edit UE5 script.
AUTOPO
Runs the Auto Retopology routine to create an automatically generated mesh with automatically generated UV maps, using 3DCoat proprietary GUUV unwrapping method or another unwrapping algorithm. You can specify guides for the edge loops and even paint areas where you wish for more polygonal density. You can also specify hard-edge options.
Read more about AUTOPO by clicking the name above or reading this guide.
Retopo via decimation
Retopo via decimation, visible objects
Transform
Activates the Transform tool for the object.
Snap to Ground
If an object is above or below 0 on the Y axis, this command will bring the lowest point of the object to 0 on the Y axis.
Lay on Ground
Similar to the Snap to Ground function, by moving an object’s lowest point to 0 on the Y axis, it also will rotate the object when the center mass is not resting on the ground. Imagine an object falling through physical means and resting on the ground.
Clone
Contains all of the cloning/duplication functions. let’s look at each of these functions.
Clone Instance: Creates an instance of the object. It uses less memory than duplicating.
Clone: Duplicates the object. The object will be in memory.
Instance w/ Symmetry: Creates instances across the symmetry plane you currently have active.
Clone & Degrade: Duplicates the object and decreases the resolution by half.
Clone Space Density: Duplicates the object’s density (or resolution) and all transformations (translations, rotations & scaling), but does not duplicate the object’s contents.
Flip: Allows you to flip the object on the X, Y & Z axes. This menu also contains a command for flipping the polygon normals of the mesh.
Combine w/ Children
Combines the current layer with all of its child layers.
Bake Color From Visible Volumes
Bakes vertex colors from other VoxTree objects to the current one. If the object is in Voxel Mode, it will automatically be converted to Surface Mode.
Merge Visible
Merges all visible VoxTree objects into one object.
Merge Sub-Tree
Merges all the children of the selected layer but not the selected not.
Copy & Merge With
Duplicates the object and adds the polygons to another object.
Merge With
Additive boolean operation. Adds the polygons from the selected object to another object and deletes the current object from the VoxTree.
Subtract From
A subtractive boolean operation. Removes the polygons from the selected object from another object and deletes the current object from the VoxTree.
Intersect With
An intersection boolean operation. It keeps only the polygons of the current object where they overlap another object. The selected object is deleted from the VoxTree.
Remove Intersection With
An intersection boolean operation, similar to but the exact opposite of Intersect With. Removes only the polygons of the current object where they overlap another object. All objects are retained (not deleted).
Split With
A split boolean operation. Separates only the polygons of the current object where they overlap another object and creates a new object in the VoxTree for the polygons that were split from the original.
Change Parent
Assign or change the parent of the selected object to another object in the VoxTree.
Tutorials
MultiRes Decimation: This video covers the new poly reduction method (decimation) in the Multi-Res toolset/workflow.