 English
  Українська
 Español
 Deutsch
 Français
 日本語
日本語 Русский
 한국어
한국어 Polski
 中文 (中国)
 Português
 Italiano
 Suomi
Suomi Svenska
 中文 (台灣)
 Dansk
Dansk Slovenčina
 Türkçe
 Nederlands
 Magyar
 ไทย
ไทย हिन्दी
 Ελληνικά
 Tiếng Việt
 Lietuviškai
 Latviešu valoda
 Eesti
Eesti Čeština
 Română
 Norsk Bokmål
The alphas imported from B&W images (including exr) may be mixed positive and negative, it allows making more realistic skin details. Negative alphas work for draw/extrude-like brushes in sculpt room.
- Imported alphas will keep 16 bits but it is applicable mostly for displacement.
- As 3DCoat will not export 16 bit color it don’t paints in 16bit color, color maps are only 8bit.
- 3DCoat can output 32bit displacement maps in EXR or TIFF, but otherwise 3DCoat works only in 8bit color depth.
- 3DCoat use psd, tif, png, bmp, tga, exr as file format. The image size can be 256 – 512 – 1024 according to your computer specs. Color depth will be 8 bit psd or 16 bit tif.
- Psd format in 3DCoat treats 50grey as border, png is better for alphas.
- You can convert alphas in Photoshop or Gimp, etc… with just tweaking levels output raising the black to 50 percent.
- Zbrush has a slider for that job, mid value slider that changes the range of the alphas. On 3DCoat you can use Depth slider to achieve same result.
- Also brushes that have range black zero work fine in surface draw but not in clay brushes.
Zbrush alphas are black to white depth and 3DCoat is 50%grey zero depth for height map .
Additional Alpha import options
Alphas may be imported as rounds with accurate falloff, it simplifies making alphas from the raw textures a lot. This option is available in alphas palette or using drag&drop.
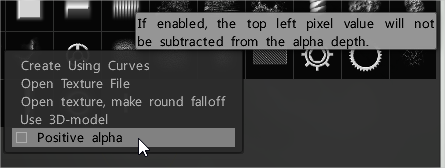
If you import 16 bit integer tiffs Alphas, in alphas panel, there is new option: “Positive alpha” that means “If enabled, the top left pixel value will not be subtracted from the alpha depth.”
If you want to add an entire folder of brush alphas, in the upper right portion of the ALPHAS pallet, click the List Menu toggle. Then click ADD EXISTING FOLDER.
Locate the folder you want ot use > Double-click an image in that folder and 3D Coat will load them all into the pallet, and it will be stored as a subfolder.
How to create an alpha brush

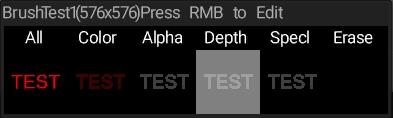
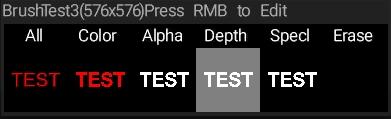
To create a brush in a 2D painting application, you must have four layers, each corresponding with the four main channels of an Alpha brush in 3DCoat.
3DCoat use jpg, psd, tif, png, bmp, tga, exr as file format. The image size can be 256 – 512 – 1024 according to your computer specs. Color depth will be 8 bit psd or 16 bit tif.
Its important to remember that all layers must have alpha channel.
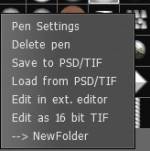
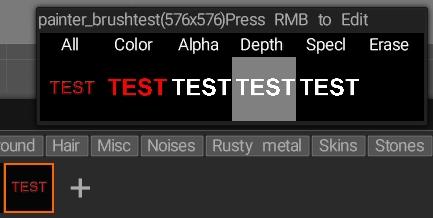
If you need to edit any already create alpha, on Brush Panel press RMB over the brush to edit it on the external editor.
The order of these Layers in the external editor is important. They are:
- Color: This contains the Brush color as well as its corresponding Transparency mask. This mask affects the Glossiness Layer, as well.
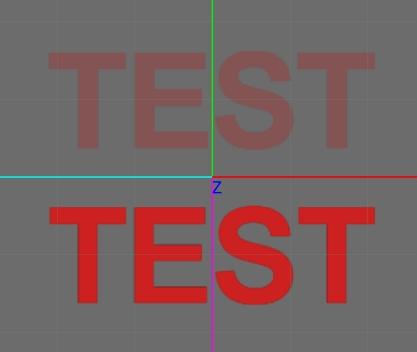
- Height/Depth: image-based painting affects displacement for sculpting and height/depth. The “zero” height of this Layer corresponds to “middle gray” or (127, 127, 127). Darker values corresponding to the concave areas will create valleys, and lighter values corresponding to convex areas will create peaks.
- Specular: White represents maximum Specular. Black represents absolutely no Specular, with shades of gray representing intermediate values. The Color layer of the Alpha’s alpha transparency also determines where Specular painting occurs.
- Erase Mask: This layer is used to create alphas that ignore certain values in other layers while painting. Remember that this mask affects the lowest Layer in the list and is active when you erase painted areas using Ctrl+Shift.
Creating alpha using tiff format
by Emi: You can’t compare edit with PSD vs Tiff, PSD will be 8Bit, Edit in ext. editor will do PSD so it is 8bit, if you want to edit the 16bit, you must use the multilayer .tiff implementation, nothing else.
And that’s where the trouble happens, because it uses Channels rather than layers. so you can’t think about Color, HeightMap, Specular and EraseMask like on the PSD version, you can’t just grab the PSD go 16bit and save it and import it either, you have to think about the channels and the order that they are done in Photoshop, which is what matters there.
- If all the .tiff channels are used, they will be imported and used according to the table below.
- If you only use some of the available channels, those you import will also be used according to the table below.
- CH: A&H
- CH: 1 – A 2 –H
- CH: 1, 2, 3 – RGB, 2 – A, H
- CH: 1, 2, 3 – RGB, 4 – A, H
- CH: 1, 2, 3 – RGB, 4 – A, 5 – H
- CH: 1, 2, 3 – RGB, 4 – A, 5 – H, 6 – Spec
- CH: 1, 2, 3 – RGB, 4 – A, 5 – H, 6 – Spec, 7 – Erase mask
So using the alpha created as 16bit .tif in 3DCoat does exactly what the list says, since it only has a single gray channel, it will be converted to Alpha and Height by 3DCoat.
After that if you if you right click edit 16bit tiff and use Photoshop, then the edit version will be the 7 channels version. so the first 3 will be white since there is no color information, Channel 4 will display the Alpha, 5 the Height, and 6 would be white and 7 black.
But yes, you need to work on the extra Alpha channels. and the order of those channels will matter.
So you can duplicate and manipulate and paint on the alpha channel, it works okay I guess, but it’s a weird system to have, especially when it is mostly compatible with Photoshop.
I could also make Gimp do the same as Photoshop, but the problem with Gimp is how it exports the Tiff, it just won’t work, it exports 16bit but only the RGBA which would explain why the alpha would look different if you use to Edit 16bit Tif on 3DCoat and send it to Gimp since it is not using the channels correctly, and only the RGBA which is darker.
But I manually achieved the same channels you get in Photoshop when you edit on 16bit Tiff. First had to hide all the extra channels on the bottom, then I right clicked on the alpha and duplicated it, it will appear at top of the list of extra channels but it has to be on the bottom bottom, which would be the Channel 4 in Photoshop because it goes from bottom to top.
Now the problem is the Height is darker than what you would get in Photoshop, so to fix it all I did was to paint in white color the RGB to remove the alpha and make it a solid color, then having RGBA visible and TIFF Channel (which now is 2nd from bottom to top) I duplicate the channel and it creates a lighter version of it, put it on second place (from bottom to top) and delete the old Tiff channel.
Now it will look exactly the same in Photoshop but guess what? You can’t use Tiff with Gimp and Gimp exports PSD as 8bit not 16bit for whatever reason so it won’t work like I thought it would.
Talking about the PSD brushes from Zbrush forum and GIMP, I think in my opinion that the best way to deal with is to conver them as TIFF files.
Since they are grayscale images, then Gray = 1 channel and that means that it will take the pixels and convert it to the Heightmap and Alpha. Like the 16 bit manual says. If you want to add color, then convert it to RGB, but then you are limited with just that and you have to add the Alpha channel in GIMP, because if not, you will only use RGB that means that Green channel (3 CH: 1, 2, 3 = RGB, 2= A, H) would be the one in charge with the Alpha and the Height. which makes it awkward because in the end, only colors that are on the Green would be displayed on 3DCoat and depending on how much green it has or not, it will vary on heightmap and the alpha on it, so other colors might look faded and weird.
So using the Alpha channel would make it easier (4 CH: 1, 2, 3 = RGB, 4 = A, H), It seems that GIMP exports TIFF as RGBA, and while Photoshop didn’t read it, 3DCoat did and that’s all that matters, but of course if you want the Alpha+Height on the Alpha channel, from a grayscale image you would have to send the RGB to the alpha and that might make the alpha look slighly different from the original 1 channel grayscale.
But you can add color, why would you add color?
I don’t know, and I would not complicate myself and just go 8 bit as usual, because you still won’t be able to add the Specular, since Gimp wont export Tiff multichannel.
How to import the new alpha brush into 3DCoat
Import the created brush into 3Dcoat pressing the plus icon on the folder on Brush Panel, or into a new created personal folder.
You can also drag and drop the pic into the viewport. A popup show up that let you select some options:
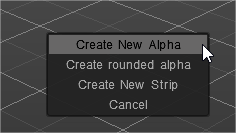
Create new alpha: Use this option to create a new traditional alpha.
Create rounded alpha: It is an important option to make alpha from the raw texture. It takes the top left pixel as zero height and cuts the image with the soft round. The resulting alpha is well-suitable to apply the additional falloff if needed.
Create new strip: Use this option to create new strip alpha.
Cancel: cancel the import.
By clicking on the Folder icon in the Brush Tab, you can import a number of file formats in to be used as a pen.
For the Stencils, if you import PNG textures into Gray with 16-bit, 3DCoat will automatically use the texture as if it were in 8-bit.
Now if you really want to use your 16-bit textures as stencils, you’ll have to convert the texture to Tif format in GrayScale with 16-bit.
The difference between 8bit stencils and 16-bit stencils is very large.
With 8-bit texture the effect is of stairs, looking like a mountain that is wearing.
With 16-bits the result is what you expect.
You try to detail characters using Stencil and never understood why the texture quality was horrible ?
You thought that quality would only be a matter of the amount of polygons, but in fact what also influences in quality is the texture being 16-bits.
For users who are starting up and learning how to use 3DCoat, always be sure to use 16-bit TIF format textures when you want to have good quality, other formats like PNG, JPG and etc.
Remember: 3DCoat will use 8 -Bits.
Decals look faded ?
The reason your decals/brushes look faded is that when you import a texture to 3D Coat as a brush, if the texture has no alpha channel, 3DCoat will try to generate one based on the combined luminance of the existing red, green, and blue channels (which it will then also uses for the depth map, etc.). (Fluffy has written this article)
This means that if you import a color texture rather than a black-and-white image, the alpha channel that’s generated will vary in opacity based on the brightness of the image, which is why the red pixels in your texture are showing up as semi-transparent (because they aren’t white). If you hover your mouse over a brush, you can see each of the channels/maps that are associated with that brush; here’s an example brush I just made (using 8 bits per channel, 24-bit .BMP file format)…
and here’s the same brush but with an alpha channel added to the texture (also 8-bits per channel but using 32-bit .TGA file format)…
As you can see, the Alpha of the brush created using the texture without an alpha channel is grey rather than white, so whenever you use it, the results will appear faded, whereas the brush created using a texture with an alpha channel appears completely opaque when used…
So, in order to create opaque 3D Coat brushes using color textures, you have to include an alpha channel.
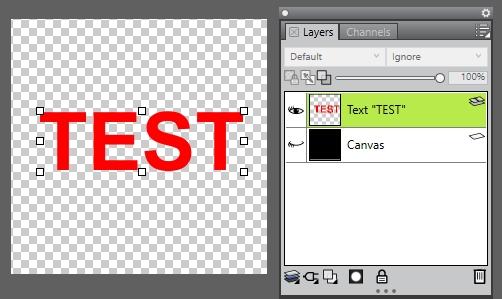
As for creating alpha channels in Corel Painter, I only have a license for Painter 2018 but assuming they haven’t made any dramatic changes, you can save to PNG complete with the alpha channel by simply hiding your canvas layer, so you have a transparent background…
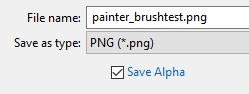
then choose Save As from the file menu, select the. PNG file format from the drop-down menu, and make sure you enable the Save Alpha checkbox…
after which, you can import the texture as a brush in 3D Coat, and the transparency of the layer you exported should appear as the alpha channel of the new brush…
Is there a way to assign different custom icons to preset brushes ?
I have many custom brushes all with the same “source” brush icon.
If I used the Clay brush as a starting point for my custom brush, the modified custom brush in my presets has the Clay brush icon.
The problem is that I have four “Clay” brush icons in my presets and I have to look at the name to determine which modification I want.
Yes, you can choose the image to be used as the tool icon:

Decals
To use decals in 3DCoat, you need to create especially Alpha cropped decals of any kind for texture painting.
This quick video is a tutorial about a neat little feature texturing and painting and show how to create decals to be used on 3DCoat.
Basically what you got to do is it’s not like a regular PNG or Targa or whatever that you would load in as a 512×512 or 1024×1024 image, you actually have to set up a multi layered PSD in Photoshop.
Tutorials
Brush Creation: this video cover the creation and importation of PSD image files from photoshop and 3D object files as brushes. By Javis Jones.
Bake Your Rock Brush Using 3DCoat Y Export: on this video, Anton Tenitsky shows how to export a photoscan at the highest quality to be used as a new brush for sculpt modeling.