• English
  • 3DCoat Documentation
  • Chapters
    • Introduction to 3DCoat
    • Getting started
    • Interface
    • Brush Components
    • Workspaces Rooms
    • Scripting & Core API
    • Questions/Answers
    • licensing
    • Training Tutorials
  • Pilgway
  • Products
    • 3DCoat
    • 3DCoatTextura
    • 3DCoatPrint
    • PBRLibrary
  • Blog Posts
  • Store
  • English English
    • Українська Українська
    • Español Español
    • Deutsch Deutsch
    • Français Français
    • 日本語 日本語
    • Русский Русский
    • 한국어 한국어
    • Polski Polski
    • 中文 (中国) 中文 (中国)
    • Português Português
    • Italiano Italiano
    • Suomi Suomi
    • Svenska Svenska
    • 中文 (台灣) 中文 (台灣)
    • Dansk Dansk
    • Slovenčina Slovenčina
    • Türkçe Türkçe
    • Nederlands Nederlands
    • Magyar Magyar
    • ไทย ไทย
    • हिन्दी हिन्दी
    • Ελληνικά Ελληνικά
    • Tiếng Việt Tiếng Việt
    • Lietuviškai Lietuviškai
    • Latviešu valoda Latviešu valoda
    • Eesti Eesti
    • Čeština Čeština
    • Română Română
    • Norsk Bokmål Norsk Bokmål
  • Creating 3D Character Using 3DCoat
  • Introduction to 3DCoat
  • Getting started
    • System requirements
    • Activating 3DCoat
    • Startup error
      • Startup error Mac
    • Upgrading permanent license
    • Linux Setup
      • Linux initial setup per-user installation
      • Linux initial setup for system
      • Tablet setup
      • To GTK3 from GTK2
    • Folders Structure
      • Custom documents folder
    • Different Forms of “Resolution”
    • Import and Export
    • Applinks in 3DCoat
      • Blender 4.1 applink
        • Blender with the Applink in Linux
      • Blender 4.2/3 applink
      • Max Applink
      • Houdini applink
      • Lightwave uplink
  • Navigation
    • Opening Dialog (Quick Start Menu)
    • Navigation Panel
    • Camera and Navigation
      • Customize Navigation as Blender
    • Viewport Navigation Gizmo
    • Left tool panel
    •  Activity Bar
    • Navigation using 3DConnexion devices
      • How to compile Spacenavd on non Ubuntu distro
    • Stylus doesn’t work in sculpting
    • Hotkeys
  • Interface
    • File
    • Edit
      • Calculate Curvature
      • Calculate Occlusion
      • Light Baking Tool
      • Preferences
    • View
    • Symmetry
    • Textures
    • Calculate
    • Layers
    • Freeze
    • Hide
    • Bake
    • Curves
      • Curves editor
      • Fill with mesh layer
      • Scale of imported curves
    • Windows
      • Tabbed and Popup Panels
      • Controls
    • Scripts
    • Addons
    • Capture
    • Help
    • Room Customization
    • Modify or Create new Room
  • Brush Components
    • Brushes general use
      • Create alpha brushes and decals
      • Making alpha from current sculpt
      • Create a Brush from a 3D Object
      • Create brushes based on Curves
      • Load photoshop .abr brushes
    • Strokes
      • Curves Popup Menu
    • Brush Options panel
    • Brush Top Bar
    • Conditions Limiter
    • Strips Panel
    • Stencils Panel
    • Smart Materials
      • Add new images or materials
      • Attach a Smart material to a layer
      • Import Quixel Material
    • Presets for Brush alphas
  • Workspaces Rooms
    • Paint
      • Texture Painting & Modes
        • Per Pixel Painting
        • Displacement Painting (Micro-Vertex)
        • Ptex Painting
        • Surface Painting (Vertex painting)
      • Importing Into the Painting Room
        • Initial CC subdivision
        • UV Set smoothing
        • Sharp (hard) edge
        • Lock Normals
        • Load new UV layout After Model Changes
        • DAZ Genesis models into 3DCoat
      • Paint Menus
        • Edit menu
        • Textures Menu
          • Texture Baking Tools
        • Hide
        • Bake Paint menu
        • The Color Picker
      • Top Bar for the Painting
      • The Layers Panel
        • The Blending Panel
        • Layer and Clipping Masks
      • Left Tool Panel
      • Opacity & Transparency
      • Tweak tools
        • Tweak Toolset
        • Exporting from the Tweak Room
      • Stencil & Material preview panel
      • Exporting from the Painting Room
    • UV
      • UV Top Bar
      • UV Left tool panel
      • UV Preview Panel
      • UV workflow example
      • Importing Into the UV Room
      • Exporting from the UV Room
    • Retopology
      • Importing into Retopo Room
      • Retopo Mesh Menu
        • Virtual Mirror Mode
      • Bake menu
        • Autopo Baking guide
        • Baking guide
      • Top Bar
        • Select geometry
      • Left tool panel
        • Overall Purpose & Function
        • Add Geometry in the retopology room
          • Strokes tool in Retopology
        • Tweak Tools
        • UV Tools
        • Commands for Retopology room
      • AUTORETOPO
        • Autoretopology Guide
      • Poly Groups
    • Sculpt
      • Sculpt Tree
      • Sculpt Layer
      • Brush engine
      • Sculpt Brush options
      • Right mouse button menu
      • Geometry menu
      • Right-Click Menu
      • Shader
      • Commands for Sculpt room
      • Voxel mode
        • Pure Voxel Sculpting
        • Density and Resolution
        • Clay Engine
        • Voxel Tools
        • Surface tools on Voxels
        • Voxel Adjustment Tools
        • Volumetric Painting
        • Transform Tools
        • Voxel Objects Tools
          • Voxel Primitives & Import Tools
      • Surface mode
        • Surface tools
        • Surface custom tools
        • Surface adjust tools
        • Surface transform tools
        • Surface Painting
        • Surface Objects Tools
          • Sculpt Primitives & Import Tools
        • Multi Level Resolution
          • Multires tools
          • Multires adjust
          • Multires commands
      • Sculpt curves
        • Spline Curves
        • Splines model creation
      • Vector Displacement
      • Live Booleans
      • Import to Sculpt Room
      • Exporting from the Sculpt Room
    • Render
      • Comparison of different roughness values
      • Render Panel Functions
      • Turntable
      • Fakebake the lighting -non PBR-
    • Factures
      • Workflow
    • Simplest
    • Modeling
      • Mesh Menu
      • Left tool panel
        • Add Geometry
        • Tweak
        • UV panel
        • Commands panel
        • Selected
        • Entire Mesh
      • Loft surface example by Fluffy
      • Blockout by Poeboi
      • Import Zbrush Polygroups for UV mapping
    • Kitbash
    • 3DPrint
    • Photogrammetry
      • How to install Reality Capture
      • Reality Capture doesn’t show up ?
    • Nurbs
    • Nodes
      • Sculpt shader Nodes Library
  • Scripting & Core API
    • Scripting
    • Core API
    • Python API
  • Free 3DCoatPrint
Expand All Collapse All
  • Introduction to 3DCoat
  • Getting started
    • System requirements
    • Activating 3DCoat
    • Startup error
      • Startup error Mac
    • Upgrading permanent license
    • Linux Setup
      • Linux initial setup per-user installation
      • Linux initial setup for system
      • Tablet setup
      • To GTK3 from GTK2
    • Folders Structure
      • Custom documents folder
    • Different Forms of “Resolution”
    • Import and Export
    • Applinks in 3DCoat
      • Blender 4.1 applink
        • Blender with the Applink in Linux
      • Blender 4.2/3 applink
      • Max Applink
      • Houdini applink
      • Lightwave uplink
  • Navigation
    • Opening Dialog (Quick Start Menu)
    • Navigation Panel
    • Camera and Navigation
      • Customize Navigation as Blender
    • Viewport Navigation Gizmo
    • Left tool panel
    •  Activity Bar
    • Navigation using 3DConnexion devices
      • How to compile Spacenavd on non Ubuntu distro
    • Stylus doesn’t work in sculpting
    • Hotkeys
  • Interface
    • File
    • Edit
      • Calculate Curvature
      • Calculate Occlusion
      • Light Baking Tool
      • Preferences
    • View
    • Symmetry
    • Textures
    • Calculate
    • Layers
    • Freeze
    • Hide
    • Bake
    • Curves
      • Curves editor
      • Fill with mesh layer
      • Scale of imported curves
    • Windows
      • Tabbed and Popup Panels
      • Controls
    • Scripts
    • Addons
    • Capture
    • Help
    • Room Customization
    • Modify or Create new Room
  • Brush Components
    • Brushes general use
      • Create alpha brushes and decals
      • Making alpha from current sculpt
      • Create a Brush from a 3D Object
      • Create brushes based on Curves
      • Load photoshop .abr brushes
    • Strokes
      • Curves Popup Menu
    • Brush Options panel
    • Brush Top Bar
    • Conditions Limiter
    • Strips Panel
    • Stencils Panel
    • Smart Materials
      • Add new images or materials
      • Attach a Smart material to a layer
      • Import Quixel Material
    • Presets for Brush alphas
  • Workspaces Rooms
    • Paint
      • Texture Painting & Modes
        • Per Pixel Painting
        • Displacement Painting (Micro-Vertex)
        • Ptex Painting
        • Surface Painting (Vertex painting)
      • Importing Into the Painting Room
        • Initial CC subdivision
        • UV Set smoothing
        • Sharp (hard) edge
        • Lock Normals
        • Load new UV layout After Model Changes
        • DAZ Genesis models into 3DCoat
      • Paint Menus
        • Edit menu
        • Textures Menu
          • Texture Baking Tools
        • Hide
        • Bake Paint menu
        • The Color Picker
      • Top Bar for the Painting
      • The Layers Panel
        • The Blending Panel
        • Layer and Clipping Masks
      • Left Tool Panel
      • Opacity & Transparency
      • Tweak tools
        • Tweak Toolset
        • Exporting from the Tweak Room
      • Stencil & Material preview panel
      • Exporting from the Painting Room
    • UV
      • UV Top Bar
      • UV Left tool panel
      • UV Preview Panel
      • UV workflow example
      • Importing Into the UV Room
      • Exporting from the UV Room
    • Retopology
      • Importing into Retopo Room
      • Retopo Mesh Menu
        • Virtual Mirror Mode
      • Bake menu
        • Autopo Baking guide
        • Baking guide
      • Top Bar
        • Select geometry
      • Left tool panel
        • Overall Purpose & Function
        • Add Geometry in the retopology room
          • Strokes tool in Retopology
        • Tweak Tools
        • UV Tools
        • Commands for Retopology room
      • AUTORETOPO
        • Autoretopology Guide
      • Poly Groups
    • Sculpt
      • Sculpt Tree
      • Sculpt Layer
      • Brush engine
      • Sculpt Brush options
      • Right mouse button menu
      • Geometry menu
      • Right-Click Menu
      • Shader
      • Commands for Sculpt room
      • Voxel mode
        • Pure Voxel Sculpting
        • Density and Resolution
        • Clay Engine
        • Voxel Tools
        • Surface tools on Voxels
        • Voxel Adjustment Tools
        • Volumetric Painting
        • Transform Tools
        • Voxel Objects Tools
          • Voxel Primitives & Import Tools
      • Surface mode
        • Surface tools
        • Surface custom tools
        • Surface adjust tools
        • Surface transform tools
        • Surface Painting
        • Surface Objects Tools
          • Sculpt Primitives & Import Tools
        • Multi Level Resolution
          • Multires tools
          • Multires adjust
          • Multires commands
      • Sculpt curves
        • Spline Curves
        • Splines model creation
      • Vector Displacement
      • Live Booleans
      • Import to Sculpt Room
      • Exporting from the Sculpt Room
    • Render
      • Comparison of different roughness values
      • Render Panel Functions
      • Turntable
      • Fakebake the lighting -non PBR-
    • Factures
      • Workflow
    • Simplest
    • Modeling
      • Mesh Menu
      • Left tool panel
        • Add Geometry
        • Tweak
        • UV panel
        • Commands panel
        • Selected
        • Entire Mesh
      • Loft surface example by Fluffy
      • Blockout by Poeboi
      • Import Zbrush Polygroups for UV mapping
    • Kitbash
    • 3DPrint
    • Photogrammetry
      • How to install Reality Capture
      • Reality Capture doesn’t show up ?
    • Nurbs
    • Nodes
      • Sculpt shader Nodes Library
  • Scripting & Core API
    • Scripting
    • Core API
    • Python API
  • Free 3DCoatPrint

Surface Painting (Vertex painting)

697 views 0

Written by Carlos
October 13, 2022

Vertex painting is a 3D computer graphics technique that allows users to paint colors onto vertices of a 3D model.

Vertex painting allows painting on a model’s surface without assigning a texture map.
It is a list of colors which are associated with individual vertices as opposed to the texels within a texture map.

Once in Surface Mode, we are dealing with a polygonal representation of a voxel object’s “skin”.
Although this skin represents a temporary condition of a model before it is ready for export, vertex colors can be applied to this temporary, relatively high-resolution mesh in the Painting Workspace.

Surface painting vertex color (and vertex alpha) add a little bit to the memory cost for each model.
It’s more data.

A texture map can be created at a later time, and the painted surface can be transferred (bake) to the map.

Direct painting over surface models


Just switch to the Painting Room, select “File > Import > Import for Sculpt/Vertex Painting/Reference” and begin using color painting tools: Import model for vertex painting.

Both diffuse color and glossiness intensity are supported.

If the model is only a low polygon version, you can use Multiresolution on it to increase the resolution without losing the vertex colors. Also can do Facture painting on this low poly version.

To use the Painting Room tools for painting the diffuse color directly onto your Surface Mode mesh simply click on the Paint toolset or switch to Painting Room and start painting with the standard tools and Alphas with a single color or use a “Material” from the “Smart Materials Panel”.

Ensure that you have enabled “Show Voxels In Painting Room” from the “View” menu to enable vertex color painting.

If you have applied a Sculpt Shader to your sculpture, the diffuse details from this shader will be combined with whatever you paint in the Painting Room.

When you have an object where Vertex Paint is applied, the paint is on top of the shader material.
Think of the Shader as the base object material and the paint (as in the real world) is applied over it.
When you then, try to adjust the shader settings, you cannot see the adjustments because the Vertex Paint is covering it.

The best thing to do is to wait until you have finished creating/sculpting all of your models before applying paint to them, and use shaders to apply base materials for them.
After you are done with the modeling/sculpting stage, you can then proceed to apply vertex paint or Retopo the model > bake the details > Paint in the Paint workspace on the low polygon, UV mapped model.

Import model with a texture and convert it to Vertex Paint


When you import the mesh into the Sculpt Room as a Surface mode object (not voxels) for the vertex painting and it has textures, 3DCoat bakes the UV texture to Vertex Paint.
Textures will be converted to vertex color. All of them will be applied to the mesh (color, gloss, metal, displacement).

3Dcoat will automatically calculate the number of vertices needed to carry the amount of information in the textures.

Also tit is good method to import huge reference objects.

The higher the poly count of the imported mesh, the higher the resolution of the vertex paint, during the bake.

The higher the poly count of the imported mesh, the higher the resolution of the vertex paint.

If you work with ZBrush, export the model with polygroups and polypaint as obj from ZBrush, then import the obj file into Surface mode in Sculpt Room.
You get the subgroups with the sub-groups materials converted into vertex colors which is what you want. 

Import models with polypaint


Sometimes you need to get a polypainted .fbx from Zbrush into 3DCoat for the purpose of baking out the diffuse, normal, ao, etc.

Usually you want to bring Zbrush model into 3DCoat for two purposes.

  • To create a low poly version of Zbrush object (making retopology).
  • Then baking the high rez details and color information out of Zbrush model as maps (normal, diffuse, etc) that you can then place onto your low-rez version for the purposes of being implemented into a real time game engine.

Select File > Import > Import for Sculpt/Vertex Painting/Reference: Import model for vertex painting.
If model has texture it will be converted to vertex color. Also tit is good method to import huge reference objects.

It is useful when you want to paint a medium/high polygonal mesh without UV mapping it.

Also is good to conceptualizing your colors maps. The vertex colors can be exported as such with the mesh, or baked to an image map after baking to a retopo mesh if you choose.

Import FBX with vertex colors: Vertex colors are supported as fbx import. OBJ specification does not support vertex color, some program can store this information but other software cannot read it, only option is FBX.

Go to File > Import > Import for Sculpt/Vertex Painting/Reference or
Select Surface Sculpting, then in Sculpt Room choose Import and pick your FBX file.
If model has texture it will be converted to vertex color. Also this is good method to import huge reference objects.

In import settings turn on Import without voxelization as otherwise vertex colours will be lost.

If you need to subdivide your vertex-coloured object, do it in your DCC application before importing it to 3DCoat.
The reason behind this is that if you subdivide the object using the subdivide button in the Import tool, vertex attributes won’t get interpolated but simply dropped.
Subdivision with Subdivide tool after importing the object does interpolate its vertex attributes, so that is another option.

Paint Room Model to Sculpt Model with Textures and Depth


You may also transform paint objects to sculpt objects.
Textures (color, gloss, metal, displacement) will be transformed to vertex paint layer.

To do it a new selection has been put in the Bake menu in the Paint Room shown in the picture.

  • Paint Mesh -> Sculpt (No color and No subdivision): Bring a copy of mesh or meshes from the Paint Workspace as is, into the Sculpt Workspace as new Sculpt Objects.
  • Paint Mesh -> Sculpt (With PBR and subdivision): Get textured object from paint room subdivided with textures.
  • Paint Mesh (Subdivided) Copy to Sculpt mesh: This option creates a copy of visible Paint Meshes from the Paint Workspace, and brings them into the Sculpt Workspace as a new Sculpt Object(s).

You have a choice of subdivision levels when transforming the paint room model to a sculpt surface mode model.

Subdivision method


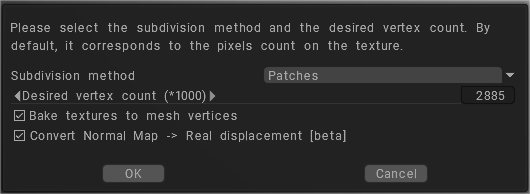
  • Patches: The original vertices positions will be kept, the surface will be covered with the Bezier patches. Pay attention, if the surface is not smooth enough the patches may be rough.
  • Catmull-Clark subdivision: The resulting model is the subdivision surface.
  • Flat patches: The resulting surface consists of flat (or almost flat in the case of quads) patches.

Name Correspondence for Baking: You may use this option to simplify Sculpt Object Baking if names of Retopo Objects correspond to Sculpt Object names. If you check the option each Retopo Object will be baked using only the Sculpt Object of same name and its children.
Re-Bake Sculpt Mesh changes onto Paint Mesh: This command will bake changes in the Sculpt room object to the Painting Room object and update the painting layers in the process. Previous painting layers will be preserved (whenever possible) while newly baked maps will be assigned new layers.
This command takes painting scene object as retopo mesh and bakes details and color form Sculpt scene to painting object. It allows to update normalmap and color layers related to volumes.
Pay attention that painted areas on sculpt mesh will overwrite painted areas on the painting room object. So be careful to avoid losing data.

The normal map is converted to real geometry in the sculpt room on surface mode.

Vertex paint adjust


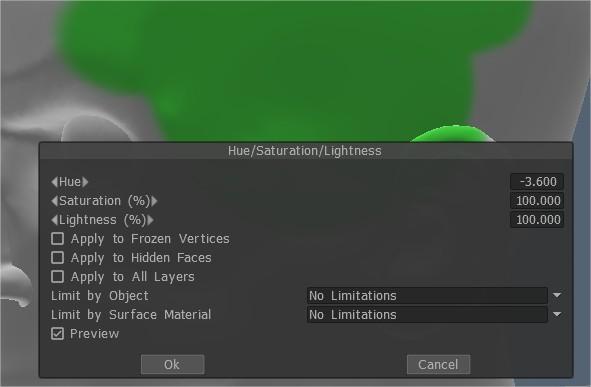
If you need to adjust some vertex paint colors, on Paint Room select “Textures > Adjust”.


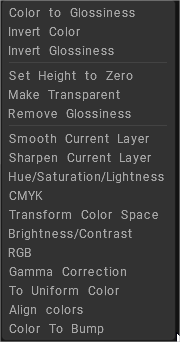
As example Hue/Saturation/Lightness let you correct hue, saturation, and lightness for the entire currently selected polypaint (surface mode) layer.

Bake vertex paint from sculpt room to textures


Once you use any method to “Bake” your model and its topology into the Painting Room, all these painted details will be baked into this permanent mesh as a diffuse texture map, which can then be exported along with your mesh.

To use regular painting methods (Per-Pixel, Micro-Vertex, etc.) deselect “View/Show voxels in painting room” after bake.

To preserve the best representation of the textures between the two rooms after bake use the Default Shader in the Sculpt room.

You can have a more accurate idea for adjusting by sculpting the object and then baking the changes back to the paint room losing your previous bake.
This is possible in 3DCoat if you were not aware of the baking feature losing your previous work.

Tutorials


Polypainting: This video is a feature demonstration of the Vertex Painting toolset

Unique Sculpting Features: This video begins a series highlighting some of the unique features in 3DCoat that helps set it apart. It begins by showing how 3DCoat leverages PBR Texture Painting and High Poly Sculpting simultaneously…taking care of two normally time-consuming and tedious tasks at once and done rather quickly.

How to Import to Surface with (Image) Color : This video covers a quick tip about importing a model into 3DCoat’s Sculpt Workspace and having the color from a texture map baked into the vertices of the model in the process.

Surface Painting: Exporting: This video continues the PolyPainting demonstration by covering an example of exporting the object directly from the Sculpt Room to a 3D application (3ds Max, in this case)…no UVs..no Retopo work.

Advantages of Vertex Painting: This video demonstrates some advantages of using Surface (Vertex) Painting instead of the standard UV-based texture painting tools.

Choosing Right Shader for Vertex Painting : This video briefly addresses a common question about Vertex Painting (why the user can’t see their paint strokes, sometimes). And it’s simply a matter of choosing the right type of shader.

Freeze Painted/Transparent Pixels: This Quick Tip video demonstrates how a user can apply a Freeze Mask to either Painted Pixels or Transparent Pixels. This can help create masks quickly, in situations that might otherwise take more time and effort.

Tags:vertex paint

Was this helpful?

Yes  No
Related Articles
  • 3DPrint
  • Nodes
  • Create brushes based on Curves
  • Baking guide
  • Autopo Baking guide
  • Light Baking Tool
Previously
Ptex Painting
Up Next
Importing Into the Painting Room

On This Page: [hide]

Direct painting over surface models

Import model with a texture and convert it to Vertex Paint

Import models with polypaint

Paint Room Model to Sculpt Model with Textures and Depth

Subdivision method

Vertex paint adjust

Bake vertex paint from sculpt room to textures

Tutorials

AI:
Hi! How can I help you?
Attention: This is a beta version of AI chat. Some answers may be wrong. See full version of AI chat