 English
  Українська
 Español
 Deutsch
 Français
 日本語
日本語 Русский
 한국어
한국어 Polski
 中文 (中国)
 Português
 Italiano
 Suomi
Suomi Svenska
 中文 (台灣)
 Dansk
Dansk Slovenčina
 Türkçe
 Nederlands
 Magyar
 ไทย
ไทย हिन्दी
 Ελληνικά
 Tiếng Việt
 Lietuviškai
 Latviešu valoda
 Eesti
Eesti Čeština
 Română
 Norsk Bokmål

Primitives
Add simple Primitives to scene. Select from Model library meshes, splines and latheable objects.

As with all modeling and sculpting applications, primitives form the basis for many and varied starting shapes.
Almost any model can be composed, almost entirely, from a positive and negative combination of basic primitive shapes.
Import
Import an object into the scene. Press ENTER to apply the selected object.
The object should be closed without self-intersections.
Use the brush/move/rotate/scale modes to place the object.
This tool lets you import polygonal meshes importing into the Sculpt workspace.
Tree generator
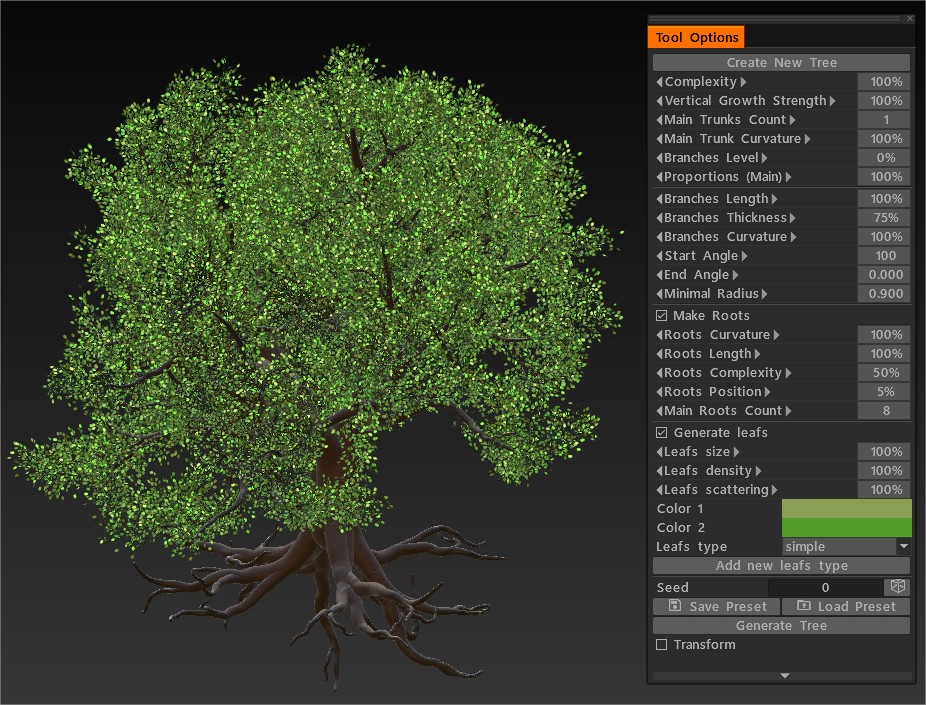
A quick look at the new Tree Generator tool: A first look at the new Tree Generator tool inside of 3DCoat. It is a non-destructive, procedural tool.
Even more important than the good mechanism created in 3DCoat to make procedural, non-destructive tools.
Trees Generator tool got the possibility to generate Leaves. You may add own leaves types, sculpt the shape of crone if need, export all this as FBX.
In CoreAPI you got the possibility to add textured objects into the sculpt scene (see the Trees generator example).
Logo: The logo tool lets you import any black-and-white picture and convert it to voxels. You can convert images that are in the .BMP, .TGA, .jpeg, and .PNG formats.

Click on the Logo tool and select an image. When imported, voxels will be created based on grayscale images. It will default to the merge tool so you can use the standard merge gizmo here.
Sketch: This tool allows to create volumetric object using 2 or 3 projections of the object on axis. Inner area of projected object should be painted with white color, outer with black color.

If you paint manually use CTRL to paint with black and subtract areas.
Initially you have filled cube because all 3 sides are white. Try to paint with CTRL to subtract area.
You may use Clear button to clear entire cube side and paint with pen or lasso. If you want to load images as references it is better to use antialiased images to get better result.
Don’t try to place there photographies from different sides.
You should mark with white and black color inner and outer zones. It should look rather like negative shadow. After placing images as reference images, press ENTER or use Apply button.
Softness allows to get softer intersections but can lead to losing of the precise shape. Also please keep in mind that using too large images in scale of scene can lead to creating too heavy (in polygons) object, so scale reference images down to get proper scale of object in scene.
For the first try don’t use reference images more than 256 x 256. It’s great for creating a quick base volume for sculpting or things like greebles & nurnies.
Split and Joints: It’s primarily a workflow enhancement for those construction/sculpting models to be exported for 3D Printing. Take note that it only operates in Surface (polygons only) mode.
Split: This tool is very similar to the Cut&Clone tool. It has the same border settings. The difference is that it tears a chunk of the object you are operating on and creates its object Layer in the Sculpt Tree.
Split break volumes on pieces using E-mode selections. You may split multiple volumes and instances simultaneously. This is especially useful to create broken state of some object
Clone: Clones the selection without cutting.
Cut & Clone: This tool will let you cut and clone the volume of a voxel object based on the type of brush parameters. It defaults to the drag rectangle pen mode and will copy the whole volume of the object underneath. You can also adjust your border parameters with three different types: Round, Plane, and Sharp.
Vox Extrude: works similarly to VoxLayer without creating a new object layer but switching the entire layer to Surface mode. Press “Apply” while holding Ctrl if you want to invert the tool.
Vox Layer: creates a thin layer around the frozen area of the current volume. Paint with the freeze to mark the area and press Apply afterward.
Points to Polygons: Add points with LMB. Tweak points and add faces with RMB. (look at preview). Force triangles with SHIFT.
Hold the cursor close to the center of the potential quad for more precise placement of the quad.
Snake: Clicking and dragging with the LMB creates a snake-like shape in your viewport. Its position is based on your first click and your viewport perspective. As with the curves tool, you can reset it with the Tube button. You can select several profiles and, of course, also use spline presets.
One unique parameter for this tool is the * Smoothing speed: The snake will smooth along its entire length, causing it to move. The higher the value, the more smoothing. (Min/max values: 1-5)
Spikes: Functions like the snake tool, except that it tapers on the endpoint, causing a spike-like appearance.
Toothpaste: This tool shares all options with the Muscles tool except the muscle types. Its function is similar to its name: it is like applying toothpaste to a surface. A big advantage is that it respects Brush alphas, so you can use them to create unique rake brushes.
Tubes/Muscle: Stylus pressure and depth intensity determine the thickness of the muscle. You can turn off “pressure dependent on radius” to get more accurate results.
Muscles tool lets you easily sculpt muscle and tendon looking shapes.
You can achieve many different effects by, for instance, sculpting with this tool outside of a volume to create objects that look like wings.

There are several settings in this tool:
- Act as Vox Hide: This is very important for realistic sculpting. If enabled, the brush acts as the rich Vox Hide tool. Draw to hide, CTRL + draw to unhide. Also, look at the Geometry->Invert hidden, objectify hidden, and other nearby options.
- Smoothing speed: This lets you adjust the rate at which your stroke is smoothed.
- Snap to Surface: Forces your stroke to adhere to the object’s surface instead of passing in front of the base object or right through it.
- Tube Profile: Select between two different types: Muscle and Tendon.
Cloth Realtime cloth simulator. Don’t forget to press ENTER to bake cloth to the current volume object. It is better to subdivide the cloth several times before applying the object.
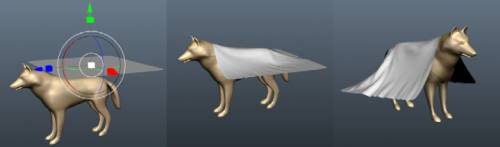
Real-time Cloth Simulation in 3DCoat is now at a new level of quality and speed.
Cloth: This tool is a cloth simulator that you can use to drape a polygon mesh over another object. There is a default Cloth with which you can test, but you are not limited to this as you can also import an external polygonal mesh.
Keep in mind that the higher the resolution of the mesh you use to drape, the slower the simulation will be and the longer it will take to get the desired results. The simulation can be started with the Start button; once the simulation is running, you can Pause/Resume, End, and Reset the simulation.

The parameters for this tool are as follows:
- Open the Mesh: Prompts you with a file-open dialog which lets you select a file (.OBJ, .LWO, .FBX, .STL, .PLY, and .3b) on disk to use as the object to be draped.
- Subdivide: Subdivide the object you have mesh over another object. There is a test, but you are not limited to this, as you can also import an external one. It can be used before or after you run the simulation.
- Pick from retopo: If you have retopologized something and it is in the Retopo tab, then you can use this button to select that mesh as the object to drape.
- To Retopo: Sends the recently draped mesh to the Retopo tab for further retopologization.
- Pick Current Object: Pick the current sculpt object (volume) as the cloth object. It will be automatically reduced to the specified polycount.
Pay attention; the volume you picked participates in the collision, so hide or ghost it if you don’t want it. - Start/Reset: These two buttons start and reset the simulation.
- Default Cloth: Set default cloth object.
- Reset Gizmo: reset the gizmo to default position.
Sets several other parameters, such as the Gravity and the Friction of the draped object on the object you are draping over, as well as the Cloth thickness.
For thickness, the higher the value, the thicker the cloth.
Stick to Current Object: Very important! Use this option for better cloth control. Create new object that will be used as a freezing area for cloth, set as current, check this option. This will allow you to freeze cloth inside current object.
Gravity: Change the gravity to make the object fall faster/slower and also the general weight of the drapery.
Friction: Determines how “sticky” the drapery is to the object it’s being draped upon.
Cloth Roughness: Higher values increase the coarseness of the cloth object. The lower the value – the softer the material is.
Cloth Elasticity: Cloth Elasticity parameter modulates the elastic nature of the cloth object.
Cloth Thickness: After draping your item but before applying it as a sculpt, you need to specify the thickness.
Cloth Extrusion: Change the value here if you need to extrude the cloth surface.
If you turn current volume to cloth, you may ghost or hide the volume to avoid collision of the mesh with the volume.
Joints: The Joints tool in 3DCoat is used to create and manage joints between different parts of a model. The tool allows the creation of blocks of geometry model and creates joints between parts.
It allows you to define how parts are connected and can be used for creating articulated models or for preparing models for 3D printing with movable parts.
The tool provides options to adjust the fit and movement of the joints, ensuring that connected parts can move or rotate as intended.
Tutorials
Improved Cloth Simulation Tool: The video demonstrates the Cloth Tool in action while modeling a bed.
3DCoat Cloth Tool: Use the Cloth Tool to create a clothing item. Apologies for the lack of editing and poor audio in this tutorial; I had very little time, so I just went for it in one go. There is a link below to help those not familiar with retopology. (By Ian Thompson).
T-Shirt in 3DCoat: Here’s a demonstration of quickly making a T-shirt for a character with 3DCoat’s cloth simulator and retopology tools. (By Phil Nolan.)
Split and Joints: The tool allows to split your model into parts and create joints between parts. It cuts model via round. Pay attention that round should split model at least on 2 parts, so be careful with placing the round.