 English
  Українська
 Español
 Deutsch
 Français
 日本語
日本語 Русский
 한국어
한국어 Polski
 中文 (中国)
 Português
 Italiano
 Suomi
Suomi Svenska
 中文 (台灣)
 Dansk
Dansk Slovenčina
 Türkçe
 Nederlands
 Magyar
 ไทย
ไทย हिन्दी
 Ελληνικά
 Tiếng Việt
 Lietuviškai
 Latviešu valoda
 Eesti
Eesti Čeština
 Română
 Norsk Bokmål
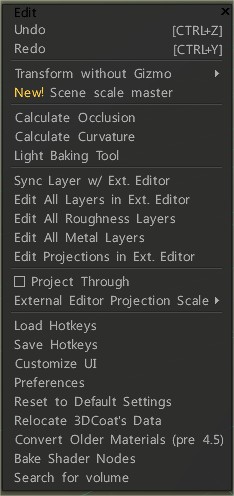
Undo: hotkey Ctrl+Z
Redo: hotkey Ctrl+Y
Transform without Gizmo:
These menu items are intended for assigning hotkeys to transform objects without the gizmo.
1) Press END over the required menu item, and assign the hotkey.
2) Press that hotkey and transform the object.
3) Press SPACE to enter numerical values (if this is a one-dimensional transform).
4) Press SHIFT, CTRL or CTRL+SHIFT for the discrete transform.
5) Press ESC or RMB to cancel the transform.
6) Press LMB to complete the transform.
When you transform the objects using this method, overview of the editing menu in which you will learn about the main editing functions and setting up the scene, you may use hotkeys (regardless of how they are assigned in 3D-Coat)
W – Activate free translation.
E – Activate free rotation.
R – Activate free scaling.
X, Y (or C), Z – Act along the axis for the translation, rotation or scaling, in dependence on the current mode.
– If you are in the translation mode:
X, then Y or SHIFT Z, or ZZ – move an object in plane XY.
Y, then Z or SHIFT X, or XX – move an object in plane YZ.
Z, then X or SHIFT Y, or YY – move an object in plane ZX.
F – Pick new pivot of the transformation.
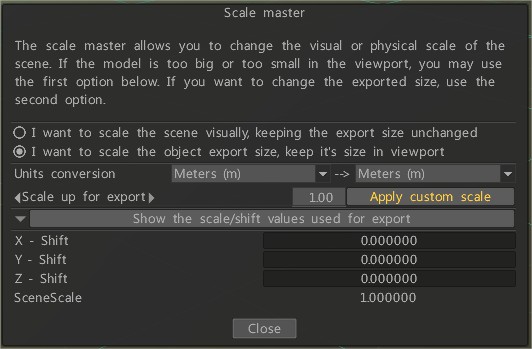
Scale Master
The scale master allows you to change the visual or physical scale of the scene.
If the model is too big or too small in the viewport, you may use the first option below.
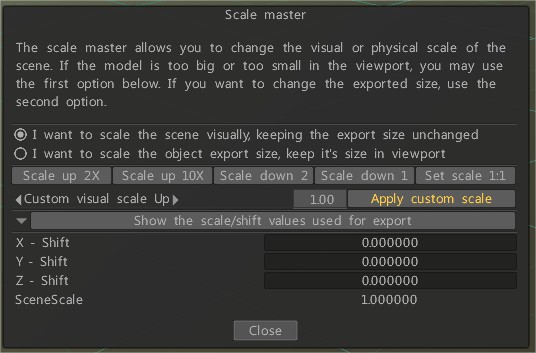
If you want to change the exported size, use the second option.
Calculate Occlusion
Calculate Occlusion baker runs a routine that calculates “Ambient Occlusion” (global illumination) based on tracing a number of light rays surrounding an object.
Calculate Curvature
Calculate Curvature: The curvature layer is required to use cavity/curvature as a condition for materials or conditional painting. The command will update the cavity/curvature layer using the current displacement and normal map.
Light Baking Tool
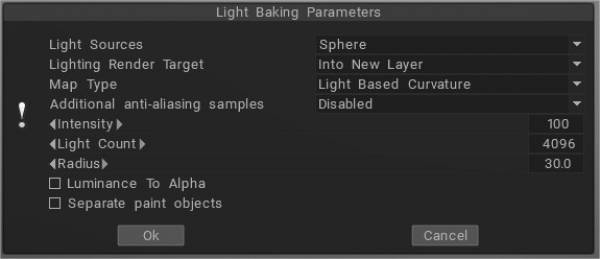
Light Baking Tool: This video covers the Light Baking tool in 3DCoat.
Light Based Curvature: more correctly calculates the result on UV Overlap; black areas no longer appear on different objects which have the same UV coordinates.
Thickness: Similar to AO, it casts rays from the surface of the mesh to the inside. It can be used in SSS shading.
Light From Render Room: If you wish to bake light without an environment, use “light from render room” instead of “Light and Reflections.
Subsurface Scattering:
Translucent:
Bent Normals: Using Bent normals within Materials can help improve how they react to lighting and shading. It set out the average direction of ambient illumination.
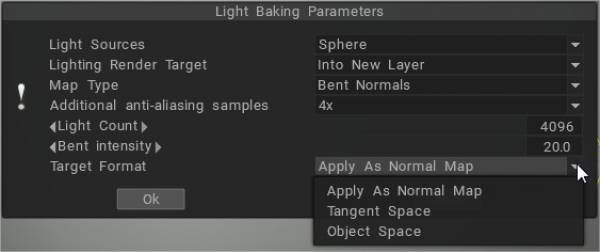
Example: Benefits of Using Bent Normals
Light and Reflections: fill the layer with any reflective Smart Material, bake your reflection, and it creates a reflection layer in the texture layer. It picks up any light you have set up in the render room, including the environment light.
Local Curvature: calculates curvature on objects with a normal map and analyzes the model’s curvature in many projections pixel by pixel, which allows you to get a more accurate and beautiful result. The radius and intensity can be adjusted.
Local Curvature RGB: Bakes curvature with radius 1, 20, and 100 to RGB channels, respectively. (Use RGB cavity as the default cavity calculation method can be set on Preferences).
The new RGB cavity was introduced as a possible default calculation method. In this case, the multi-range cavity will be calculated on the GPU, and additional control in UI of conditions/smart materials will appear, the “Cavity width.” It allows for variation in the cavity width/smoothing in real time, which is very important for realistic PBR texturing.
Cavity width (using the RGB cavity) may be used for smart materials for each layer separately. Each material layer has its own cavity width settings. It allows for much better effects for “aging” materials, like several differently “aged” layers of paint.
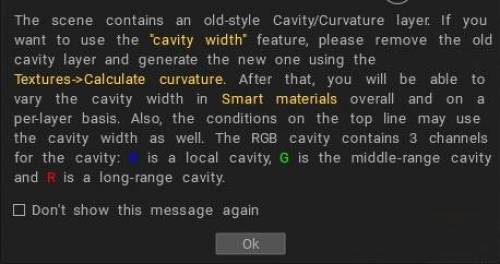
RGB cavity is a multi-range cavity texture, each channel corresponds to a different cavity scale. B is the local cavity, G is a middle-range cavity, and R is the far-range cavity.
If you already have the old cavity layer in the scene, you need to delete it to use this feature. This is a very significant feature for the PBR painting over the texture/mesh.
If the RGB cavity is enabled by default and you are loading the scene that has the old-style cavity layer, the Coat will warn you that it is better to re-calculate the cavity to get better control.
Global (light based) curvature and local curvature are related to the geometry of a surface. Global (light based) curvature refers to the overall shape of a surface and is a measure of how much the surface deviates from being flat.
For example, a sphere has positive global curvature, while a plane has zero global curvature.
Local curvature, on the other hand, refers to the curvature of a surface at a particular point or over a small region.
This curvature can be different from the global curvature and can vary from point to point on a surface.
For example, a sphere has positive local curvature everywhere, while a parabolic cylinder has positive local curvature in some regions and negative local curvature in others.
Sync layer with the external editor: This command allows you to synchronize the current layer with an external editor. You can set the path to the editor in Preferences. (The default is Adobe Photoshop.) The alpha channel will contain the transparency mask.
When you call on this command, the program Adobe Photoshop will open automatically with your file. Then you can change it and jump back to 3DCoat by pressing CTRL+S.
Edit All Layers in Ext. Editor: Edit all layers in an external editor. You can change the editor in the Options menu (Adobe Photoshop by default). This editor should be able to edit PSD files.
The texture will be stored as layers and opened as a PSD file in the external editor. Then you can edit the texture and even add new layers. When you save it, 3DCoat will automatically reload it. Hotkey Ctrl+P
Edit All Roughness/Glossiness Layers: Edit all Roughness/Glossiness layers in an external editor.
Edit All Metal Layers: Edit all Glossiness layers in an external editor.
Edit Projections in Ext. Editor: You can edit the current projection in Adobe Photoshop using layers. You can change the editor in the Preferences menu (Adobe Photoshop by default).
This editor should be able to edit PSD files. The texture will be stored as layers and opened as a PSD file in the external editor. Then you can edit the texture and even add new layers.
When you save it, 3DCoat will automatically reload it. Hotkey Ctrl+Alt+P
Project Through: Project the image through all objects, even back faces.
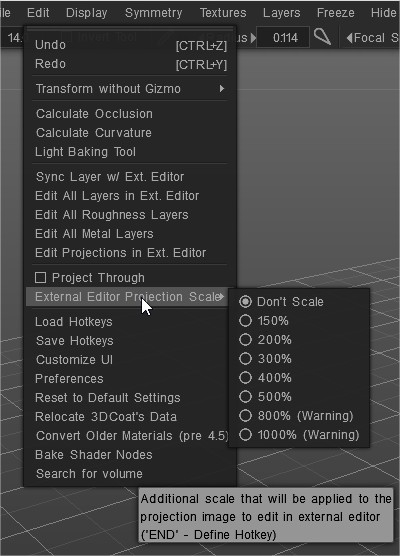
External Editor Projection Scale: Additional scale that will be applied to the projection image to edit in an external editor.
Load Hotkeys: Load hotkeys from the file.
Save Hotkeys: Save hotkeys from the file.
Customize UI: Remove/customize UI element.
Preferences: Set Hotkeys, Autosave time, External 2D-Editor, UI colors, and more…
Reset to default settings: Resetting is necessary if the program behaves unstably. Choose which settings you need to reset. Files options*.xml will be deleted. The program will be restarted, so first, save the changes.

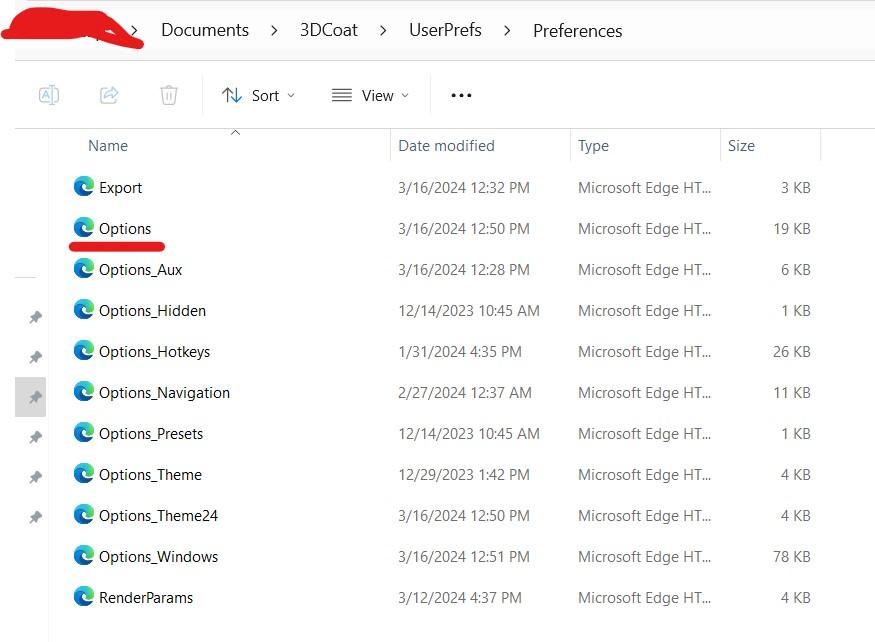
You can also try deleting the Options.xml file.
Make sure 3DC is closed when you do this. 3DCoat will auto create a new options.xml file when reopening 3DCoac.
Location of options.xml file shown in picture.
Relocate 3DCoat’s data: Edit Data Placement.
Convert Older Materials (pre 4.5): Convert Older Materials (pre 4.5)
Bake shader nodes: Bake shader nodes to real color/displacement. It may be helpful for the export.
Search for volume:
Tutorials
Quick Tip AO Baking Troubleshooting: This video demonstrates a Quick Tip about troubleshooting AO baking in 3DCoat, should a user encounter an unreasonable amount of lag.
AO Baking w/ OpenCL & Normal Map utilization: This video covers two major new improvements to AO baking in 3DCoat 4.5. OpenCL acceleration and Normal Map utilization.
Krita and 3DCoat workflow By Paul Geraskin.