• 中文 (中国)
  • 3DCoat文档
  • Chapters
    • 3DCoat简介
    • 入门
    • 界面和导航
    • Brush组件
    • Node System
    • GPU Texturing
    • 工作区房间
    • Scripting和Core API
    • 问题和答案
    • Licensing
  • Learn
    • Getting Started
    • Painting
    • Sculpt
    • Modeling
    • Retopology
    • UV
    • Smart Materials
    • Nodes
    • Photogrammetry
    • Render
    • Print
    • Learning
    • 培训教程
  • Blog
    • 2026 Key Features and Improvements
    • Texturing with nodes
    • Shader Nodes VS. a Material Nodes
    • Multiple UV Tiles/UDIMs to one single UV set ?
    • I want to create geometry only with displacement to be manufactured with a CNC machine
    • Creating 3D Character Using 3DCoat
    • DAZ Genesis models into 3DCoat
    • Cavity and Curvature maps
    • Types of normal maps
    • Texture painting pipeline
    • Load new UV layout After Model Changes
    • Import Zbrush Polygroups for UV mapping
  • Products
    • 3DCoat
    • 3DCoatTextura
    • 3DCoatPrint
    • PBRLibrary
  • Store
  • Pilgway
  • 中文 (中国) 中文 (中国)
    • 多语言切换器
    • 多语言切换器
    • 多语言切换器
    • 多语言切换器
    • 多语言切换器
    • 多语言切换器
    • 多语言切换器
    • 多语言切换器
    • 多语言切换器
    • 多语言切换器
    • 多语言切换器
    • 多语言切换器
    • 多语言切换器
    • 多语言切换器
    • 多语言切换器
    • 多语言切换器
    • 多语言切换器
    • 多语言切换器
    • 多语言切换器
    • 多语言切换器
    • 多语言切换器
    • 多语言切换器
    • 多语言切换器
    • 多语言切换器
    • 多语言切换器
    • 多语言切换器
    • 多语言切换器
    • 多语言切换器
    • 多语言切换器
  • 3DCoat文档
  • Chapters
    • 3DCoat简介
    • 入门
    • 界面和导航
    • Brush组件
    • Node System
    • GPU Texturing
    • 工作区房间
    • Scripting和Core API
    • 问题和答案
    • Licensing
  • Learn
    • Getting Started
    • Painting
    • Sculpt
    • Modeling
    • Retopology
    • UV
    • Smart Materials
    • Nodes
    • Photogrammetry
    • Render
    • Print
    • Learning
    • 培训教程
  • Blog
    • 2026 Key Features and Improvements
    • Texturing with nodes
    • Shader Nodes VS. a Material Nodes
    • Multiple UV Tiles/UDIMs to one single UV set ?
    • I want to create geometry only with displacement to be manufactured with a CNC machine
    • Creating 3D Character Using 3DCoat
    • DAZ Genesis models into 3DCoat
    • Cavity and Curvature maps
    • Types of normal maps
    • Texture painting pipeline
    • Load new UV layout After Model Changes
    • Import Zbrush Polygroups for UV mapping
  • Products
    • 3DCoat
    • 3DCoatTextura
    • 3DCoatPrint
    • PBRLibrary
  • Store
  • Pilgway
  • 中文 (中国) 中文 (中国)
    • 多语言切换器
    • 多语言切换器
    • 多语言切换器
    • 多语言切换器
    • 多语言切换器
    • 多语言切换器
    • 多语言切换器
    • 多语言切换器
    • 多语言切换器
    • 多语言切换器
    • 多语言切换器
    • 多语言切换器
    • 多语言切换器
    • 多语言切换器
    • 多语言切换器
    • 多语言切换器
    • 多语言切换器
    • 多语言切换器
    • 多语言切换器
    • 多语言切换器
    • 多语言切换器
    • 多语言切换器
    • 多语言切换器
    • 多语言切换器
    • 多语言切换器
    • 多语言切换器
    • 多语言切换器
    • 多语言切换器
    • 多语言切换器
Expand All Collapse All
  • 3DCoat简介
  • 入门
    • System requirements
    • Why 3DCoat is Unique?
    • 激活3DCoat
    • 启动错误
      • Startup error Mac
    • Color management
    • Upgrading permanent license
    • Linux Setup
      • Linux initial setup per-user installation
      • Linux initial setup for system
      • Tablet setup
      • To GTK3 from GTK2
      • Error libicuuc.so.70
    • 文件夹结构
      • Custom documents folder
    • 不同形式的“决议”
    • Tablet on Window
    • Import_
    • 3DCoat中的Applinks
      • Blender应用程序链接
        • Blender with the Applink in Linux
      • Blender 4.2/3/4/5 applink
      • Max Applink
      • Houdini applink
      • Lightwave uplink
  • Navigation
    • 打开对话框(快速启动菜单)
    • 导航面板
    • 相机和导航
      • Customize Navigation as Blender
    • Left tool panel
    •  Activity Bar
    • 使用 3DConnexion 设备导航
      • How to compile Spacenavd on non Ubuntu distro
    • Quick Access Menu
    • Stylus doesn’t work in sculpting
    • 热键
  • 界面和导航
    • 文件菜单
    • 编辑菜单
      • Bake Geometry Info
      • Calculate Occlusion
      • Calculate Curvature
      • Light Baking Tool
      • 优先
      • Cavity and Curvature maps
    • 查看菜单
    • 对称
    • Textures
    • Calculate
    • 图层菜单
    • 冻结菜单
    • Hide
    • Bake
    • 曲线 2022
      • 曲线菜单
      • Curves Properties RMB
      • 填充网格层
      • Scale of imported curves
    • 窗口菜单
      • 选项卡式 Windows 弹出式面板
      • 滑块
    • Scripts
    • Addons
    • Capture
    • 帮助菜单
    • 客制化
    • 修改或创建新房间
  • Brush组件
    • Brush顶栏
    • 刷子一般用途
      • 创建画笔和贴花
      • 从当前造型制作 alpha
      • 从 3D 对象创建Brush
      • Create brushes based on Curves
      • Load photoshop .abr brushes
    • 笔画
      • 曲线弹出菜单
    • Brush选项
    • 条件限制器
    • 条面板
    • 模板面板
    • 智能材料
      • 添加新图像或材料
      • 将智能材质附加到图层
      • Import Quixel Megascans
    • 如何为Brush创建预设
  • Node System
    • Node Editor
    • Node & Object Inspectors
    • Node Graph
    • NodeGraph Language (NGL)
    • GPU Nodes
      • Color
      • GeometryIn
      • In
      • Layer
      • Material
      • Math
      • Noise
      • Noise3D
      • Out
      • Pattern
      • Pattern3D
      • Shape
      • Texture
      • Tilable
      • UV
    • Filters
    • Masks
    • Materials
    • Modifiers
    • Volumes
  • 免费3DCoatPrint
  • GPU Texturing
    • PBM Channels
    • Per-Pixel Painting
  • 工作区房间
    • Painting
      • 纹理Painting和模式
        • Per-PixelPainting
        • 位移Painting(微顶点)
        • PtexPainting
        • 表面Painting(Polypainting)
      • 导入Painting室
        • Initial CC subdivision
        • UV Set smoothing
        • Sharp (hard) edge
        • 锁定法线
        • 模型更改后加载新的UV布局
        • DAZ Genesis models into 3DCoat
        • ID map
      • Painting工作区的菜单
        • Edit menu
        • 纹理菜单
          • 纹理Baking工具
        • 隐藏
        • Bake Paint菜单
        • 拾色器
      • Surface Materials
      • Painting的顶栏
      • 图层面板
        • 混合面板
        • Layer and Clipping Masks
      • Painting室工具
      • 不透明度 - 透明度
      • 调整工作区
        • 调整工具集
        • 从调整室导出
      • 蒙版/材质预览面板
      • 从Painting室导出
    • UV工作区
      • UV顶栏
      • UV左工具面板
      • UV预览面板
      • UV工作流程示例
      • 导入UV室
      • 从UV室导出
    • 重新拓扑
      • 导入Retopo Room
      • Retopo Mesh 菜单和 Bake 菜单
        • 虚拟镜像模式
      • Bake menu
        • Treat Poly Groups as Paint Objects
        • Baking guide
      • Retopology 中的笔触工具
      • 顶栏
        • 选择几何体
      • Retopology 房间的左侧工具面板
        • 总体目的和功能
        • 添加几何
        • Retopo工具
        • UV工具
        • 拓扑室命令
      • 自动拓扑
        • Autopo guide
      • 保利集团
    • 塑造
      • Sculpt Layer
      • 造型树
      • 雕刻Brush选项
      • Top Bar
      • Brush引擎
      • 几何子菜单
      • 雕刻“右键单击”菜单
      • 着色器
      • Voxel模式
        • 纯Voxel雕刻
        • 密度和分辨率
        • 黏土引擎
        • Voxel工具
        • 体素上的表面工具
        • Voxel调整工具
        • 立体Painting
        • Voxel对象工具
      • 表面模式
        • 表面工具
        • 表面定制工具
        • Surface Layer
        • 表面调整工具
        • 表面Painting
        • 多级分辨率
          • Multires tools
          • Multires adjust
          • Multires commands
      • 雕刻曲线
        • 样条曲线
        • Splines model creation
      • 矢量位移
      • 表面变换工具
        • Voxel变换工具
        • Instancer
        • Move
        • Pose
        • Fit
        • Reproject
        • Surface Array
      • Voxel基元和Import工具
        • Hollow Box
      • 实时布尔值
      • 雕刻室的命令
      • Import到造型室
      • 从 Sculpt Room 导出
    • 使成为
      • Comparison of different roughness values
      • 渲染面板功能
      • 转盘
      • 伪造光照 - 非PBR-
    • Factures
      • 工作流程
    • 最简单的
    • 造型
      • Mesh Menu
      • 建模室中的左侧工具面板
        • 添加几何图形
          • Make Joints
          • 已选择
        • 调整
        • Smart Hybrid
        • UV
          • 命令
        • 整个网格
      • Fluffy 的阁楼表面示例
      • Poeboi 封锁
      • Import Zbrush Polygroups for UV mapping
    • Kitbash - 快速创建 3D 模型
      • Create kitbash
      • Left tool panel Kitbash
    • 3DPrint
    • Photogrammetry
      • How to install Reality Capture
      • Reality Capture doesn’t show up ?
    • 网格到 NURBS 房间
    • Nodes
      • Texturing with nodes
      • 雕刻着色器节点库
      • Open PBR
  • Scripting和Core API
    • Core API
    • Python API
    • Extensions and Addons

Cavity and Curvature maps

94 views 0

Written by Carlos
September 17, 2026

To bake a curvature map in 3DCoat, go to the Paint Room, open the Edit menu, and select Calculate Curvature.

Steps to Bake Curvature

  • Switch to the Paint Room after your mesh and normals are ready.
  • Hide the voxel display if needed by unchecking View > Show Voxel.
  • Go to the top menu and select Textures > Calculate Curvature (or Edit > Calculate Curvature depending on your version).
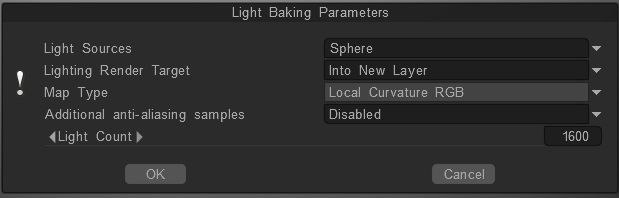
  • Choose your preferred curvature type in the pop-up panel (such as Local Curvature RGB or standard settings) and click OK to process the bake.
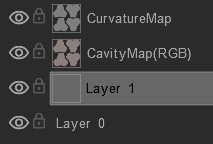
  • 3DCoat generates and applies the map to a background layer used by smart materials. You can turn the layer’s visibility on in your layer panel if you want to see the black-and-white or RGB breakdown visually.

Tips for Curvature Settings

  • RGB vs Black & White: Modern versions use RGB cavity/curvature by default to store concavity and convexity separately in different color channels.
  • Legacy Mode: If you prefer the old black-and-white style cavity map baker, you can switch it on by going to Edit > Preferences, navigating to the Tools section, and unchecking/changing the default cavity calculation settings.

How can i export only curvature and occlusion maps?

On Paint Room open the export Panel at File > Export > Objects & Textures

Create a new Export Constructor preset selecting only ExportAO and Export Curvature Map.


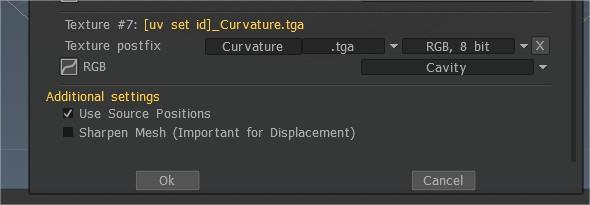
When i click on the Export Panel add texture and then i click RGB i cannot find any curvature name, only cavity. Is cavity same as curvature?

Yes and no.

Cavity Map focus on small details, while Curvature Map emphasize the overall shape of a surface, it map store the concave and convex edges of a mesh.

However ‘Cavity map’ is different than “Curvature map”. A Curvature map actually store the concave and convex edges of a mesh. Is also called Concavity, Convexity, Pits & Peaks, Worn Edge.

The convex (white) and the concave (Black) is Curvature map and the transition between peaks and crevices (gray values) of the model is Cavity map.

To produce a Cavity map that we could use as Curvature, we need more gray-scale values so that we can identify the convex (white), the concave (Black) and the transition between peaks and crevices (gray values) of the model.

– Cavity texture

Focuses on small details like crevices, grooves, and indentations (cavity maps are also known as crevice maps).
They are a more detailed version of ambient occlusion maps.
Cavity maps can be useful for improving dirt masks, enhancing colors, and adding highlights.

– Curvature texture

Focuses on the overall shape of a surface, showing where the surface curves inward or outward.
Curvature maps are also known as concavity, convexity, pits and peaks, or worn edge.
Curvature maps can be used to simulate edge wear, highlight details, and check for surface continuity.

Curvature can be both an RGB map encoding convexity/concavity in separate channels, or a gray scale map encoding convex edges as white and concave edges as black like in the image below.


I went ahead and exported cavity, it looks like a curvature map. Can i use that one as a curvature?

Select Cavity for Curvature. (the map generated is named Cavity at export).

This map is often (erroneously) called Cavity, but more accurately a Cavity map can also be a white map with concave edges encoded as black.

3DCoat does not have the option to export both maps at the same time, but you can generate them using the Generate Curvature map tool.


Utilize Normal maps during AO and Curvature baking

Other major new Improvement is the ability to utilize Normal maps during this baking process, so let’s go ahead and get started by hiding some of the layers.
Hold down the ALT key and select the visibility icon on one of these layers and the only one to leave intact is the one that has normal map information on it.

You need to have the Normal map visible so that 3DCoat can utilize it during this baking process.

So now let’s go ahead and go to the Edit menu and choose Calculate Occlusion and Curvature maps.


Pay attention that curvature consists of two components

First is local curvature that allows to detect small details, scratches.
Second is long-range curvature that flows smoothly and allows to detect large details.

If you need Gray Maps set intensity for both types: curvature or cavity.

  • Turn intensity up create a cavity map. (curvature intensity 400, long range curvature 10).
  • Turn intensity down create a curvature map. (curvature intensity 8, long range curvature 100).

Another workflow is to use Local Curvature RGB for Cavity map…

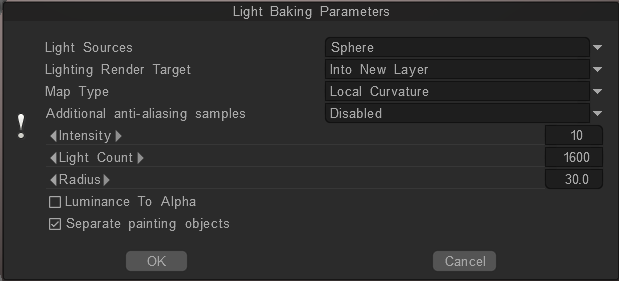
And Local Curvature for gray Curvature map

Following this steps you can get this result:


RGB Cavity map

Starting from 3DCoat 2021.53 the RGB Cavity map was introduced as the default calculation method in Texturing.

You can active RGB Cavity “Curvature” on Edit > Preferences > Tools.

On Cavity map RGB each channel contains different information, like convexity in red and concavity in green for instance.


Cavity Area Width:

This option requires the RGB cavity pre-calculated using the Textures->Calculate curvature, Local Curvature RGB.

When you first run the Curvature using RGB Cavity, the Light Baking Panel comes up.
Not change the settings Local Curvature RGB (you can change some later) and run the Curvature Calculation.

In the Smart Material Editor this option appears in the Editor when RGB Cavity is selected as default. You may vary the width of the area of the cavity influence, make the cavity narrow or wide.

* Before that, you need to remove the regular cavity layer if it already exists.

Adjusting Cavity Area Width and Overall Cavity Modulator can give you some nice effects like several layers of old paint on top of each other. As is show on this video:

The curvature layer is required to use cavity/curvature as a condition for materials or conditional painting.

If you work with Conditions painting by layer, on the upper right side you can adjust degree & contrast


Remember that Conditions painting only work on freeze for sculpt surface mode or Surface Paint on vertex on Paint Room.

But the standard sculpting brushes do not respect conditions, only work on Freeze mask to restrict where surface sculpting tools will be applied to the surface of the model.


Just a fast simple example:

Base layer
1st layer = Old Copper
2nd layer = Blue paint
3rd layer = Red paint.

Adjust each smart material differently using Adjusting Cavity Area Width and Overall Cavity Modulator.

It is really not one smart material but 3 separate Smart materials on separate layers.
Can create it using any default Smart Materials.

Follow this steps:

Open the Smart Material editor and the real time preview window, placing it over the model.
This is the most important because you get the real time view of the smart material and how it will be applied.
Do not go by as seen on the Smart Material Editor’s ball if you want real time feedback in this case.
Start Adjusting the Cavity Modulator and Cavity Area Width till you get the effect you want.
The picture above is the blue paint settings, it was the blue metal but looks like blue paint. It was the second layer in the stack.


This other example show how to further increase the variation of your applied Smart Material.

Assign Cube Mapping as Preferred mapping.
On Material/Stencil Control Panel, select Settings.

On this panel you can change the rotation of the cube map on the XYZ axis (per axis) and the expansion per axis as well as is shown in picture below.
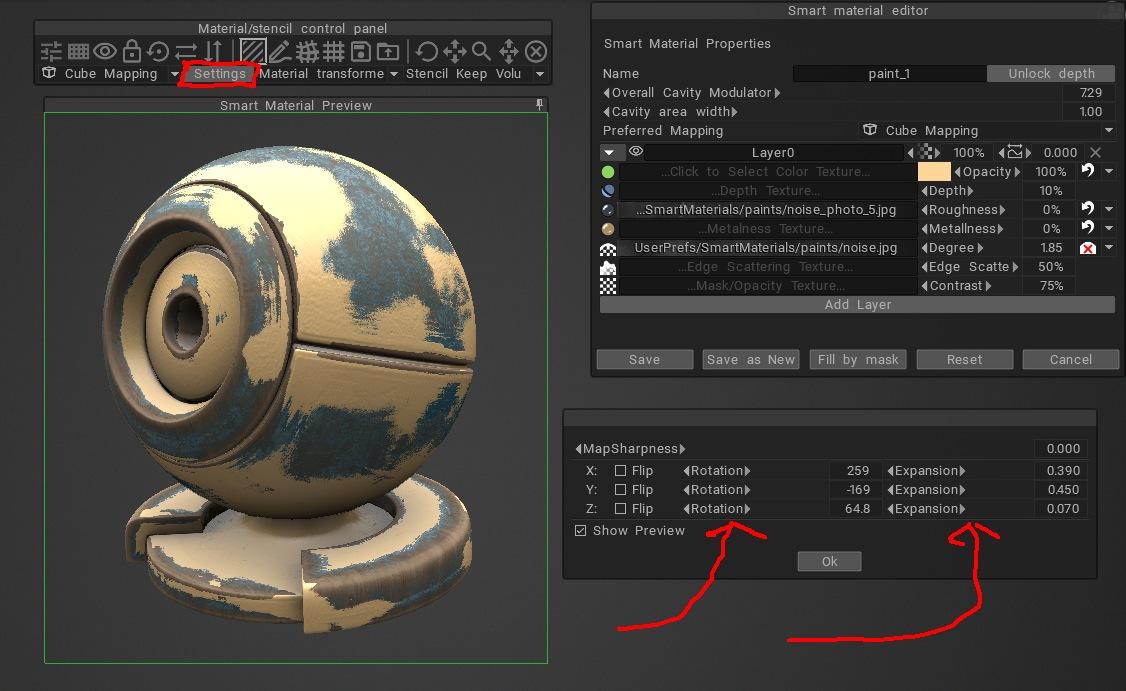
You can preview in real time as the texture moves over the surface.

Last picture shown how to further increase variation using a layer blend mode. On this example is used the Overlay blend mode on the top layer.

You can adjust the strength of the blend mode by using the Opacity adjustment.

The new RGB cavity curvature calculation and Cavity Area Width plus Cavity Modulator is great.
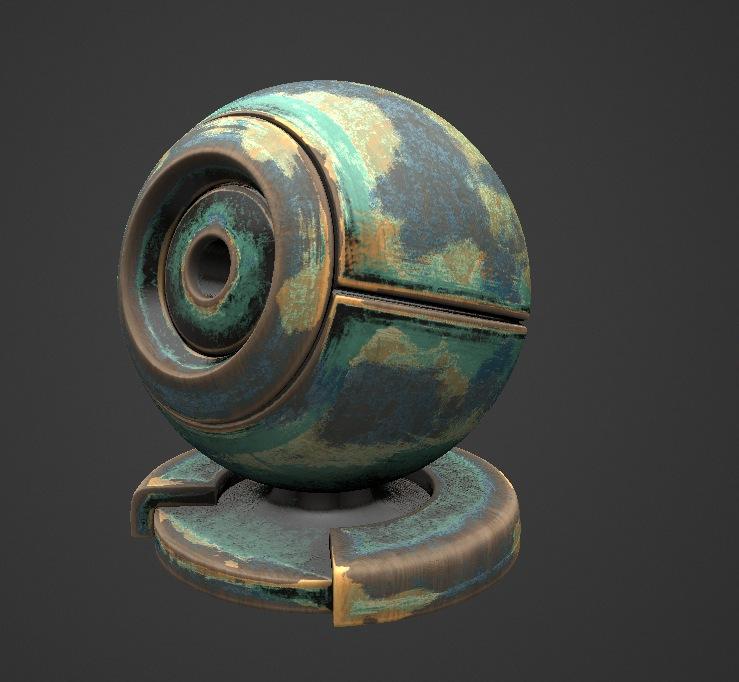
Lots to explore here.

Have fun exploring!

Was this helpful?

Yes  No
Related Articles
  • Noise3D
  • Noise
  • Bake Geometry Info
  • Make Joints
  • Texturing with nodes
  • Hollow Box
Previously
优先
Up Next
查看菜单
AI:
Hi! How can I help you?
Attention: This is a beta version of AI chat. Some answers may be wrong. See full version of AI chat