 中文 (台灣)
  English
 Українська
 Español
 Deutsch
 Français
 日本語
日本語 Русский
 한국어
한국어 Polski
 中文 (中国)
 Português
 Italiano
 Suomi
Suomi Svenska
 Dansk
Dansk Slovenčina
 Türkçe
 Nederlands
 Magyar
 ไทย
ไทย हिन्दी
 Ελληνικά
 Tiếng Việt
 Lietuviškai
 Latviešu valoda
 Eesti
Eesti Čeština
 Română
 Norsk Bokmål
添加/拆分:此工具可让您通过指向并单击要添加边的位置来简单地添加边。另见添加/拆分附录。
选择:在此模式下,您可以选择单个顶点、边和面。使用 CTRL 从选择中删除元素。使用 LMB 选择一个元素,然后使用 RMB 移动(滑动)它们。在“面”模式下,使用 INSERT 细分面,使用 DEL 删除。在“边缘”模式下,使用 INSERT 拆分边缘,BKSP 折叠,DEL 删除边缘,L 选择边缘循环,R 选择边缘环,SHIFT 选择/突出边缘环。
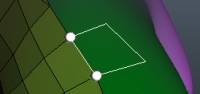
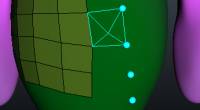
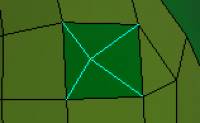
3DCoat 2022 中的软选择功能,用于Retopo和建模工作区。它还结合了与 Sculpt 工作区中姿势工具相同的选择模式。
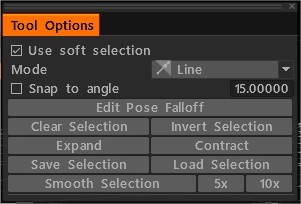
选择工具具有选择模式,允许您选择顶点、边和面。
选择变换:
选择路径:通过指定由您按线性顺序选择的顶点组成的路径来定义展开的接缝。在建立创建接缝的路径时按“Enter”。
四边形:此工具的基本用法允许您选择多边形的一条边,然后拖出并单击新多边形的边的位置。另见四边形。
您可以使用四种不同的方法来定义新拓扑,一次定义一个四边形。它们是 2 次单击方法、平行、直接和梯形。
点到多边形:使用此工具逐点创建四边形或三角形,将鼠标光标悬停在点定义的区域上,然后“右键单击”以建立新的多边形。您可以通过“右键单击”并拖动它们来移动顶点。
使用特殊子菜单清除点。
Cap :将鼠标光标悬停在被连接的拓扑包围的孔上,然后“右键单击”创建一个“极点”和关闭孔的连接三角形。
笔划绘制笔划并按 ENTER 键创建多曲面。按 ESC 清除笔画。使用 CTRL 绘图以添加样条线并连接和断开现有笔划。您还可以绘制闭合样条曲线/曲线。开始在空间中绘制切片。您可以通过一次笔划连接多个切片或圆来创建圆柱体。
- 曲线/描边:创建拓扑“切口”以在模型区域中形成环路,或绘制具有预先定义的均匀顶点间距的自由形式样条。此工具的一个用途是通过首先绘制一系列循环(在空间中开始绘制并在空间中完成)来定义多边形环的周围圆柱体,然后沿着模型“附件”(手臂或腿)的长度绘制自由形式样条),然后按“Enter”确定并创建一组圆柱形面来定义附件。
在特殊子菜单下,此工具有一些本地命令:
- 清除。这将清除所有绘图线。
- 光滑的。平滑所有当前绘制的线条。
- 删除。这将删除您当前选择的行。
在Retopo和 Modeling 房间中添加了retopo基元的布尔操作。您可以使用布尔运算添加、减去、相交和拆分来创建图元。
3D Primitives:为建模和Retopo房间创建 3D 基元的工具。您可以创建 2D 图元(圆形、长方体、平面、椭圆、N 边形、圆盘、三角形)。
2D Primitives:为建模和Retopo房间创建 2D 基元的工具。您可以创建 3D 图元(球体、立方体、圆柱体等)。
RFill :该视频演示了 RFill 工具在 3DCoat 的 Retopology 工作区中的用法。它可能会在不久的将来重命名为“Quad Fill”,因为它用四边形填充网格中的开口。
这是一个四边形填充工具,旨在使用适当的拓扑流填充网格中的孔。
刀用刀切出一张脸。画线并按 ENTER 或 DblClick。此外,您可以通过两点绘制多边形。
Smart Retopo该视频展示了我们所谓的 Smart-Retopo 功能,该功能基于使用曲线工具集。
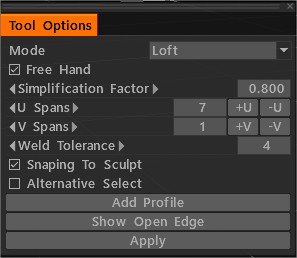
在 Loft 模式下绘制笔划并按 ENTER(应用)创建一个阁楼多重曲面(Retopo Mesh)。
您可以在条带模式下绘制简单的表面条带。
您可以在四边形模式下绘制网格的边界。
按回车后,创建预备网格。您可以编辑边界线。按 ENTER(应用)创建Retopo网格。按 ESC 清除笔画。
按住 Shift 键关闭捕捉。开始在空白处绘制以切片。通过鼠标右键编辑边缘。如果按住 Ctrl 激活滑动边缘。如果按住 Ctrl+Shift 激活 Splite Rings。
U 跨度指定最长曲线中的节点数。其他步骤的数量取决于曲线的长度。如果按住 Ctrl,您可以通过鼠标滚轮更改 U 跨度。
Qty USpans/VSpans 与 Face 数量的对应关系。添加了检查按钮“替代选择”。
脊柱工具沿圆弧拉伸选定的面。变换 Gizmo 可以编辑弧的角度和轴。您可以编辑段数和比例因子。在样条模式下,您可以使用 LMB 拖动点在 3D 空间中移动,并使用鼠标上的滚轮(或 Wacom 平板电脑上的等效物)以交互方式缩放围绕光标所在点的边缘循环的几何形状。每个样条点代表一个新的挤压。点击“工具选项”面板中的 ENTER 键或“新建挤压”按钮可创建新的挤压/点。沿着样条线双击创建一个中间(边循环)挤压/(样条)点,而双击一个点删除(边循环)挤压/(样条)点。
Smart Extrude沿任何方向挤出面或边。按 ENTER 键创建一个新的挤压。您还可以交互式缩放(鼠标左键 + 拖动)和旋转(SHIFT + 拖动)选定的面或边。
- Free Extrude向任何方向挤出。请记住,新顶点不会自动捕捉,但如果您不关闭“自动捕捉”,它们将在进一步的操作中捕捉。
- Normal Extrude沿平均法线方向挤出。请记住,新顶点不会自动捕捉,但如果您不关闭“自动捕捉”,它们将在进一步的操作中捕捉。
- Extrude Faces挤出面,这样每个面都将尽可能移动相同的距离。请注意,在某些情况下,完全平行的面置换是不可能的,但3DCoat会尝试尽可能精确地置换。
自由移动移动选定的面/边/顶点。通过使用鼠标或 Gizmo。如果没有选择任何东西,整个网格将移动。您可以通过按左键使用鼠标光标移动先前选择的组或点。必须激活 [Auto pick] 选项。
- 自由旋转旋转选定的面/边/顶点。通过使用鼠标或 Gizmo。如果未选择任何内容,则整个网格将旋转。您可以通过按左键旋转先前选择的组或鼠标光标点。必须激活 [Auto pick] 选项。
- 自由缩放缩放选定的面/边/顶点。通过使用鼠标或 Gizmo。如果没有选择任何东西,整个网格将被缩放。您可以通过按左键使用鼠标光标缩放先前选择的组或点。必须激活 [Auto pick] 选项。
基元示例
基元:向场景添加简单的基元。您可以为网格、样条和旋转对象库建模。在应用之前使用工具选项面板转换模型。
Retopo Primitives :该视频演示了 3DCoat 的Retopo Workspace 中的 Primitives Tool。它有助于快速创建Retopo网格对象,但也可以用作3DCoat中多边形建模的起点。
FreeForm Retopo Primitives :该视频演示了如何在3DCoat的Retopo工作区中将Retopo模型预设用作 FreeForm Deformation Primitives,以及有关在Retopo和 Sculpt 环境之间互换建模的提示。
R-Fill:这是一种四边形填充工具,旨在使用适当的拓扑流填充网格中的孔。
刀:用刀切出一张脸。画线并按 ENTER。
自由挤出:向任意方向挤出。请记住,新顶点不会自动捕捉,但如果您不关闭“自动捕捉”,它们将在进一步的操作中捕捉。
智能挤出:向任何方向挤出面或边。按 ENTER 键创建一个新的挤压。您还可以交互式缩放(鼠标左键 + 拖动)和旋转(SHIFT + 拖动)选定的面或边。
智能挤出第 2 部分
3DCoat中的智能拉伸第 2 部分:拉伸工具已根据用户要求进行了修改。通过新选择,运动开始时会自动挤出。像以前一样工作的可能性留给了 Smart Extrude。
智能挤出第 3 部分
样条工具:沿圆弧拉伸选定的面。变换 Gizmo 可以编辑弧的角度和轴。您可以编辑段数和比例因子。在样条模式下,您可以使用 LMB 拖动点在 3D 空间中移动,并使用鼠标上的滚轮(或 Wacom 平板电脑上的等效物)以交互方式缩放围绕光标所在点的边缘循环的几何形状。
每个样条点代表一个新的挤压。点击“工具选项”面板中的 ENTER 键或“新建挤压”按钮可创建新的挤压/点。
沿样条线双击创建一个中间边循环挤出/样条点,而双击一个点删除边循环挤出/样条点。
自由移动:移动选定的面/边/顶点。通过使用鼠标或 Gizmo。如果没有选择任何东西,整个网格将移动。您可以通过按左键使用鼠标光标移动先前选择的组或点。必须激活 [Auto pick] 选项。
Surface Swept:通过沿选定的曲线引导移动轮廓生成网格。电网步进频率由 U 和 V Spanse 在 2 个方向上调节。也可以通过在粉红色或蓝色粗曲线附近双击,在所需位置插入额外的边缘环。
添加模式:“扭曲图可编辑”。控制沿轨道部分旋转的能力。
Surface Swept Tool :在此模式下,可沿 X / Y 轴缩放。
Profile:通过沿 Axis 或选定的 curve-guide 移动 profile 生成网格。电网步进频率由 U 和 V Spanse 在 2 个方向上调节。
Surface Strip:可以通过绘制中心线来创建条纹。您可以使用鼠标滚轮在样条点附近编辑条带的宽度。您可以通过 DblClick 插入和删除样条点。按 Esc 键开始绘制其他曲线。
Surface Swept 2:通过沿着两个选定的曲线引导移动轮廓生成网格。电网步进频率由 U 和 V Spanse 在 2 个方向上调节。
扫掠曲面 N 生成器:扫掠曲面将通过沿两条曲线引导移动 N 个轮廓来生成。出现工具选项对话框后,您需要选择第二个指南和曲线配置文件。 VoxTree 中的新项目将被创建,网格将被放置在那里。
在 SculptTree 中选择相应的对象,以便能够更改厚度、刻面数量和平滑度等参数。删除相应的 SculptTree 元素以停止填充曲线。
旋转曲面:旋转曲面将通过围绕选定曲线轴旋转选定轮廓而生成。电网步进频率由 U 和 V Spanse 在 2 个方向上调节。
Surface by 2 Views:通过沿曲线引导移动两个二次曲线生成的网格。您可以编辑曲线。 Z-Up 坐标系中未启用“Surface by 2 Views”。
放样曲面:放样曲面是由多条曲线生成的曲面,在选定曲线之间创建平滑的相切。通过在选定的曲线截面上移动来生成网格。电网步进频率由 U 和 V Spanse 在 2 个方向上调节。
Fluffy 的阁楼表面示例
Surface Patch:选定的曲线定义了 Mesh 的边界和几何形状。电网阶跃频率由 U Spanse 调节。
斜角:在边缘创建斜角。
副本阵列:您可以为选定的面或当前的多边形组创建副本。您需要指定线性和径向类型的副本数。对于沿样条线的复制,指定步数。
晶格:晶格将从边或选定的面生成。可以使用敏感圆圈更改宽度。水平移动光标会改变宽度和垂直深度。
到 NURBS 曲面:使用 Catmull-Clark 算法将低多边形网格面转换为 NURBS 曲面。随后export到 IGES 文件。也可以在export前合并曲面。
选择两个要统一的曲面。按 Esc(或鼠标中键)开始新的选择。
IGESexport在测试期后将需要特殊许可,因为它本质上是一种工业特性。
https://www.youtube.com/embed/cneyBIgDVn4?feature=oembedTo Nurbs
调整
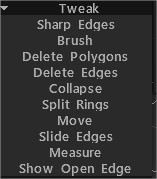
锋利的边缘:将边缘标记为锋利。法线将沿着这些边缘分裂。
Brush:此工具的工作方式类似于软选择。最靠近笔刷光标中心的顶点比外边缘的顶点移动得更多。使用 SHIFT 平滑顶点间距。
 Keep Bounds While Smoothing:启用此选项后,在平滑网格时将保留边界。按 SHIFT 键平滑。\
通过所有组:通过所有可见组操作。\
删除多边形:单击(单个)或沿多边形拖动光标以将其删除。按住 CTRL 键删除连接的多边形集。
删除边:删除边、边环或边循环。按住 CTRL 键可以快速选择和删除整个边循环。
折叠:在边缘使用 LMB 将其折叠。使用 CTRL+LMB 折叠边缘环。
开口环:带线的开口边缘环。
移动:调整顶点、边和面。
滑动边缘:使用 LMB 滑动边缘。 CTRL+LMB 将滑动边缘循环。
测量:单击以添加点。使用 SHIFT 水平、垂直或对角线对齐线条。按 ESC 停止测量指南创建。新的点击将启动一个新的指南。单击线和点以拆分线或拖动点。测量指南可以在其他工具中用作视觉标记或捕捉指南。
Show Open Edge:由 Red 绘制的网格图的开放边缘。
双击擦除点。将附近的点一起移动以擦除捕获的点。使用 CTRL 以避免捕捉到现有点或线,例如,当您需要从现有点或线开始新线时。
UV
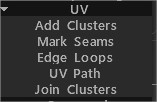
添加簇:使用 LMB 在面上标记簇(UV岛)中心。再次单击集群将其删除。
Mark Seams:在UV-Map 上标记接缝。 CTRL+LMB 取消标记接缝。
Edge Loops:在UV-Map 上标记整个边缘循环。使用 CTRL+LMB 取消标记。
UV路径:沿着几个点之间的最短路径(在特定条件下)放置路径。单击以添加点或分割线,使用 RMB,或双击以删除点。按 ENTER 标记接缝,按 CTRL ENTER 删除接缝。使用不同的标准来调整路径流。
加入集群:将鼠标悬停在集群之间的接缝处,然后单击以移除整个接缝并加入集群。如果突出显示的接缝是红色的,则生成的摘要岛有自相交或太大的方形垃圾。如果是绿色,则summary island没有自交点,方形trash不超过1/2。
命令
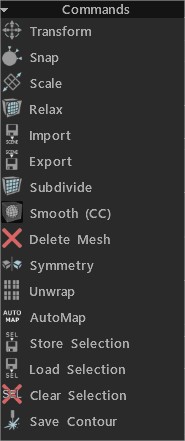
变换:变换选定的面/顶点。如果没有,则选定的整个网格将被转换。
Snap:将retopo网格顶点捕捉到表面。如果您在场景中更改了对象的状态并想要重新捕捉重新retopo网格,它会有所帮助。如果您在顶点模式下使用“选择”工具,则只有选定的顶点会受到影响。
缩放:缩放选定或整个网格。每个连接簇将被单独转换。
放松:放松整个retopo网格或子集。如果您在顶点模式下使用“选择”工具,则只会影响选定的顶点。
Import:Importretopo网格。
Export:Export多边形网格。
细分。
平滑 (CC):使用 Catmull-Clark 细分对当前组进行细分和平滑处理。
删除网格。
对称:对网格应用对称。
Unwarp:将所有岛屿安装到UV贴图上。
商店选择。
加载选择。
清除选择。
保存轮廓:此命令允许您将实际比例的轮廓保存为 EPS 或 DXF,以便进一步进行激光切割。线的长度对应于几何长度。如果您想使用激光切割机切割形状并将零件粘合在一起,这会很有帮助。
已选
扩展:扩展所选元素的区域。
收缩:收缩所选元素的区域。
变换:变换选定的面/顶点。如果未选择任何内容,则整个网格将被转换。
Normal Extrude:沿平均法线方向挤出。请记住,新顶点不会自动捕捉,但如果您不关闭“自动捕捉”,它们将在进一步的操作中捕捉。
挤出面:挤出面,以便尽可能将每个面移动相同的距离。请注意,在某些情况下,完全平行的面置换是不可能的,但3DCoat会尝试尽可能精确地置换。
挤出顶点:挤出面,使每个顶点都以相同的距离移动。
侵入:侵入选定的面。
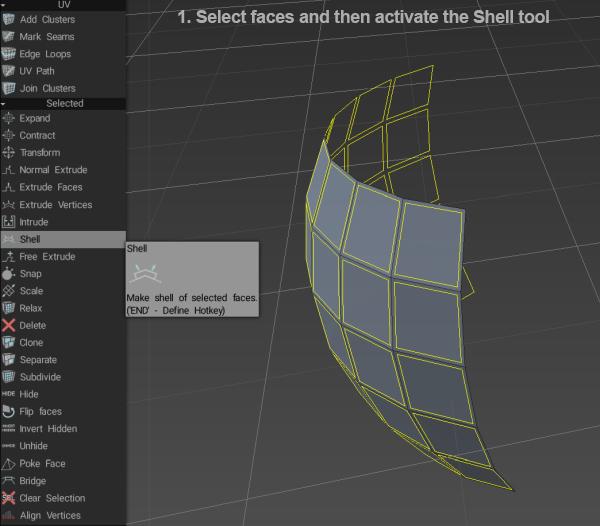
外壳:制作选定面的外壳。 Fluffy 说:首先,选择要“实体化”的面,然后激活Shell工具……
然后使用“工具选项”窗口中的按钮或箭头小工具来设置挤出量……
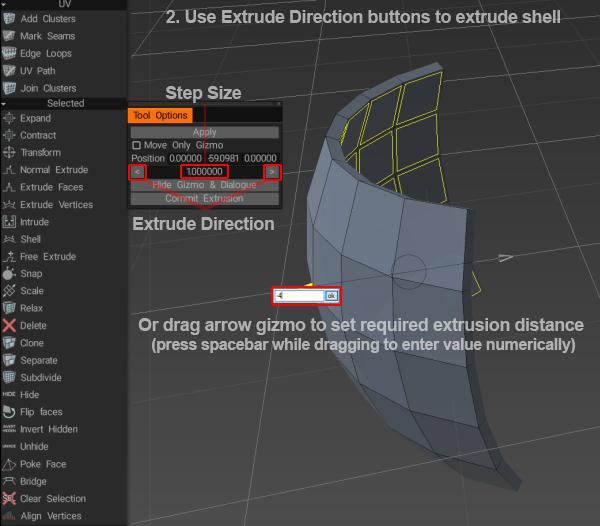
自由挤出:向任意方向挤出。请记住,新顶点不会自动捕捉,但如果您不关闭“自动捕捉”,它们将在进一步的操作中捕捉。
切割边缘:将边缘切割成相等的段。用户将预先确定沿所选边的段数。
Snap:将retopo网格顶点捕捉到表面。如果您在场景中更改了对象的状态并想要重新捕捉重新retopo网格,它会有所帮助。如果您在顶点模式下使用“选择”工具,则只有选定的顶点会受到影响。
缩放:缩放选定或整个网格。每个连接簇将被单独转换。
放松:放松整个retopo网格或子集。如果您在顶点模式下使用“选择”工具,则只有选定的顶点会受到影响。
顺时针旋转:顺时针旋转选定的边。
逆时针旋转:逆时针旋转选定的边。
挤出:挤出选定的边。
拆分:选择多条边,然后单击拆分。将鼠标移到边缘上以指定拆分位置,然后单击进行拆分。您可以使用 INSERT 键触发此工具并拆分选定的边。
折叠:使用 BKSP 折叠选定的边。
删除:使用 DELETE 键删除选中的边。
边缘循环:按 L 选择边缘循环。在一个循环边上选择两条边以限制效果。
边缘环:按 R 选择边缘环。在一个边环上选择两条边以限制效果。
Sel.Sharp:选择锋利的边缘。
分割边:分割选定的边。
桥:通过选择两条边,您可以创建一个面。
设置接缝:将选定的边标记为接缝(在UV预览窗口中)。
删除UV接缝:删除选定边缘上的接缝(在UV预览窗口中)。
标记为锐利:将选定的边缘标记为锐利。法线将沿该边缘分裂。
Clear Sharp:清晰、锋利的边缘。法线不会分裂。
店铺选择:店铺选择。
加载选择: LoadSelection。
清除选择:清除选择。
Align Vertices:按平面对齐顶点。您可以看到顶点的移动方向。如果选择面,可以按圆或球进行对齐。
整个网格
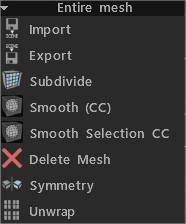
Import:Importretopo网格。
Export:Exportretopo网格。
细分:细分多边形网格。
平滑 (CC):使用 Catmull-Clark 细分对当前组进行细分和平滑处理。
平滑选择 CC:使用 Catmull-Clark 算法细分和平滑选定的面。
删除网格:删除多边形网格。
对称:对网格应用对称。
展开:将所有岛屿放入UV贴图。
教程
Retopo Room Pt.7:Manual Retopo Tools :该视频介绍了3D Coat中的一些手动 Retopology 工具,例如 ADD/SPLIT 工具、POINTS & FACES 工具和 QUADS 工具。
尖端
快速提示:使用 RFill 作为桥梁工具:该视频显示