 中文 (台灣)
  English
 Українська
 Español
 Deutsch
 Français
 日本語
日本語 Русский
 한국어
한국어 Polski
 中文 (中国)
 Português
 Italiano
 Suomi
Suomi Svenska
 Dansk
Dansk Slovenčina
 Türkçe
 Nederlands
 Magyar
 ไทย
ไทย हिन्दी
 Ελληνικά
 Tiếng Việt
 Lietuviškai
 Latviešu valoda
 Eesti
Eesti Čeština
 Română
 Norsk Bokmål
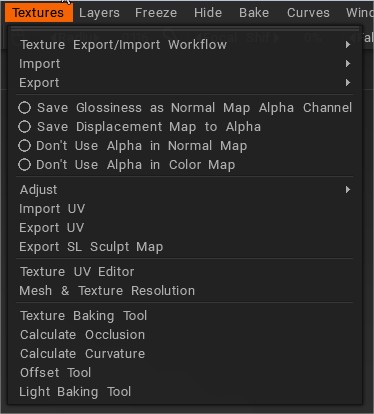
纹理Export/Import工作流程
3DCoat支持三种不同的PBR工作流程:
– 光泽/颜色镜面
– 光泽度/金属度
– 粗糙度/金属度
与这些工作流程中的每一个相对应的纹理贴图在export时保存。
Import:从左侧的列表中选择您要import的纹理类型。
Export:从左侧的列表中选择您希望export的纹理类型,以便在第 3 方应用程序中使用。
此外,通过Export”命令下方列出的四个框中的任何一个,进一步细化导出的纹理数据。
Save Glossiness as Normal Map Alpha Channel:将 Glossiness 通道保存为normal map中的 Alpha 通道。
Save Displacement Map to Alpha:将置换贴图保存到normal map的alpha通道。
不要在法线贴图中使用 Alpha:法线贴图将仅存储为 RGB 图像。
不要在颜色贴图中使用 Alpha:将所有纹理 -normal map和颜色/反照率存储为不带 Alpha 的 RGB 图像。
调整
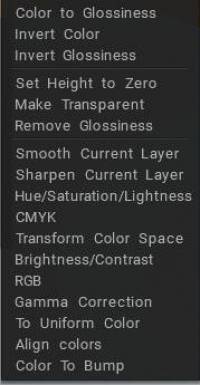
调整:从 Paint Room 文件中的图层阵列中,选择左侧显示的选项(包括一些常见的图像调整参数)以及一些为专业用户量身定制的非常专业的选项。图层调整命令有很多,比如:
- 颜色到光泽度:将颜色亮度转换为光泽度通道。
- 反转颜色:反转该层的颜色。
- 反转光泽度:反转该层的光泽度。
- 将高度设置为零:在所有图层中将高度设置为零。
- 透明化:图层将变得完全透明。
- 删除光泽度:光泽度通道将设置为零。
- 平滑当前层:平滑整个当前层。
- 锐化当前层:锐化整个当前层。
- 色调/饱和度/亮度:校正当前所选图层的色调、饱和度和亮度。
- CMKY:修改CMYK通道。
- 变换色彩空间:在色彩空间中自由变换。最终的颜色由三种颜色组成;每种新颜色都将替换红色、绿色和蓝色通道。
- 亮度/对比度:调整当前图层的亮度和对比度。
- RGB:修改当前图层的RGB值。
- 伽玛校正:对该图层进行伽玛校正。
- 统一颜色:将图层纹理转换为统一;您可以使用 Overlay 或 Modulate2x 将图层与下面图层的颜色混合并组合多个纹理。
- 对齐颜色:该工具将纹理的颜色调整为当前图层下图层的颜色,保留指定半径的细节。
- 颜色到凹凸:将图层纹理转换为凹凸,将细节保留为指定大小。它允许您从颜色纹理中提取小细节。此工具非常适合从使用摄影测量法获得的模型中获取小细节。
所有这些都可以在实时预览中查看,不仅可以应用于当前图层,还可以应用于所有图层。
Export/ImportUV
ImportUV:实际导入一个具有UV坐标和贴图的网格,用UV Room 选定贴图中存在的新贴图替换这些贴图。此选项对于具有重叠UV簇的模型很重要,例如,具有镜像UVs。在这种情况下,您应该使用“保留UVs”选项加载模型UV坐标将以纹理岛不会相互重叠的方式进行更改 如果选项“使用”,模型和纹理将使用原始UV集导出原始UV”已勾选。否则,它们将与新的UV集一起导出。
ExportUV:导出当前正在处理的模型,不带其附带的纹理。这允许在 2D 图像编辑程序中编辑UV贴图本身。此命令可与Import UV配对使用。您可以exportUV集,对其进行调整,然后再次import。
Export SL Sculpt Map:获取当前UV信息并将其导出以供编辑器使用,以便为程序“Second Life”创建资产。
纹理UV编辑器
纹理UV编辑器:打开一个综合编辑器,用于查看和编辑“展开”形式的纹理贴图。选择编辑任何现有的UV贴图纹理,包括漫反射颜色、法线光泽度或整个着色模型。
您确实有一个下拉列表菜单可以在不同的地图/频道之间循环。它位于纹理编辑器的右上角(就在UV贴图列表菜单的左侧)。
由于3DCoat允许您根据需要制作尽可能多的对象UV贴图,因此请从下拉菜单中选择查看和处理其中任何一个。使用内置的 2D 纹理编辑器,您可以同时在 2D 和 3D 窗口中绘制。
您可以在 3D 中绘画,然后结果将同时显示在 2D 窗口中,反之亦然。您可以在 2D 纹理编辑器窗口左上角的下拉列表中选择一个UV集以在其中进行绘制。
UV管理器
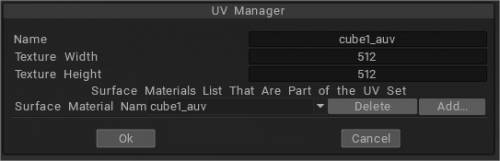
仅适用于Microvertex模式:打开包含与当前对象关联的所有UV集的列表。
网格和纹理分辨率
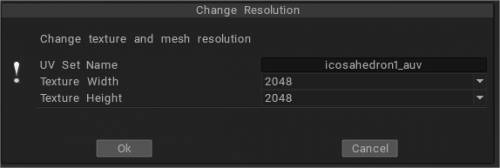
Mesh and Texture Resolution :如果场景中有多个对象,单独的对象可以有单独的UV。使用此命令来管理它们。您可以将多种材质(表面)分组到一个UV集中。
它改变了对象的多边形数量和纹理的大小。您可以多次更改网格分辨率(就像其他软件通常那样),但您也可以按百分比更改,例如 50%。
纹理Baking工具
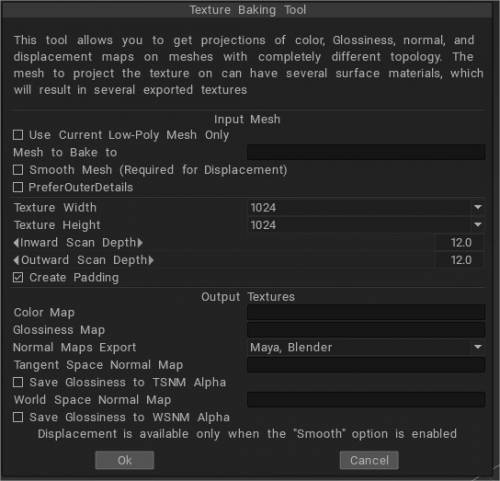
纹理Baking工具:打开纹理Baking对话框,其中包含将纹理信息Baking到模型所需的所有参数。这允许您将细节bake到法线或displacement map。即使在参考和低多边形网格之间的表面拓扑不完全匹配时,也可以使用此方法。这个工具非常详细,下面有它的部分。请参考该部分以获取更多信息。
计算曲率:要求曲率层以空腔/曲率作为材料或条件绘画的条件。该命令将使用当前位移和normal map更新腔/曲率层。
请注意,曲率由两个部分组成。首先是局部曲率,可以检测小细节、划痕。其次是平滑流动并允许检测大细节的远程曲率。为两种类型的曲率设置强度。
计算遮挡:此工具计算分布在球体或半球上的许多聚光灯的全局照明。计算可能需要很长时间
如果您正在为UV贴图模型烘焙贴图,则不应启用体素。 AO 和曲率的细节取自normal map。
偏移工具:当您import图像平面以创建平面纹理时(如打开的3DCoat对话框中所示),您可以选择制作平铺纹理(重复并环绕到图像的另一侧)。使用此工具可帮助您对齐纹理,使其以您想要的方式包裹。
您应该使用此工具仅加载方形图像。它可以方便地创建带有凹凸和镜面反射的平铺纹理。加载方形对象后,您将看到“偏移工具”窗口,可以在其中指定偏移值。 U 偏移量,V 偏移量 – 纹理水平和垂直移动一致。
倒档:激活后,该选项会恢复换档。
光Baking工具:
可以使用此工具生成直接光照贴图。
要在没有环境的情况下bake光,请从渲染室选择贴图类型光,以将添加到渲染室的任何光bake到 Paint Room 上的新层中。 (您也可以在平面着色模式下使用光和反射从渲染室bake光)。
如果您需要从选定的环境贴图bake镜面反射,请使用平滑阴影视图中的光与反射。
注意:如果您的bake太暗,请使用值 400 或更多。