 中文 (台灣)
  English
 Українська
 Español
 Deutsch
 Français
 日本語
日本語 Русский
 한국어
한국어 Polski
 中文 (中国)
 Português
 Italiano
 Suomi
Suomi Svenska
 Dansk
Dansk Slovenčina
 Türkçe
 Nederlands
 Magyar
 ไทย
ไทย हिन्दी
 Ελληνικά
 Tiếng Việt
 Lietuviškai
 Latviešu valoda
 Eesti
Eesti Čeština
 Română
 Norsk Bokmål
ALPHAS 的重要变化:现在从图像(包括 exr)导入的 alpha 可以混合正负,它允许制作更逼真的皮肤细节。负 alphas 适用于雕刻室中的绘制/挤出类画笔。
附加选项:Alphas 可以导入为具有精确衰减的圆形,它大大简化了从原始纹理制作 Alpha 的过程。此选项可在 alphas 调色板中使用或使用拖放操作。
如何创建画笔(alpha)

要在 2D 绘画应用程序中创建画笔,您必须有四个图层,每个图层对应于3DCoat中 Alpha 画笔的四个主要通道。
3DCoat使用 psd、tif、png、bmp、tga、exr 作为文件格式。根据您的计算机规格,图像大小可以是 256 – 512 – 1024。颜色深度将为 8 位 psd 或 16 位 tif。
重要的是要记住所有层都必须有 alpha 通道。
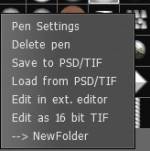
如果您需要编辑任何已经创建的 alpha,请在Brush面板上按 RMB 在画笔上以在外部编辑器上对其进行编辑。
这些图层在外部编辑器中的顺序很重要。他们是:
- 颜色:这包含Brush颜色及其相应的透明蒙版。此蒙版也会影响光泽度层。
- 高度/深度:基于图像的绘画会影响雕刻的位移和高度/深度。该层的“零”高度对应于“中灰”或 (127, 127, 127)。对应于凹面区域的较暗值将产生谷,对应于凸面区域的较亮值将产生峰。
- 高光:白色代表最大高光。黑色代表绝对没有镜面反射,灰色阴影代表中间值。 Alpha 的 alpha 透明度的 Color 层也决定了 Specular painting 发生的位置。
- 擦除蒙版:该层用于创建在绘画时忽略其他层中某些值的 alpha。请记住,此蒙版会影响列表中的最低层,并且在您使用 Ctrl+Shift 擦除绘制区域时处于活动状态。
Emi 使用 tiff 格式创建 alpha:
你不能比较用 PSD 和 Tiff 编辑,PSD 将是 8 位,在 ext 中编辑。编辑器会做 PSD 所以它是 8 位的,如果你想编辑 16 位,你必须使用多层 .tiff 实现,没有别的。这就是问题发生的地方,因为它使用通道而不是图层。所以你不能像在 PSD 版本上那样考虑 Color、HeightMap、Specular 和 EraseMask,你不能只抓取 PSD go 16bit 并保存并import,你必须考虑通道和它们的顺序在Photoshop中完成,这才是最重要的。
– 如果所有.tiff 通道都被使用,它们将根据下表导入和使用。
– 如果您只使用部分可用频道,您import的频道也将根据下表使用。
- 频道:A&H
- CH:1-A 2-H
- 通道:1、2、3 – RGB,2 – A、H
- 通道:1、2、3 – RGB,4 – A、H
- 通道:1、2、3 – RGB,4 – A,5 – H
- 通道:1、2、3 – RGB,4 – A,5 – H,6 – 规格
- CH:1、2、3 – RGB,4 – A,5 – H,6 – Spec,7 – 擦除掩码
因此,使用在3DCoat中创建为 16 位 .tif 的 alpha完全按照列表中的说明进行操作,因为它只有一个灰色通道,它将被3DCoat转换为 Alpha 和 Height。
之后,如果您右键单击编辑 16 位 tiff 并使用 photoshop,则编辑版本将为 7 通道版本。所以前 3 个将是白色,因为没有颜色信息,第 4 个通道将显示 Alpha,第 5 个显示高度,第 6 个是白色,第 7 个是黑色。但是,是的,您需要处理额外的 Alpha 通道。这些频道的顺序很重要。
因此,您可以在 alpha 通道上复制、操作和绘画,我猜它工作正常,但它是一个奇怪的系统,尤其是当它主要与Photoshop兼容时。
我也可以让 Gimp 做和Photoshop一样的事情,但是 Gimp 的问题在于它如何导出 Tiff,它只是行不通,导出 16 位但仅导出 RGBA,这可以解释为什么如果您使用编辑,alpha 看起来会有所不同3DCoat上的 16 位 Tif 并将其发送到 Gimp,因为它没有正确使用通道,只有更暗的 RGBA。
但我手动实现了在 16 位 Tiff 上编辑时在Photoshop中获得的相同通道。首先必须隐藏底部的所有额外通道,然后我右键单击 alpha 并复制它,它会出现在额外通道列表的顶部,但它必须在底部底部,这将是通道 4在Photoshop中,因为它从下到上。现在的问题是高度比你在Photoshop中得到的要暗,所以为了解决这个问题,我所做的就是用白色绘制 RGB 以移除 alpha 并使其成为纯色,然后让 RGBA 可见和 TIFF 通道(现在是从下到上第二个)我复制通道并创建一个更轻的版本,将它放在第二位(从下到上)并删除旧的 Tiff 通道。现在它在Photoshop中看起来完全一样,但你猜怎么着?您不能将 Tiff 与 Gimp 一起使用,并且 Gimp 出于任何原因将 PSD 导出为 8 位而不是 16 位,因此它不会像我想象的那样工作。
如何import新的 alpha 笔刷导入3DCoat
Import3Dcoat,按Brush面板文件夹上的加号图标,或导入新创建的个人文件夹。
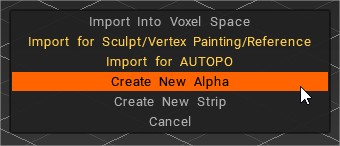
您也可以将图片拖放到视口中。出现一个弹出窗口,让您选择一些选项:
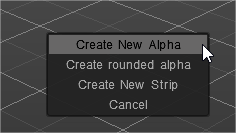
创建新的 alpha:使用此选项创建新的传统 alpha。
创建圆形 alpha:从原始纹理创建 alpha 是一个重要的选项。它以左上角像素为零高度并用软轮切割图像。如果需要,生成的 alpha 非常适合应用额外的衰减。
Create new strip:使用此选项创建新的 strip alpha。
取消:取消import。
贴花看起来褪色
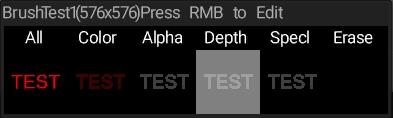
您的贴花/画笔看起来褪色的原因是当您将纹理作为画笔import3D Coat时,如果纹理没有 alpha 通道, 3DCoat将尝试根据现有红色、绿色和蓝色的组合亮度生成一个通道(然后它还将用于深度图等)。 ( Fluffy 写了这篇文章)
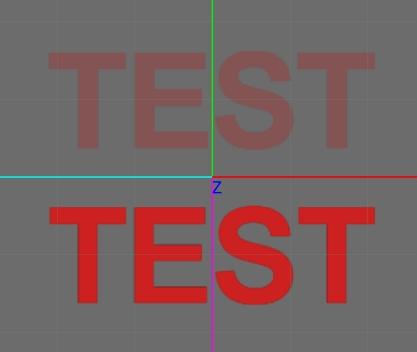
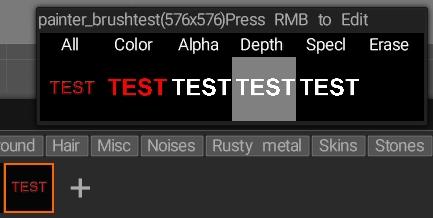
这意味着如果您import彩色纹理而不是黑白图像,则生成的 alpha 通道的不透明度会根据图像的亮度而变化,这就是纹理中的红色像素显示为半透明的原因-透明(因为它们不是白色的)。如果将鼠标悬停在画笔上,您可以看到与该画笔关联的每个通道/贴图;这是我刚刚制作的示例画笔(每个通道使用 8 位,24 位 .BMP 文件格式)…
这是相同的画笔,但在纹理中添加了一个 alpha 通道(每个通道也是 8 位,但使用 32 位 .TGA 文件格式)…
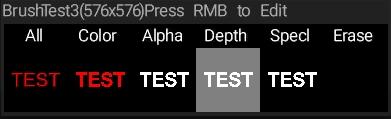
如您所见,使用不带 Alpha 通道的纹理创建的画笔的 Alpha 是灰色而不是白色,因此无论何时使用它,结果都会显得褪色,而使用带 Alpha 通道的纹理创建的画笔则完全不透明当使用…
因此,为了使用颜色纹理创建不透明的3D Coat笔刷,您必须包含一个 alpha 通道。
至于在 Corel Painter 中创建 alpha 通道,我只有 Painter 2018 的许可证,但假设他们没有进行任何重大更改,您可以通过简单地隐藏画布层来保存为带有 alpha 通道的 PNG,这样您就有了一个透明的背景…
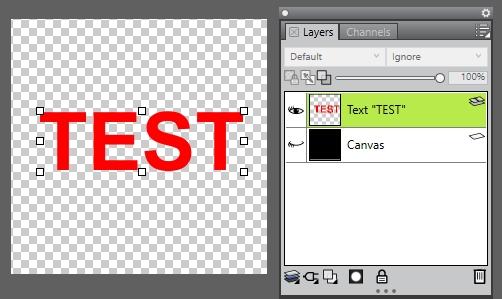
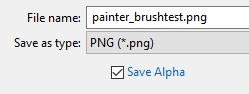
然后从文件菜单中选择另存为,选择。从下拉菜单中选择 PNG 文件格式,并确保启用保存 Alpha 复选框…
之后,您可以在3D Coat中将纹理作为画笔import,并且您导出的图层的透明度应显示为新画笔的 alpha 通道…
从 3D 对象创建Brush
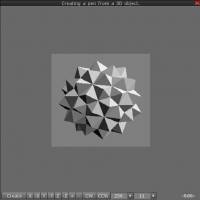
通过单击“Brush”选项卡中的“文件夹”图标,您可以import多种文件格式以用作笔。
您还可以将 3D 模型拖放到视口中,然后从这些命令中选择它
为显示这些选项的 3D 对象菜单弹出窗口创建 alpha:
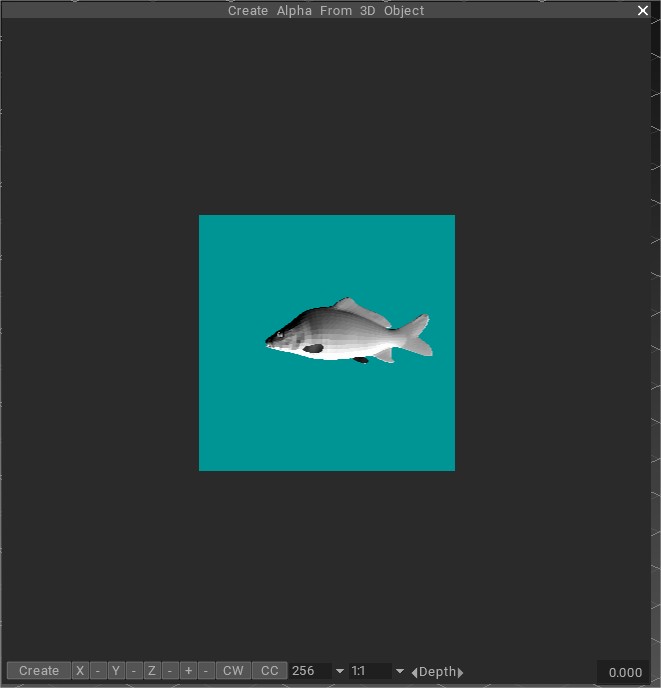
您可以在图像中看到用于导入 3D 网格的编辑视口。模型可以旋转、移动和缩放。按 LMB 旋转模型,按住 SPACE 移动模型,使用 RMB 缩放模型,并使用 ALT+LMB 组合在屏幕框架内旋转。
创建 3DBrush:该视频演示了如何使用硬盘上已有的模型或直接在3DCoat中创建模型以用作 3DBrush;沿笔触复制对象。
您可以选择纹理大小和图像比例。如下所述,在创建条带时使用非正方形图像特别方便。使用右下角的滑块,您可以调整模型浸入背景平面的水平,这决定了零Brush水平。
Chuot dong在此视频中展示了如何从 3d 文件创建画笔。
问答
我有许多自定义画笔都具有相同的“源”画笔图标。例如,如果我使用 Clay 笔刷作为我的自定义笔刷的起点,则我的预设中修改后的自定义笔刷具有 Clay 笔刷图标。问题是我的预设中有四个“粘土”画笔图标,我必须查看名称才能确定我想要的修改。
有没有办法将不同的自定义画笔分配给预设画笔?
