中文 (台灣)
  English
 Українська
 Español
 Deutsch
 Français
 日本語
日本語 Русский
 한국어
한국어 Polski
 中文 (中国)
 Português
 Italiano
 Suomi
Suomi Svenska
 Dansk
Dansk Slovenčina
 Türkçe
 Nederlands
 Magyar
 ไทย
ไทย हिन्दी
 Ελληνικά
 Tiếng Việt
 Lietuviškai
 Latviešu valoda
 Eesti
Eesti Čeština
 Română
 Norsk Bokmål
使用 2D 曲线创建网格:这一切是如何完成的。
蓬松的:
看起来他们在该视频中使用球体工具的方法是将其与填充内部投影选项结合使用,您可以通过右键单击主窗口或曲线树面板中的曲线找到该选项。

但是,看起来他们可能使用的是旧版本的3D Coat ,因为 Sphere 工具的工具选项与 2022.55 版本中的工具选项不同。上面的对象是使用 Blob 工具(位于 Sphere 工具的正上方)创建的,该工具仍然具有视频中看到的 Round Border 选项。
除了使用 Blob 工具而不是 Sphere 工具之外,用于创建上图中对象的过程是相同的。加载曲线后切换到顶视图并确保您使用的是正交投影而不是透视,然后选择斑点工具右键单击所需的曲线并选择填充内部投影(画笔的半径决定了生成的对象的厚度) ).
我个人建议尝试使用曲线的替代方法。不要从菜单中选择投影内部填充,而是尝试使用网格层填充(位于同一菜单下方)。它在表面模式下创建一个新层,并根据选定的曲线生成一个网格对象,并提供一组选项,允许您设置厚度、网格密度、松弛等,以及允许您在平坦或圆形边缘之间进行选择或定义您自己的自定义边缘形状,并允许您通过在当前曲线的子层上创建更多曲线来添加孔。
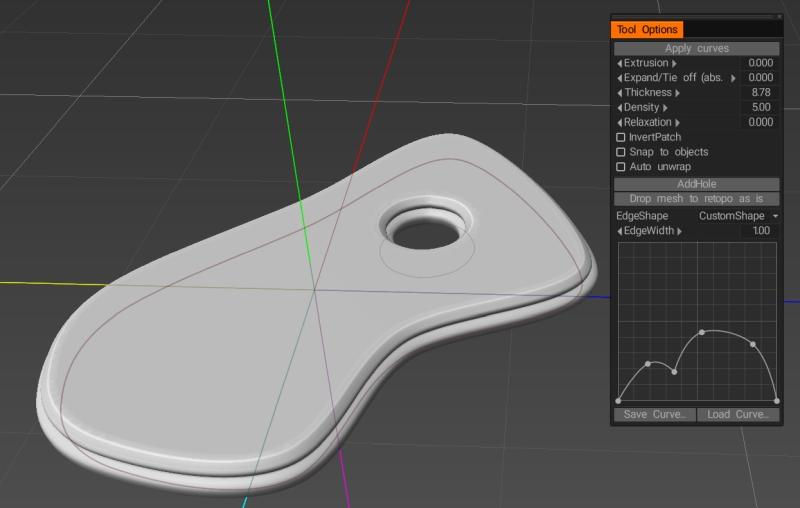
更好的是,当使用网格层填充时,网格对象和曲线保持链接,因此当您调整曲线的形状、自定义边缘形状或用于创建对象的各种其他设置时,这些更改会自动应用到对象,直到您选择取消链接的时间。
AbnRanger:
让我尝试提供一点帮助。我想我知道你的意思,但我可能偏离了目标。
1) 如果您想从 Illustrator 文件之类的文件中import矢量形状,请确保将 Illustrator 文件另存为 EPS 文件。
2) 在 Sculpt 工作区中,转到 CURVES 菜单并选择 LOAD CURVE 或 LOAD CURVE FROM IMAGE
借助3DCoat中的曲线,您可以使用多种工具来增加体积,但像 Sphere 工具这样的东西会起作用……
3) 在 E-Panel 的右侧选择 CLOSED SPLINE 绘图模式(按 E 键将面板带到光标处)
4) 选择第一个图标…SEGMENT 选择工具 > 选择要填充的形状/曲线
5) RMB 点击曲线并选择 FILL INSIDE PROJECTION….但你也可以选择 BRUSH ALONG CURVE 让它沿着曲线填充。
6) 您可以从“曲线菜单”>“曲线操作”中使用布尔运算……但您也可以在重复第 5 步时只选择要剪切/减去的曲线,除非这次您在执行此操作时按住 CTRL。
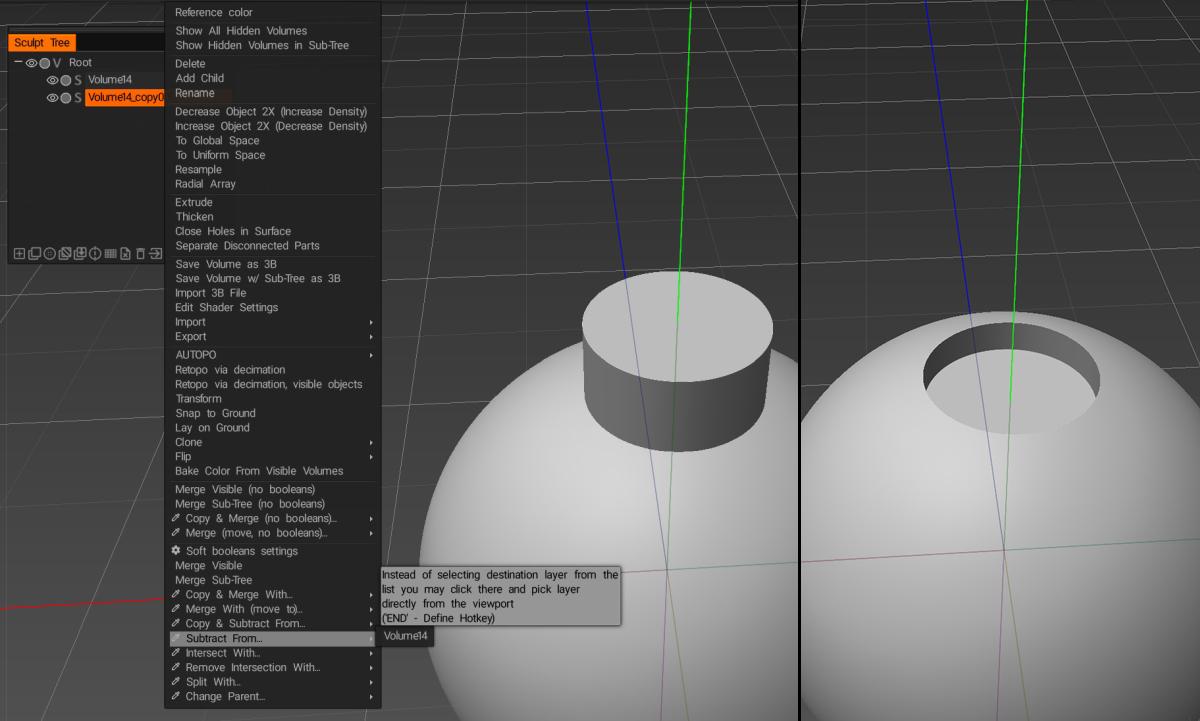
使用网格层填充时,如果我转换为体素(或表面模式下的多分辨率),我会松开锐边。使用这种方法时有没有办法保持锋利的边缘?
蓬松的:
如果您想切换到体素,您可能需要增加体素层的分辨率以保留锐利的边缘或精细的细节。请记住,增加体素层的分辨率会增加整个对象的分辨率,因此在处理大型对象时,屏幕上可能会出现大量多边形。
我通常尝试在Voxel模式下执行布尔运算,因为它们通常更可靠,但如果您想在不使用非常高分辨率的体素对象的情况下保留锐利的边缘,那么您可以尝试保持在表面模式下。无论哪种方式,您都可以通过右键单击其中一个图层并选择一个布尔选项(合并,减去,相交等)然后选择另一个图层来将两个图层一起布尔。
使用曲线将是挤出偏移的更好解决方案,尤其是与涂层工具(可以通过右键单击曲线并选择使用网格层填充来访问)搭配使用,它不仅允许您为挤出边缘分配自定义轮廓。

…您可以在创建形状后随时修改它(直到您有意将曲线与对象分离)…