 中文 (台灣)
  English
 Українська
 Español
 Deutsch
 Français
 日本語
日本語 Русский
 한국어
한국어 Polski
 中文 (中国)
 Português
 Italiano
 Suomi
Suomi Svenska
 Dansk
Dansk Slovenčina
 Türkçe
 Nederlands
 Magyar
 ไทย
ไทย हिन्दी
 Ελληνικά
 Tiếng Việt
 Lietuviškai
 Latviešu valoda
 Eesti
Eesti Čeština
 Română
 Norsk Bokmål
雕刻斜面:沿曲线创建斜面。

首先,您需要在需要放置斜角的边缘周围放置曲线(或多条曲线)。调整笔半径以定义斜角半径。斜角半径可能因点而异。您可以稍后使用“Bevel radius scale”滑块缩放整个斜角半径。如果需要,调整窗口中的斜角形状。选择曲线并按下“Make bevel over curves”按钮。将围绕选定曲线创建斜角。
– 每个曲线点都可以获得其半径,当您单击以将点添加到曲线时定义;该半径将用于倒角。
– 如果没有选择任何曲线,则所有可见曲线都将用于斜面。
– 如果细节层次不够,按Undo,然后“Subdivide edge”,然后再做斜角。
– 斜面是在当前体积上创建的,因此选择正确的当前体积。
– 倒角不会改变密度/拓扑结构,所以它只是表面变形。所以它被烘焙到当前层,你可以隐藏/调整图层深度不透明度的斜角。
切断:通过体积从雕塑中切掉多边形或样条形部分。
噪波:允许您在整个雕刻图层或蒙版选区上生成程序噪波。
闭孔
– 重建:在画笔下方局部重建网格,通常用于修复网格中的缺陷。
– 网格医生
– 清洁粘土
填充孔:填充网格中的孔,可以选择采用周围网格的轮廓。
多边形删除:在雕塑上绘制一个带有遮罩的区域,以删除遮罩区域中受影响的多边形。
Angulator:此工具可在选定区域内创建更清晰的区域。选择有冻结的区域,然后按应用。区域内的表面将被近似以延长(外推)选区边缘的表面方向。
溶解:此工具的作用就像您无限次平滑选定区域一样。您甚至可以使用此工具溶解大细节。使用“保留表面”选项来平滑细节,但保留整体表面流动(只要可能)。
Subdivide:使用Loop subdivision方法对曲面进行细分。选择要细分的区域并使用工具选项。
- 细分冻结区域。
- 细分非冻结区域。
- 细分整个网格。
—-测量:点击添加点。使用 SHIFT 水平、垂直或对角线对齐线条。按 ESC 停止测量指南创建。新的点击将启动一个新的指南。单击线和点以拆分线或拖动点。测量指南可以在其他工具中用作视觉标记或捕捉指南。
双击擦除点。将附近的点一起移动以擦除捕获的点。使用 CTRL 可避免吸附到现有点或线,例如,当您需要从现有点或线开始新线时。
测量:通过使用“LMB”单击并拖动,您可以从笔划的开始到结束进行测量,从而使您能够更准确地进行雕刻以缩放。
测量工具:该视频介绍了 4.5 版中完全重建/重新设计的测量工具。
3D 打印支持:3D 打印支持结构不是模型的一部分。它们用于在打印过程中支撑模型的各个部分。这意味着一旦打印结束,您还有一项额外的任务,即在模型准备就绪之前移除结构。
这是一个特定于 3D 打印的支持创建工具,其中模型的扩展部分需要支持元素来提供正确的打印结果。
Vox Slice:此工具允许使用交互式切片平面实时可视化模型。这是一种检查 MRI 和其他扫描数据的方法。这是一种确保您的扫描数据或其他导入的网格中没有漏洞的有趣方法,并且可以快速确保import良好。
挤出面:
桥:
快速拾取:拾取当前的雕刻对象。单击对象以选择当前对象。另一种方法是在任何其他工具中使用“H”热键来拾取当前对象。有时,当 VoxTree 中有多个对象时,要知道哪一层有什么对象会变得有点麻烦。使用 Pick 工具,您可以通过单击要处理的对象来直观地选择对象(以及 VoxTree 层)。
浅浮雕
这会查看对象的现有体积并根据 Gizmo 的位置进行拉伸以创建新体积。 Gizmo 从尖端开始的底部(球体)区域是将受到影响的区域。它非常适合制作硬币和珠宝。该工具在平面的一侧制作“半高”细节,然后在特定方向上拉伸这些细节。当系数设置为高于或低于 1 时,工具箭头端的定向锥度或压扁。工具的球端始终向球的位置和方向挤压形状的高轮廓点
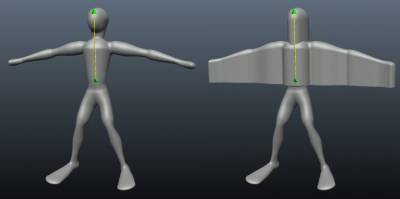
底切使用此工具可以为成型目的准备雕刻对象(不需要底切的地方)并移除底切以进行成型。
如果您从某个方向及其相反方向查看对象,此工具会删除不可见区域。
如果您去除底切,则可以使用 CNC 机器切割或模制模型。选择方向后按 Apply 或 ENTER。
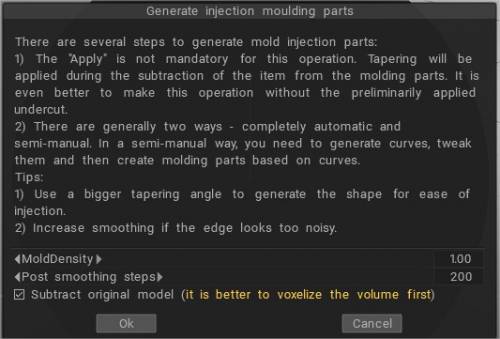
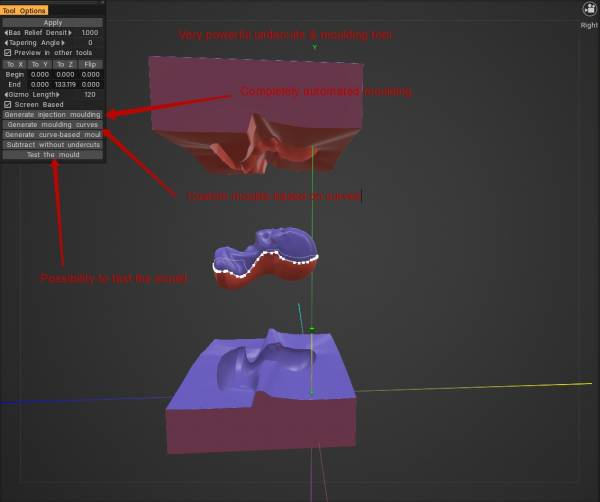
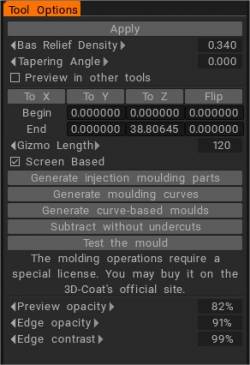
2022 版具有更好的底切和成型工具(在特殊的额外模块中)
教程
快速提示:使用 VoxHide 作为遮罩工具:该视频演示了如何将 VoxHide 工具用作遮罩工具来代替仅在表面模式下工作的冻结Brush。
使用截断和隐藏工具反转Voxel素选择:该视频是使用截断和隐藏工具的快速演示。主要展示如何使用相关但鲜为人知的热键反转选择。