• Tiếng Việt
  • Tài liệu 3DCoat
  • Chapters
    • Introduction to 3DCoat
    • Getting started
    • Interface
    • Brush Components
    • Workspaces Rooms
    • Scripting & Core API
    • Hỏi & Đáp
    • licensing
    • Hướng dẫn đào tạo
  • Pilgway
  • Products
    • 3DCoat
    • 3DCoatTextura
    • 3DCoatPrint
    • PBRLibrary
  • Blog Posts
  • Store
  • Tiếng Việt Tiếng Việt
    • English English
    • Українська Українська
    • Español Español
    • Deutsch Deutsch
    • Français Français
    • 日本語 日本語
    • Русский Русский
    • 한국어 한국어
    • Polski Polski
    • 中文 (中国) 中文 (中国)
    • Português Português
    • Italiano Italiano
    • Suomi Suomi
    • Svenska Svenska
    • 中文 (台灣) 中文 (台灣)
    • Dansk Dansk
    • Slovenčina Slovenčina
    • Türkçe Türkçe
    • Nederlands Nederlands
    • Magyar Magyar
    • ไทย ไทย
    • हिन्दी हिन्दी
    • Ελληνικά Ελληνικά
    • Lietuviškai Lietuviškai
    • Latviešu valoda Latviešu valoda
    • Eesti Eesti
    • Čeština Čeština
    • Română Română
    • Norsk Bokmål Norsk Bokmål
  • Creating 3D Character Using 3DCoat
  • Introduction to 3DCoat
  • Getting started
    • System requirements
    • Activating 3DCoat
    • Startup error
      • Startup error Mac
    • Upgrading permanent license
    • Linux Setup
      • Linux initial setup per-user installation
      • Linux initial setup for system
      • Tablet setup
      • To GTK3 from GTK2
    • Folders Structure
      • Custom documents folder
    • Different Forms of “Resolution”
    • Import and Export
    • Applinks in 3DCoat
      • Blender 4.1 applink
        • Blender with the Applink in Linux
      • Blender 4.2/3 applink
      • Max Applink
      • Houdini applink
      • Lightwave uplink
  • Navigation
    • Opening Dialog (Quick Start Menu)
    • Navigation Panel
    • Camera and Navigation
      • Customize Navigation as Blender
    • Viewport Navigation Gizmo
    • Left tool panel
    •  Activity Bar
    • Navigation using 3DConnexion devices
      • How to compile Spacenavd on non Ubuntu distro
    • Stylus doesn’t work in sculpting
    • Hotkeys
  • Interface
    • File
    • Edit
      • Calculate Curvature
      • Calculate Occlusion
      • Light Baking Tool
      • Preferences
    • View
    • Symmetry
    • Textures
    • Calculate
    • Layers
    • Freeze
    • Hide
    • Bake
    • Curves
      • Curves editor
      • Fill with mesh layer
      • Scale of imported curves
    • Windows
      • Tabbed and Popup Panels
      • Controls
    • Scripts
    • Addons
    • Capture
    • Help
    • Room Customization
    • Modify or Create new Room
  • Brush Components
    • Brushes general use
      • Create alpha brushes and decals
      • Making alpha from current sculpt
      • Create a Brush from a 3D Object
      • Create brushes based on Curves
      • Load photoshop .abr brushes
    • Strokes
      • Curves Popup Menu
    • Brush Options panel
    • Brush Top Bar
    • Conditions Limiter
    • Strips Panel
    • Stencils Panel
    • Smart Materials
      • Add new images or materials
      • Attach a Smart material to a layer
      • Import Quixel Material
    • Presets for Brush alphas
  • Workspaces Rooms
    • Paint
      • Texture Painting & Modes
        • Per Pixel Painting
        • Displacement Painting (Micro-Vertex)
        • Ptex Painting
        • Surface Painting (Vertex painting)
      • Importing Into the Painting Room
        • Initial CC subdivision
        • UV Set smoothing
        • Sharp (hard) edge
        • Lock Normals
        • Load new UV layout After Model Changes
        • DAZ Genesis models into 3DCoat
      • Paint Menus
        • Edit menu
        • Textures Menu
          • Texture Baking Tools
        • Hide
        • Bake Paint menu
        • The Color Picker
      • Top Bar for the Painting
      • The Layers Panel
        • The Blending Panel
        • Layer and Clipping Masks
      • Left Tool Panel
      • Opacity & Transparency
      • Tweak tools
        • Tweak Toolset
        • Exporting from the Tweak Room
      • Stencil & Material preview panel
      • Exporting from the Painting Room
    • UV
      • UV Top Bar
      • UV Left tool panel
      • UV Preview Panel
      • UV workflow example
      • Importing Into the UV Room
      • Exporting from the UV Room
    • Retopology
      • Importing into Retopo Room
      • Retopo Mesh Menu
        • Virtual Mirror Mode
      • Bake menu
        • Autopo Baking guide
        • Baking guide
      • Top Bar
        • Select geometry
      • Left tool panel
        • Overall Purpose & Function
        • Add Geometry in the retopology room
          • Strokes tool in Retopology
        • Tweak Tools
        • UV Tools
        • Commands for Retopology room
      • AUTORETOPO
        • Autoretopology Guide
      • Poly Groups
    • Sculpt
      • Sculpt Tree
      • Sculpt Layer
      • Brush engine
      • Sculpt Brush options
      • Right mouse button menu
      • Geometry menu
      • Shader
      • Voxel mode
        • Pure Voxel Sculpting
        • Density and Resolution
        • Clay Engine
        • Right-Click Menu
        • Voxel Tools
        • Surface tools on Voxels
        • Voxel Adjustment Tools
        • Volumetric Painting
        • Transform Tools
        • Voxel Objects Tools
          • Voxel Primitives & Import Tools
      • Surface mode
        • Surface tools
        • Surface custom tools
        • Surface adjust tools
        • Surface transform tools
        • Surface Painting
        • Surface Objects Tools
          • Sculpt Primitives & Import Tools
        • Multi Level Resolution
          • Multires tools
          • Multires adjust
          • Multires commands
        • Right-Click Menu
      • Sculpt curves
        • Spline Curves
        • Splines model creation
      • Commands for Sculpt room
      • Vector Displacement
      • Live Booleans
      • Import to Sculpt Room
      • Exporting from the Sculpt Room
    • Render
      • Comparison of different roughness values
      • Render Panel Functions
      • Turntable
      • Fakebake the lighting -non PBR-
    • Factures
      • Workflow
    • Simplest
    • Modeling
      • Mesh Menu
      • Left tool panel
        • Add Geometry
        • Tweak
        • UV panel
        • Commands panel
        • Selected
        • Entire Mesh
      • Loft surface example by Fluffy
      • Blockout by Poeboi
      • Import Zbrush Polygroups for UV mapping
    • Kitbash
    • 3DPrint
    • Photogrammetry
      • How to install Reality Capture
      • Reality Capture doesn’t show up ?
    • Nurbs
    • Nodes
      • Sculpt shader Nodes Library
  • Scripting & Core API
    • Scripting
    • Core API
    • Python API
  • Free 3DCoatPrint
Expand All Collapse All
  • Introduction to 3DCoat
  • Getting started
    • System requirements
    • Activating 3DCoat
    • Startup error
      • Startup error Mac
    • Upgrading permanent license
    • Linux Setup
      • Linux initial setup per-user installation
      • Linux initial setup for system
      • Tablet setup
      • To GTK3 from GTK2
    • Folders Structure
      • Custom documents folder
    • Different Forms of “Resolution”
    • Import and Export
    • Applinks in 3DCoat
      • Blender 4.1 applink
        • Blender with the Applink in Linux
      • Blender 4.2/3 applink
      • Max Applink
      • Houdini applink
      • Lightwave uplink
  • Navigation
    • Opening Dialog (Quick Start Menu)
    • Navigation Panel
    • Camera and Navigation
      • Customize Navigation as Blender
    • Viewport Navigation Gizmo
    • Left tool panel
    •  Activity Bar
    • Navigation using 3DConnexion devices
      • How to compile Spacenavd on non Ubuntu distro
    • Stylus doesn’t work in sculpting
    • Hotkeys
  • Interface
    • File
    • Edit
      • Calculate Curvature
      • Calculate Occlusion
      • Light Baking Tool
      • Preferences
    • View
    • Symmetry
    • Textures
    • Calculate
    • Layers
    • Freeze
    • Hide
    • Bake
    • Curves
      • Curves editor
      • Fill with mesh layer
      • Scale of imported curves
    • Windows
      • Tabbed and Popup Panels
      • Controls
    • Scripts
    • Addons
    • Capture
    • Help
    • Room Customization
    • Modify or Create new Room
  • Brush Components
    • Brushes general use
      • Create alpha brushes and decals
      • Making alpha from current sculpt
      • Create a Brush from a 3D Object
      • Create brushes based on Curves
      • Load photoshop .abr brushes
    • Strokes
      • Curves Popup Menu
    • Brush Options panel
    • Brush Top Bar
    • Conditions Limiter
    • Strips Panel
    • Stencils Panel
    • Smart Materials
      • Add new images or materials
      • Attach a Smart material to a layer
      • Import Quixel Material
    • Presets for Brush alphas
  • Workspaces Rooms
    • Paint
      • Texture Painting & Modes
        • Per Pixel Painting
        • Displacement Painting (Micro-Vertex)
        • Ptex Painting
        • Surface Painting (Vertex painting)
      • Importing Into the Painting Room
        • Initial CC subdivision
        • UV Set smoothing
        • Sharp (hard) edge
        • Lock Normals
        • Load new UV layout After Model Changes
        • DAZ Genesis models into 3DCoat
      • Paint Menus
        • Edit menu
        • Textures Menu
          • Texture Baking Tools
        • Hide
        • Bake Paint menu
        • The Color Picker
      • Top Bar for the Painting
      • The Layers Panel
        • The Blending Panel
        • Layer and Clipping Masks
      • Left Tool Panel
      • Opacity & Transparency
      • Tweak tools
        • Tweak Toolset
        • Exporting from the Tweak Room
      • Stencil & Material preview panel
      • Exporting from the Painting Room
    • UV
      • UV Top Bar
      • UV Left tool panel
      • UV Preview Panel
      • UV workflow example
      • Importing Into the UV Room
      • Exporting from the UV Room
    • Retopology
      • Importing into Retopo Room
      • Retopo Mesh Menu
        • Virtual Mirror Mode
      • Bake menu
        • Autopo Baking guide
        • Baking guide
      • Top Bar
        • Select geometry
      • Left tool panel
        • Overall Purpose & Function
        • Add Geometry in the retopology room
          • Strokes tool in Retopology
        • Tweak Tools
        • UV Tools
        • Commands for Retopology room
      • AUTORETOPO
        • Autoretopology Guide
      • Poly Groups
    • Sculpt
      • Sculpt Tree
      • Sculpt Layer
      • Brush engine
      • Sculpt Brush options
      • Right mouse button menu
      • Geometry menu
      • Shader
      • Voxel mode
        • Pure Voxel Sculpting
        • Density and Resolution
        • Clay Engine
        • Right-Click Menu
        • Voxel Tools
        • Surface tools on Voxels
        • Voxel Adjustment Tools
        • Volumetric Painting
        • Transform Tools
        • Voxel Objects Tools
          • Voxel Primitives & Import Tools
      • Surface mode
        • Surface tools
        • Surface custom tools
        • Surface adjust tools
        • Surface transform tools
        • Surface Painting
        • Surface Objects Tools
          • Sculpt Primitives & Import Tools
        • Multi Level Resolution
          • Multires tools
          • Multires adjust
          • Multires commands
        • Right-Click Menu
      • Sculpt curves
        • Spline Curves
        • Splines model creation
      • Commands for Sculpt room
      • Vector Displacement
      • Live Booleans
      • Import to Sculpt Room
      • Exporting from the Sculpt Room
    • Render
      • Comparison of different roughness values
      • Render Panel Functions
      • Turntable
      • Fakebake the lighting -non PBR-
    • Factures
      • Workflow
    • Simplest
    • Modeling
      • Mesh Menu
      • Left tool panel
        • Add Geometry
        • Tweak
        • UV panel
        • Commands panel
        • Selected
        • Entire Mesh
      • Loft surface example by Fluffy
      • Blockout by Poeboi
      • Import Zbrush Polygroups for UV mapping
    • Kitbash
    • 3DPrint
    • Photogrammetry
      • How to install Reality Capture
      • Reality Capture doesn’t show up ?
    • Nurbs
    • Nodes
      • Sculpt shader Nodes Library
  • Scripting & Core API
    • Scripting
    • Core API
    • Python API
  • Free 3DCoatPrint

Symmetry

1364 views 1

Written by Carlos
September 19, 2022
by Anton Tenitsky

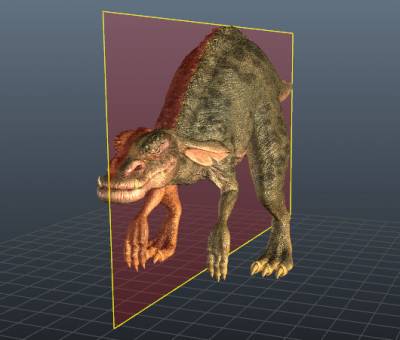
Many organic and man-made objects are constructed to be symmetrical across one or more axes. 3DCoat lets you create and arrange items with this kind of symmetry. This dialog can be invoked in any Workspace where symmetrical functions operate by pressing the “S” key.

Symmetry in 3DCoat is used for drawing, sculpting, or retopologizing objects symmetrically. For quick access, press the “S” key. By default, symmetry is not activated.
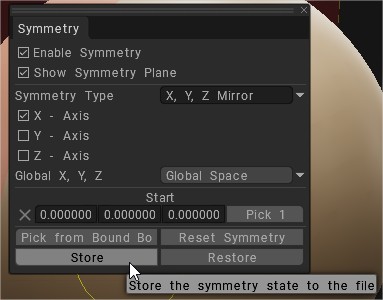
Toggle Symmetry on and off, set the symmetry plane to be active for any of the three axes, reset the location of the Symmetry planes, hide the visual display and lock the position of the active plane position to avoid accidentally moving it with these options.

Enable Symmetry: Toggles Symmetry on/off.
Show Symmetry Plane: Toggles only the visibility of the symmetry plane.

Symmetry Type


Mirror: Paint, Sculpt or Retopologize across a plane or multiple planes.
Radial Symmetry: Paint, Sculpt or Retopologize radially with as many radial slices as needed. Can create radially and across a symmetry plane simultaneously for more complex procedures if needed. Creates radial objects before the mirrored symmetry.

Radial Mirror: Paint, Sculpt, or Retopologize across a symmetry plane. A hybrid of Mirror and Radial modes. Creates the radial objects after the mirrored symmetry plane.
Translation: It allows for the painting/creating of periodical structures in space and tiled textures. The tiles from the splash screen are good when you use only color. They cause artifacts as soon as you try to sculpt. The translation symmetry method above is perfect for sculpting to export depth. No artifacts…

Translation symmetry

Important thing not shown in the video is that you need to create box primitive with a bit larger dimensions than your bake, like 120x120x5, in surface mode, before enabling translation symmetry with 100×100 offsets. So you can sculpt across tile boundaries without artifacts.

And usage of Layers: always create new layer in Layers panel before starting, so you can use Erase SL brush, and revert back to clean box just by deleting SL layer.

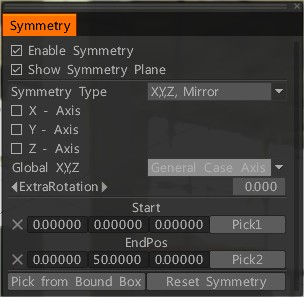
X,Y, Z Toggles: Toggles the respective plane on/off for symmetry.
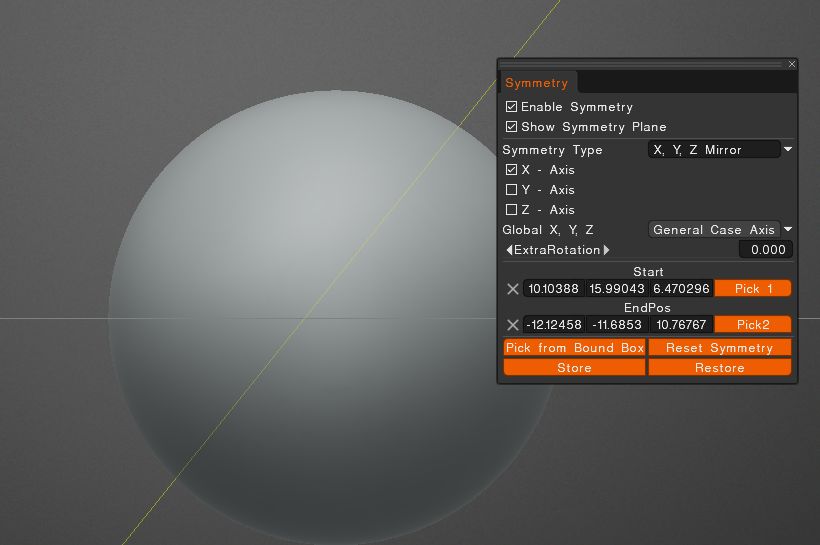
Global X,Y,Z: Allows you to specify what the global center is for the symmetry plane, which can be either true Global Space, Local Space (to the Objects center) or General Case Axis, which is a customizable center.

To mirror an object around another select specific axis or reset symmetry and pick new point of its center. Then if you are ok with it, go to geometry/ symmetry copy.
It will make a symmetrical new object within the selected existing one.

Pick from Bound Box: pick symmetry values from volume bound box location.
Store: let you to store the current symmetry state.

Virtual Symmetry (Retopo Room)


An additional mode of symmetry for the Retopo Room allows you to create virtual symmetry so you can see what your Retopo Object will look like symmetrically. A “real” workable mesh can also be created from virtual symmetry, but also be aware that if you already have a symmetrical Retopo Object, turning on Virtual Symmetry will effectively “double-up” on the number of polygons visible, even if the geometry is virtual.

Also note that if your mesh has symmetrical geometry in the Retopo Room, turning Symmetry Mode on will create actual, editable geometry on top of the already existing geometry. So avoid using symmetry with that kind of mesh in the Retopo Room.

Tutorials


Local Symmetry: This video demonstrates how to quickly apply Symmetry Locally in 3DCoat.

Quick Tip: Local Symmetry: Quick tip about using symmetry on a model that may not be lined up at the origin of the grid centered on Global Space.

Quick Tip: Local Symmetrical Copy.

Symmetry for Non-Symmetrical objects 3DCoat.

Local Symmetry Copying: This video demonstrates a few tools and techniques for copying a local portion of a model across the Symmetry plane rather than the entire side of the model.

Radial Symmetry: This video demonstrates many of the new Symmetry Options added after the 4.1 release….including Radial Symmetry and Radial Mirror.

Examples


Working with Symmetry (Voxel Room): This video begins a demonstration and explanation of using Symmetry in 3DCoat. It covers the Voxel Room, and the follow-on videos will cover other workspaces and their unique Symmetry options/tools.

Working w/ Symmetry (Retopo/UVs): This video continues the Introduction to working with Symmetry; focusing on the Retopo Room and UVs).

Working in Symmetry (Paint Room): This video concludes the introduction to working with symmetry in 3DCoat, by demonstrating some unique Symmetry tools in the Paint Room.

Tags:symmetry

Was this helpful?

1 Yes  No
Related Articles
  • 3DPrint
  • Nodes
  • Create brushes based on Curves
  • Right-Click Menu
  • Baking guide
  • Autopo Baking guide
Previously
View
Up Next
Textures

On This Page: [hide]

Symmetry Type

Virtual Symmetry (Retopo Room)

Tutorials

Examples

AI:
Hi! How can I help you?
Attention: This is a beta version of AI chat. Some answers may be wrong. See full version of AI chat