 中文 (台灣)
  English
 Українська
 Español
 Deutsch
 Français
 日本語
日本語 Русский
 한국어
한국어 Polski
 中文 (中国)
 Português
 Italiano
 Suomi
Suomi Svenska
 Dansk
Dansk Slovenčina
 Türkçe
 Nederlands
 Magyar
 ไทย
ไทย हिन्दी
 Ελληνικά
 Tiếng Việt
 Lietuviškai
 Latviešu valoda
 Eesti
Eesti Čeština
 Română
 Norsk Bokmål
此功能仅在表面模式下有效,因此您需要切换到表面模式,您可以看到工具栏中出现了新按钮。
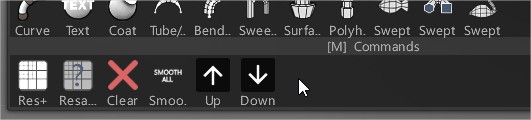
向上使用多分辨率逐步向上,如果位于最高层,则添加新的细分层。
DOWN使用多分辨率(如果存在)逐步向下。
如果我们单击其中之一, 3DCoat就会为我们提供打开多分辨率面板的功能。
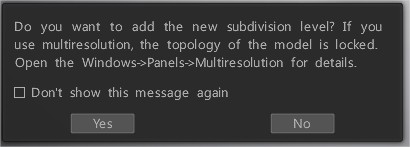
如果我们单击“是”,则会打开多分辨率面板,您也可以在 Windows 菜单 > 面板选项卡中找到该面板。
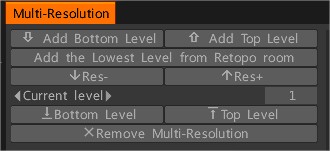
因此,在此面板上,我们看到向上和向下的箭头(添加底部/顶部级别),使用这些箭头我们可以添加分辨率级别。
我们可以看到面板中间出现的图标和面板底部出现的箭头。
使用这些箭头切换创建的分辨率级别,低于当前级别值,我们可以使用下部箭头从最低级别切换到最高级别,反之亦然。

但最有趣的是,如果你在最高级别创建任何复杂的细节,然后返回最低级别,然后再次返回最高级别,即使你在较低级别使模型变形,我也可以保留复杂的细节,所以还是不要丢失小细节。
我们还可以在retopo室或建模室中创建低多边形网格,并将其用作多分辨率上的最低级别,但不建议网格太低多边形。

现在我们需要从Retopo房间中按添加最低级别,我们可以看到最低级别现在是我们在多边形建模中创建的级别。
添加底部级别:设置底部/最低多分辨率级别(通过抽取 2x)。
添加顶级:添加顶级多分辨率级别(通过循环细分)。
从Retopo房间添加最低级别:使用当前可见的retopo网格作为最低多分辨率级别。与当前网格相比,不建议使用太低的多边形网格,因为网格是线性插值的,因此变形可能会导致不必要的锐边。
Res-:下台(如果可能)。
Res+:多分辨率升级。如果您达到最高的多分辨率级别,它不会添加新级别。
当前级别:切换到任意已创建的级别。
底部级别:转到最低的多分辨率级别。
顶级:转到顶级多分辨率级别。
删除多分辨率:删除多分辨率数据以便能够更改模型的拓扑。
如果您检查“首选项”>“工具”选项卡,现在可以看到默认情况下禁用旧的缓存/代理模式方法。
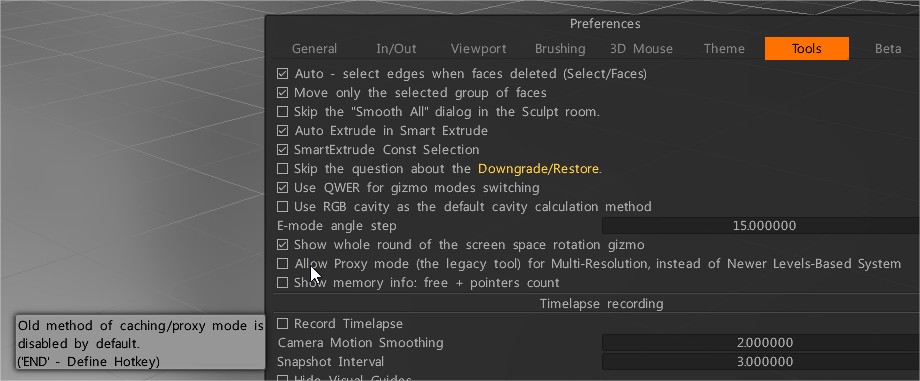
如果将其打开,则它允许使用代理模式(旧工具)进行多分辨率,而不是较新的基于多级的系统(通过循环细分)。
循环和 Catmull-Clark 细分算法
循环细分规则基于控制网格中的三角形面;具有三个以上顶点的面在开始时被三角化。在每个细分步骤中,所有面都分为四个子面。
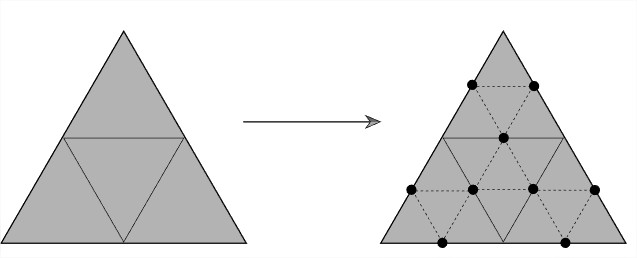
循环细分的基本细化过程。 (左)细分之前的控制网格。 (正确的)
一步细分后的新网格。通过分割每条边并将新顶点与新边连接,网格的每个三角形面已细分为四个新面。
Catmull-Clark 细分是一种平滑 3 维多边形网格表面的方法,方法是将表面的多边形划分为更小的多边形,并根据相邻顶点重新定位先前的顶点。
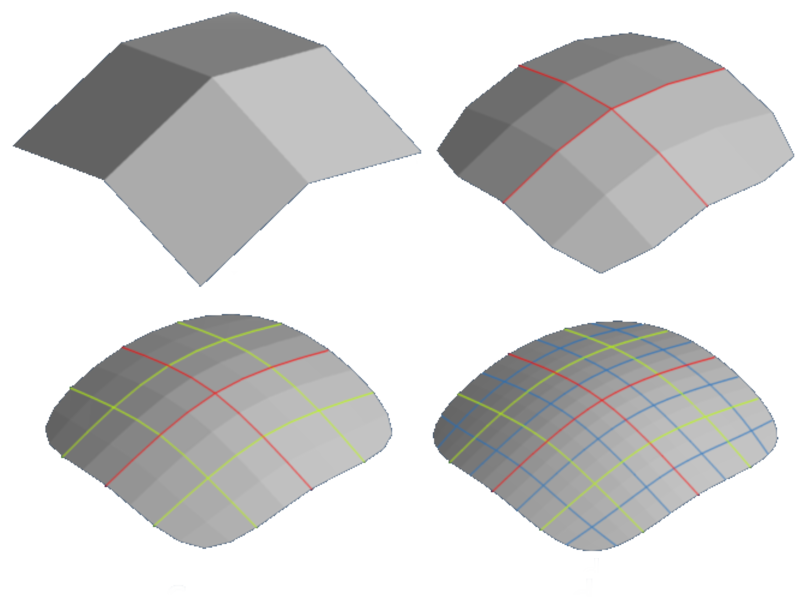
该方法采用网格中包含的每个原始多边形,并将该多边形划分为四边形,根据平均值构造新的顶点,并根据周围环境调整原始多边形的先前顶点。