3DCoat has a very intuitive and comprehensive set of controls and keyboard shortcuts to help you handle your workspace and 3D scenes.
We`ve tried to integrate the most common navigation conventions used in the most common 3D applications and created ways to adapt them to almost anything.
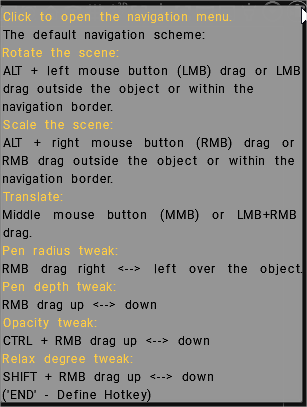
Common to all rooms are the standard methods for displaying your scene and individual models in 3D Viewport. If you hold down the ALT/OPTION key in the 3D viewport and then drag the LMB, the camera rotates around the scene. If you hold down the SHIFT key, the camera will snap to the next box level.
If you hold down the ALT/OPTION key, click and hold it, and then drag the RMB, the view is enlarged or reduced depending on the direction of movement. At the same time, holding down the ALT/OPTION button and dragging the MBB, the view modes. Since nearly all input devices use “mouse” navigation as a base for defining usage:
When not engaging any of the “E” Panel tool modes, dragging in empty space in the Viewport while holding down the Left mouse button will rotate the Camera (your view) around the scene.
When “E” Panel tools are being used (or some specific Voxel tools), add the “Alt/Option” key modifier to obtain the same effect. In general, when Left dragging in the Viewport does NOT rotate your view; engaging the “Alt/Option” key modifier will remedy this.
Holding down the “Shift” key will snap the view in regular rotational intervals.
Dragging in empty space in the Viewport while holding down the Right mouse button will Zoom the view, in or out, depending on the direction of movement.
Dragging in empty space in the Viewport while holding down the Middle mouse button or Scrollwheel button will Pan the view.
Camera settings (Drop-Down Menu)
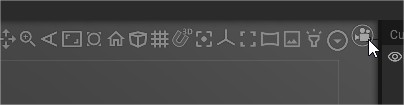
A click on the “Camera” drop-down arrow at the top right of the interface will show you some options for your camera as well as the use of presets or customizing the navigation in 3D Coat itself.
You can also create shortcuts for the camera position/rotation for later use. These camera shortcuts also save all types of 2D grid, stamp, or template position/rotation/scaling settings, making it easy to use and reuse tools with repeatable results when needed.
You can set a pivot point for your camera`s rotational navigation by pressing “F”.
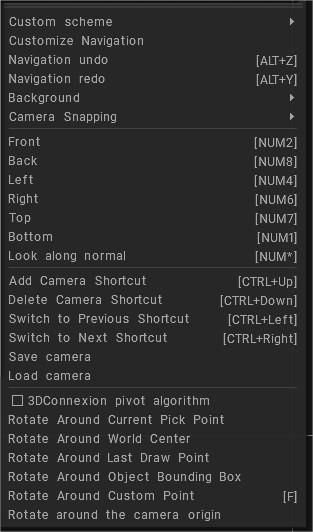
Custom scheme: Choose between styles of navigation: 3DCoat, 3DCoat arrows, Maya, or Zbrush style.
By default, the 3DCoat style is set. With the 3DCoat navigation style, you can rotate your scene by moving your mouse with LMB pressed on the empty area. In the same way, you can zoom your scene with RMB and pan with MMB. If you don’t want to move your cursor aside, you can always use ALT+LMB, RMB, or MMB to navigate the scene.
Customize navigation: Opens a panel that allows total customization of all navigation commands. You can customize navigation according to your own preferences.
Customize the background
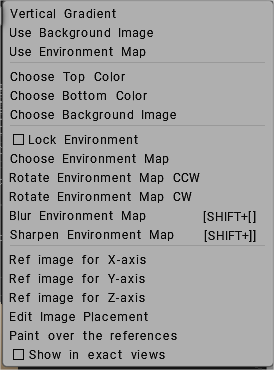
There is also a set of options to customize the background. These options are mostly self-explanatory. The ones that are not, however, are detailed below:
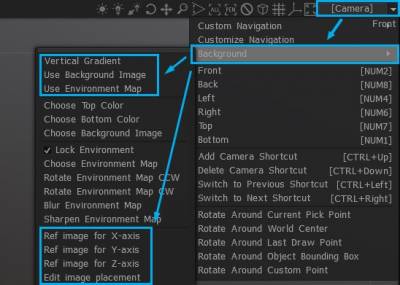
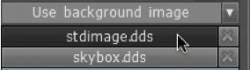
Background: A set of options that lets you set a variety of view backgrounds as visual references. The Viewport Background fills the background of the 3D viewport (and stretches to fill, if needed). Select Use background image and choose your image from the opening dialog. On Preferences the default image is a starfield.
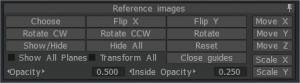
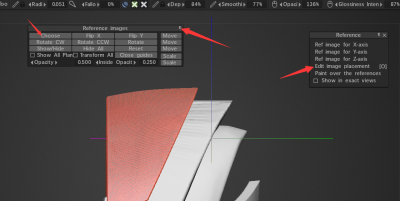
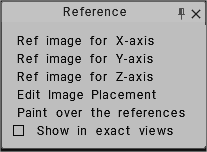
Reference Images can be used for each view axis, X, Y, and Z. You can edit image placement for each image plane on each axis with a Transform widget: the position, scaling, rotation, and view opacity.
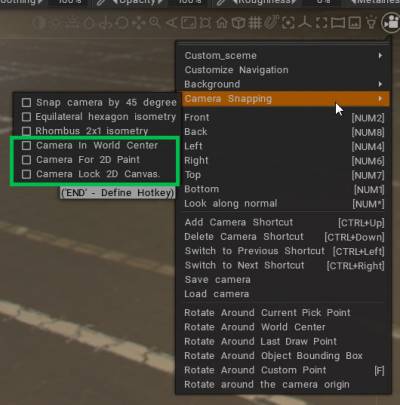
Camera Snapping: Navigation Panel Updated, new behavior. New camera snapping modes:
If you need to turn off interactive dead zones or navigation zones, point on Camera > Customize Navigation. – Turn off LMB Navigation Is In Nav Zone.
– At the very bottom uncheck Display Nav Zone and change Navi Zone Width to 0.
Pivot Points
There are a number of options to set a pivot point for scene rotation. Choose what is most suitable for you. You can specify a pivot point for your camera’s rotational navigation (world center, pick point, etc.).
Rotate Around…: These commands set the pivot point for the view camera.
Store camera positions
The other choices let you delete and switch these stored camera positions.
Add camera shortcut: The information about the camera position and current material placement will be stored. It can be used for frame sequence rendering.
Delete camera shortcut: Delete the last used or added shortcut.
Switch to the previous shortcut: Switch to the previous camera and material shortcut.
Switch to next shortcut: Switch to the next camera and material shortcut.
Background Images
There are two different kinds of Backgrounds: those which simply fill the background of the 3D viewport (and stretch to fill, if needed) and those that are set up manually for use as sculpting or painting reference images.
Viewport Background: Select Use background image and choose your image from the opening dialog. The default image is a starfield.
Or if you’d like to assign an image to the background of the interface, you can assign one from your hard drive. Open the top menu, and open Edit→Preferences. Scroll down, locate the Background type option, and click the drop-down arrow to select the Use Background image.
By default, you will see a backdrop that looks like a star field. You can, of course, choose your own file by clicking in the file requester field.
Viewport Reference Images
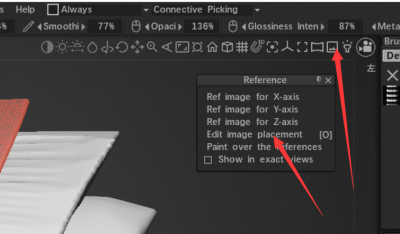
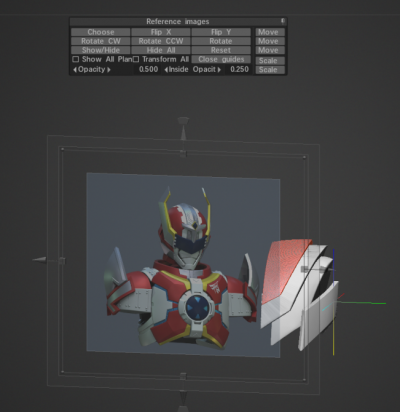
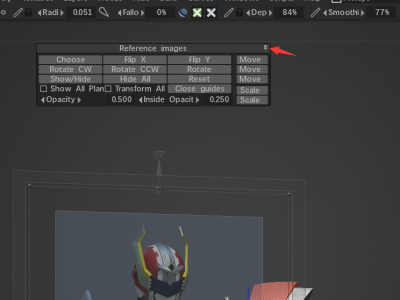
Sometimes you’ll need to create a model that needs to conform to exact specifications. This is where placing these types of reference images comes in handy. The Reference Images can be placed on any axis of your choosing X, Y, or Z. You can even assign a different image to each axis so you can have a view of your artwork no matter which axis you happen to work from. Click on the arrow next to the Camera controls, then select Background→Choose Ref Image.
Once you click the menu, you’ll then navigate your hard drive for an image to use along the Z-axis. The image you select will appear in 3DCoat’s main window. Also, a pop-up menu with positioning and scaling tools will appear. Use the tools along your image or the Reference images pop-up menu to resize, reposition or show and hide the image. You can even change the opacity of the image, so it’s easier to focus on your modeling tasks.
Let’s take a look at how to assign images to any axis.
Choose Reference Images: The three bottom choices allow you to pick three separate images – 1 for each view axis, X,Y and Z. Edit image placement: When selected, this option provides each image plane on each axis with a Transform widget and accompanying dialog settings for adjusting its position, scaling, rotation and view opacity.
Using Reference Images: This video demonstrates the usage of reference images. Either as Image Planes in the viewport or usage of the Image Picker as a static reference image within the UI.
Reference & Wallpapers
The Viewer background fills the background of the 3D Viewer. Select Use background image and select your image from the dialog that opens. The default image is a star field. Reference images can be used for each view axis X, Y, and Z. You can edit the image placement for each image plane on each axis with a transform widget. You can edit the position, scaling, rotation, and opacity of the view.
When I dragged a reference image into 3DCoat, I was given some menu controls, but there doesn’t seem to be a way to get them back. So how do I adjust reference images?
* click here to hide cross gizmo.
Thanks, Nick-L-F.
Camera and Custom Navigation
Orthographic Views Hotkeys are Front, Back, Left, Right, Top, and Bottom, and Look Along Normals.
NumPad 2 Front NumPad 8 Back NumPad 4 Left NumPad 6 Right NumPad 7 Top NumPad 1 Bottom
Ctrl+Up Arrow Add Camera Shortcut Ctrl+Down Arrow Delete Camera Shortcut Ctrl+Left arrow Switch to the previous shortcut Ctrl+Right arrow Switch to the next shortcut
Customize your 3DCoat experience
You can assign single and multi-button shortcuts to almost any 3DCoat function or tool directly in the user interface. Simply press the END key while moving the mouse over any element, followed by the keyboard shortcut of your choice.
If you find that you are using rare or never specific, unclear features of the application, select Customize User Interface from the Edit menu and disable any items you no longer want to be displayed in the user interface to avoid unwanted clutter.
You can both set up navigation and set up a modifier key together with the scroll wheel to change many features, such as brush size or orientation.
Use the Edit > Preferences > Theme option to customize the color scheme and appearance of the entire 3DCoat interface.
Quick Tip: Camera Rotation Centers: This Quick Tip video demonstrates the 2 Camera Rotation Centers that the 3DCoat user will want to be aware of, as they are most beneficial in certain scenarios.
HDR Environment Map Options: This video covers a number of new options for previewing and utilizing an HDR environment map within a scene for both lighting and the background.
 English
  Українська
 Español
 Deutsch
 Français
 日本語
日本語 Русский
 한국어
한국어 Polski
 中文 (中国)
 Português
 Italiano
 Suomi
Suomi Svenska
 中文 (台灣)
 Dansk
Dansk Slovenčina
 Türkçe
 Nederlands
 Magyar
 ไทย
ไทย हिन्दी
 Ελληνικά
 Tiếng Việt
 Lietuviškai
 Latviešu valoda
 Eesti
Eesti Čeština
 Română
 Norsk Bokmål

