中文 (台灣)
  English
 Українська
 Español
 Deutsch
 Français
 日本語
日本語 Русский
 한국어
한국어 Polski
 中文 (中国)
 Português
 Italiano
 Suomi
Suomi Svenska
 Dansk
Dansk Slovenčina
 Türkçe
 Nederlands
 Magyar
 ไทย
ไทย हिन्दी
 Ελληνικά
 Tiếng Việt
 Lietuviškai
 Latviešu valoda
 Eesti
Eesti Čeština
 Română
 Norsk Bokmål
3DCoat有一个用于重新拓扑网格的图层系统。这使得使用问题区域重新拓扑网格和拥有同一对象的多个重新拓扑版本变得更加容易。与 3dcoat 中的所有其他图层选项卡非常相似,它们的功能类似于Photoshop中的图层。您可以单击并拖动图层以重新排序它们,将它们拖动到垃圾桶图标以删除它们,使用可见性图标隐藏和显示它们等。
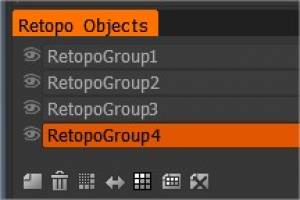
您可以在Retopo Room 中创建多个对象,每个对象都有其几何形状。这允许您独立于彼此重新拓扑部分或具有具有不同拓扑的同一对象的多个版本。它还可以更轻松地重新拓扑问题区域中的网格。您可以移动并拖动对象以重新排序它们,到垃圾桶图标以删除它们,使用可见性图标切换可见性等。双击Retopo对象将允许您重命名它。让我们看一下 Poly Groups 面板:
图层:如您在屏幕截图中所见,如果您愿意,可以有多个图层进行重新拓扑。它们可以通过拖放重新排序;如果您不再需要它们,可以将它们拖到垃圾桶中。双击层将允许您重命名它。
可见性:每个层都有其可见性图标,允许您打开或关闭它们。
选项卡底部也有图标,它们是:
新建层:创建一个新层。
垃圾桶:删除所选图层。
细分:这可以让您细分整个选定的图层。
对称副本:制作图层的对称副本。应为此命令启用对称。
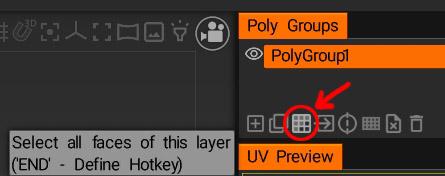
选择:选择该层的所有面。
移动:将选定的面移动到当前层。
清除:从当前图层中删除所有多边形。
背面看起来比模型的其余部分更暗。你知道有什么方法可以修复单面多边形并使它们成为双面吗?
蓬松:与正面相比,多边形的背面看起来更暗的原因是背面处于阴影中,因为它们面向内部而不是朝向光源。
单面多边形并不是您可以“修复”的东西,因为将它们变成双面是一个过程,发生在您打算在其中使用最终模型的任何渲染器/平台(有些会支持双面,有些会’t).
更重要的是,使多边形成为双面将不允许您向两面添加纹理;多边形正面的任何纹理都将在背面出现镜像,因为两侧共享相同的UV空间。
要制作可以独立纹理两侧的双面多边形,您需要向模型添加额外的多边形。我不使用Blender ,但这里有几种方法可以通过3D Coat中的Retopo房间来完成。
首先,您需要使用“从 Paint room 获取网格”选项(请参阅上一篇文章)或仅将模型的副本importrepo room。在Retopo房间中放置模型后,使用“多边形组”面板中的“选择所有面”按钮选择所有面。
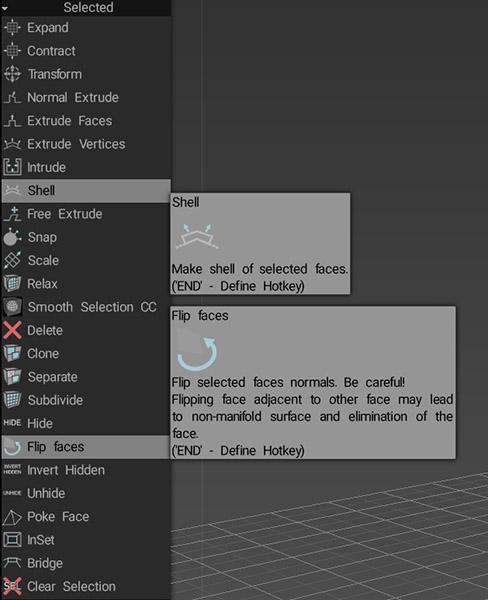
如果你想让面有体积/厚度,那么你可以使用壳工具,否则使用翻转面工具(两者都位于左侧工具面板的选定部分)
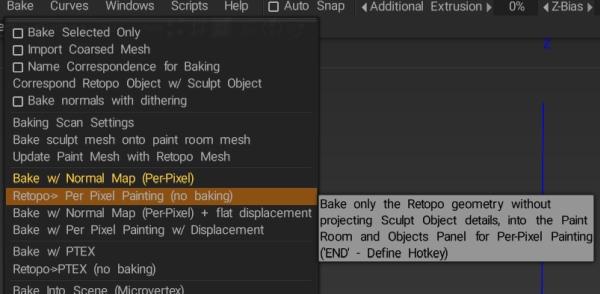
如果您使用Shell工具,那么您需要对新创建的面进行UV展开,然后使用 Update Paint Mesh with Retopo Mesh 选项(参见上一篇文章)来替换 Paint room 中的原始模型,而如果您使用Flip Faces 工具您需要做的就是使用 Bake 菜单中的Retopo > Per Pixel Painting (无烘焙)选项(见下文)将模型的翻转版本与原始版本一起importPaint room(不要忘记重命名您的UV集,这样您就不会得到多个具有相同名称的UV集)。一旦您在 Paint 室中将模型的翻转版本与原始版本放在一起,您就可以根据要处理的面孔的哪一侧,在两个UV集之间进行交换。