 中文 (中国)
  English
 Українська
 Español
 Deutsch
 Français
 日本語
日本語 Русский
 한국어
한국어 Polski
 Português
 Italiano
 Suomi
Suomi Svenska
 中文 (台灣)
 Dansk
Dansk Slovenčina
 Türkçe
 Nederlands
 Magyar
 ไทย
ไทย हिन्दी
 Ελληνικά
 Tiếng Việt
 Lietuviškai
 Latviešu valoda
 Eesti
Eesti Čeština
 Română
 Norsk Bokmål
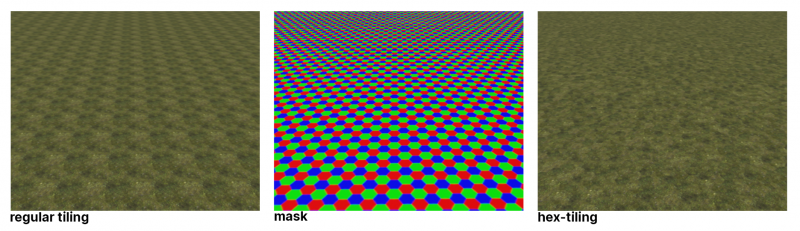
在实时图形中,使用平铺纹理来表示大表面区域是很常见的。但是,左侧的重复很明显。
使用六边形拼贴允许我们隐藏重复,但需要一个解决方案来隐藏相邻六边形拼贴之间的接缝。
这就是我们多年来在制造方面所拥有的。不是六边形,而是更不规则的图形,可以更好地杀死瓷砖。 (安德鲁)
Factures提供了一种简单而强大的方法来实现几乎无限级别的表面细节。
这是业界第一种在没有实际UV分配的情况下应用纹理的方法。它的工作原理类似于顶点绘制;但是,您使用纹理进行绘画,而不仅仅是颜色。
仅在表面模式下雕刻才支持Factures。
主要规则是您可以为每个顶点分配纹理和颜色。每一层上的每个顶点只有一个纹理。因此,如果您在当前层上的另一个纹理上绘制纹理,该纹理将被替换,而不是混合。
但是您可以使用具有不透明度的多层将许多纹理应用于每个顶点。如果相邻顶点有不同的纹理,纹理将在顶点之间混合,并且不会出现接缝。
注意道路工具:它绘制纹理条带,就像修路一样。
如果要使用条件下拉列表,首先使用计算菜单创建或更新空腔或遮挡层。
Factures是3DCoat中的大“彩蛋”。这是制作超级详细对象的一种非常强大的方法。例如,您有一个风景并且想要用草、岩石、沙子等纹理覆盖它。
当然,直接在UV网格上绘画是个坏主意;需要巨大的纹理。放置平铺纹理也是一个坏主意;平铺清晰可见,不同纹理之间的边缘也可见。 Factures是一个很好的解决方案。
它是逐顶点纹理。 UV坐标分配给顶点,纹理也分配给每个顶点;如果不同的顶点具有不同的纹理,它们将相互混合,并且不会出现接缝。
但是有几个问题:
1)Export。 Engine/3d-package 应该支持每个顶点颜色/alpha 通道以使用从 Coat 导出的 FBX。通常需要设置节点才能正确使用导出的结果。
2)还有点未完成。没有好的纹理,也没有默认的纹理库。不包括着色器。我将在下一个版本中包含着色器。
https://3dcoat.com/forum/applications/core/interface/file/attachment.php?id=20391
添加工厂,选择它。在绘画室→用刷子绘画。使用人民币购买人造房产。
您还可以将 Quixel 材质import为Factures 的顶点纹理。
左侧工具面板
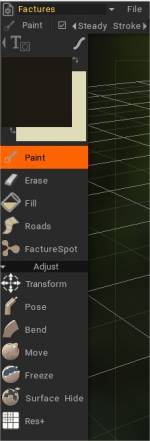
绘制:在网格上绘制VerTexture 。
擦除:擦除VerTexture。
填充:填充VerTexture。
道路: RoadsTool。
FactureSpot: Ctc_Nick hint = 在 Spot Tool 中,使用普通Brush模式,只需单击一次;否则,您会“涂抹”纹理。将Stroke模式设置为图章或图章拖动。
你也可以:
制作一个新层。使用绘画工具、套索模式绘制。
然后在 Vertexture Settings 中,激活“Apply VerTexture Interactivley”并编辑 Scale、Rotation、U 和 V Shift 以进行定位。
调整
变换:将对象作为一个整体进行变换。单击要转换的对象。
姿势:使用部分对象选择来摆出对象的姿势。
弯曲:围绕轴弯曲对象。
移动:移动表面区域。按下并拖动 LMB 以相对于屏幕视图移动光标内的表面。使用 CTRL 沿法线移动曲面。不同的 Alpha 会给出不同的结果。
冻结:冻结表面的一部分。使用 CTRL+D 清除冻结部分,使用 CTRL+SHIFT+I 反转冻结。
Surface Hide:Brush或使用Stroke Draw 模式隐藏所选 VoxTree 对象的部分。要取消隐藏,请从几何菜单中选择该选项。
Res+:增加当前物体的分辨率。
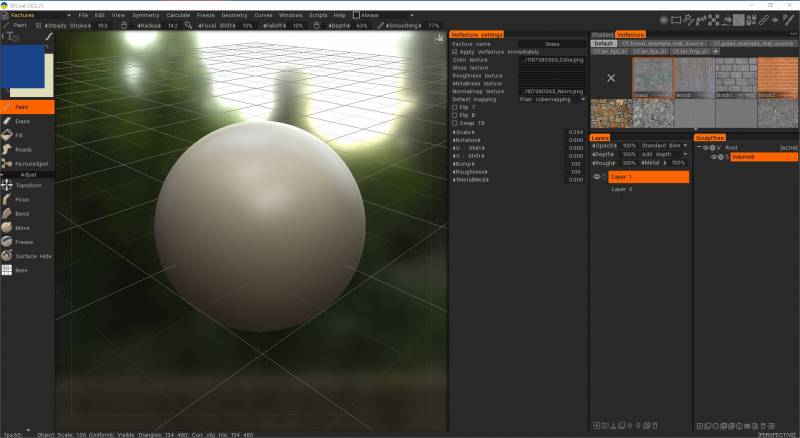
顶点材质设置
在右上角,您会看到一个箭头,按下该箭头会显示新文件夹的创建选项,用于为Factures创建不同的新类别 Vertextures 。
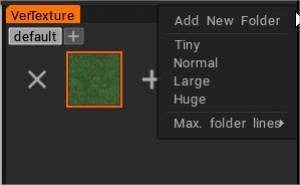
您可以创建新文件夹并定义 Vertextures 图标的可视化大小。
Vertext素材库面板
每个创建的VerTexture对应的设置都可以在 Vertexture Settings 窗口中查看和修改。
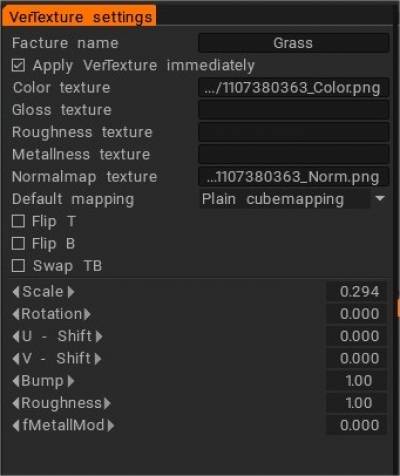
- 立即应用VerTexture :将VerTexture属性更改应用到整个当前图层
- 色彩质感
- 光泽质感
- 粗糙纹理:
- 金属质感:
- 法线贴图纹理:
默认mapping
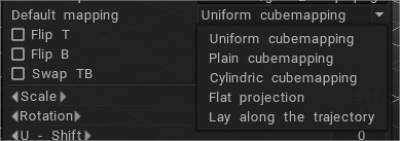
- 统一立方体mapping:统一立方体mapping允许消除由于块旋转的随机化而导致的平铺。注意纹理应该是嘈杂的并且相对均匀。
- 普通立方体mapping:没有随机化的普通立方体mapping。
- Cylindric cube mapping: 立方体mapping与顶面的低优先级。
- 平面投影:
- 沿着轨迹铺设:
Flip T:法线贴图的翻转 T 向量。
Flip B:法线贴图的翻转 B 向量。
Swap TB:交换normal map的 T & B 向量。
规模
回转
U – 移位
V – 班次
撞
粗糙度
fMetallMod