 Tiếng Việt
  English
 Українська
 Español
 Deutsch
 Français
 日本語
日本語 Русский
 한국어
한국어 Polski
 中文 (中国)
 Português
 Italiano
 Suomi
Suomi Svenska
 中文 (台灣)
 Dansk
Dansk Slovenčina
 Türkçe
 Nederlands
 Magyar
 ไทย
ไทย हिन्दी
 Ελληνικά
 Lietuviškai
 Latviešu valoda
 Eesti
Eesti Čeština
 Română
 Norsk Bokmål
Nó là một trong những công cụ mạnh mẽ nhất trong kho vũ khí voxel, vì nó cho phép bạn đặt các điểm spline trực tiếp vào cảnh của bạn bằng LMB.
Để chỉnh sửa một điểm hiện có, chỉ cần nhấp bằng LMB. Để hoàn tất chỉnh sửa một điểm, hãy nhấn phím ESC của bạn. Công cụ này cũng sử dụng một gizmo để chuyển đổi. Các mũi tên sẽ dịch chuyển, các hộp sẽ co giãn hoặc giãn ra và vòng màu trắng bên trong sẽ dịch chuyển trên tất cả các trục.
Khi sử dụng chức năng Áp dụng cho toàn bộ đường cong, sẽ có một vòng màu trắng bên ngoài cho phép xoay dựa trên khung nhìn. Ngoài các công cụ đường cong tiêu chuẩn được mô tả ở trên, hiện có bốn chế độ:
- Đùn: Điều này cho phép bạn đùn các hệ thống phân cấp mới từ điểm đường cong hiện có. Chỉ cần nhấp và giữ LMB,
sau đó kéo theo hướng bạn muốn tạo khối đùn. Giữ SHIFT sẽ mặc định ở chế độ Xoay mới. Nó cũng có thể được kích hoạt bằng phím “Q”.
- Di chuyển: Điều này cho phép bạn di chuyển các điểm của một đường cong riêng lẻ. Việc thêm phím SHIFT sẽ di chuyển hệ thống cấp bậc con hoặc cấp độ gốc của nó, tùy thuộc vào hướng mũi tên của trình thao tác. Nó cũng có thể được kích hoạt bằng phím “W”.
- Xoay: Điều này cho phép bạn xoay cấu trúc phân cấp cha hoặc con của một điểm với các phép xoay dựa trên chế độ xem. Nó cũng có thể được kích hoạt bằng phím “R”.
- Tỷ lệ: Điều này cho phép bạn chia tỷ lệ phân cấp cha hoặc con của một điểm. Nó cũng có thể được kích hoạt bằng phím “E”.
LƯU Ý: Bạn cần nhấp vào LMB để chỉnh sửa điểm và “Esc” để dừng chỉnh sửa điểm. Khi sử dụng một trong bốn chế độ chỉnh sửa mới, bạn không cần phải chọn một điểm. Chỉ cần giữ SHIFT (hoặc bật hành động Đảo ngược SHIFT) và bạn sẽ thấy các hình nón màu lục – chúng cho phép bạn chỉnh sửa điểm và thứ bậc của điểm đó. Cuối cùng, hướng bị ảnh hưởng của hệ thống phân cấp là cạnh lớn hơn của hình nón màu lục.
Những công cụ này cho phép một số thứ, bao gồm đường ống, dây chuyền, ký tự cơ bản hoặc hình dạng và cơ thể sinh vật, v.v. Dưới đây là một số thông số của công cụ này:
- Điền vào bên trong: Lấp đầy toàn bộ khoảng trống giữa tất cả các điểm để tạo một đối tượng khối đặc trong toàn bộ không gian.
- Chạy bàn chải dọc theo đường cong : Điều này cho phép bạn thụt lề hoặc nhô ra các khu vực dọc theo đường cong một cách hoàn hảo. Nó có một số tùy chọn.
tất cả đều tự giải thích; vui lòng khám phá các cài đặt này.
- Tuân thủ: Buộc các điểm trên đường cong của bạn bị ràng buộc với bề mặt của đối tượng âm lượng mà bạn kéo qua.
- Đường răng cưa: Theo mặc định, công cụ đường cong sẽ tạo ra một TCB spline trơn tru. Nhưng với tùy chọn này, bạn có thể tạo một spline tuyến tính, về cơ bản là tạo các giao điểm “nhọn”.
- Đính vào mặt phẳng đối xứng: Khi bạn nhấp vào hoặc gần mặt phẳng, nó sẽ buộc các điểm mới được tạo trên mặt phẳng đối xứng.
- Hành động chuyển số đảo ngược: Điều này chỉ ảnh hưởng đến bốn chế độ đường cong mới. Theo mặc định, trong bất kỳ chế độ nào trong số này, bạn phải
giữ SHIFT để thực hiện các chức năng thay thế của chúng. Tùy chọn này sẽ đảo ngược cài đặt này để theo mặc định, bạn sử dụng các chức năng thay thế và các phương pháp mặc định thông thường yêu cầu bạn giữ phím SHIFT.
Đùn cùng bán kính: Trong chế độ Đùn, tùy chọn này tạo một điểm mới có cùng kích thước với điểm mà bạn đã đùn từ đó. Theo mặc định, một điểm mới được tạo có kích thước bằng con trỏ bút của bạn.
- Đường cong mới: Thêm một đường cong khác vào cảnh của bạn và (các) đường cong hiện tại của bạn.
- Ống: Đặt lại đường cong về trạng thái mặc định.
- Đặt lại tỷ lệ/góc: Hai công cụ này sẽ đặt lại mọi tỷ lệ hoặc góc xoay mà bạn đã áp dụng cho đường cong đã chọn.
- Độ cứng: Để sử dụng tính năng này, bạn phải chọn một điểm trên đường cong; sau đó, bằng cách nhấn nút này, điểm đã chọn sẽ trở nên sắc và nhọn.
- Đã đóng: Đóng đường cong spline giữa điểm đầu tiên và điểm cuối cùng trên spline. Tất nhiên, bạn vẫn có thể thêm hoặc bớt điểm khi sử dụng chức năng này.
- Phím xoá:
- Xóa tất cả: Xóa tất cả các đường cong khỏi cảnh.
- Lưu/Tải: Bạn có thể lưu và tải toàn bộ bộ đường cong để sử dụng sau hoặc phân phối cho người dùng khác.
- Hồ sơ: Danh sách thả xuống này chứa một số hồ sơ, mỗi hồ sơ thay đổi hình dạng tổng thể của đường cong spline.
- Áp dụng cho toàn bộ đường cong: Với tính năng này, mọi thao tác xoay, chia tỷ lệ hoặc dịch chuyển sẽ áp dụng cho toàn bộ đường cong có tâm từ điểm đã chọn hiện tại của bạn trên đường trục. Gizmo cho điểm sẽ thay đổi, thêm một vòng tròn lớn, màu trắng mới xung quanh phần còn lại của gizmo.
Vòng kết nối mới này sẽ cho phép xoay vòng dựa trên khung nhìn.
- Cài đặt trước Spline: Công cụ này có các cài đặt khác, hy vọng là tự giải thích. Nhưng một điều bạn nên khám phá là các cài đặt trước của spline.
Những thứ này cho phép bạn thực hiện nhiều phong cách và kỹ thuật voxel sculpting độc đáo. Bạn cũng có thể thêm tệp của riêng mình bằng cách sử dụng các tệp bên ngoài ở định dạng .OBJ hoặc .LWO.
Cách tạo spline cho menu spline
Bài viết này giải thích cách chỉ định phần ‘bắt đầu-giữa-cuối’ của một spline.
Yêu cầu đối với mô hình được sử dụng trong bảng Splines
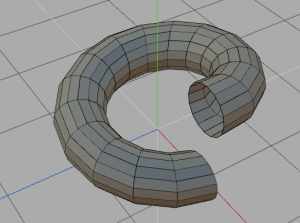
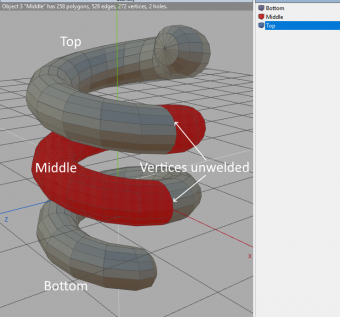
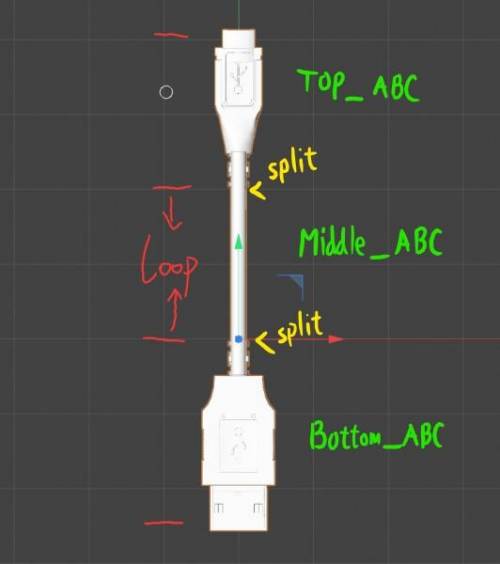
Mô hình được sử dụng liền mạch trên spline phải bao gồm 3 đối tượng, được đặt tên là Trên, Dưới và Giữa. Đối tượng ở giữa là đối tượng sẽ được xếp liên tục dọc theo đường cong. Nó có các đỉnh xấp xỉ trong phạm vi [0..1] dọc theo trục Y. Đỉnh và đáy của đối tượng Giữa phải được mở và vị trí của các đỉnh đối diện phải khác nhau chính xác một dọc theo Y. Đây là một ví dụ về đối tượng Giữa:
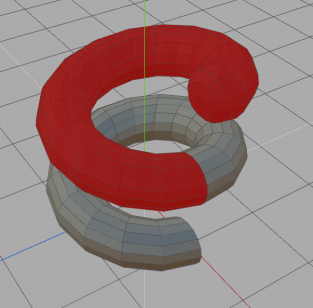
Có thể có một số đối tượng được đặt tên là “Middle_anything”. Chúng sẽ có các cạnh mở giống hệt nhau, nhưng hình học có thể khác ở giữa. 3DCoat sẽ sử dụng các đối tượng ngẫu nhiên ở giữa để đặt chúng dọc theo đường cong. Đối tượng Trên cùng được đặt chính xác trên đối tượng Ở giữa và có phạm vi tọa độ Y gần đúng [1..2]. Đối tượng này đang mở ở phía dưới; các đỉnh sẽ nhận được các giá trị giống như các đỉnh trên cùng ở giữa. Một ví dụ về đối tượng Top, được đánh dấu màu đỏ:
Đối tượng Dưới cùng được đặt chính xác bên dưới đối tượng Giữa và có phạm vi tọa độ Y gần đúng [-1..0]. Đối tượng này được mở ở trên cùng; các đỉnh sẽ nhận được các giá trị giống như các đỉnh ở giữa. Đây là một ví dụ về đối tượng Dưới cùng được đánh dấu màu đỏ:
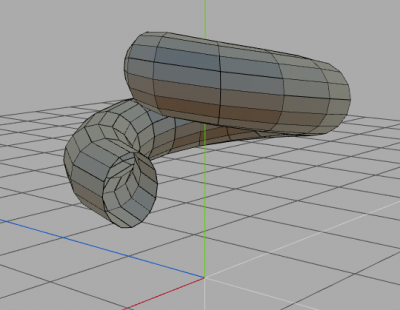
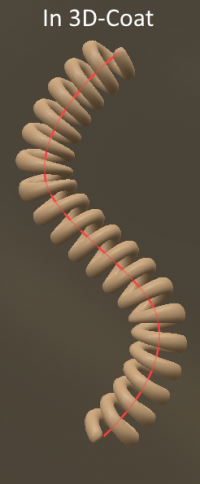
Toàn bộ đường cong sẽ được lát gạch với các phần ở giữa; phần đầu tiên là Đáy và phần cuối cùng là Trên cùng. Nếu đường cong bị đóng, chỉ các phần ở giữa sẽ được sử dụng. Các cạnh mở sẽ được hàn với các phần gần đó, vì vậy toàn bộ đối tượng sẽ được đóng lại nếu bạn thực hiện đúng mọi thứ. Vì vậy, mô hình cuối cùng trông như thế này:
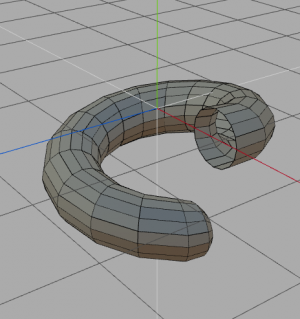
Kết quả:
Bạn đã làm nó như thế nào? Tôi chỉ có thể sử dụng một cài đặt tệp tại một thời điểm và không thể đồng thời đặt trên cùng, giữa và dưới cùng. Bạn có thể cho tôi biết giải pháp?
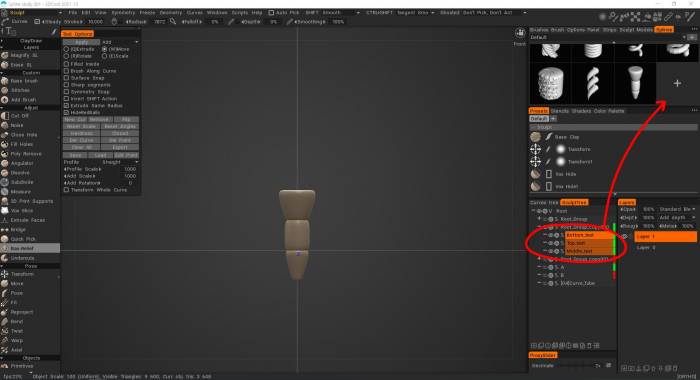
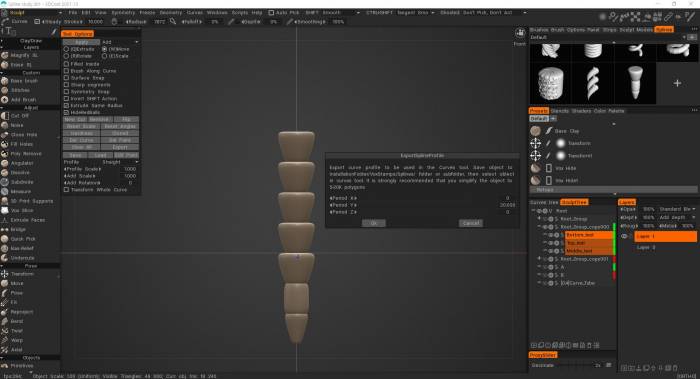
Chọn các đối tượng trên cùng/giữa/dưới cùng một lúc và kéo và thả chúng vào bảng điều khiển Splines hoặc menu RMB → Export → Lưu vào bảng điều khiển Splines.
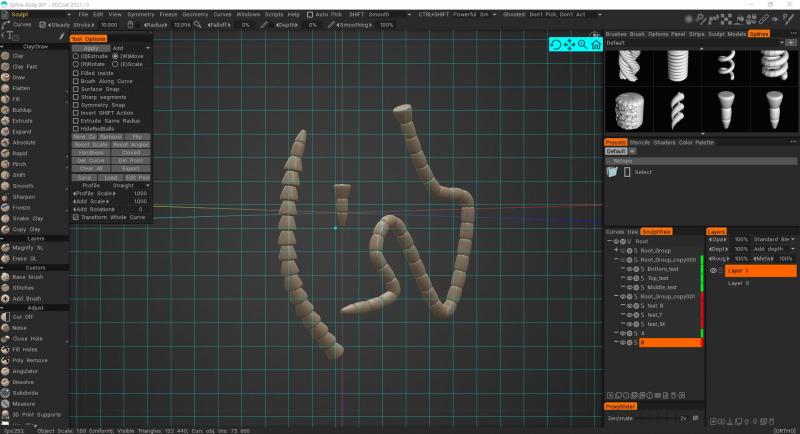
Tại thời điểm này, có vẻ như nó không được nhận dạng chính xác, nhưng nếu bạn nhấn OK sau khi điều chỉnh khoảng cách, phần ở giữa sẽ được nhận dạng chính xác.
Nếu phần giữa của mô hình không lặp lại, hãy kiểm tra những điều sau
1. Đối tượng được đặt tên như sau?
– Đứng đầu_@@@
– Ở giữa_@@@
– Đáy_@@@
2. Phần kết nối của đối tượng ‘Mở cạnh’ là gì?
– Nguyên tắc spline nói rằng phần trên-giữa-dưới phải là một cạnh mở
3. Đây chỉ là đề phòng, nhưng bạn đã đăng ký và dùng thử thay vì xem trước trong giai đoạn tạo chưa?
– Nó dường như không được lặp lại trong phần xem trước, nhưng nếu bạn thực hiện đúng các bước 1 và 2, kết quả sẽ được lặp lại ở các phần giữa bình thường.
Video hướng dẫn
Sao chép các đối tượng trên bề mặt mô hình : Video này bắt đầu trình diễn các kỹ thuật khác nhau mà người ta có thể sử dụng để tạo một đối tượng trong 3DCoat và tạo một 3D Brush alpha từ nó hoặc sao chép các phiên bản của nó dọc theo bề mặt của một đối tượng khác.
Brush dọc theo đường cong trong 3DCoat : Video này minh họa khả năng chải dọc theo đường cong, chủ yếu trong Phòng điêu khắc Voxel , sử dụng công cụ Curves. Nó cũng bao gồm việc tạo 3D Brush Alpha từ một đối tượng/tệp OBJ.