 中文 (台灣)
  English
 Українська
 Español
 Deutsch
 Français
 日本語
日本語 Русский
 한국어
한국어 Polski
 中文 (中国)
 Português
 Italiano
 Suomi
Suomi Svenska
 Dansk
Dansk Slovenčina
 Türkçe
 Nederlands
 Magyar
 ไทย
ไทย हिन्दी
 Ελληνικά
 Tiếng Việt
 Lietuviškai
 Latviešu valoda
 Eesti
Eesti Čeština
 Română
 Norsk Bokmål

GPU 加速调整模板和纹理图案(造型、纹理)。
如果您在至少一个通道中显示蒙版/材质(深度和/或颜色和/或光泽度,请参阅下面有关它们的更多详细信息),一个新面板会显示在顶部。使用 Preview Options 面板,您可以调整 Masks & Material 预览参数,如下所示:
隐藏/显示/自动:隐藏/显示/自动隐藏纹理的全屏视图。您可以使用热键“H”切换模式。
解锁/锁定:这使您可以在缩放和移动模型时自动缩放和纹理化。
Flip X:在水平轴上像镜子一样反射蒙版图像。
Flip Y:在垂直轴上像镜子一样反射蒙版图像。
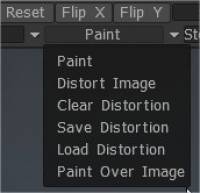
绘画:此模式可让您使用蒙版或材质进行绘画。
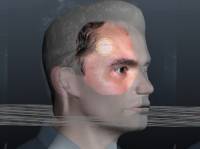
扭曲图像:在此模式下,您可以直接使用画笔扭曲蒙版或材质。您可以使用此功能做一些非常独特的纹理工作。当您的图像与网格不完全匹配时,这很棒。然后,您可以使用此工具来塑造图像以更精确地匹配网格——这样您就可以使用材质或遮罩进行绘画。正如您在图像中看到的那样,头部的下巴线、鼻子和轮廓已经用扭曲的图像特征进行了塑造。
重置:将纹理置于其初始位置。
清除/保存/加载失真:您可以使用这些选项清除、保存和加载失真。
映射方法:您可以在此处使用一些方法。
来自相机立方体贴图。在 Camera lets 中,您可以通过视口投影方法。 If the Cube Mapping application type is selected, the material preview will be displayed on the pen only, as opposed to full screen (when From camera is selected).在右侧,有一个滑块负责查看蒙版/材质时的透明度。
预览的不透明度:基于百分比的不透明度控制。添加新蒙版或材质的方式与使用画笔和条带时完全相同。
映射方法
您可以在此处使用一些方法。
From Camera:智能材质将从相机的前视轴投射到物体上。
立方体贴图:智能材质将使用立方体mapping投影到对象上。 If the “cube mapping” application type is selected, the material preview will be displayed on pen only, as opposed to full screen (when “From camera” is selected).
圆柱形:对模板/智能材料使用圆柱形mapping。按设置以获得一组丰富的圆柱mapping参数。
球形:对模板/智能材料使用球形mapping。按设置以获得一组丰富的球面mapping参数。
UV-Mapping:
预览不透明度:在右侧,有一个滑块负责查看蒙版/材质时的透明度。
绘画方法
绘画:此模式允许您使用您的材质或遮罩进行绘画。
扭曲图像:在此模式下,您可以直接使用画笔扭曲蒙版或材质。您可以使用此功能完成一些非常独特的纹理工作。当您的图像与网格不完全匹配时,它非常适合使用。
然后你可以使用这个工具来塑造它以更精确地匹配网格,这样你就可以用材质或遮罩进行绘画。正如您在图像中看到的那样,头部的下巴线、鼻子和轮廓已经用扭曲的图像特征进行了塑造。
Clear Distortion:将纹理放在初始位置。
保存/加载失真:使用这些选项,您可以清除、保存和加载失真。每一个都是不言自明的。
在图像上绘画:在图像上绘画——按“E”选择描边模式。使用 CTRL 擦除。
智能材料和模板弹出窗口
当激活其中一个材料模板或同时激活两者时,您将在屏幕上看到一个新面板。该面板包含智能材质和模板的所有可编辑功能。现在让我们看看那些。
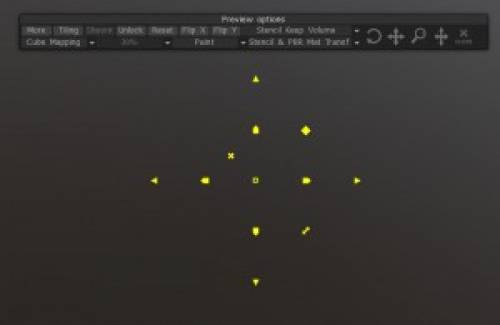
更多/更少:显示/隐藏更多用于控制智能材料或模板的选项。允许您对智能材料或模板执行各种颜色、光线等调整。
平铺:打开/关闭材质或模板的平铺。
显示/隐藏/自动:切换智能材质或模板的可见性。
解锁/锁定:锁定/解锁智能材质或模板的可编辑功能。
重置:将所有可编辑参数重置为其默认状态。
FlipX/Y:翻转智能材质或模板的 X 轴或 Y 轴。
投影类型
在不同的投影类型之间切换。您可以使用来自相机、立方体mapping、柱面mapping和球面mapping的项目。每种mapping类型也有其选项。
模式:您可以更改材质或模板所处的模式。这些模式是:
绘画:通过使用材质、模板或两者进行绘画。
扭曲图像:使用基于笔刷的移动工具扭曲智能材质、模板或两者的图像。
Clear/Save/Load Distortion:使用您对材质或模板所做的任何扭曲执行选定的操作。
Paint Over Image:允许您在智能材质或模板上使用 3DCoats 绘画工具。
变换 Gizmo
允许您通过移动、旋转和缩放来变换智能材质或模板。您也可以挤压/拉伸。
还有一个更直观的 Transform Gizmo,可直接在 3D 视口中工作。激活材质或模板(以及 2D 网格)时,智能材质或模板的中心会出现一个黄色圆圈。
RMB 单击黄色圆圈将为变换 Gizmo 调出更多控制图标。
您可以直接从这个 Gizmo 以更直观的方式移动、旋转和缩放,还可以对齐 Gizmo 的中心以获得更高级的绘画和雕刻技术。
教程
立方体贴图增强设置:该视频演示了 3DCoat 使用立方体贴图投影类型和智能材料或模板实现三平面贴图。
2D Gizmo :该视频演示了新的 2D Gizmo 在3DCoat V4 中的用法。在操作 2D 网格、材质或蒙版叠加层时,它允许更多选项和更高的精度。 3DCoat还将在创建相机快捷方式时存储更改。