 English
  Українська
 Español
 Deutsch
 Français
 日本語
日本語 Русский
 한국어
한국어 Polski
 中文 (中国)
 Português
 Italiano
 Suomi
Suomi Svenska
 中文 (台灣)
 Dansk
Dansk Slovenčina
 Türkçe
 Nederlands
 Magyar
 ไทย
ไทย हिन्दी
 Ελληνικά
 Tiếng Việt
 Lietuviškai
 Latviešu valoda
 Eesti
Eesti Čeština
 Română
 Norsk Bokmål
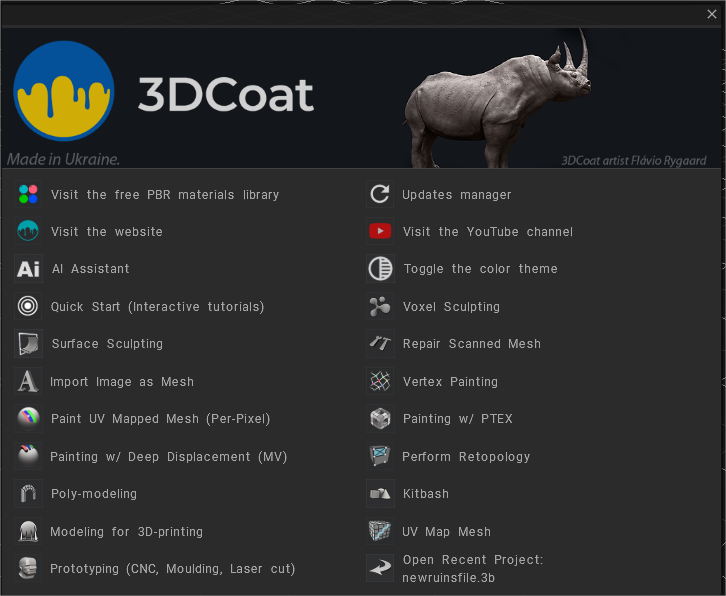
When you first launch 3Dcoat, you are presented with an opening dialog that attempts to categorize and anticipate what you would like to do with the program (if it is closed, use Shift+M to open it again).
We’ll explain and clarify the purpose of each of these options.
Splash Screen, UI & Navigation
Visit the PBR library
The team behind 3DCoat is excited to present our library of scanned PBR-ready Smart Materials.
Updates manager
Auto-incremental-updater! “Help→Updates manager” allows getting new updates without the full installer downloading. Only changed files will be downloaded. All versions are installed to the same folder, 3DCoat-2021, versions may be easily and quickly switched if needed. As soon as a new update appears, the message will notify you after opening the 3DCoat.
After the first call, AutoUpdater creates the link in StartMenu. So you will be able to use AutoUpdater even after switching to versions when it was not supported. In this case, you may call it from the start menu instead of Help→Updates manager.
In preferences, you may tell to be notified only about stable updates. And you may turn off notifications if needed.
Visit the website
Visit the Youtube channel
Start the interactive tutorials. Quick Start Training Missions are available from the splash screen in 3DCoat, as well as some other options for new users to get up and running.
AI Assistant
AI assistant is 3DCoat’s specialized Chat GPT.
Toggle the color theme
Press the icon to toggle UI color scheme.
Quick Start
This option open the Interactive tutorials.
Voxel Sculpting
Start sculpting within 3DCoat using some default shapes or choose to open an .obj file which will serve as a “base” that will be “Voxelized” at a resolution that you can determine by resizing the object preview with a “Gizmo.”
Surface Sculpting
Use this Import dialog to select a “base mesh” to be extensively altered using 3DCoat’s large arsenal of surface-based and Live-Clay tools (dynamic tessellation).
Suppose you wish to Export a version of your sculpture that will be rendered or animated in a 3rd party application. In that case, you will first need to create an organized topology within the Retopo Room – and if you wish to texture this model before exporting, you will need to create “UV Seams” and “Unwrap” your topology into a resulting UV Map – followed by “Baking” your “Retopo Groups” into the Paint Room.
Repair Scanned Mesh
Use these options for (high-res) meshes that are a product of being scanned.
Import as voxels: Very straightforward translation of a polygonal surface scan into a volume-based Voxel object. Depending on your choice, 3DCoat will attempt to close small or all holes in the scan before “Importing” into the Voxel Room for further clean-up and modification.
Import as shell: The same as above, except the result, as it appears in the Voxel Room, is a “hollow” object with designated “thickness.”
Import as surface: Delivers your mesh directly into “Surface Mode”, where the array of tools is optimal for cleaning up messy scanned meshes.
Import as bas-relief: Import your mesh into the Sculpt Room as an initial “Bas-Relief” sculpture.
3D Scan Cleanup: This video begins the demonstration of cleaning up a 3D Scan.
Import Image as Mesh
Provides a comprehensive set of options for importing your model into Paint Room, making it ready for Vertex Painting.
The options provided in the opening dialog allow for some preliminary texturing using image maps as a basis for final Bump, Stencil, and Color texture maps (available for export and use within 3rd party applications).
Heightmap landscape for game engines: This tutorial shows how to create a mesh from a black and white height map & color texture if you have it, retopo it and paint on textures, colors and, fine bump details, etc. By Psionic Games.
Vertex Painting
Load a mesh that you wish to apply “Vertex Color” as a starting point.
Great for when you want to paint a medium/high polygonal mesh without UV mapping it. Conceptualizing your colors and Gloss maps. The Vertex Maps can be exported as such with the mesh or baked to an image map if you choose.
If you import the mesh for the vertex painting and it has textures, all of them will be applied to the mesh (color, gloss, metal, displacement)
Paint UV Mapped Mesh (Per-Pixel)
Open and Import your existing mesh into the Paint Room for texturing operations using the “Per-Pixel” method.
Ideal for low poly game assets but not limited to these.
Use models with existing UV information or import, allowing 3DCoat to automatically UV Map your mesh.
An existing “Normal Map” can be used as a base for texturing.
Paint With Ptex
Merge a model from a selection of default meshes or use a model of your choice for texturing using the Ptex method.
Ptex allows for texturing using an optimal distribution of surface space, thus creating a very different kind of UV Map. This kind of map, though capable of being translated and communicated to 3rd party applications (UV Maps can be correctly read), cannot be practically edited in a traditional “Paint” application as other kinds of UV Maps allow.
Paint with Deep Displacement (Micro-vertex)
Choose to “Import” a mesh selecting the Initial Subdivision option for Painting and Texturing using the “Micro-Vertex” method.
This method allows you to define a Viewport Mesh that is a subdivided version of your imported base mesh.
Painting operations automatically produce “real” displacement if the “Depth” icon is enabled and View > Show Displaced Mesh is switched ON.
Upon Export of your textured Viewport Mesh, you can also save its corresponding Displacement Map (ordinary or vector).
You also have the choice to export only the base mesh (as it was before adjusting its Viewport Density) or the same mesh at some other subdivided density.
Perform Retopology
Import your mesh directly into the Retopo Workspace for the purposes of adjusting existing topology or creating a new version with all new topology.
The Retopo Workspace also provides the tools for creating UV Seams and temporary UV Maps, as well as laying out new topology.
The work which you perform in the Retopo Workspace becomes “permanent” at that time when you “Bake” the “Retopo Groups” into the Paint Workspace for texturing operations.
Once made permanent, you can perform extensive adjustments to your UV Maps within the UV Workspace using its deep mapping and layout tools.
Poly Modelling
New Modeling Room with a classic low-poly modeling toolset was added.
New paradigm introduced: Start with the Fast Low-poly modeling for the base form, then make a Sculpt Mesh with Subdivision and add details in the Sculpt room:
The Modeling workspace is merely an extension of the Retopo Workspace, which already had a lot of poly modeling tools, so the user could do a fair amount of modeling within 3DCoat if they wanted to.
KitBash
Use this workspace to join parts that can be attached and linked with each other, like ‘lego’:
A new library of Splines was added: Splines is a set of flexible objects that can be stretched with the Curves or Snake tool.
Modeling for 3D-printing
Open and correct the existing model or create a new one from scratch. Pay notice that in the printing mode, the scene is Z-up. If you want to change it later, you can do so in Edit→Preferences.
You can use our Free product 3DCoat Print
– 3D-printing friendly mode in the start thumbnail.
UV Map Mesh
Import your mesh directly into the UV Workspace, Tweak Workspace, Objects Panel, and Paint Workspace simultaneously.
You can choose to re-organize existing UV Maps, create new UV Maps, “Tweak” existing geometry and begin texturing your imported mesh with this option.
Product Prototyping (CNC, Moulding, Lasercut)
Use height-map imagery to construct a Voxel object, remove undercuts from an imported mesh, close holes in an imported mesh, “Import” your base mesh into the Sculpt Workspace as a “Bas-Relief” sculpture or prepare your “Imported” mesh for laser cutting operations with this set of options.
Open Recent Project
Choose this option to open the listed “recent” project that you have worked upon.
Tutorials
Mannequin Model Preset: This video covers the usage of the new Mannequin Model preset in 3DCoat (available in the build following the current 3.7.12E) and its subcomponents accessible in the Models Pallet.
Old Splash Screen Options This video begins a series demonstrating the ability to start straight away on specific tasks through the Splash Screen. The items covered or touched on in this video are:
1) Voxel Sculpting or Surface Mode Sculpting…what’s the difference, and what is a Voxel, anyway?
2) LiveClay: just a brief explanation and demonstration.