 Ελληνικά
  English
 Українська
 Español
 Deutsch
 Français
 日本語
日本語 Русский
 한국어
한국어 Polski
 中文 (中国)
 Português
 Italiano
 Suomi
Suomi Svenska
 中文 (台灣)
 Dansk
Dansk Slovenčina
 Türkçe
 Nederlands
 Magyar
 ไทย
ไทย हिन्दी
 Tiếng Việt
 Lietuviškai
 Latviešu valoda
 Eesti
Eesti Čeština
 Română
 Norsk Bokmål
Η μηχανική των πλήκτρων πρόσβασης βελτιώθηκε. τώρα, εάν το κλειδί έχει εκχωρηθεί σε κάποια ενέργεια μέσα στο εργαλείο, η ίδια ενέργεια σε άλλο εργαλείο θα αντιδράσει στο πλήκτρο πρόσβασης. Είναι σημαντικό εάν θέλετε να αντιστοιχίσετε κλειδιά σε κάποια κοινή λειτουργία όπως το “Act as vox hide” ή κάποια άλλη κοινή επιλογή.
Προσθήκη συντομεύσεων πληκτρολογίου (πλήκτρα πρόσβασης)
Ο ορισμός ενός πλήκτρου πρόσβασης είναι πραγματικά πολύ απλός. Το μόνο που χρειάζεται να κάνετε είναι να στρέψετε τον κέρσορα του ποντικιού σας πάνω από το στοιχείο για το οποίο θέλετε να ορίσετε ένα πλήκτρο πρόσβασης και, στη συνέχεια, να πατήσετε το πλήκτρο ΤΕΛΟΣ, θα δείτε στη συνέχεια την ακόλουθη προτροπή.

Τώρα μπορείτε να πατήσετε το πλήκτρο που θέλετε να αντιστοιχίσετε στη λειτουργία. Λάβετε υπόψη ότι σχεδόν κάθε κουμπί ή στοιχείο μενού που βλέπετε στο 3DCoat έχει ένα προσαρμοσμένο πλήκτρο πρόσβασης. Επίσης, εάν ένα πλήκτρο πρόσβασης έχει ήδη ληφθεί, δεν είναι πρόβλημα να προχωρήσετε και να εκχωρήσετε ξανά το κλειδί σε ό,τι θέλετε.
Χρησιμοποιήστε το backspace για να διαγράψετε το πλήκτρο πρόσβασης.
Πλήκτρα συντόμευσης και αυτοκόλλητα πλήκτρα:
Μπορείτε να ορίσετε ένα πλήκτρο πρόσβασης σε σχεδόν οποιοδήποτε εργαλείο/ενέργεια που μπορείτε να εκτελέσετε μέσω της διεπαφής χρήστη. Για να ορίσετε ένα πλήκτρο πρόσβασης, τοποθετήστε το δείκτη του ποντικιού πάνω από το απαιτούμενο εργαλείο/ενέργεια και πατήστε το πλήκτρο «END». Στη συνέχεια, πατήστε τον απαιτούμενο συνδυασμό πλήκτρων. Τα κλειδιά μπορούν να καθοριστούν για το τρέχον δωμάτιο ή ακόμα και ένα εργαλείο.
Ένα κλειδί μπορεί να αντιστοιχιστεί σε πολλαπλές ενέργειες ή εργαλεία ταυτόχρονα (που ονομάζονται "Σωρευμένα κλειδιά"). Τα Stacked Keys σάς επιτρέπουν να περιηγηθείτε σε πολλά εργαλεία με ένα μόνο πλήκτρο πρόσβασης. Εάν έχετε ορίσει μια μεμονωμένη ενέργεια, εργαλείο ή προεπιλογή σε ένα κλειδί, τότε μπορείτε να χρησιμοποιήσετε τα Sticky Keys. Πατώντας το πλήκτρο θα ενεργοποιηθεί το εργαλείο και αν συνεχίσετε να το κρατάτε και μετά αφήστε το, θα ενεργοποιήσει το προηγούμενο εργαλείο. Με αυτόν τον τρόπο μπορείτε να ενεργοποιήσετε προσωρινά κάποιο εργαλείο όπως το freeze για παράδειγμα. Με τα Sticky Keys, εάν ενεργοποιήσετε το εργαλείο μέσω του πλήκτρου πρόσβασης και πατήσετε ξανά το αντιστοιχισμένο πλήκτρο, θα ενεργοποιήσει ξανά το εργαλείο που χρησιμοποιήθηκε προηγουμένως. Τα κολλώδη πλήκτρα δεν λειτουργούν με τα στοιβαγμένα κλειδιά.
Εκχωρήστε ένα πλήκτρο πρόσβασης
Όταν επιλέγετε ένα εργαλείο ή ένα στοιχείο μενού από ένα από τα δωμάτια, μπορείτε να ενεργοποιήσετε την επιλογή εμφάνισης σύντομων ή μεγάλων “Συμβουλών”. Αυτά εμφανίζονται καθώς τοποθετείτε το ποντίκι σας πάνω από το εργαλείο ή τη λειτουργία που σας ενδιαφέρει και θα δείτε στο τέλος της υπόδειξης τα εξής:
“(“ΤΕΛΟΣ” – Ορίστε το πλήκτρο πρόσβασης). Μπορείτε να αντιστοιχίσετε συντομεύσεις ενός και πολλαπλών κουμπιών σε σχεδόν οποιαδήποτε λειτουργία ή εργαλείο 3DCoat απευθείας στη διεπαφή χρήστη. Απλώς πατήστε το πλήκτρο ΤΕΛΟΣ του πληκτρολογίου ενώ μετακινείτε το ποντίκι πάνω από οποιοδήποτε στοιχείο, ακολουθούμενο από τη συντόμευση πληκτρολογίου της επιλογής σας.
Εάν έχει ήδη εκχωρηθεί ένα πλήκτρο πρόσβασης, θα ερωτηθείτε εάν θέλετε:
- Εκχωρήστε ξανά το κλειδί με το νέο εργαλείο/λειτουργία.
- Στοιβάξτε το εργαλείο/τη λειτουργία με τυχόν προηγούμενα εργαλεία/λειτουργίες, επιτρέποντάς σας να κάνετε εναλλαγή μεταξύ όλων των εργαλείων με ένα πλήκτρο πρόσβασης.
Υπάρχει πιο γρήγορος τρόπος για εναλλαγή μεταξύ προηγούμενης και τρέχουσας βούρτσας ; άλλο, στη συνέχεια χειροκίνητη επιλογή και το μενού του πλήκτρου διαστήματος: Εάν ορίσετε τη συντόμευση για ένα πινέλο, το να το πατήσετε δεύτερη φορά θα επιστρέψετε στο προηγούμενο.
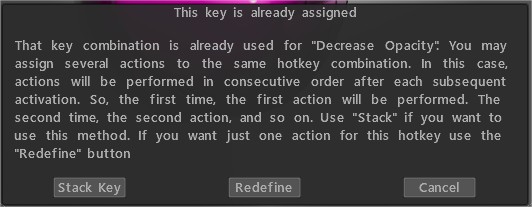
Αφαιρέστε τυχόν εργαλεία/λειτουργίες που έχουν εκχωρηθεί σε αυτό το κλειδί.
Sticky Keys : Αυτό το βίντεο δείχνει τη χρήση της νέας λειτουργικότητας Sticky Keys στο 3DCoat, καθώς και τον τρόπο αντιστοίχισης πλήκτρων πρόσβασης και πλήκτρων στοίβας.
Πρόσβαση πλήκτρων πρόσβασης σε πινέλα και πίνακες : Αυτό το βίντεο δείχνει τη δυνατότητα χρήσης πλήκτρων πρόσβασης για να φέρετε πάνελ και παλέτες απευθείας στον κέρσορα σας και πώς να εμποδίσετε το 3DCoat να μεταβεί σε διαφορετικά πακέτα πινέλων όταν επιλέγετε διαφορετικό πινέλο ή εργαλείο.
Διαστημικά πάνελ
Όταν εργάζεστε, είναι πολύ σημαντικό να έχετε γρήγορη πρόσβαση σε όλα τα απαραίτητα εργαλεία. Τα πλήκτρα συντόμευσης μπορούν να βοηθήσουν σε αυτό. Η 3DCoat έχει αναπτύξει ένα βολικό σύστημα για τη ρύθμιση και τη χρήση των πλήκτρων πρόσβασης.
Τώρα θα περιγράψουμε μερικά από τα σημαντικά πλήκτρα πρόσβασης που μπορείτε να χρησιμοποιήσετε για να επιταχύνετε τη ροή εργασίας σας.
Με αυτό το πλήκτρο, μπορείτε να καλέσετε όλα τα εργαλεία που είναι διαθέσιμα και δεν χρειάζεται να τα επιλέξετε στο αριστερό παράθυρο.
Στο επάνω μέρος του “Πίνακας διαστήματος” μπορείτε επίσης να βρείτε τους αριθμούς 1, 2, 3, 4, … Απλώς μετακινήστε το ποντίκι εκεί που χρειάζεστε το εργαλείο και τώρα μπορείτε να τους έχετε πρόσβαση χρησιμοποιώντας τα κατάλληλα πλήκτρα στο πληκτρολόγιο.
Τώρα απλώς πατήστε τον συνδυασμό: το διάστημα και τον αριθμό στον οποίο βρίσκεται το εργαλείο για να επιλέξετε γρήγορα το εργαλείο.
Το πλεονέκτημα αυτής της μεθόδου είναι ότι μπορείτε να προσαρμόσετε αυτό το πλαίσιο όπως θέλετε και να αλλάξετε γρήγορα τα εργαλεία σε αυτό.
Λίστα πλήκτρων πρόσβασης
LMB = “αριστερό κουμπί ποντικιού”
RMB = “δεξί κουμπί ποντικιού”
MMB = “μεσαίο κουμπί ποντικιού”
WHEEL=”κύλιση τροχού ποντικιού”
Μενού Αρχείο
Άνοιγμα αρχείου (CTRL+O)
Αποθήκευση αρχείου (CTRL+S)
Αποθήκευση αρχείου ως (CTRL+ALT+S)
Αποθήκευση σταδιακά (CTRL+SHIFT+S)
Import μοντέλου (CTRL+SHIFT+O)
Import επιπέδου εικόνας (CTRL+SHIFT+M)
Μενού Επεξεργασίας
Αναίρεση (CTRL+Z)
Επανάληψη (CTRL+Y)
Επεξεργασία όλων των επιπέδων στον εξωτερικό επεξεργαστή (CTRL+P)
Επεξεργασία προβολής σε εξωτερικό πρόγραμμα επεξεργασίας (CTRL+ALT+P)
Εργαλείο μετατόπισης (CTRL+SHIFT+F)
Προβολή μενού
Ορθοπροβολή (NUM5)
Δείτε μόνο το ανάγλυφο (1)
Προβολή μη σκιασμένου μοντέλου (2)
Προβολή μόνο specular (3)
Προβολή wireframe (4)
Προβολή σκιασμένου μοντέλου (5)
Προβολή μοντέλου low-poly (6)
Προβολή χαμηλού, σκιασμένου μοντέλου (7)
Εμφάνιση πλέγματος 2D (CTRL+’)
Αναδυόμενα παράθυρα
Επιλογέας χρώματος (Β)
Επιλογή σημείου περιστροφής (F)
Εμφάνιση λίστας επιπέδων (L)
Εμφάνιση πίνακα εργαλείων (SPACE)
Κανάλι βάθους (D)
Έγχρωμο κανάλι (C)
Κατοπτρικό κανάλι (R)
Λίστα στυλό (Τ)
Λίστα υλικών (M)
Τύποι σχεδίου (Ε)
Γρήγορος πίνακας (~)
Συμμετρία (S)
Λειτουργίες στρωμάτων
Προσθήκη νέου επιπέδου (CTRL+SHIFT+N)
Διαγραφή επιπέδου (CTRL+SHIFT+DELETE)
Διαγραφή μη παγώματος (ΔΙΑΓΡΑΦΗ)
Γέμισμα μη παγωμένο (INS)
Συμπλήρωση με μάσκα (CTRL+INS)
Διπλότυπο επίπεδο (CTRL+SHIFT+D)
Συγχώνευση ορατών επιπέδων (CTRL+SHIFT+E)
Συγχώνευση προς τα κάτω (CTRL+E)
Λειτουργίες παγώματος
Εναλλαγή παγώματος προβολής (ALT+F)
Ξεπάγωμα όλων (CTRL+D)
Αντιστροφή παγώματος/επιλογής (CTRL+SHIFT+I)
Εμφάνιση/απόκρυψη παγώματος (CTRL+F)
Ομαλή κατάψυξη (CTRL+NUM*)
Ανάπτυξη παγωμένης περιοχής (CTRL+NUM+)
Συμβόλαιο παγωμένης περιοχής (CTRL+NUM–)
Πάγωμα περιγράμματος (CTRL+NUM/)
Αντιγραφή/Επικόλληση & Επιλογή
Επικόλληση (CTRL+V)
Αντιγραφή (CTRL+C)
Δημιουργία νέου στυλό από ιστότοπο (CTRL+SHIFT+C)
Επιλογή χρώματος (V)
Επιλογή στρώματος (Η)
Splines
Προσθήκη σημείου σε spline (LMB)
Σχεδίαση εξωθημένης καμπύλης (ENTER)
Πατημένο σε ένα (CTRL+ENTER)
Διαγραφή όλων των σημείων (ESC)
Διαγραφή του τελευταίου σημείου (BKSP)
Αλλαγή του επιπέδου συμμετρίας θέσης (TAB+σύρετε LMB)
Απόκρυψη λειτουργιών
Κατάργηση απόκρυψης όλων (CTRL+X)
Ανάπτυξη κρυφής περιοχής (NUM+)
Κρυφή περιοχή σύμβασης (NUM–)
Εξομάλυνση
Αυξήστε το επίπεδο εξομάλυνσης (SHIFT+”+”) ή SHIFT+WHEEL UP
Μειώστε το επίπεδο εξομάλυνσης (SHIFT+”-”) ή SHIFT+WHEEL DOWN
Στιλπνότητα
Αύξηση της αδιαφάνειας του Glossinesy (/)
Μειώστε την αδιαφάνεια του Glossiness (;)
Χρώμα
Αύξηση της διαφάνειας της υφής (P”)
Μείωση της διαφάνειας της υφής (O)
Splines
Προσθήκη σημείου σε spline (LMB) Σχεδίαση εξωθημένης καμπύλης (ENTER) Πιέζεται σε ένα (CTRL+ENTER) Διαγραφή όλων των σημείων (ESC) Διαγραφή του τελευταίου σημείου (BKSP ) Αλλαγή του επιπέδου συμμετρίας θέσης (TAB+ drag LMB) Επεξεργασία.
Αντιγραφή/Επικόλληση & Επιλογή
Επικόλληση (CTRL+V) Αντιγραφή (CTRL+C) Δημιουργία νέου στυλό από ιστότοπο (CTRL+SHIFT+C) Επιλογή χρώματος (V) Επιλογή επιπέδου (H) Επεξεργασία.
Πίνακες αναδυόμενων παραθύρων
Επιλογέας χρώματος (Β)
Επιλογή σημείου περιστροφής (F)
Εμφάνιση λίστας επιπέδων (L)
Εμφάνιση πίνακα εργαλείων (SPACE)
Κανάλι βάθους (D)
Έγχρωμο κανάλι (C)
Κανάλι γυαλάδας (R)
Λίστα στυλό (Τ)
Λίστα υλικών (M)
Τύποι σχεδίου (Ε)
Γρήγορος πίνακας (~)
Συμμετρία (S)
Κάμερα και προσαρμοσμένη πλοήγηση
NumPad 1 Κάτω
NumPad 2 μπροστά
NumPad 4 αριστερά
NumPad 5 Εναλλαγή προοπτικής-Ορθογραφικής προβολής
NumPad 6 Δεξιά
NumPad 7 Top
NumPad 8 Πίσω
Ctrl+Πάνω βέλος Προσθήκη συντόμευσης κάμερας
Ctrl+Κάτω βέλος Διαγραφή συντόμευσης κάμερας
Ctrl+Αριστερό βέλος Μετάβαση στην προηγούμενη συντόμευση
Ctrl+Δεξί βέλος Μετάβαση στην επόμενη συντόμευση
Ρύθμιση ρυθμιστικών
Μειώστε την αδιαφάνεια O
Αυξήστε την αδιαφάνεια P
Μειώστε τη γωνία 9
Αύξηση γωνίας 0
Μείωση ακτίνας [
Αύξηση ακτίνας ]
Μείωση πτυχίου –
Αύξηση Πτυχίου +
Μείωση ομαλή μετατόπιση μοιρών + –
Αυξήστε την ομαλή μετατόπιση μοιρών + +
Μείωση αδιαφάνειας στιλπνότητας ;
Αύξηση αδιαφάνειας γυαλάδας »
Μείωση Βαθμού Γυαλάδας <
Αύξηση βαθμού γυαλάδας >
Ανταλλαγή χρωμάτων X