 Ελληνικά
  English
 Українська
 Español
 Deutsch
 Français
 日本語
日本語 Русский
 한국어
한국어 Polski
 中文 (中国)
 Português
 Italiano
 Suomi
Suomi Svenska
 中文 (台灣)
 Dansk
Dansk Slovenčina
 Türkçe
 Nederlands
 Magyar
 ไทย
ไทย हिन्दी
 Tiếng Việt
 Lietuviškai
 Latviešu valoda
 Eesti
Eesti Čeština
 Română
 Norsk Bokmål
Μεταμορφώνω
Μπορείτε να μετατρέψετε χειροκίνητα ένα αντικείμενο με ένα gizmo εισάγοντας ακριβείς παραμέτρους. Για αυτό, τοποθετήστε το δείκτη του ποντικιού σε ένα από τα στοιχεία χειριστή.
Όταν τονίζει το κίτρινο, το ρυθμιστικό μπορεί να μετακινηθεί με πατημένο το LMB. Μπορείτε να περιστρέψετε το αντικείμενο σε βήματα 45 μοιρών εάν πατήσετε (κρατήσετε πατημένο) Ctrl και LMB.
Εάν πρέπει να αλλάξετε με ακρίβεια τις παραμέτρους, τοποθετήστε τον δείκτη στο στοιχείο χειριστή, κρατήστε τον με το κλικ LMB και πατήστε το πλήκτρο διαστήματος στο πληκτρολόγιο ενώ κρατάτε πατημένο το LMB. Εισαγάγετε τις παραμέτρους στο παράθυρο που μόλις άνοιξε.
Χρησιμοποιήστε το ποντίκι ή το στυλό για μετασχηματισμό αντί για πλοήγηση.
Σε αυτήν τη λειτουργία, μπορείτε να χρησιμοποιήσετε κανονικούς κανόνες πλοήγησης για να μετασχηματίσετε αντικείμενα. Απενεργοποιήστε το για πλοήγηση αντί για τον μετασχηματισμό. Η πλοήγηση μέσω της ζώνης/εικονιδίων πλοήγησης δεν μπορεί να χρησιμοποιηθεί για μετασχηματισμούς, πλοηγείται ούτως ή άλλως.
* Object Gizmo και Gizmo Less Transform : του Anton Tenitsky.
Κίνηση
Move : Αυτό το εργαλείο είναι ένα από τα πιο ισχυρά και ευέλικτα εργαλεία στο οπλοστάσιο voxel. Όχι μόνο μπορεί να «ρυθμίσει» οποιοδήποτε σχήμα, μεγάλο ή μικρό, αλλά μπορεί επίσης να λειτουργήσει ως εργαλείο «Εξώθησης/Εισβολής».
Μετακινήστε μια επιφάνεια. Πατήστε και σύρετε το LMB για να μετακινήσετε την επιφάνεια εντός του δρομέα σε σχέση με την προβολή οθόνης. Χρησιμοποιήστε CTRL για να μετακινήσετε την επιφάνεια κατά μήκος του κανονικού. Διαφορετικά Alpha δίνουν διαφορετικά αποτελέσματα.
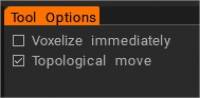
Voxelize αμέσως : Μόλις ολοκληρωθεί η κίνηση, η επιφάνεια θα γίνει αμέσως voxelized. Απενεργοποιήστε αυτό το πλαίσιο ελέγχου εάν θέλετε να κάνετε πολλές κινήσεις και να κάνετε voxelize αμέσως μόλις μεταβείτε σε οποιοδήποτε εργαλείο voxel.
Τοπολογική κίνηση: Μετακίνηση μόνο συνδεδεμένη με τα κεντρικά μέρη. Χρησιμοποιήστε το για να κλείσετε τρύπες και να μετακινήσετε αυτό που θέλετε να μετακινήσετε και όχι τα πάντα κάτω από τη βούρτσα. Είναι ένα πολύ χρήσιμο πινέλο για τη γλυπτική στενών λεπτομερειών, όπως τα χείλη, τα μάτια και τα δάχτυλα.
ThroughAllVolumes (TransPose & Move Tool Changes) : Αυτό το βίντεο καλύπτει τις αλλαγές που έγιναν στα εργαλεία Pose & Move.
– Επιλογή: Προσαρμόστε το Retopo Mesh στο Sculpt
- Conform Retopo Mesh to Sculpt : Αυτό το βίντεο δείχνει μια ενημέρωση της λειτουργίας “Conform Retopo Mesh” στον χώρο εργασίας Sculpt του 3DCoat, η οποία επιτρέπει στον χρήστη να δει το Retopo Mesh (στον χώρο εργασίας Sculpt) ενώ κάνει επεξεργασίες μεγάλης κλίμακας με το Pose, Move , ή εργαλείο μετασχηματισμού.
Καλύπτει επίσης ορισμένες πρόσθετες συμβουλές για να κάνετε το πλέγμα Retopo να συμμορφώνεται μετά την επεξεργασία με τα πινέλα Sculpting.
Στάση
Λειτουργία Soft Selection στο 3DCoat 2022 για το εργαλείο Pose στον χώρο εργασίας Sculpt.
Pose : Αυτό το εργαλείο είναι ιδανικό για γρήγορη αλλαγή της περιστροφής, της κλίμακας και της μετάφρασης μιας επιλογής. Μπορείτε να καθορίσετε την επιλογή με διάφορους τρόπους. Μπορείτε να χρησιμοποιήσετε μια γραμμή, ένα δαχτυλίδι ή μια σφαίρα και μπορείτε ακόμη και να ζωγραφίσετε πάνω του με ένα Brush ή ένα αντικείμενο. Ελέγξτε τη λειτουργία Airbrush όταν χρησιμοποιείτε το “Select with a pen” για να αυξήσετε ομαλά την περιοχή επιλογής.
Αφού γίνει μια επιλογή, θα εμφανιστεί ένα ειδικό gizmo πόζας.
Απενεργοποιώντας το Regular Gizmo, το εργαλείο έχει τρεις καταστάσεις: Περιστροφή, Κλίμακα και Μετάφραση.
Μπορείτε να αλλάξετε λειτουργίες κάνοντας κλικ στη μακριά κόκκινη ορθογώνια γραμμή στη βάση του gizmo. Σε κάθε κατάσταση, το gizmo έχει ένα σύνολο παραμέτρων στον πίνακα επιλογών του εργαλείου.
Τέλος, όπως με όλα τα εργαλεία στο 3DCoat, το εργαλείο πόζας σέβεται τη συμμετρία, καθώς και όλες τις λειτουργίες επιλογής, όπως ορθογώνιο μεταφοράς, λάσο κ.λπ. Τώρα, το εργαλείο Pose λειτουργεί σε όλα τα ορατά αντικείμενα (μέσω όλων των τόμων).
Ας ρίξουμε τώρα μια ματιά σε μερικές από τις παραμέτρους Transpose Mode:
- Ορατότητα παγώματος/πόσης: Η αδιαφάνεια της επιλογής πόζας ή παγώματος.
- Δράση πόζας: έχετε δύο επιλογές:
- Μετακίνηση από Gizmo.
- Κανονική εξώθηση.
- Mode: Η μέθοδος επιλογής για το εργαλείο Pose.
- Γραμμή: Αυτή η λειτουργία σάς επιτρέπει να σχεδιάσετε μια κλίση με βάση τη γραμμή για χρήση με το εργαλείο πόζας gizmo. Ξεκινά με το αρχικό σας κλικ LMB και τελειώνει με την απελευθέρωση του LMB.
- Δακτύλιος: Επιλέγει μια κλίση που βασίζεται σε δακτύλιο. Ξεκινά με το αρχικό σας κλικ LMB και τελειώνει με την απελευθέρωση του LMB.
- Sphere: Επιλέγει μια σφαιρική κλίση. Ξεκινά με το αρχικό σας κλικ LMB και τελειώνει με την απελευθέρωση του LMB.
- Snap to angle: Ενεργοποιήστε εάν χρειάζεστε την επιλογή Snap to Angle.
- Ζωγραφική: Επιλέξτε με πινέλο πάνω από ένα στοιχείο. Η επιλογή με τη λειτουργία στυλό σάς επιτρέπει να βουρτσίζετε απευθείας την επιλογή σας. Το μέγεθος του στυλό επηρεάζει άμεσα την περιοχή επιλογής. Επιπλέον, μπορείτε επίσης να εξομαλύνετε την επιλεγμένη περιοχή κρατώντας πατημένο το “Shift + LMB”. Αυτός είναι ένας πολύ καλός τρόπος για να επιλέγετε πράγματα γρήγορα εάν χρειάζεστε μόνο μικρές μικρές λεπτομέρειες.
- Σημείωση: Η λειτουργία “Επιλογή ζωγραφικής” είναι πολύ χρήσιμη. Με το εργαλείο Pose, μπορείτε να χρησιμοποιήσετε σχεδόν οποιαδήποτε μέθοδο επιλογής στον πίνακα “E”, όπως σύρετε ορθογώνιο, λάσο κ.λπ. Μπορείτε επίσης να αφαιρέσετε την επιλογή σας χρησιμοποιώντας το κανονικό εργαλείο κρατώντας πατημένο το πλήκτρο CTRL.
- Λειτουργία Airbrush: Ενεργοποιήστε τη λειτουργία airbrush. Μπορείτε επίσης να επιλέξετε ομαλά περιοχές αντί να έχετε μια επιλογή με σκληρό άκρο. Κάνει τακτοποιημένες παραμορφώσεις γύρω από τις άκρες της επιλογής σας.
- Επιλέξτε αντικείμενο: Εάν έχετε πολλά αντικείμενα στο Sculpt Tree, αυτή η λειτουργία μπορεί να σας φανεί χρήσιμη. Απλώς κάντε κλικ στο αντικείμενο που θέλετε να παραμορφώσετε χρησιμοποιώντας το εργαλείο Pose, το οποίο θα τοποθετήσει ολόκληρο τον τόμο ως επιλογή σας.
- Επεξεργασία πτώσης πόζας:
- Καθαρή επιλογή:
- Invert Selection: Αντίστροφη επιλογή πόζας.
- Αποθήκευση επιλογής: Αποθήκευση επιλογής πόζας στο αρχείο. Συνιστάται να το χρησιμοποιείτε σε λειτουργία επιφάνειας. Εάν η δομή του πλέγματος αλλάξει λόγω voxelization, δεν θα μπορείτε να εφαρμόσετε την προηγούμενη επιλογή αποθήκευσης.
- Φόρτωση επιλογής: Φόρτωση επιλογής πόζας από το αρχείο. Εάν αλλάξει η δομή του πλέγματος, δεν μπορείτε να επαναφέρετε την επιλογή, επομένως χρησιμοποιήστε την σε λειτουργία επιφάνειας όποτε είναι δυνατόν.
- Smooth Selection: Smooth Pose Selection. Ομαλό εργαλείο πόζας all-in – εξομαλύνει την επιλογή όλων των τόμων εάν έχει επιλεγεί “μέσω όλων των τόμων”. Επίσης, υπάρχουν κουμπιά 5x και 10x κοντά στην εντολή Smooth για πιο γρήγορη εξομάλυνση.
- Αποθήκευση επιλογής στο επίπεδο: Αποθήκευση επιλογής θέσης ως στρώμα.
- Επιλέξτε επιλογή από το Επίπεδο: Ανάκληση επιλογής με κλικ.
– Χρήση ελεύθερης φόρμας: Αυτή η δυνατότητα επιτρέπει σε ένα πλέγμα να παραμορφώσει την επιλεγμένη περιοχή πόζας. Επιλέξτε από πολλά σχήματα πλέγματος για να μετατρέψετε την επιλογή Pose.
– Apply Transform to Gizmo: Εφαρμογή Transform σε ολόκληρο το Gizmo.
- Κανονικό Gizmo: Χρησιμοποιήστε ένα κανονικό gizmo αντί για ένα που βασίζεται σε γραμμή. Παρακάτω έχετε ρυθμίσεις για να επιλέξετε έναν τύπο ελέγχου εάν είναι επιλεγμένο το κανονικό gizmo o line-based.
- Απόκρυψη Gizmo: Απόκρυψη του gizmo για να επιλέξετε μια περιοχή με μεγαλύτερη ακρίβεια.
- Προσαρμογή περιοχής μετάβασης: Προσαρμόστε την περιοχή που ενώνει μη επιλεγμένες και πλήρως επιλεγμένες περιοχές. Επιτρέπει την κάμψη πιο ακριβή και φυσική.
- Move Only Gizmo: Μετακινήστε το gizmo αλλά μην μεταμορφώσετε το αντικείμενο.
- Αφήστε τους περιστρεφόμενους άξονες: Μετά την περιστροφή, οι άξονες θα παραμείνουν στην τελική κατάσταση. Διαφορετικά, θα επιστρέψουν στον προσανατολισμό X, Y και Z.
- Pick Pivot: Κάντε κλικ για να επιλέξετε το σημείο περιστροφής από την επιφάνεια.
- Μόνο επιλογή θέσης: Επιλέξτε τη θέση και τον άξονα Υ από την κανονική θέση της πένας. και η θέση, Χ και ο άξονας Ζ από τον προσανατολισμό του στυλό.
- Επιλογή Κανονικής & Θέσης: Επιλέξτε τη θέση και τον άξονα Υ από την κανονική του στυλό και τη θέση του άξονα Χ και Ζ από τον προσανατολισμό του στυλό.
- Pick View Direction & Position: Επιλέξτε θέση gizmo από το σημείο επιλογής, άξονα Y από την κατεύθυνση προς τα εμπρός, X – δεξιά, Z – επάνω.
- Επαναφορά άξονα.
- Επαναφορά χώρου: Επαναφέρετε τον τοπικό χώρο του αντικειμένου, ώστε να κλιμακώνεται ομοιόμορφα κατά μήκος όλων των αξόνων και οι κατευθύνσεις των τοπικών αξόνων θα προσανατολίζονται σε καθολικά X, Y και Z.
- Κέντρο στον τοπικό χώρο: Επικεντρώστε το gizmo στον τοπικό χώρο. Ο άξονας θα προσανατολιστεί κατά μήκος του τοπικού άξονα, εάν επιλέξετε “Αποχώρηση από το περιστρεφόμενο gizmo”.
- Προς τον κύριο άξονα: Κατευθύνετε τον άξονα gizmo κατά μήκος του κύριου γεωμετρικού άξονα του αντικειμένου.
- To Center Mass: Μετακινήστε το gizmo στο κέντρο μάζας.
- To Bound Center: Μετακινήστε το gizmo στο κέντρο του δεσμευμένου πλαισίου.
- Στοίχιση για προβολή:
- Apply Transform to Gizmo: Εφαρμογή για μετατροπή σε ολόκληρο το gizmo.
TransPose Tool Poly Groups : Αυτό το βίντεο δείχνει μερικές νέες προσθήκες λειτουργιών στο Pose Tool στο 3DCoat 4.9. Το ένα είναι το κούμπωμα γωνίας για ακριβείς γραμμικές επιλογές. Η άλλη είναι η λειτουργία Poly Group που είναι ενσωματωμένη στο εργαλείο Pose.
Πώς να κάνετε τέτοιου είδους ανατροπές
Philnolan3d: Θα μπορούσατε να παίξετε με το εργαλείο Pose για να αποκτήσετε διαφορετικά σχέδια. Αυτό το έκανα γρήγορα με τη λειτουργία επιλογής Ring. Απλώς σύροντας την επιλογή μου κατά μήκος κοντά στη μέση, και μετά κοιτάζοντας προς τα κάτω το μήκος, γύρισα το gizmo.
Κατάλληλος
Fit : Τοποθετήστε ένα αντικείμενο σε ένα άλλο. Μπορείτε να επισημάνετε τα αντίστοιχα χαρακτηριστικά και να τοποθετήσετε αντικείμενα μαζί. Μετά από κατά προσέγγιση τοποθέτηση, μπορείτε να κάνετε την τοποθέτηση με ακρίβεια. τα αντίστοιχα χαρακτηριστικά θα συρράψουν μεταξύ τους.
Επαναπροβολή
Επιτρέπει στο χρήστη να επαναπροβάλλει τις λεπτομέρειες και τη βαφή κορυφής από ένα ή περισσότερα πλέγματα στη σκηνή σε ένα άλλο πλέγμα. Είτε σε ολόκληρο το πλέγμα είτε τοπικά χρησιμοποιώντας πινέλο.
Στροφή
Λυγίστε το αντικείμενο γύρω από τον άξονα. Εφαρμόστε το voxelized (ήταν σε voxels) και μεταβείτε στο εργαλείο Transform. Έτσι, οι αλλαγές τοπολογίας είναι αποτέλεσμα voxelization. Η προεπισκόπηση σημαίνει αμέσως ότι το αντικείμενο παραμορφώνεται ακόμα κι αν το gizmo μετακινηθεί. Διαφορετικά, η κάμψη εφαρμόστηκε ξανά μόνο όταν τελείωσε η κίνηση gizmo.
Συστροφή
Στρίψτε το αντικείμενο.
Στημόνι
Στρεβλώστε (λυγίστε) αντικείμενο γύρω από τον κύκλο.
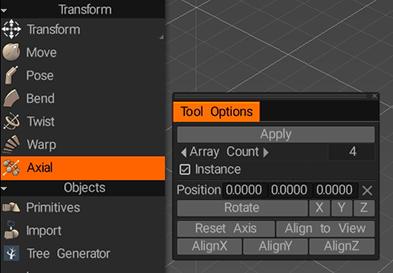
Αξονικός
Δημιουργία Radial Array. Οποιοδήποτε στρώμα Voxel μπορεί να αντιγραφεί και να περιστραφεί σε αριθμό και γωνία από έναν κεντρικό άξονα.
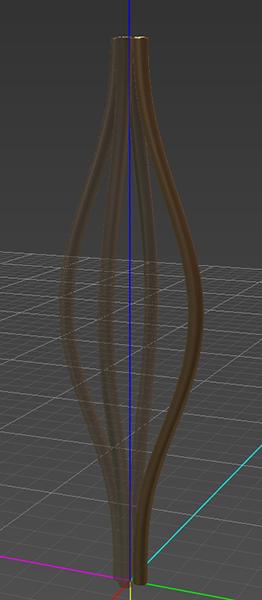
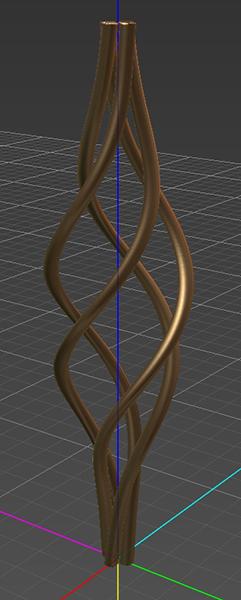
Πώς να κάνετε τέτοιου είδους ανατροπές;
Αξονικό εργαλείο
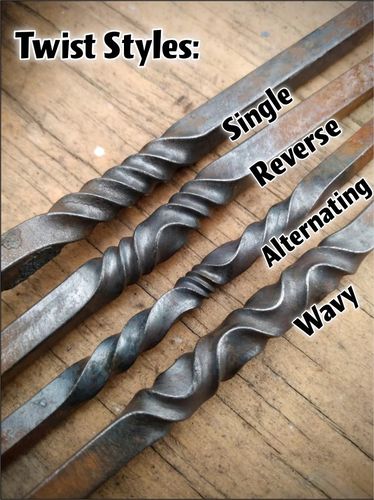
Αφράτα: Για στριμμένα αντικείμενα που αποτελούνται από πολλά μέρη όπως αυτά στην παραπάνω εικόνα, μπορείτε να δοκιμάσετε χρησιμοποιώντας την παρακάτω μέθοδο…
Πρώτα, δημιουργήστε ένα κομμάτι του αντικειμένου και μετατοπίστε το από το κέντρο της σκηνής, μετά μεταβείτε στο εργαλείο Αξονικό (στην ενότητα Μετασχηματισμός του πίνακα εργαλείων) και ορίστε τον αριθμό των πρόσθετων εξαρτημάτων που θέλετε και τη θέση και τον προσανατολισμό του τον άξονα κατά μήκος του οποίου θα δημιουργηθούν τα αντίγραφα, θυμηθείτε να ενεργοποιήσετε την επιλογή Instance…
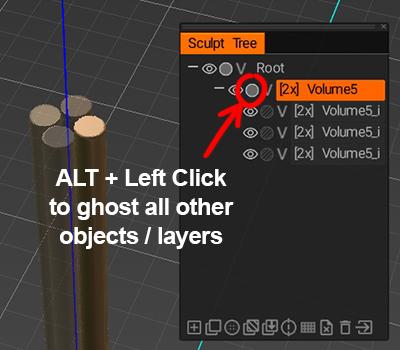
Αφού εφαρμόσετε το εργαλείο Axial, μπορεί να σας φανεί χρήσιμο να εμφανίσετε τα επίπεδα που δημιουργήθηκαν πρόσφατα για να διευκολύνετε την εργασία στο αρχικό αντικείμενο. Μπορείτε να το κάνετε αυτό κάνοντας ALT+κάνοντας αριστερό κλικ στο εικονίδιο φάντασμα στο επίπεδο γονικού αντικειμένου.
Αφού το κάνετε αυτό, μπορείτε να χρησιμοποιήσετε το εργαλείο Μετακίνηση (που βρίσκεται επίσης στην ενότητα Μετασχηματισμός του πίνακα εργαλείων) για να προσθέσετε το απαιτούμενο κενό μεταξύ των αντικειμένων. Δεδομένου ότι όλα τα άλλα αντικείμενα είναι παρουσίες του αντικειμένου στο οποίο εργάζεστε, τυχόν αλλαγές που κάνετε θα επηρεάσουν όλα τα αντίγραφα του αντικειμένου.
Τέλος, χρησιμοποιήστε το εργαλείο Twist (που βρίσκεται πάλι στην ενότητα Μετασχηματισμός του πίνακα εργαλείων) για να προσθέσετε την επιθυμητή ποσότητα περιστροφής στα αντικείμενα…

Σε αυτό το σημείο, θα πρέπει να καταλήξετε σε ένα αποτέλεσμα παρόμοιο με αυτό…
Φροντιστήρια
Αυτή η σειρά βίντεο καλύπτει τον τρόπο χρήσης του εργαλείου πόζας για τη μετάφραση οργανικών και σκληρών επιφανειών.