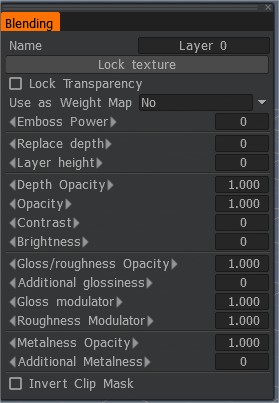
Περνώντας το Brush σας πάνω από ένα στρώμα, μπορείτε να δείτε ένα διακεκομμένο βέλος που βλέπει προς τα κάτω. Κάντε κλικ στο LMB για να εμφανιστεί ο πίνακας Layer Blend. Μπορείτε επίσης να αποκτήσετε πρόσβαση στον πίνακα από το μενού Παράθυρο>Αναδυόμενα παράθυρα>Μείξη επιπέδων.
Αυτός ο πίνακας περιέχει ένα πιο προηγμένο σύνολο παραμέτρων. Ας ΡΙΞΟΥΜΕ μια ΜΑΤΙΑ:
Υφή κλειδώματος: Η υφή κλειδώματος επιτρέπει το κλείδωμα της υφής χρώματος/βάθους πάνω από το στρώμα ανεξάρτητα από την ανάλυσή του. Η υφή στην τρέχουσα κατάστασή της θα αποθηκευτεί στο δίσκο. Μόλις αλλάξετε την ανάλυση της υφής, θα χρησιμοποιηθεί η κλειδωμένη υφή αντί της επαναδειγματοληψίας των εικονοστοιχείων του τρέχοντος στρώματος.
Είναι σημαντικό να στερεώνετε υλικά σε στρώματα και να βάφετε σε χαμηλή ανάλυση. Σε αυτήν την περίπτωση, η απόφραξη, η κοιλότητα και ο normal map θα πρέπει να διατηρούνται στην αρχική ανάλυση. Αυτή η λειτουργία βοηθά στη διατήρηση σημαντικών επιπέδων στην αρχική ανάλυση.
Κλείδωμα διαφάνειας: Αυτό σας επιτρέπει να σχεδιάσετε ένα επίπεδο χωρίς να αλλάξετε τη διαφάνειά του. Ουσιαστικά, σας επιτρέπει να επεξεργαστείτε τα τρέχοντα χρώματα σε ένα επίπεδο χωρίς να προσθέσετε περισσότερα.
Χρήση ως χάρτη βάρους: Μια πολύ χρήσιμη λειτουργία για τη ζωγραφική χαρτών βάρους απευθείας στο εσωτερικό του 3DCoat. Ενώ δεν ζωγραφίζετε απευθείας χάρτες βάρους, χρησιμοποιείτε ζωγραφική βάσει εικόνας, αλλά εάν ρυθμίσετε το 3DCoat να χρησιμοποιείται για αυτήν την παράμετρο, θα μετατρέψει τις τιμές της κλίμακας του γκρι σε όποιο εύρος τιμών καθορίσετε σε αυτήν την αναπτυσσόμενη λίστα. Οι τιμές 0..100% θα μετατρέψουν το μαύρο σε 0 και το λευκό σε 100. Οι τιμές -100..100% θα μετατρέψουν το μαύρο σε -100 και το λευκό σε 100.
Χρησιμοποιήστε αυτό το επίπεδο ως χάρτη βάρους για την export LWO. Ο χάρτης βάρους θα δημιουργηθεί με το ίδιο όνομα με το όνομα του επιπέδου.
- Όχι: Δεν γίνονται παρακάμψεις.
- τιμές [0..100%]: Αντικαταστήστε το βάθος όλων των προηγούμενων επιπέδων με το τρέχον χρησιμοποιώντας το χρώμα άλφα.
- τιμές [-100% .. 100%]: Πρόσθετο ύψος για τη στρώση για να παρακάμψει το βάθος των προηγούμενων στρώσεων. Λειτουργεί μόνο εάν χρησιμοποιείται “Αντικατάσταση βάθους”.
Ισχύς ανάγλυφου: Ένα πολλαπλασιαστικό εφέ για την αύξηση της τιμής βάθους του στρώματος. Εάν η τιμή είναι εξώθηση, η εξώθηση θα είναι μεγαλύτερη. Εάν η τιμή είναι κοιλότητα, η κοιλότητα θα είναι βαθύτερη.
Αντικατάσταση βάθους: Αντικαταστήστε το βάθος όλων των προηγούμενων επιπέδων με το τρέχον χρησιμοποιώντας το χρώμα άλφα.
Layer Height: Πρόσθετο ύψος για τη στρώση για να παρακάμψει το βάθος των προηγούμενων στρωμάτων. Λειτουργεί μόνο εάν χρησιμοποιείται “Αντικατάσταση βάθους”.
Βάθος/Χρώμα/Γυαλάδα/Μεταλλικότητα Αδιαφάνεια: Ελέγξτε την αδιαφάνεια για την αντίστοιχη τιμή του στρώματος. Αυτό αντικατοπτρίζεται από τον πίνακα Layers για ευκολία.
Depth Opacity: Διαμορφωτής βάθους.
Αδιαφάνεια: Color Opacity Modulator.
Αντίθεση: Ελέγξτε την Αντίθεση του επιλεγμένου επιπέδου.
Brightness: Ελέγξτε τη φωτεινότητα του επιλεγμένου επιπέδου.
Γυαλάδα/Αδιαφάνεια τραχύτητας: Πρόσθετος διαμορφωτής στιλπνότητας για τη μετασχηματισμένη περιοχή.
Πρόσθετη στιλπνότητα: Ένας πολλαπλασιαστής για την αύξηση της τιμής της στιλπνότητας του στρώματος.
Διαμορφωτής στιλπνότητας:
Διαμορφωτής τραχύτητας:
Μεταλλική αδιαφάνεια:
Πρόσθετο μέταλλο:
Clip Mask Layer: Οι μάσκες Clip χρησιμοποιούνται όταν θέλετε να καλύψετε ένα επιλεγμένο στρώμα με ένα άλλο επίπεδο. Σε αυτή τη συνάρτηση, μπορείτε να καθορίσετε το επίπεδο που θέλετε να χρησιμοποιήσετε για να αποκόψετε τη μάσκα του επιλεγμένου επιπέδου. Η χρήση της λειτουργίας Invert Clip Mask θα αναστρέψει την περιοχή που έχει περικοπεί. Σημειώστε ότι τα κανάλια από το ένα επίπεδο θα κρύψουν το άλλο. Για παράδειγμα, τα έγχρωμα κανάλια καλύπτουν μόνο το χρώμα. Τα κανάλια βάθους καλύπτουν μόνο το Βάθος, τη Γυαλάδα κ.λπ.
Αυτή η λειτουργία είναι πολύ καλή όταν έχετε ένα λεπτομερές βάψιμο που φαίνεται νέο στην εμφάνιση και θέλετε να το “λερώσετε” ή να κάνετε φθορά. Μπορείτε να χρησιμοποιήσετε μια στρώση για να βάψετε τις περιοχές που θέλετε να έχουν φθορά και να τη χρησιμοποιήσετε για να καλύψετε τη βαμμένη στρώση με όλες τις λεπτομέρειες που θέλετε να φορεθεί.
Clip Mask Layer : Αυτή η αναπτυσσόμενη λίστα επιτρέπει την κάλυψη του τρέχοντος στρώματος με ένα άλλο. Το χρώμα, το βάθος και η στιλπνότητα του τρέχοντος στρώματος θα καλύπτονται από την αδιαφάνεια χρώματος των επιλεγμένων επιπέδων. Η διαφάνεια και το βάθος του τρέχοντος στρώματος θα διαμορφωθούν από την επιλεγμένη διαφάνεια του επιπέδου.
Invert Clip Mask: Μια αντίστροφη αδιαφάνεια επιπέδου θα χρησιμοποιηθεί ως μάσκα.
Φροντιστήριο
Αναδυόμενο παράθυρο ανάμειξης επιπέδων : Αυτό το βίντεο δείχνει εν συντομία το αναδυόμενο πλαίσιο ανάμειξης επιπέδων σε 3DCoat. Προορίζεται για γρήγορες ρυθμίσεις στρώσης ακριβώς μέσα στο πλαίσιο στρώματος χωρίς να χρειάζεται εναλλαγή εμπρός και πίσω (μεταξύ των πάνελ).
 Ελληνικά
  English
 Українська
 Español
 Deutsch
 Français
 日本語
日本語 Русский
 한국어
한국어 Polski
 中文 (中国)
 Português
 Italiano
 Suomi
Suomi Svenska
 中文 (台灣)
 Dansk
Dansk Slovenčina
 Türkçe
 Nederlands
 Magyar
 ไทย
ไทย हिन्दी
 Tiếng Việt
 Lietuviškai
 Latviešu valoda
 Eesti
Eesti Čeština
 Română
 Norsk Bokmål