 Русский
  English
 Українська
 Español
 Deutsch
 Français
 日本語
日本語 한국어
한국어 Polski
 中文 (中国)
 Português
 Italiano
 Suomi
Suomi Svenska
 中文 (台灣)
 Dansk
Dansk Slovenčina
 Türkçe
 Nederlands
 Magyar
 ไทย
ไทย हिन्दी
 Ελληνικά
 Tiếng Việt
 Lietuviškai
 Latviešu valoda
 Eesti
Eesti Čeština
 Română
 Norsk Bokmål
Трансформировать
Вы можете вручную преобразовать объект с помощью гизмо, введя точные параметры. Для этого наведите указатель мыши на один из элементов манипулятора.
Когда он подсвечивается желтым цветом, ползунок можно перемещать с нажатой ЛКМ. Вы можете поворачивать объект с шагом 45 градусов, если нажмете (удерживая) Ctrl и ЛКМ.
Если вам нужно точно изменить параметры, наведите указатель мыши на элемент манипулятора, задержите его щелчком ЛКМ и нажмите пробел на клавиатуре, удерживая ЛКМ нажатой. Введите параметры в только что открывшемся окне.
Используйте мышь или перо для преобразования вместо навигации.
В этом режиме вы можете использовать обычные правила навигации для преобразования объектов. Выключите его для навигации вместо преобразования. Навигация по навигационной зоне/значкам не может использоваться для преобразований, она все равно перемещается.
* Object Gizmo и Gizmo Less Transform : Anton Tenitsky.
Двигаться
Перемещение : этот инструмент является одним из самых мощных и универсальных инструментов в воксельном арсенале. Он не только может «настраивать» любую форму, большую или маленькую, но также может выступать в качестве инструмента «вытягивания/внедрения».
Переместить площадь поверхности. Нажмите и перетащите ЛКМ, чтобы переместить поверхность в пределах курсора относительно экрана. Используйте CTRL для перемещения поверхности по нормали. Разные Альфы дают разные результаты.
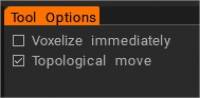
Вокселизация немедленно : как только перемещение будет завершено, поверхность будет немедленно вокселизирована. Снимите этот флажок, если вы хотите сделать несколько движений и вокселизировать, как только вы переключитесь на любой инструмент вокселей.
Топологическое перемещение: перемещение только связанных с центром частей. Используйте его, чтобы закрыть дыры и переместить то, что вы хотите переместить, а не все, что находится под кистью. Это очень полезная кисть для создания мелких деталей, таких как губы, глаза и пальцы.
ThroughAllVolumes (Изменения инструментов TransPose & Move) : в этом видео рассказывается об изменениях, внесенных в инструменты Pose & Move.
– Опция: согласовать сетку Retopo со скульптурой
- Conform Retopo Mesh to Sculpt : это видео демонстрирует обновление функции «Conform Retopo Mesh» в рабочей области Sculpt 3DCoat, которая позволяет пользователю видеть сетку Retopo (в рабочей области Sculpt) при внесении крупномасштабных изменений с помощью Pose, Move , или инструмент преобразования.
Он также содержит некоторые дополнительные советы по приведению сетки Retopo в соответствие после редактирования с помощью кистей Sculpting.
Поза
Функция Soft Selection в 3DCoat 2022 для инструмента Pose в рабочей области Sculpt.
Поза : этот инструмент отлично подходит для быстрого изменения поворота, масштаба и перемещения выделения. Определить выбор можно несколькими способами. Вы можете использовать линию, кольцо или сферу и даже рисовать на них с помощью Brush или объекта. Проверьте режим аэрографа при использовании «Выделить пером», чтобы плавно увеличить область выделения.
После того, как выбор сделан, появится специальная штуковина для позирования.
При отключении обычного гизмо инструмент имеет три состояния: поворот, масштабирование и перевод.
Вы можете переключать режимы, нажимая на длинную красную прямоугольную полосу в основании гизмо. В каждом состоянии гизмо имеет набор параметров на панели параметров инструмента.
Наконец, как и все инструменты в 3DCoat, инструмент «Поза» учитывает симметрию, а также все режимы выделения, такие как перетаскивание прямоугольника, лассо и т. д. Теперь инструмент «Поза» работает со всеми видимыми объектами (во всех объемах).
Давайте теперь посмотрим на некоторые параметры режима транспонирования:
- Видимость стоп-кадра/позы: непрозрачность позы или стоп-кадра.
- Действие позы: у вас есть два варианта:
- Двигайтесь с помощью Гизмо.
- Обычный выдавливание.
- Режим: метод выбора для инструмента «Поза».
- Линия: этот режим позволяет рисовать линейный градиент для использования с гизмо инструмента позы. Он начинается с вашего первоначального щелчка ЛКМ и заканчивается отпусканием ЛКМ.
- Кольцо: выбор градиента на основе кольца. Он начинается с вашего первоначального щелчка ЛКМ и заканчивается отпусканием ЛКМ.
- Сфера: выбор сферического градиента. Он начинается с вашего первоначального щелчка ЛКМ и заканчивается отпусканием ЛКМ.
- Привязка к углу: активируйте, если вам нужен выбор привязки к углу.
- Краска: выберите, проведя кистью по элементу. Выбор в режиме пера позволяет вам непосредственно рисовать кистью по вашему выбору. Размер пера напрямую влияет на область выделения. Кроме того, вы также можете сгладить выделенную область, удерживая «Shift + ЛКМ». Это отличный способ быстро выбрать что-то, если вам нужно выбрать только крошечные детали.
- Примечание. Режим «Paint Select» очень полезен. С помощью инструмента «Поза» вы можете использовать практически любой метод выделения на панели «E», например, перетаскивание прямоугольника, лассо и т. д. Вы также можете вычесть выделение, используя обычный инструмент, удерживая клавишу CTRL.
- Режим аэрографа: активируйте режим аэрографа. Вы также можете плавно выбирать области вместо резкого выделения. Это обеспечивает аккуратные деформации по краям вашего выделения.
- Выберите объект: если у вас есть несколько объектов в дереве скульптуры, этот режим может пригодиться. Просто нажмите на объект, который вы хотите деформировать, с помощью инструмента «Поза», который поместит весь объем в качестве вашего выбора.
- Редактировать спад позы:
- Очистить выбор:
- Инвертировать выбор: инвертировать выбор позы.
- Сохранить выбор: сохранить выбор позы в файл. Рекомендуется использовать это в поверхностном режиме. Если структура сетки изменится из-за вокселизации, вы не сможете применить предыдущий выбор хранилища.
- Загрузить выбор: загрузить выбор позы из файла. Если структура сетки изменится, вы не сможете восстановить выделение, поэтому по возможности используйте его в поверхностном режиме.
- Плавный выбор: плавный выбор позы. Инструмент Smooth all-in pose — сглаживает выделение всех объемов, если выбран параметр «сквозь все объемы». Кроме того, рядом с командой Smooth есть кнопки 5x и 10x для более быстрого сглаживания.
- Сохранить выделение в слое: Сохранить выделение позы как слой.
- Выберите выделение из слоя: Восстановить выделение по щелчку.
– Использовать свободную форму: эта функция позволяет решетке деформировать выбранную область позы. Выберите одну из нескольких форм решетки, чтобы преобразовать выбор позы.
– Применить преобразование к гизмо: применить преобразование ко всему гизмо.
- Обычный гизмо: используйте обычный гизмо вместо линейного. Ниже у вас есть настройки для выбора типа управления, если выбран обычный гизмо или линейный.
- Скрыть гизмо: скрытие гизмо для более точного выбора области.
- Настройка области перехода: настройка области, соединяющей невыделенные и полностью выделенные области. Это позволяет сделать изгиб более точным и естественным.
- Переместить только гизмо: перемещайте гизмо, но не трансформируйте объект.
- Оставить повернутые оси: после поворота оси останутся в конечном состоянии. В противном случае они вернутся к ориентации X, Y и Z.
- Pick Pivot: Нажмите, чтобы выбрать точку поворота на поверхности.
- Pick Position Only: выберите положение и ось Y по нормали пера; и положение, оси X и Z от ориентации пера.
- Выбрать нормаль и положение: выберите положение и ось Y из нормали пера и положение осей X и Z из ориентации пера.
- Выбор направления и положения вида: выберите положение гизмо от точки выбора, ось Y от направления вперед, X — вправо, Z — вверх.
- Сбросить ось.
- Сбросить пространство: сбросить локальное пространство объекта, чтобы он был масштабирован равномерно по всем осям, а направления локальных осей были ориентированы на глобальные X, Y и Z.
- Центр в локальном пространстве: центрирование гизмо в локальном пространстве. Ось будет ориентирована вдоль локальной оси, если вы отметите «Оставить повернутый гизмо».
- К главной оси: Направьте ось гизмо вдоль главной геометрической оси объекта.
- К центру масс: переместите гизмо в центр масс.
- К центру привязки: переместите гизмо в центр привязываемого прямоугольника.
- Выровнять для просмотра:
- Применить преобразование к гизмо: применить преобразование ко всему гизмо.
Полигональные группы инструмента TransPose : это видео демонстрирует несколько новых функций, добавленных в инструмент Pose Tool в 3DCoat 4.9. Одним из них является угловая привязка для точного линейного выбора. Другая функция — Poly Group, встроенная в инструмент Pose.
Как сделать такие повороты
Philnolan3d: Вы можете поиграть с инструментом Pose, чтобы получить разные дизайны. Я просто быстро сделал это с режимом выбора кольца. Просто перетащив выделение по длине около середины, а затем посмотрев вниз по длине, я повернул гизмо.
Соответствовать
Подгонка : подгонка одного объекта к другому. Вы можете отмечать соответствующие функции и размещать объекты вместе. После приблизительного размещения вы можете сделать точное размещение; соответствующие функции будут сшиты друг с другом.
Перепроецировать
Позволяет пользователю перепроецировать детали и рисование вершин из одного или нескольких мешей сцены в другой меш. Либо на всю сетку, либо локально с помощью кисти.
Сгибать
Согните объект вокруг оси. Примените voxelized (было в вокселях) и переключитесь на инструмент Transform. Таким образом, изменения топологии являются результатом вокселизации. Предварительный просмотр сразу означает, что объект деформируется даже при перемещении гизмо. В противном случае сгибание применялось повторно только после завершения движения гизмо.
Крутить
Скрутить предмет.
Деформация
Деформация (изгиб) объекта по кругу.
Осевой
Создайте радиальный массив. Любой Voxel слой можно дублировать и поворачивать по количеству и углу относительно центральной оси.
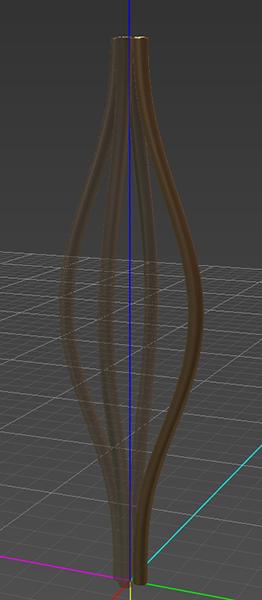
Как сделать такие повороты?
Осевой инструмент
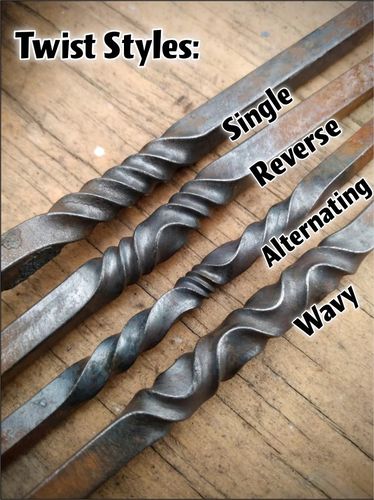
Пушистый: для скрученных объектов, состоящих из нескольких частей, таких как те, что на изображении выше, вы можете попробовать использовать следующий метод…
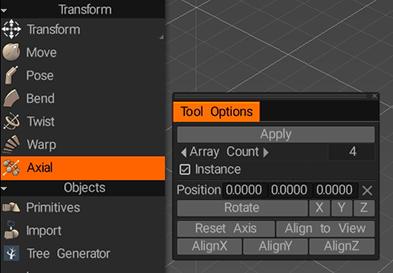
Сначала создайте одну часть объекта и сместите ее от центра сцены, затем перейдите к инструменту «Аксиальный» (в разделе «Преобразование» панели инструментов) и настройте количество дополнительных частей, которые вы хотите, а также положение и ориентацию ось, вдоль которой будут генерироваться копии, не забудьте включить опцию Instance…
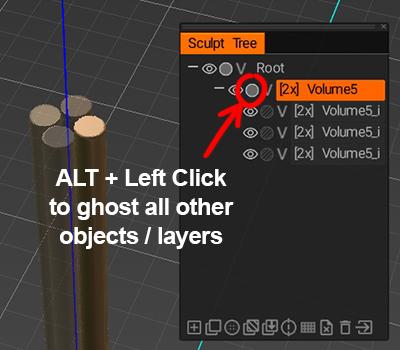
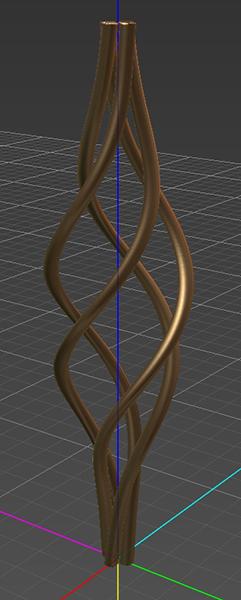
После того, как вы применили инструмент «Аксиальный», вам может оказаться полезным скрыть вновь созданные слои, чтобы упростить работу с исходным объектом; вы можете сделать это, нажав ALT+левый клик по значку-призраку на слое родительского объекта.
Сделав это, вы можете использовать инструмент «Перемещение» (также расположенный в разделе «Преобразование» на панели инструментов), чтобы добавить необходимый промежуток между объектами. Поскольку все остальные объекты являются экземплярами объекта, над которым вы работаете, любые внесенные вами изменения повлияют на все копии объекта.
Наконец, используйте инструмент Twist (опять же расположенный в разделе Transform панели инструментов), чтобы добавить желаемую степень поворота к объекту (ам)…

в этот момент вы должны получить результат, подобный этому…
Учебники
В этой серии видеороликов рассказывается, как использовать инструмент позирования для преобразования органических форм и форм с твердой поверхностью.