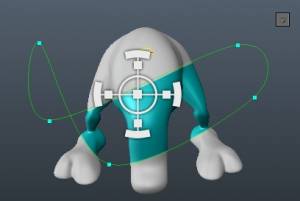
Κοντά στα σημεία ελέγχου, θα δείτε το αναπτυσσόμενο βέλος που συνοδεύει τον σχεδιασμένο spline. Πατήστε το και θα μπορείτε να επιλέξετε διαφορετικές επιλογές από ένα εκτεταμένο μενού εντολών:
Εφαρμογή: Εφαρμογή δράσης spline. Μπορείτε να χρησιμοποιήσετε το ENTER. Με πατημένο το CTRL, θα αντιδράσει.
Clear: Διαγράψτε όλα τα σημεία ελέγχου.
Αποσύνδεση από επιφάνεια: Αυτή η εντολή αποσπά κάθε σημείο ελέγχου που προσαρτάται σε μια επιφάνεια (ένα σημείο ελέγχου προσαρτάται εάν το προσθέσετε ενώ ο κέρσορας βρίσκεται πάνω από την επιφάνεια).
Το διάστημα μετακινεί το σχήμα στο χώρο της οθόνης. Στερεώστε σημεία στην επιφάνεια έτσι ώστε η ράβδος να περιστρέφεται μαζί με το μοντέλο.
Το διάστημα μετακινεί το σχήμα στο χώρο της οθόνης. Χρησιμοποιήστε αυτήν την εντολή εάν πατήσατε ESC αφού προσθέσατε σημεία ελέγχου και αποφασίσατε να συνεχίσετε. Πατήστε ESC για να τελειώσετε.
Επεξεργασία σημείων: Αυτή είναι μια προεπιλεγμένη λειτουργία αφού ολοκληρώσετε την προσθήκη σημείων ελέγχου. Τοποθετήστε το δείκτη του ποντικιού πάνω από έναν spline στο σημείο όπου θέλετε να προσθέσετε ένα άλλο σημείο ελέγχου (όταν δείτε ένα κόκκινο σημείο, πατήστε LMB για να το προσθέσετε). Σύρετε οποιοδήποτε σημείο ελέγχου με το LMB. Χρησιμοποιήστε το RMB πάνω από οποιοδήποτε σημείο ελέγχου για να αλλάξετε την ευκρίνεια κορυφής.
Μετασχηματισμός όλων: Μεταμορφώστε ολόκληρη τη σφήνα με το χειριστή (περιστροφή, κίνηση, κλίμακα κάθετα, οριζόντια, αναλογικά).

B-Splines: (επισημαίνονται). Χρησιμοποιήστε το B-Splines από προεπιλογή. Σε αυτήν τη λειτουργία, η πλάκα θα είναι πιο ομαλή και δεν θα διασχίζει τα σημεία ελέγχου. Χρησιμοποιήστε το με ευκρίνεια κορυφής για να λάβετε διάφορες μορφές.
Απόκρυψη βοηθητικών γραμμών: Απόκρυψη γκρίζων γραμμών που συνδέουν σημεία ελέγχου.

Επεξεργασία πίνακα σημείων: Ορίστε αριθμητικές τιμές για κάθε σημείο ελέγχου. Σε αυτό το παράθυρο, μπορείτε επίσης να ορίσετε τον τύπο κάθε σημείου ελέγχου: αιχμηρό (κάνει μια ευκρινή γωνία σε αυτό το σημείο), B-spline (απλή spline αν δεν είναι επιλεγμένη).

Κλίμακα: Ρυθμίστε τον παράγοντα κλίμακας και πατήστε το κουμπί «OK» ή ENTER.
Περιστροφή: Ρυθμίστε τη γωνία περιστροφής και πατήστε το κουμπί “OK” ή ENTER.
Αναποδογυρίστε οριζόντια: Αναποδογυρίστε ολόκληρο το spline οριζόντια.
Αναστροφή κατακόρυφα: Αναποδογυρίστε ολόκληρη τη λωρίδα κάθετα.
Αποθήκευση…: Αποθήκευση του spline σε ένα αρχείο.
Φόρτωση…: Φόρτωση προηγουμένως αποθηκευμένου spline από ένα αρχείο.
Σας επιτρέπει να αποθηκεύετε και να φορτώνετε προφίλ καμπυλών. Αυτό είναι ένα πολύ ισχυρό χαρακτηριστικό, καθώς μπορείτε να import αρχεία EPS, μεταξύ άλλων τύπων αρχείων, με διανυσματικά γραφικά για χρήση ως μέρος ενός Brush στα δωμάτια Paint ή Sculpt. Μπορείτε επίσης να αποθηκεύσετε τα προφίλ καμπυλών που έχουν δημιουργηθεί σε 3DCoat, να τα φορτώσετε ξανά αργότερα ή να τα μοιραστείτε με άλλους.
– Τα αρχεία υποστήριξης για αποθήκευση είναι: EPS, Spline (ιδιόκτητο αρχείο 3DCoat )
– Τα υποστηριζόμενα αρχεία για φόρτωση είναι: EPS, Spline ( ιδιόκτητο αρχείο 3DCoat ), TGA, BMP, PNG, JPG, DDS, TIF/TIFF, EXR, HDR.
Εφαρμογή Brush “Dabs” with Spacing: Αυτό κάνει το τρέχον Brush να ανταποκρίνεται ιδιαίτερα στις επιλογές “Dabs, Jitter, and Spacing” που βρίσκονται στον πίνακα “Brush Options”. Ο πειραματισμός δείχνει αυτή τη δράση καλύτερα.
 Ελληνικά
  English
 Українська
 Español
 Deutsch
 Français
 日本語
日本語 Русский
 한국어
한국어 Polski
 中文 (中国)
 Português
 Italiano
 Suomi
Suomi Svenska
 中文 (台灣)
 Dansk
Dansk Slovenčina
 Türkçe
 Nederlands
 Magyar
 ไทย
ไทย हिन्दी
 Tiếng Việt
 Lietuviškai
 Latviešu valoda
 Eesti
Eesti Čeština
 Română
 Norsk Bokmål