Είναι σύνηθες στα γραφικά σε πραγματικό χρόνο να χρησιμοποιούνται υφές πλακιδίων για την αναπαράσταση μεγάλων επιφανειών. Ωστόσο, η επανάληψη είναι αισθητή στα αριστερά.
Η χρήση εξαγωνικών πλακιδίων μας επιτρέπει να κρύψουμε την επανάληψη, αλλά απαιτεί μια λύση για να κρύψουμε τις ραφές μεταξύ γειτονικών εξαγωνικών πλακιδίων.
Αυτό έχουμε στα εργοστάσια εδώ και χρόνια. Όχι εξάγωνο, αλλά η πιο ακανόνιστη φιγούρα για καλύτερη θανάτωση πλακιδίων. (Ανδρέας)

Οι Factures παρέχουν έναν εύκολο και ισχυρό τρόπο για την επίτευξη λεπτομέρειας επιφάνειας πρακτικά απεριόριστων επιπέδων.
Αυτός είναι ο πρώτος τρόπος της βιομηχανίας να εφαρμόσει μια υφή χωρίς την πραγματική αντιστοίχιση UV . Λειτουργεί παρόμοια με τη ζωγραφική κορυφής. Ωστόσο, ζωγραφίζεις με υφή, όχι μόνο χρώμα.
Οι Factures υποστηρίζονται μόνο με γλυπτική σε λειτουργία επιφάνειας.
Ο κύριος κανόνας είναι ότι μπορείτε να αντιστοιχίσετε μια υφή και ένα χρώμα σε κάθε κορυφή. Κάθε κορυφή σε κάθε στρώμα έχει μόνο ΜΙΑ υφή. Έτσι, εάν ζωγραφίσετε με υφή πάνω από μια άλλη υφή στο τρέχον στρώμα, η υφή θα αντικατασταθεί, δεν θα αναμειχθεί.
Αλλά μπορείτε να εφαρμόσετε πολλές υφές σε κάθε κορυφή χρησιμοποιώντας πολλαπλά επίπεδα με αδιαφάνεια. Εάν οι γειτονικές κορυφές έχουν διαφορετικές υφές, οι υφές θα αναμειχθούν μεταξύ των κορυφών και δεν θα εμφανιστεί καμία ραφή.
Δώστε προσοχή στο εργαλείο Δρόμοι: ζωγραφίζει λωρίδες υφής, όπως ακριβώς χτίζετε δρόμους.
Εάν θέλετε να χρησιμοποιήσετε την αναπτυσσόμενη λίστα Συνθήκες, χρησιμοποιήστε πρώτα το μενού Υπολογισμός για να δημιουργήσετε ή να ενημερώσετε επίπεδα κοιλότητας ή απόφραξης.
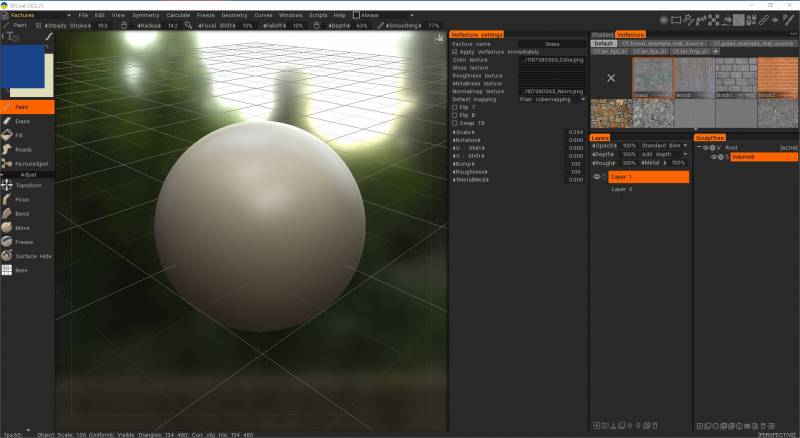
Τα Factures είναι ένα μεγάλο «πασχαλινό αυγό» στο 3DCoat. Είναι ένας πολύ ισχυρός τρόπος για να φτιάξετε εξαιρετικά λεπτομερή αντικείμενα. Για παράδειγμα, έχετε ένα τοπίο και θέλετε να το καλύψετε με γρασίδι, βράχο, άμμο κ.λπ., υφές.
Φυσικά, το άμεσο βάψιμο πάνω από πλέγμα UV είναι κακή ιδέα εκεί. θα απαιτηθούν τεράστιες υφές. Η τοποθέτηση πλακιδίων υφής είναι επίσης κακή ιδέα. Τα πλακάκια είναι καλά ορατά και η άκρη μεταξύ των διαφορετικών υφών είναι επίσης ορατή. Τα Factures είναι μια καλή λύση για αυτό.
Είναι ανά-κορυφή υφή. Η συντεταγμένη UV εκχωρείται στην κορυφή και οι υφές εκχωρούνται επίσης ανά κορυφή. εάν διαφορετικές κορυφές έχουν διαφορετική υφή, θα αναμειχθούν μεταξύ τους και δεν θα εμφανιστούν ραφές.
Υπάρχουν όμως αρκετά προβλήματα:
1) Export. Ο κινητήρας/το 3d-package θα πρέπει να υποστηρίζει κανάλι χρώματος/άλφα ανά κορυφή για χρήση FBX που εξάγεται από το Coat. Συνήθως χρειάζεται να ρυθμίσετε κόμβους για να χρησιμοποιήσετε σωστά τα εξαγόμενα αποτελέσματα.
2) Ακόμα λίγο ημιτελές. Χωρίς καλές υφές και καμία προεπιλεγμένη βιβλιοθήκη υφών. Δεν περιλαμβάνονται σκίαστρες. Θα συμπεριλάβω shaders στην επόμενη κατασκευή.
https://3dcoat.com/forum/applications/core/interface/file/attachment.php?id=20391
Προσθέστε facture, επιλέξτε το. Στο Paint room → ζωγραφίστε με πινέλο. Χρησιμοποιήστε το RMB για τις ιδιότητες του εργοστασίου.
Μπορείτε επίσης να import υλικά Quixel ως υφές Vertex για Factures.
Αριστερός πίνακας εργαλείων
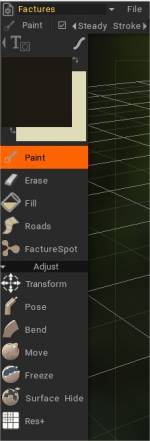
Paint: Paint VerTexture πάνω από το πλέγμα.
Διαγραφή: Διαγραφή του VerTexture.
Συμπλήρωση: Συμπληρώστε με το VerTexture.
Δρόμοι: RoadsTool.
FactureSpot: Ctc_Nick hint = Στο Spot Tool, με την κανονική λειτουργία Brush , απλώς κάντε κλικ μία φορά. Αλλιώς, “αλείφετε” την υφή. Αντ’ αυτού, ορίστε τη λειτουργία Stroke σε Stamp ή Stamp Drag.
Μπορείτε επίσης να:
Δημιουργήστε ένα νέο στρώμα. Σχεδίαση με Εργαλείο ζωγραφικής, Λειτουργία λάσο.
Στη συνέχεια, στις Ρυθμίσεις Vertexture, ενεργοποιήστε το «Apply VerTexture Interactivley» και επεξεργαστείτε Scale, Rotation, U και V Shift για τοποθέτηση.
Προσαρμόζω
Μετασχηματισμός: Μεταμορφώστε το αντικείμενο ως σύνολο. Κάντε κλικ σε ένα αντικείμενο για μετασχηματισμό.
Pose: Τοποθετήστε το αντικείμενο χρησιμοποιώντας μερική επιλογή αντικειμένου.
Κάμψη: Λυγίστε το αντικείμενο γύρω από τον άξονα.
Μετακίνηση: Μετακίνηση επιφάνειας. Πατήστε και σύρετε το LMB για να μετακινήσετε την επιφάνεια εντός του δρομέα σε σχέση με την προβολή οθόνης. Χρησιμοποιήστε CTRL για να μετακινήσετε την επιφάνεια κατά μήκος του κανονικού. Διαφορετικά Alpha δίνουν διαφορετικά αποτελέσματα.
Πάγωμα: Παγώστε μέρη της επιφάνειας. Χρησιμοποιήστε τα πλήκτρα CTRL+D για να καθαρίσετε παγωμένα μέρη και CTRL+SHIFT+I για να αντιστρέψετε το πάγωμα.
Απόκρυψη επιφάνειας: Brush ή χρησιμοποιήστε τη λειτουργία Stroke Draw για να αποκρύψετε τμήματα του επιλεγμένου αντικειμένου VoxTree. Για να αποκρύψετε, επιλέξτε αυτήν την επιλογή από το Μενού Γεωμετρία.
Res+: Αυξήστε την ανάλυση του τρέχοντος αντικειμένου.
Ρυθμίσεις υλικού Vertex
Στην επάνω δεξιά γωνία, θα δείτε ένα βέλος που, όταν πατάτε, εμφανίζει τις επιλογές δημιουργίας νέων φακέλων για τη δημιουργία διαφορετικών νέων κατηγοριών Vertextures για Factures.
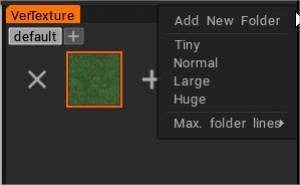
Μπορείτε να δημιουργήσετε νέους φακέλους και να ορίσετε το μέγεθος της οπτικοποίησης των εικονιδίων Vertextures.
Πίνακας βιβλιοθήκης υλικού Vertext
Οι ρυθμίσεις που αντιστοιχούν σε κάθε VerTexture που δημιουργείται μπορούν να προβληθούν και να τροποποιηθούν στο παράθυρο Ρυθμίσεις Vertexture.
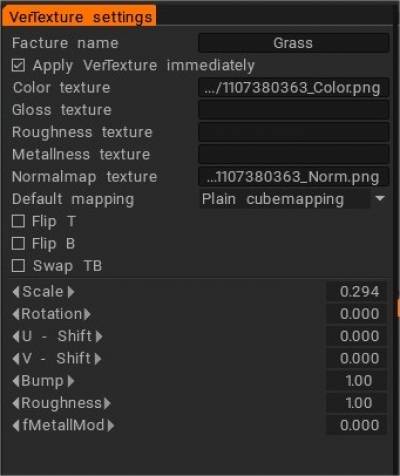
- Άμεση εφαρμογή VerTexture : Εφαρμογή των αλλαγών των ιδιοτήτων VerTexture σε ολόκληρο το τρέχον επίπεδο
- Έγχρωμη υφή
- Γυαλιστερή υφή
- Υφή τραχύτητας:
- Μεταλλική υφή:
- Κανονική υφή χάρτη:
Προεπιλεγμένη mapping
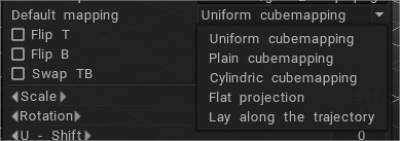
- Ομοιόμορφη mapping κύβου: Η ομοιόμορφη mapping κύβου επιτρέπει την εξάλειψη των πλακιδίων λόγω της τυχαιοποίησης της περιστροφής του τεμαχίου. Προσέξτε ότι οι υφές πρέπει να είναι θορυβώδεις και σχετικά ομοιόμορφες.
- Απλή mapping κύβου: Συνήθης mapping κύβου χωρίς τυχαιοποίηση.
- mapping κυλινδρικού κύβου : mapping κύβου με το χαμηλό πτερύγιο της επάνω πλευράς.
- Επίπεδη προβολή:
- Ξαπλώστε κατά μήκος της τροχιάς:
Flip T: Αναστροφή T διάνυσμα για τον κανονικό χάρτη.
Flip B: Flip B διάνυσμα για τον κανονικό χάρτη.
Εναλλαγή TB: Εναλλαγή διανυσμάτων T & B για τον normal map.
Κλίμακα
Περιστροφή
U – Shift
V – Shift
Χτύπημα
Τραχύτητα
fMetallMod
 Ελληνικά
  English
 Українська
 Español
 Deutsch
 Français
 日本語
日本語 Русский
 한국어
한국어 Polski
 中文 (中国)
 Português
 Italiano
 Suomi
Suomi Svenska
 中文 (台灣)
 Dansk
Dansk Slovenčina
 Türkçe
 Nederlands
 Magyar
 ไทย
ไทย हिन्दी
 Tiếng Việt
 Lietuviškai
 Latviešu valoda
 Eesti
Eesti Čeština
 Română
 Norsk Bokmål