Τώρα πρέπει να μάθουμε πώς να χρησιμοποιούμε σωστά το χρώμα. Για αυτό το σημείο, τοποθετήστε τον κέρσορα στο εικονίδιο “Χρώμα” στον αριστερό πίνακα εργαλείων και κάντε κλικ σε ένα τετράγωνο κάτω από την επιγραφή “Χρώμα”. Με αυτόν τον τρόπο, θα δείτε ένα πλαίσιο που σας επιτρέπει να επιλέξετε ένα χρώμα. Σε αυτό το πλαίσιο υπάρχουν περαιτέρω επιλογές για άλλους επιλογείς χρωμάτων. Έχετε πέντε διαφορετικά χρώματα επιλογής? Το τελευταίο σάς επιτρέπει να επιλέξετε ένα χρώμα από οποιαδήποτε εικόνα φορτώνετε.
Αυτό το χρώμα θα βάψει το τετράγωνο που δείξατε. Δείχνει το τρέχον χρώμα. Μπορείτε επίσης να επιλέξετε το δεύτερο χρώμα: κάντε κλικ σε ένα εικονίδιο ακριβώς δίπλα στο πρώτο εικονίδιο χρώματος στο πλαίσιο «Το χρώμα» (σε αυτήν την εικόνα, το πρώτο χρώμα είναι πράσινο και το δεύτερο μαύρο).
Εκτός από ένα τυπικό σύνολο επιλογών χρώματος, το παράθυρο «Επιλογή χρώματος» περιέχει διάφορες λειτουργίες επιλογής χρώματος: HSL και IMG (επιλογή από εικόνα). Για το τελευταίο, υπάρχουν διαθέσιμα επιπλέον κουμπιά.
Υπάρχουν πέντε Color Pickers για να διαλέξετε. Αυτά καθίστανται διαθέσιμα κάνοντας αριστερό κλικ στα χρωματικά δείγματα στο επάνω αριστερό μέρος του κύριου πίνακα εργαλείων ζωγραφικής. Αυτοί είναι:

- Τριγωνικός
- Μπαρ
- Γύρος
- Τετράδυμο
- Εικόνα
Αυτά καθίστανται διαθέσιμα κάνοντας αριστερό κλικ στα χρωματικά δείγματα στο επάνω αριστερό μέρος του κύριου πίνακα εργαλείων ζωγραφικής. Οι pickers λειτουργούν ακριβώς όπως οι αντίστοιχοι σε άλλες mainstream εφαρμογές ζωγραφικής.
Επιλογέας χρώματος εικόνας
Ενώ τα τέσσερα πρώτα είναι κοινά, ας συζητήσουμε το Image Color Picker λίγο πιο αναλυτικά.
Σας επιτρέπει να επιλέξετε ένα χρώμα από μια εικόνα και είναι επίσης βολικό για να διατηρείτε μια εικόνα αναφοράς ανοιχτή ανά πάσα στιγμή κατά τη διάρκεια των εργασιών γλυπτικής ή ζωγραφικής. Μπορείτε να χειριστείτε ποιο τμήμα αυτής της εικόνας είναι ορατό και τη θέση της στο παράθυρο με τα τρία χειριστήρια gizmo σε αυτόν τον πίνακα.
Επιλέξτε την εικόνα της επιλογής σας με το κουμπί Επιλογή ή Επικολλήστε την εικόνα από το Πρόχειρό σας. Μόλις χρησιμοποιηθεί, μια εικόνα γίνεται διαθέσιμη μέσω του αναπτυσσόμενου βέλους στα δεξιά του ονόματος της εικόνας.
Πίνακας χρώματος εικόνας
Η εξαίρεση είναι ο πίνακας έγχρωμης εικόνας , ο οποίος σας επιτρέπει να αντιστοιχίσετε μια εικόνα της επιλογής σας, από την οποία μπορείτε να επιλέξετε οποιαδήποτε απόχρωση υπάρχει στην εικόνα για ζωγραφική.
Αυτό είναι επίσης πολύ βολικό για να διατηρείτε μια εικόνα αναφοράς ανοιχτή ανά πάσα στιγμή κατά τη διάρκεια εργασιών γλυπτικής ή ζωγραφικής.
Μπορείτε να χειριστείτε ποιο τμήμα αυτής της εικόνας είναι ορατό και τη θέση της στο παράθυρο, με τα τρία χειριστήρια ακριβώς κάτω από αυτήν και στα αριστερά του παραθύρου της εικόνας.
Επιλέξτε την εικόνα της επιλογής σας με το κουμπί “Επιλογή” ή “Επικόλληση” της εικόνας από το Πρόχειρό σας. Μόλις χρησιμοποιηθεί, μια εικόνα γίνεται διαθέσιμη μέσω του “αναπτυσσόμενου βέλους” στα δεξιά του ονόματος της εικόνας.
Φροντιστήριο
Image Picker : Αυτό το βίντεο παρουσιάζει το Image Picker σε 3DCoat, το οποίο επιτρέπει στο χρήστη να δειγματίζει πληροφορίες χρώματος από μια εικόνα, καθώς και να χρησιμεύει ως εικόνα αναφοράς με δυνατότητα σύνδεσης.
Χρήση εικόνων αναφοράς : Αυτό το βίντεο δείχνει τη χρήση εικόνων αναφοράς. Είτε ως επίπεδα εικόνας στη θύρα προβολής είτε ως χρήση του Επιλογέα εικόνας ως στατικής εικόνας αναφοράς στο περιβάλλον εργασίας χρήστη.
Τώρα πρέπει να μάθουμε πώς να χρησιμοποιούμε σωστά το χρώμα. Για αυτό το σημείο, τοποθετήστε τον κέρσορα στο εικονίδιο “Χρώμα” στον αριστερό πίνακα εργαλείων και κάντε κλικ σε ένα τετράγωνο κάτω από την επιγραφή “Χρώμα”. Με αυτόν τον τρόπο, θα δείτε ένα πλαίσιο που σας επιτρέπει να επιλέξετε ένα χρώμα. Σε αυτό το πλαίσιο υπάρχουν περαιτέρω επιλογές για άλλους επιλογείς χρωμάτων. Έχετε πέντε διαφορετικά χρώματα επιλογής? Το τελευταίο σάς επιτρέπει να επιλέξετε ένα χρώμα από οποιαδήποτε εικόνα φορτώνετε.

Αυτό το χρώμα θα βάψει το τετράγωνο που δείξατε. Δείχνει το τρέχον χρώμα. Μπορείτε επίσης να επιλέξετε το δεύτερο χρώμα: κάντε κλικ σε ένα εικονίδιο ακριβώς δίπλα στο πρώτο εικονίδιο χρώματος στο πλαίσιο «Το χρώμα» (σε αυτήν την εικόνα, το πρώτο χρώμα είναι πράσινο και το δεύτερο μαύρο). Το δεύτερο χρώμα χρησιμοποιείται στο κανάλι διάχυσης ενώ εργάζεστε με τη λίστα πτώσης.
Εκτός από ένα τυπικό σύνολο επιλογών χρώματος, το παράθυρο «Επιλογή χρώματος» περιέχει διάφορες λειτουργίες επιλογής χρώματος: HSL και IMG (επιλογή από εικόνα). Για το τελευταίο, υπάρχουν διαθέσιμα επιπλέον κουμπιά.
Υπάρχουν επιπλέον επιλογές για τον πίνακα επιλογής χρώματος εικόνας:
- Εικονίδια χειριστή. Με τα εικονίδια στο αριστερό επάνω μέρος του επιλογέα χρώματος εικόνας, μπορείτε να μετακινήσετε/ζουμ/επαναφέρετε τη θέση της εικόνας.
- Επιλέγω. Επιλέξτε μια εικόνα από το αρχείο.
- Επικόλληση. Επικολλήστε την εικόνα από το πρόχειρο και χρησιμοποιήστε την σαν προσαρμοσμένο εργαλείο επιλογής.
- Αναπτυσσόμενη λίστα εικόνας . Εάν έχετε περισσότερες από μία εικόνες, μπορείτε να κάνετε πολλαπλή επιλογή από κάθε μία κάνοντας κλικ εδώ στη λίστα.
Επιπλέον, για γρήγορη επιλογή χρώματος, πατάτε και κρατάτε πατημένο το πλήκτρο «Β» (όταν το καλείτε με αυτόν τον τρόπο, ανοίγετε το παράθυρο μείωσης μεγέθους «Επιλογή χρώματος», όπως και όταν καλείτε από τον επιλογέα χρωμάτων Windows→ Αναδυόμενα παράθυρα- >Επιλογή χρώματος. RMB’ για να απενεργοποιήσετε/ενεργοποιήσετε τη χρήση χρώματος. Ισοδυναμεί με την επιλογή λευκού χρώματος. Μπορείτε να πάρετε χρώμα απευθείας από μια επιφάνεια, να στρέψετε τον κέρσορα σε ένα αντίστοιχο σημείο και να πατήσετε “V”.
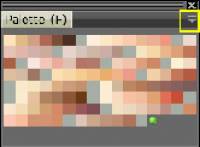
Πάνελ παλέτας χρωμάτων
Μπορείτε επίσης να επιλέξετε ένα χρώμα από ένα παράθυρο της παλέτας χρωμάτων. υπάρχουν τρεις προκαθορισμένες παλέτες:
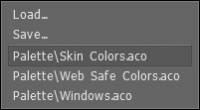
Κάντε κλικ στην αναπτυσσόμενη λίστα:

Υπάρχουν 3 προκαθορισμένες παλέτες:

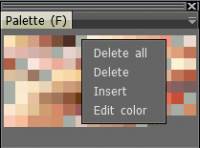
Μπορείτε να φορτώσετε και να αποθηκεύσετε ένα αρχείο παλέτας χρωμάτων .ACO. Μπορείτε επίσης να κάνετε δεξί κλικ σε ένα χρώμα για να αλλάξετε τις ιδιότητες του χρώματος:

 Ελληνικά
  English
 Українська
 Español
 Deutsch
 Français
 日本語
日本語 Русский
 한국어
한국어 Polski
 中文 (中国)
 Português
 Italiano
 Suomi
Suomi Svenska
 中文 (台灣)
 Dansk
Dansk Slovenčina
 Türkçe
 Nederlands
 Magyar
 ไทย
ไทย हिन्दी
 Tiếng Việt
 Lietuviškai
 Latviešu valoda
 Eesti
Eesti Čeština
 Română
 Norsk Bokmål