Προσθήκη/Διαίρεση : Αυτό το εργαλείο σάς επιτρέπει απλώς να προσθέτετε άκρες δείχνοντας και κάνοντας κλικ στη θέση που θέλετε να προσθέσετε την άκρη. Δείτε επίσης Προσθήκη/διαίρεση προσθήκης .
Επιλογή : Σε αυτήν τη λειτουργία μπορείτε να επιλέξετε μεμονωμένες κορυφές, άκρες και όψεις. Χρησιμοποιήστε το CTRL για να αφαιρέσετε στοιχεία από την επιλογή. Επιλέξτε ένα στοιχείο με LMB και μετά μετακινήστε το (σύρετε) με RMB. Στη λειτουργία “Face” χρησιμοποιήστε το INSERT για υποδιαίρεση προσώπων και το DEL για διαγραφή. Στη λειτουργία ‘Edge’ χρησιμοποιήστε το INSERT για να χωρίσετε άκρες, το BKSP για σύμπτυξη, το DEL για να αφαιρέσετε άκρες, το L για να επιλέξετε βρόχους άκρων και το R για να επιλέξετε δακτυλίους άκρων, το SHIFT για να επιλέξετε/επισημάνετε τους δακτυλίους ακμών.
Λειτουργία Soft Selection στο 3DCoat 2022, για τους χώρους εργασίας Retopo και Modeling. Επίσης, ενσωματώνει τις ίδιες λειτουργίες επιλογής από το εργαλείο Pose στον χώρο εργασίας Sculpt.
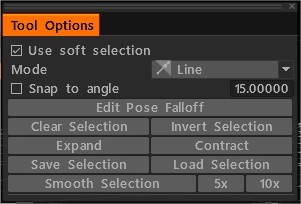
Το εργαλείο επιλογής διαθέτει λειτουργίες επιλογής, που σας επιτρέπουν να επιλέξετε Κορυφές, άκρες και Πρόσωπα.
Επιλέξτε Μετασχηματισμός:
Επιλογή διαδρομής: Ορίστε μια ραφή για το ξετύλιγμα προσδιορίζοντας μια διαδρομή που αποτελείται από κορυφές που επιλέγετε με γραμμική σειρά. Πατήστε “Enter” όταν καθορίζετε τη διαδρομή σας για τη δημιουργία της ραφής.
Quads : Η βασική χρήση αυτού του εργαλείου σας επιτρέπει να επιλέξετε μια άκρη ενός πολυγώνου και, στη συνέχεια, να σύρετε και να κάνετε κλικ στην τοποθέτηση των άκρων για ένα νέο πολύγωνο. Δείτε επίσης Quads.
Μπορείτε να χρησιμοποιήσετε τέσσερις διαφορετικές μεθόδους για τον ορισμό νέας τοπολογίας, ένα τετράγωνο τη φορά. Είναι μέθοδοι 2 κλικ, Parallel, Direct και Trapezoid.

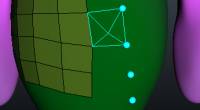
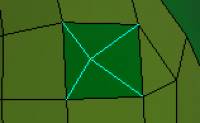
Σημεία προς πολύγωνα : Χρησιμοποιήστε αυτό το εργαλείο για να δημιουργήσετε τετράγωνα ή τρίγωνα, σημείο προς σημείο, τοποθετώντας τον κέρσορα του ποντικιού πάνω από την περιοχή που ορίζεται από τα σημεία και “Κάνοντας δεξί κλικ” για να δημιουργήσετε το νέο πολύγωνο. Μπορείτε να μετακινήσετε κορυφές κάνοντας «δεξί κλικ» και σύροντάς τις.
Χρησιμοποιήστε το Ειδικό Υπομενού για να διαγράψετε σημεία.
Cap : Περνώντας τον κέρσορα του ποντικιού πάνω από μια τρύπα που περιβάλλεται από συνδεδεμένη τοπολογία και “Δεξί κλικ” δημιουργείται ένας “πόλος” και τα συνδετικά τρίγωνα που κλείνουν την τρύπα.
Πινακίδες Σχεδιάστε πινελιές και πατήστε ENTER για να δημιουργήσετε μια πολυ-επιφάνεια. Πατήστε το ESC για να καθαρίσετε τις πινελιές. Σχεδιάστε με CTRL για να προσθέσετε splines και να συνδέσετε και να σπάσετε υπάρχουσες πινελιές. Μπορείτε επίσης να σχεδιάσετε κλειστές σφήνες/καμπύλες. Ξεκινήστε να σχεδιάζετε στο κενό για να το κόψετε. Μπορείτε να ενώσετε πολλές φέτες ή κύκλους με μία μόνο διαδρομή για να δημιουργήσετε κυλίνδρους.
- Καμπύλες/Καμπύλες : Δημιουργήστε τοπολογικές «κοψίματα» που σχηματίζουν βρόχους μέσω μιας περιοχής μοντέλου ή σχεδιάστε σφήνες ελεύθερης μορφής με ομοιόμορφη απόσταση κορυφών που ορίζετε εκ των προτέρων. Μία χρήση αυτού του εργαλείου είναι ο καθορισμός ενός περιβάλλοντος κυλίνδρου πολυγωνικών δακτυλίων σχεδιάζοντας πρώτα μια ακολουθία βρόχων (αρχίστε να σχεδιάζετε στο διάστημα και τελειώστε στο διάστημα) και στη συνέχεια σχεδιάστε μια σφήνα ελεύθερης μορφής κατά μήκος ενός μοντέλου “παραρτήματος” (χέρι ή πόδι ) και πατήστε «Enter» για να οριστικοποιήσετε και να δημιουργήσετε ένα κυλινδρικό σύνολο προσόψεων που ορίζουν το προσάρτημα.
Υπάρχουν μερικές τοπικές εντολές σε αυτό το εργαλείο στο Ειδικό Υπομενού:
- Σαφή. Αυτό θα καθαρίσει όλες τις γραμμές σχεδίασης.
- Λείος. Εξομαλύνει όλες τις τρέχουσες γραμμές που σχεδιάζονται.
- Διαγράφω. Αυτό θα διαγράψει τη γραμμή που έχετε επιλέξει.
Προστέθηκαν οι λειτουργίες boolean για τα πρωτόγονα retopo στο Retopo και στο Modeling room. Μπορείτε να δημιουργήσετε πρωτόγονα χρησιμοποιώντας τις πράξεις boolean add, αφαίρεση, τομή και διαίρεση.
3D Primitives: εργαλεία για τη δημιουργία 3D primitives για δωμάτια Modeling και Retopo . Μπορείτε να δημιουργήσετε τα δισδιάστατα πρωτόγονα (κύκλος, πλαίσιο, επίπεδο, έλλειψη, N-gon, δίσκος, τρίγωνο).
2D Primitives: εργαλεία για τη δημιουργία 2D primitives για δωμάτια Modeling και Retopo . Μπορείτε να δημιουργήσετε τρισδιάστατα πρωτόγονα (σφαίρες, κύβους, κύλινδρους κ.λπ.).
RFill : Αυτό το βίντεο δείχνει τη χρήση του εργαλείου RFill στον χώρο εργασίας Retopology του 3DCoat. Μπορεί να μετονομαστεί σε «Quad Fill» στο εγγύς μέλλον, καθώς γεμίζει τα ανοίγματα στο πλέγμα με τετράγωνα.
Αυτό είναι ένα εργαλείο Quad Fill που έχει σχεδιαστεί για να γεμίζει τρύπες σε ένα πλέγμα με την κατάλληλη τοπολογική ροή.
Μαχαίρι Κόψτε ένα πρόσωπο με μαχαίρι. Σχεδιάστε τη γραμμή και πατήστε ENTER ή DblClick. Επίσης, μπορείτε να σχεδιάσετε ένα πολύγωνο κατά δύο σημεία.
Smart Retopo Το βίντεο δείχνει αυτό που ονομάζουμε λειτουργία Smart-Retopo, με βάση τη χρήση του συνόλου εργαλείων Curves.
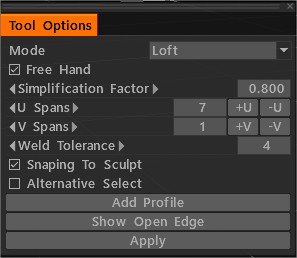
Στη λειτουργία Loft σχεδίαση πινελιών και πατήστε ENTER (Εφαρμογή) για να δημιουργήσετε μια πολυεπιφάνεια σοφίτας (Retopo Mesh).
Μπορείτε να σχεδιάσετε απλή επιφάνεια-λωρίδα στη λειτουργία Λωρίδα.
Μπορείτε να σχεδιάσετε το όριο του πλέγματος σε λειτουργία Τετραγωνισμού.
Αφού πατήσετε Enter, δημιουργώντας προπαρασκευαστικό πλέγμα. Μπορείτε να επεξεργαστείτε τη γραμμή ορίου. πατήστε ENTER (Εφαρμογή) για να δημιουργήσετε ένα Retopo Mesh. Πατήστε το ESC για να καθαρίσετε τις πινελιές.
Κρατήστε πατημένο το Shift για να απενεργοποιήσετε το Snapping. Ξεκινήστε να σχεδιάζετε σε κενό χώρο για κοπή. Επεξεργασία άκρων με το δεξί κουμπί του ποντικιού. Αν κρατήσετε πατημένο το Ctrl, ενεργοποιήστε το Slide Edge. Αν κρατήσετε πατημένο το Ctrl+Shift, ενεργοποιήστε το Splite Rings.
U Spans Καθορίζει τον αριθμό των κόμβων στη μεγαλύτερη καμπύλη. Ο αριθμός των βημάτων σε άλλα εξαρτάται από το μήκος της καμπύλης. Εάν κρατήσετε πατημένο το Ctrl, μπορείτε να αλλάξετε το U Spans με τον τροχό του ποντικιού.
Αντιστοιχία Ποσοτήτων USpan/VSpans προς Ποσότητα προσώπου. Προστέθηκε το κουμπί ελέγχου “Εναλλακτική επιλογή”.
Spine Tool Εξώθηση επιλεγμένων όψεων κατά μήκος του τόξου. Ένα Transform Gizmo μπορεί να επεξεργαστεί τη γωνία και τον άξονα του τόξου. Μπορείτε να επεξεργαστείτε τον Αριθμό τμημάτων και τον παράγοντα Κλίμακα. Στη λειτουργία Spline, μπορείτε να σύρετε σημεία LMB για να μετακινηθείτε σε χώρο 3D και να χρησιμοποιήσετε τον Τροχό κύλισης στο ποντίκι (ή αντίστοιχο στο Wacom Tablet) για να κλιμακώσετε διαδραστικά τη γεωμετρία του βρόχου άκρων που περιβάλλει το σημείο στο οποίο έχει τελειώσει ο δρομέας. Κάθε σημείο spline αντιπροσωπεύει μια νέα εξώθηση. Πατώντας το πλήκτρο ENTER ή το κουμπί NEW EXTRUDE στον πίνακα Επιλογές εργαλείου δημιουργείται ένα νέο σημείο εξώθησης/εξώθησης. Κάνοντας διπλό κλικ κατά μήκος του spline δημιουργείται ένα ενδιάμεσο (βρόχος άκρων) εξώθηση/(spline) σημείο, ενώ το διπλό κλικ σε ένα σημείο αφαιρεί ένα σημείο εξώθησης (βρόχος άκρης) / (spline).
Smart Extrude Εξωθήστε την όψη ή την άκρη προς οποιαδήποτε κατεύθυνση. Πατώντας το πλήκτρο ENTER δημιουργείται μια νέα εξώθηση. Μπορείτε επίσης να κλιμακώσετε διαδραστικά (RMB + Drag) και να περιστρέψετε (SHIFT + Drag) επιλεγμένα πρόσωπα ή άκρες.
- Δωρεάν Εξώθηση Εξώθηση προς οποιαδήποτε κατεύθυνση. Να θυμάστε ότι οι νέες κορυφές δεν θα κοπούν αυτόματα, αλλά θα κουμπώσουν σε περαιτέρω λειτουργίες εάν δεν απενεργοποιήσετε το Auto snap.
- Normal Extrude Εξώθηση κατά τη μέση κανονική κατεύθυνση. Να θυμάστε ότι οι νέες κορυφές δεν θα κοπούν αυτόματα, αλλά θα κουμπώσουν σε περαιτέρω λειτουργίες εάν δεν απενεργοποιήσετε το Auto snap.
- Εξώθηση όψεων Εξώθηση όψεων ώστε κάθε όψη να μετακινείται στην ίδια απόσταση όποτε είναι δυνατόν. Προσέξτε ότι σε ορισμένες περιπτώσεις, η μετατόπιση ακριβώς παράλληλων όψεων είναι αδύνατη, αλλά το 3DCoat προσπαθεί να μετατοπίσει όσο το δυνατόν ακριβέστερα.
Δωρεάν μετακίνηση Μετακίνηση επιλεγμένων προσόψεων/άκρων/κορυφών. Χρησιμοποιώντας ποντίκι ή Gizmo. Εάν δεν έχει επιλεγεί τίποτα, ολόκληρο το πλέγμα θα κινείται. Μπορείτε να μετακινήσετε μια προηγουμένως επιλεγμένη ομάδα ή σημείο με τον κέρσορα του ποντικιού πατώντας το αριστερό κουμπί. Η επιλογή [Auto pick] πρέπει να είναι ενεργοποιημένη.
- Ελεύθερη περιστροφή Περιστροφή επιλεγμένων προσόψεων/άκρων/κορυφών. Χρησιμοποιώντας ποντίκι ή Gizmo. Εάν δεν έχει επιλεγεί τίποτα, ολόκληρο το πλέγμα θα είναι Περιστρεφόμενο. Μπορείτε να περιστρέψετε την προηγουμένως επιλεγμένη ομάδα ή σημείο με τον κέρσορα του ποντικιού πατώντας το αριστερό κουμπί. Η επιλογή [Auto pick] πρέπει να είναι ενεργοποιημένη.
- Δωρεάν κλιμάκωση Κλιμάκωση επιλεγμένων προσόψεων/άκρων/κορυφών. Χρησιμοποιώντας ποντίκι ή Gizmo. Εάν δεν έχει επιλεγεί τίποτα, ολόκληρο το πλέγμα θα είναι Scaling. Μπορείτε να κλιμακώσετε την προηγουμένως επιλεγμένη ομάδα ή το σημείο με τον κέρσορα του ποντικιού πατώντας το αριστερό κουμπί. Η επιλογή [Auto pick] πρέπει να είναι ενεργοποιημένη.
Δημιουργία αρμών : Υπάρχουν δύο τρόποι για να φτιάξετε στοιχειώδη τούβλα για το εργαλείο Αρμών.
Παραδείγματα πρωτόγονων
Primitives : Προσθέστε απλά primitives στη σκηνή. Μπορείτε να μοντελοποιήσετε μια βιβλιοθήκη με meshes, splines και αντικείμενα περιστροφής. Χρησιμοποιήστε τον πίνακα επιλογών εργαλείων για να μεταμορφώσετε το μοντέλο πριν από την εφαρμογή.
Retopo Primitives : Αυτό το βίντεο παρουσιάζει το εργαλείο Primitives στον χώρο εργασίας Retopo του 3DCoat. Βοηθά στη γρήγορη δημιουργία αντικειμένων πλέγματος Retopo , αλλά μπορεί να χρησιμοποιηθεί και ως σημείο εκκίνησης για πολυμοντελοποίηση στο 3DCoat.
FreeForm Retopo Primitives : Αυτό το βίντεο δείχνει τη χρήση των προεπιλογών Retopo Model ως FreeForm Deformation Primitives στον χώρο εργασίας Retopo του 3DCoat και μια συμβουλή για τη μοντελοποίηση εναλλακτικά μεταξύ του περιβάλλοντος Retopo και Sculpt.
R-Fill: Αυτό είναι ένα εργαλείο Quad Fill που έχει σχεδιαστεί για να γεμίζει τρύπες σε ένα πλέγμα με την κατάλληλη τοπολογική ροή.
Μαχαίρι: Κόψτε ένα πρόσωπο με μαχαίρι. Σχεδιάστε τη γραμμή και πατήστε ENTER.
Free Extrude: Εξώθηση προς οποιαδήποτε κατεύθυνση. Να θυμάστε ότι οι νέες κορυφές δεν θα κοπούν αυτόματα, αλλά θα κουμπώσουν σε περαιτέρω λειτουργίες εάν δεν απενεργοποιήσετε το Auto snap.
Έξυπνη εξώθηση: Εξωθήστε την όψη ή την άκρη προς οποιαδήποτε κατεύθυνση. Πατώντας το πλήκτρο ENTER δημιουργείται μια νέα εξώθηση. Μπορείτε επίσης να κλιμακώσετε διαδραστικά (RMB + Drag) και να περιστρέψετε (SHIFT + Drag) επιλεγμένα πρόσωπα ή άκρες.
Smart Extrude μέρος 2
Smart Extrude in 3DCoat Part2 : Τα εργαλεία εξώθησης έχουν τροποποιηθεί όπως ζητήθηκε από τους χρήστες. Με μια νέα επιλογή, η εξώθηση είναι αυτόματη όταν ξεκινά η κίνηση. Η δυνατότητα να λειτουργήσει όπως πριν απομένει για το Smart Extrude.
Smart Extrude μέρος 3
Εργαλείο Spline: Εξώθηση επιλεγμένων όψεων κατά μήκος του τόξου. Ένα Transform Gizmo μπορεί να επεξεργαστεί τη γωνία και τον άξονα του τόξου. Μπορείτε να επεξεργαστείτε τον Αριθμό τμημάτων και τον παράγοντα Κλίμακα. Στη λειτουργία Spline, μπορείτε να σύρετε σημεία LMB για να μετακινηθείτε σε χώρο 3D και να χρησιμοποιήσετε τον Τροχό κύλισης στο ποντίκι (ή αντίστοιχο στο Wacom Tablet) για να κλιμακώσετε διαδραστικά τη γεωμετρία του βρόχου άκρων που περιβάλλει το σημείο στο οποίο έχει τελειώσει ο δρομέας.
Κάθε σημείο spline αντιπροσωπεύει μια νέα εξώθηση. Πατώντας το πλήκτρο ENTER ή το κουμπί NEW EXTRUDE στον πίνακα Επιλογές εργαλείου δημιουργείται ένα νέο σημείο εξώθησης/εξώθησης.
Με διπλό κλικ κατά μήκος του spline δημιουργείται ένα ενδιάμεσο άκρο βρόχου εξώθησης/σημείο spline, ενώ το διπλό κλικ σε ένα σημείο αφαιρεί ένα σημείο εξώθησης βρόχου ακμής/σημείο spline.
Ελεύθερη μετακίνηση: Μετακίνηση επιλεγμένων προσώπων/άκρων/κορυφών. Χρησιμοποιώντας ποντίκι ή Gizmo. Εάν δεν έχει επιλεγεί τίποτα, ολόκληρο το πλέγμα θα κινείται. Μπορείτε να μετακινήσετε μια προηγουμένως επιλεγμένη ομάδα ή σημείο με τον κέρσορα του ποντικιού πατώντας το αριστερό κουμπί. Η επιλογή [Auto pick] πρέπει να είναι ενεργοποιημένη.
Surface Swept: Δημιουργία πλέγματος μετακινώντας το προφίλ κατά μήκος επιλεγμένου οδηγού καμπύλης. Η συχνότητα βημάτων πλέγματος ρυθμίζεται σε 2 κατευθύνσεις από U και V Spanse. Είναι επίσης δυνατό να εισαγάγετε πρόσθετους δακτυλίους άκρων στην επιθυμητή θέση με διπλό κλικ κοντά στην παχιά ροζ ή μπλε καμπύλη.
Προστέθηκε λειτουργία: “Twist Plots Editable”. Η δυνατότητα ελέγχου της περιστροφής κατά μήκος των τμημάτων της τροχιάς.
Surface Swept Tool : Σε αυτήν τη λειτουργία, η κλιμάκωση είναι διαθέσιμη κατά μήκος των αξόνων X / Y.
Προφίλ: Δημιουργία πλέγματος μετακινώντας το προφίλ κατά μήκος του άξονα ή επιλεγμένο οδηγό καμπύλης. Η συχνότητα βημάτων πλέγματος ρυθμίζεται σε 2 κατευθύνσεις από U και V Spanse.
Επιφανειακή ταινία: Μια λωρίδα μπορεί να δημιουργηθεί σχεδιάζοντας μια κεντρική γραμμή. Το πλάτος της λωρίδας που μπορείτε να επεξεργαστείτε κοντά σε σημεία spline με τον τροχό του ποντικιού. Μπορείτε να εισαγάγετε και να διαγράψετε σημεία spline με DblClick. Πατήστε Esc για να ξεκινήσετε να σχεδιάζετε άλλες καμπύλες.
Surface Swept 2: Δημιουργία πλέγματος μετακινώντας το προφίλ κατά μήκος δύο επιλεγμένων οδηγών καμπύλης. Η συχνότητα βημάτων πλέγματος ρυθμίζεται σε 2 κατευθύνσεις από U και V Spanse.
Swept Surface N Geners: Οι Sweep Surface θα δημιουργηθούν μετακινώντας προφίλ N κατά μήκος δύο οδηγών καμπυλών. Αφού εμφανιστεί το παράθυρο διαλόγου Επιλογές εργαλείου, πρέπει να επιλέξετε το δεύτερο προφίλ οδηγού και καμπύλης. Το νέο στοιχείο στο VoxTree θα δημιουργηθεί και το πλέγμα θα τοποθετηθεί εκεί.
Επιλέξτε το αντίστοιχο αντικείμενο στο SculptTree για να μπορείτε να αλλάξετε παραμέτρους όπως πάχος, ποσότητα όψεων και εξομάλυνση. Διαγράψτε το αντίστοιχο στοιχείο SculptTree για να σταματήσετε να γεμίζετε την καμπύλη.
Η επιφάνεια περιστροφής: Η επιφάνεια περιστροφής θα δημιουργηθεί με περιστροφή του επιλεγμένου προφίλ γύρω από τον επιλεγμένο άξονα καμπύλης. Η συχνότητα βημάτων πλέγματος ρυθμίζεται σε 2 κατευθύνσεις από U και V Spanse.
Επιφάνεια κατά 2 προβολές: Το πλέγμα που δημιουργείται μετακινώντας δύο κωνικά κατά μήκος του οδηγού καμπύλης. Μπορείτε να επεξεργαστείτε την καμπύλη. Το “Surface by 2 Views” δεν είναι ενεργοποιημένο στο σύστημα συντεταγμένων Z-Up.
Επιφάνεια σοφίτας: Οι επιφάνειες σοφίτας είναι επιφάνειες που δημιουργούνται από πολλαπλές καμπύλες δημιουργώντας μια ομαλή εφαπτομένη μεταξύ των επιλεγμένων καμπυλών. Δημιουργία πλέγματος με κίνηση σε επιλεγμένο τμήμα καμπύλης. Η συχνότητα βημάτων πλέγματος ρυθμίζεται σε 2 κατευθύνσεις από U και V Spanse.
Παράδειγμα επιφάνειας σοφίτας από τον Fluffy
Επιφανειακή επικάλυψη: Επιλεγμένες καμπύλες ορίζουν το όριο και τη γεωμετρία του πλέγματος. Η συχνότητα βημάτων πλέγματος ρυθμίζεται από το U Spanse.
Φάλτσο: δημιουργήστε ένα φάλτσο στις άκρες.
Συστοιχία αντιγράφων: Μπορείτε να δημιουργήσετε αντίγραφα για επιλεγμένα πρόσωπα ή τις τρέχουσες Poly Groups. Πρέπει να καθορίσετε τον αριθμό των αντιγράφων για γραμμικούς και ακτινωτούς τύπους. Για αντίγραφα κατά μήκος ενός spline, καθορίστε τον αριθμό των βημάτων.
Πλέγμα: Το πλέγμα θα δημιουργηθεί από άκρες ή επιλεγμένες όψεις. Το πλάτος μπορεί να αλλάξει χρησιμοποιώντας τον ευαίσθητο κύκλο. Η οριζόντια μετακίνηση του κέρσορα αλλάζει το πλάτος και το κατακόρυφο – βάθος.
Σε NURBS Surface: Μετατροπή επιφανειών πλέγματος χαμηλής πολυπλοκότητας σε επιφάνειες NURBS χρησιμοποιώντας τον αλγόριθμο Catmull-Clark. Με επακόλουθη export σε αρχείο IGES. Είναι επίσης δυνατή η συγχώνευση επιφανειών πριν από την export.
Επιλέξτε δύο Επιφάνειες για Ενοποίηση. Πατήστε Esc (ή μεσαίο κουμπί του ποντικιού) για να ξεκινήσετε μια νέα επιλογή.
Η export IGES θα απαιτήσει ειδική άδεια μετά τη δοκιμαστική περίοδο, επειδή είναι ουσιαστικά βιομηχανικό χαρακτηριστικό.
https://www.youtube.com/embed/cneyBIgDVn4?feature=oembedTo Nurbs
Προσθέστε παραδείγματα εργαλείων Γεωμετρίας
Μικροδιόρθωση
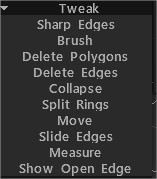
Αιχμηρές άκρες: Σημειώστε τις άκρες ως αιχμηρές. Τα κανονικά θα χωριστούν κατά μήκος αυτών των άκρων.
Brush: Αυτό το εργαλείο λειτουργεί παρόμοια με μια μαλακή επιλογή. Οι κορυφές που βρίσκονται πιο κοντά στο κέντρο του δρομέα της βούρτσας κινούνται περισσότερο από εκείνες στις εξωτερικές άκρες. Χρησιμοποιήστε το SHIFT για να εξομαλύνετε το διάστημα των κορυφών.
 Διατήρηση ορίων κατά την εξομάλυνση: Με αυτή την επιλογή ενεργοποιημένη, τα όρια θα διατηρηθούν κατά την εξομάλυνση του πλέγματος. Πατήστε SHIFT για ομαλή.\
 Μέσω όλων των ομάδων: Λειτουργία μέσω όλων των ορατών ομάδων.\
Διαγραφή πολυγώνων: Κάντε κλικ (μεμονωμένα) ή σύρετε τον κέρσορα κατά μήκος των πολυγώνων για να τα διαγράψετε. Κρατήστε πατημένο το πλήκτρο CTRL για να διαγράψετε συνδεδεμένα σύνολα πολυγώνων.
Διαγραφή άκρων: Διαγράψτε άκρες, δακτυλίους άκρων ή βρόχους άκρων. Κρατήστε πατημένο το πλήκτρο CTRL για να επιλέξετε και να διαγράψετε γρήγορα ολόκληρους βρόχους άκρων.
Σύμπτυξη: ΧΡΗΣΙΜΟΠΟΙΗΣΤΕ το LMB στην άκρη για να το συμπτύξετε. Χρησιμοποιήστε CTRL+LMB για να συμπτύξετε τους δακτυλίους άκρων.
Split Rings: Δακτύλιοι με χωριστή άκρη με γραμμή.
Μετακίνηση: Τροποποιήστε κορυφές, άκρες και όψεις.
Slide Edges: Χρησιμοποιήστε το LMB για να σύρετε τις άκρες. Το CTRL+LMB θα σύρει τους βρόχους άκρων.
Μέτρο: Κάντε κλικ για να προσθέσετε πόντους. Χρησιμοποιήστε το SHIFT για να ευθυγραμμίσετε τις γραμμές οριζόντια, κάθετα ή διαγώνια. Πατήστε ESC για να σταματήσετε τη δημιουργία οδηγού μέτρησης. Ένα νέο κλικ θα ξεκινήσει ένας νέος οδηγός. Κάντε κλικ στις γραμμές και τα σημεία για να χωρίσετε γραμμές ή να σύρετε σημεία. Οι οδηγοί μέτρησης μπορούν να χρησιμοποιηθούν σε άλλα εργαλεία ως οπτικοί δείκτες ή οδηγοί κουμπώματος.
Εμφάνιση ανοιχτής ακμής: Ανοίξτε το σχέδιο της άκρης του πλέγματος από το κόκκινο.
Κάντε διπλό κλικ για να διαγράψετε το σημείο. Μετακινήστε τα κοντινά σημεία μαζί για να διαγράψετε το καταγεγραμμένο σημείο. Χρησιμοποιήστε το CTRL για να αποφύγετε να κολλήσετε σε υπάρχοντα σημεία ή γραμμές, για παράδειγμα όταν πρέπει να ξεκινήσετε νέα γραμμή από υπάρχον σημείο ή γραμμή.
UV
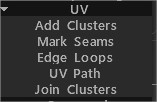
Προσθήκη συμπλεγμάτων: Χρησιμοποιήστε το LMB για να επισημάνετε το κέντρο του συμπλέγματος (Νησιά UV ) στα πρόσωπα. Κάντε ξανά κλικ στο σύμπλεγμα για να το διαγράψετε.
Mark Seams: Σημειώστε τις ραφές στον χάρτη UV. CTRL+LMB καταργεί την επισήμανση μιας ραφής.
Βρόχοι άκρων: Σημειώστε ολόκληρους βρόχους άκρων στον χάρτη UV. Χρησιμοποιήστε τα πλήκτρα CTRL+LMB για να καταργήσετε την επισήμανση τους.
Διαδρομή UV : Τοποθετήστε τη διαδρομή κατά μήκος της συντομότερης διαδρομής (υπό ορισμένα κριτήρια) μεταξύ πολλών σημείων. Κάντε κλικ για να προσθέσετε σημεία ή διαχωρισμό γραμμών, χρησιμοποιήστε RMB ή κάντε διπλό κλικ για να αφαιρέσετε σημεία. Πατήστε ENTER για να επισημάνετε τις ραφές και CTRL ENTER για να διαγράψετε τις ραφές. Χρησιμοποιήστε διαφορετικά κριτήρια για να προσαρμόσετε τη ροή διαδρομής.
Σύνδεση συστάδων: Τοποθετήστε το δείκτη της ραφής μεταξύ των συμπλεγμάτων και κάντε κλικ για να αφαιρέσετε ολόκληρη τη ραφή και να ενώσετε τα συμπλέγματα. Εάν οι επισημασμένες ραφές είναι κόκκινες, τα νησιά σύνοψης που προκύπτουν έχουν αυτοτομές ή πολύ μεγάλα τετράγωνα σκουπίδια. Εάν είναι πράσινο, το συνοπτικό νησί δεν έχει αυτοδιασταυρώσεις και τα τετράγωνα σκουπίδια δεν είναι περισσότερο από το 1/2.
Εντολές
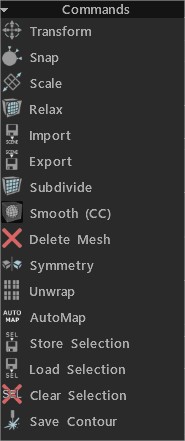
Μετασχηματισμός: Μεταμορφώστε επιλεγμένα πρόσωπα/κορυφές. Εάν δεν υπάρχει τίποτα, το επιλεγμένο ολόκληρο πλέγμα θα μετατραπεί.
Snap: Κουμπώστε τις κορυφές του πλέγματος retopo στην επιφάνεια. Βοηθά αν έχετε αλλάξει την κατάσταση του αντικειμένου στη σκηνή και θέλετε να επανατοποθετήσετε το retopo mesh. Μόνο επιλεγμένες κορυφές θα επηρεαστούν εάν βρίσκεστε στο εργαλείο “Επιλογή” σε λειτουργία κορυφής.
Κλίμακα: Κλιμακώστε το επιλεγμένο ή ολόκληρο το πλέγμα. Κάθε συνδετικό σύμπλεγμα θα μετασχηματιστεί ξεχωριστά.
Relax: Χαλαρώστε ολόκληρο το retopo mesh ή το υποσύνολο. Εάν βρίσκεστε στο εργαλείο “Επιλογή” σε λειτουργία κορυφής, θα επηρεαστούν μόνο επιλεγμένες κορυφές.
Import: Import πλέγματος retopo .
Export: Export πολυπλέγματος.
Υποδιαίρεση .
Smooth (CC): Υποδιαίρεση και εξομάλυνση της τρέχουσας ομάδας με την υποδιαίρεση Catmull-Clark.
Διαγραφή Mesh .
Συμμετρία: Εφαρμόστε συμμετρία στο πλέγμα.
Unwarp: Τοποθετήστε όλα τα νησιά στον χάρτη UV .
Επιλογή καταστήματος .
Επιλογή φόρτωσης .
Εκκαθάριση επιλογής .
Save Contour: Αυτή η εντολή σάς επιτρέπει να αποθηκεύσετε το περίγραμμα σε πραγματική κλίμακα ως EPS ή DXF για περαιτέρω κοπή με λέιζερ. Το μήκος των γραμμών αντιστοιχεί στο γεωμετρικό μήκος. Είναι χρήσιμο αν θέλετε να κόψετε σχήματα χρησιμοποιώντας κόφτη λέιζερ και να κολλήσετε εξαρτήματα μεταξύ τους.
Επιλεγμένο
Ανάπτυξη: Επεκτείνετε την περιοχή των επιλεγμένων στοιχείων.
Συμβόλαιο: Συμβόλαιο την περιοχή των επιλεγμένων στοιχείων.
Μετασχηματισμός: Μεταμορφώστε επιλεγμένα πρόσωπα/κορυφές. Εάν δεν επιλεγεί τίποτα, ολόκληρο το πλέγμα θα μεταμορφωθεί.
Normal Extrude: Εξώθηση κατά τη μέση κανονική κατεύθυνση. Να θυμάστε ότι οι νέες κορυφές δεν θα κοπούν αυτόματα, αλλά θα κουμπώσουν σε περαιτέρω λειτουργίες εάν δεν απενεργοποιήσετε το Auto snap.
Extrude Faces: Εξώθηση όψεων έτσι ώστε κάθε πρόσωπο να μετακινείται στην ίδια απόσταση όποτε είναι δυνατόν. Προσέξτε ότι σε ορισμένες περιπτώσεις, η μετατόπιση ακριβώς παράλληλων όψεων είναι αδύνατη, αλλά το 3DCoat προσπαθεί να μετατοπίσει όσο το δυνατόν ακριβέστερα.
Εξώθηση κορυφών: Εξώθηση όψεων έτσι ώστε κάθε κορυφή να μετατοπίζεται στην ίδια απόσταση.
Εισβολή: Εισβάλετε επιλεγμένα πρόσωπα.
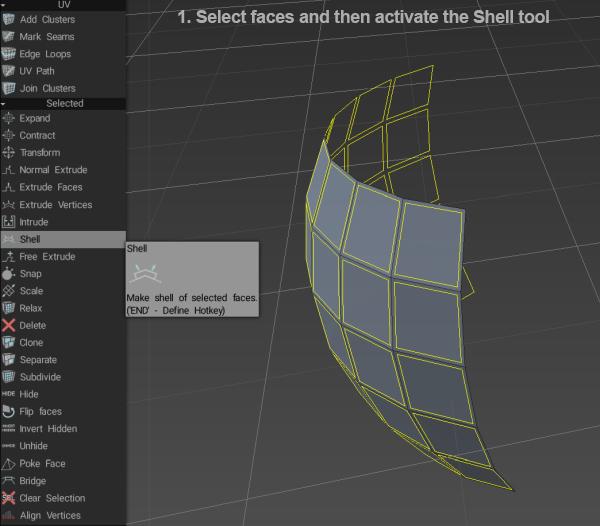
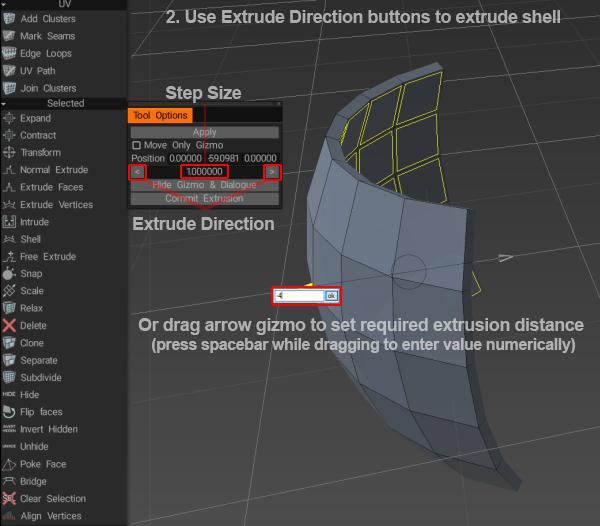
Κέλυφος: Δημιουργήστε ένα κέλυφος από επιλεγμένα πρόσωπα. Fluffy είπε: Πρώτα, επιλέξτε τα πρόσωπα που θέλετε να «στερεοποιήσετε» και μετά ενεργοποιήστε το εργαλείο Shell …
στη συνέχεια χρησιμοποιήστε τα κουμπιά στο παράθυρο Επιλογές εργαλείου ή το gizmo βέλους για να ορίσετε την ποσότητα εξώθησης…
Free Extrude: Εξώθηση προς οποιαδήποτε κατεύθυνση. Να θυμάστε ότι οι νέες κορυφές δεν θα κοπούν αυτόματα, αλλά θα κουμπώσουν σε περαιτέρω λειτουργίες εάν δεν απενεργοποιήσετε το Auto snap.
Cut Edges: Κόψτε τις άκρες σε ίσα τμήματα. Ο χρήστης θα προκαθορίσει τον αριθμό των τμημάτων κατά μήκος των επιλεγμένων άκρων.
Snap: Κουμπώστε τις κορυφές του πλέγματος retopo στην επιφάνεια. Βοηθά αν έχετε αλλάξει την κατάσταση του αντικειμένου στη σκηνή και θέλετε να επανατοποθετήσετε το retopo mesh. Μόνο επιλεγμένες κορυφές θα επηρεαστούν εάν βρίσκεστε στο εργαλείο “Επιλογή” σε λειτουργία κορυφής.
Κλίμακα: Κλιμακώστε το επιλεγμένο ή ολόκληρο το πλέγμα. Κάθε συνδετικό σύμπλεγμα θα μετασχηματιστεί ξεχωριστά.
Relax: Χαλαρώστε ολόκληρο το retopo mesh ή το υποσύνολο. Μόνο επιλεγμένες κορυφές θα επηρεαστούν εάν βρίσκεστε στο εργαλείο “Επιλογή” σε λειτουργία κορυφής.
Περιστροφή CW: Περιστρέψτε τις επιλεγμένες άκρες δεξιόστροφα.
Περιστροφή CCW: Περιστρέψτε τις επιλεγμένες άκρες αριστερόστροφα.
Extrude: Εξώθηση επιλεγμένων άκρων.
Διαίρεση: Επιλέξτε πολλές άκρες και, στη συνέχεια, κάντε κλικ στο Διαχωρισμός. Μετακινήστε το ποντίκι πάνω από τις άκρες για να καθορίσετε τη θέση διαχωρισμού και, στη συνέχεια, κάντε κλικ για διαχωρισμό. Μπορείτε να ενεργοποιήσετε αυτό το εργαλείο και να χωρίσετε επιλεγμένες άκρες χρησιμοποιώντας το πλήκτρο INSERT.
Σύμπτυξη: Χρησιμοποιήστε το BKSP για να συμπτύξετε επιλεγμένες άκρες.
Διαγραφή: Χρησιμοποιήστε το πλήκτρο DELETE για να διαγράψετε επιλεγμένες άκρες.
Βρόχος άκρων: Πατήστε L για να επιλέξετε έναν βρόχο άκρης. Επιλέξτε δύο άκρες σε έναν βρόχο άκρης για να περιορίσετε το εφέ.
Δακτύλιος άκρης: Πατήστε το R για να επιλέξετε έναν δακτύλιο άκρης. Επιλέξτε δύο άκρες σε έναν δακτύλιο άκρης για να περιορίσετε το εφέ.
Sel.Sharp: Επιλέξτε αιχμηρές άκρες.
Split Edge: Διαχωρίστε τις επιλεγμένες άκρες.
Γέφυρα: Επιλέγοντας δύο άκρες, μπορείτε να δημιουργήσετε ένα πρόσωπο.
Ρύθμιση ραφών: Επισημάνετε επιλεγμένες άκρες ως ραφές (στο παράθυρο προεπισκόπησης UV ).
Διαγραφή ραφών UV : Διαγράψτε τις ραφές πάνω από επιλεγμένες άκρες (στο παράθυρο προεπισκόπησης UV ).
Επισήμανση ως αιχμηρή: Επισήμανση επιλεγμένων άκρων ως αιχμηρές. Τα κανονικά θα χωριστούν κατά μήκος αυτών των άκρων.
Clear Sharp: Καθαρές, αιχμηρές άκρες. Τα κανονικά δεν θα χωριστούν.
Επιλογή καταστήματος: Επιλογή καταστήματος.
Load Selection: LoadSelection.
Clear Selection: Εκκαθάριση επιλογής.
Στοίχιση κορυφών: Στοίχιση κορυφών κατά επίπεδο. Μπορείτε να δείτε την κατεύθυνση κίνησης των κορυφών. Εάν επιλεγεί Πρόσωπα, η στοίχιση μπορεί να γίνει ανά κύκλο ή σφαίρα.
Ολόκληρο πλέγμα
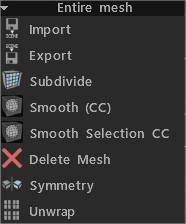
Import: Import πλέγματος retopo .
Export: Export πλέγματος retopo .
Subdivide: Subdivide poly mesh.
Smooth (CC): Υποδιαίρεση και εξομάλυνση της τρέχουσας ομάδας με την υποδιαίρεση Catmull-Clark.
Smooth Selection CC: Υποδιαιρέστε και εξομαλύνετε επιλεγμένα πρόσωπα χρησιμοποιώντας τον αλγόριθμο Catmull-Clark.
Διαγραφή πλέγματος: Διαγραφή πολυπλέγματος.
Συμμετρία: Εφαρμόστε συμμετρία στο πλέγμα.
Ξετυλίξτε: Τοποθετήστε όλα τα νησιά στον χάρτη UV .
Φροντιστήρια
Retopo Edge Tools and Selection Tips
Retopo Room Pt.7: Manual Retopo Tools : Αυτό το βίντεο καλύπτει ορισμένα από τα εργαλεία Manual Retopology στο 3D Coat, όπως το εργαλείο ADD/SPLIT, το εργαλείο POINTS & FACES και το εργαλείο QUADS.
Συμβουλές
Γρήγορη συμβουλή: Χρήση του RFill ως εργαλείου γέφυρας : Αυτό το βίντεο δείχνει
 Ελληνικά
  English
 Українська
 Español
 Deutsch
 Français
 日本語
日本語 Русский
 한국어
한국어 Polski
 中文 (中国)
 Português
 Italiano
 Suomi
Suomi Svenska
 中文 (台灣)
 Dansk
Dansk Slovenčina
 Türkçe
 Nederlands
 Magyar
 ไทย
ไทย हिन्दी
 Tiếng Việt
 Lietuviškai
 Latviešu valoda
 Eesti
Eesti Čeština
 Română
 Norsk Bokmål