Ροή εργασίας Export/ Import υφής
Το 3DCoat υποστηρίζει τρεις διαφορετικές ροές εργασίας PBR :
– Gloss/Color Specular
– Γυαλάδα/Μεταλλικότητα
– Τραχύτητα/Μεταλλικότητα
Οι χάρτες υφής που αντιστοιχούν σε καθεμία από αυτές τις ροές εργασίας αποθηκεύονται κατά την export.
Import: Επιλέξτε από τη λίστα στα αριστερά ποιο είδος υφής θέλετε να import.
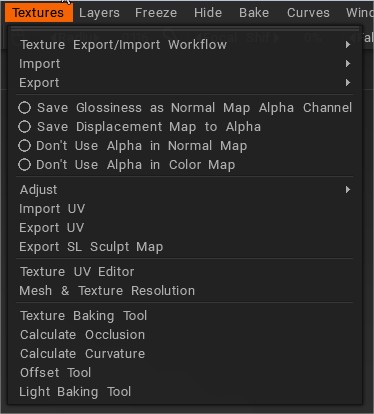
Export: Επιλέξτε από τη λίστα στα αριστερά ποιο είδος υφής θέλετε να export για χρήση σε εφαρμογές τρίτων.
Επίσης, προσθέστε περαιτέρω βελτίωση στα εξαγόμενα δεδομένα υφής επιλέγοντας οποιοδήποτε από τα τέσσερα πλαίσια που αναφέρονται κάτω από την εντολή Export .
Αποθήκευση Glossiness ως Κανονικός Χάρτης Alpha Channel: Αποθηκεύστε το κανάλι Glossiness ως κανάλι alpha σε έναν normal map.
Αποθήκευση χάρτη μετατόπισης στο Alpha: Αποθήκευση μετατόπισης στο κανάλι άλφα του normal map.
Μην χρησιμοποιείτε το Alpha στον Κανονικό χάρτη: Ο κανονικός χάρτης θα αποθηκευτεί μόνο ως εικόνα RGB.
Μην χρησιμοποιείτε το Alpha στον έγχρωμο χάρτη: Αποθηκεύστε όλες τις υφές – normal map και χρώμα/albedo ως εικόνες RGB χωρίς άλφα.
Προσαρμόζω

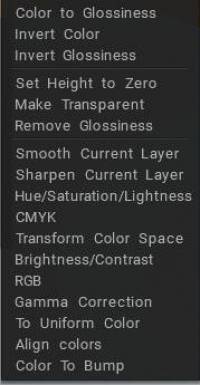
Προσαρμογή : Από τη σειρά των επιπέδων που υπάρχουν στο αρχείο Paint Room, επιλέξτε από τις Επιλογές που εμφανίζονται στα αριστερά (οι οποίες περιλαμβάνουν ορισμένες κοινές παραμέτρους προσαρμογής εικόνας) καθώς και μερικές πολύ εξειδικευμένες επιλογές που είναι προσαρμοσμένες για επαγγελματίες χρήστες. Υπάρχουν πολλές εντολές προσαρμογής επιπέδων, όπως:
- Color to Glossiness: Μετατρέψτε τη φωτεινότητα του χρώματος στο κανάλι Glossiness.
- Invert color: Αντιστρέψτε το χρώμα αυτού του στρώματος.
- Invert Glossiness: Αντιστρέψτε τη στιλπνότητα αυτού του στρώματος.
- Ρύθμιση ύψους σε μηδέν: Ορίστε το ύψος σε μηδέν σε όλα τα επίπεδα.
- Κάντε διάφανο: Το στρώμα θα γίνει πλήρως διαφανές.
- Remove Glossiness: Το κανάλι Glossiness θα μηδενιστεί.
- Ομαλό τρέχον στρώμα: Εξομάλυνση ολόκληρου του τρέχοντος στρώματος.
- Ακονίστε το τρέχον στρώμα: Ακονίστε ολόκληρο το τρέχον στρώμα.
- Απόχρωση/κορεσμός/ελαφρότητα: Σωστή απόχρωση, κορεσμός και ελαφρότητα για το τρέχον επιλεγμένο επίπεδο.
- CMKY: Τροποποιήστε τα κανάλια CMYK.
- Μετασχηματισμός χρωματικού χώρου: Δωρεάν μεταμόρφωση στο χρωματικό χώρο. Το τελικό χρώμα αποτελείται από τρία χρώματα. κάθε νέο χρώμα θα αντικαταστήσει τα κανάλια κόκκινου, πράσινου και μπλε.
- Φωτεινότητα/Αντίθεση: Προσαρμόστε τη φωτεινότητα και την αντίθεση στο τρέχον επίπεδο.
- RGB: Τροποποιήστε τις τιμές RGB του τρέχοντος επιπέδου.
- Διόρθωση γάμμα: Εκτελέστε διόρθωση γάμμα για αυτό το επίπεδο.
- Σε ομοιόμορφο χρώμα: Μετατρέπει την υφή του στρώματος σε ομοιόμορφο. μπορείτε να χρησιμοποιήσετε το Overlay ή το Modulate2x για να συνδυάσετε το επίπεδο με το χρώμα των στρωμάτων παρακάτω και να συνδυάσετε πολλές υφές.
- Στοίχιση χρωμάτων: Το εργαλείο προσαρμόζει το χρώμα της υφής στο χρώμα του στρώματος κάτω από το τρέχον στρώμα, αφήνοντας λεπτομέρειες για την καθορισμένη ακτίνα.
- Color To Bump: Μετατρέπει την υφή του επιπέδου στο Bump, αφήνοντας τις λεπτομέρειες στο καθορισμένο μέγεθος. Σας επιτρέπει να εξαγάγετε μικρές λεπτομέρειες από την υφή του χρώματος. Αυτό το εργαλείο είναι καλό για τη λήψη μικρών λεπτομερειών από μοντέλα που λαμβάνονται με τη χρήση φωτογραμμετρίας.
Όλα αυτά μπορούν να προβληθούν σε προεπισκόπηση σε πραγματικό χρόνο και να εφαρμοστούν όχι μόνο στο τρέχον επίπεδο αλλά και σε όλα τα επίπεδα.
Export/ Import UV
Import UV: Στην πραγματικότητα εισάγει ένα πλέγμα που έχει συντεταγμένες και χάρτες UV , αντικαθιστώντας αυτούς τους χάρτες με νέους που υπάρχουν στον επιλεγμένο χάρτη UV Room. Αυτή η επιλογή είναι σημαντική για μοντέλα με επικαλυπτόμενα συμπλέγματα UV , για παράδειγμα, με κατοπτρισμένες UVs. Σε αυτήν την περίπτωση, θα πρέπει να φορτώσετε το μοντέλο με την επιλογή “Keep UVs” στις συντεταγμένες UV θα αλλάξουν με τέτοιο τρόπο ώστε τα νησιά υφής να μην επικαλύπτονται μεταξύ τους. Τα μοντέλα και οι υφές θα εξαχθούν με το αρχικό σύνολο UV εάν η επιλογή “Χρήση Γνήσιο UV” ελέγχεται. Διαφορετικά, θα εξάγονται με το νέο σετ UV .
Export UV: Εξάγει το μοντέλο στο οποίο εργαζόμαστε αυτήν τη στιγμή χωρίς τις συνοδευτικές υφές του. Αυτό επιτρέπει την επεξεργασία του ίδιου του χάρτη UV μέσα σε ένα πρόγραμμα επεξεργασίας εικόνας 2D. Αυτή η εντολή θα μπορούσε να χρησιμοποιηθεί σε συνδυασμό με το Import UV. Μπορείτε να export το σετ UV , να το προσαρμόσετε και μετά να το import ξανά.
Export SL Sculpt Map: Λαμβάνει τις τρέχουσες πληροφορίες UV και τις εξάγει για χρήση σε ένα πρόγραμμα επεξεργασίας με σκοπό τη δημιουργία στοιχείων για το πρόγραμμα “Second Life”.
Υφή UV Editor
Texture UV Editor : Ανοίγει ένα ολοκληρωμένο πρόγραμμα επεξεργασίας για προβολή και επεξεργασία χαρτών υφής στη μορφή “Unwrapped”. Επιλέξτε να επεξεργαστείτε οποιαδήποτε υπάρχουσα υφή του χάρτη UV , συμπεριλαμβανομένου του διάχυτου χρώματος, της κανονικής γυαλάδας ή ολόκληρου του σκιασμένου μοντέλου.
Έχετε ένα μενού drop list για εναλλαγή μεταξύ των διαφορετικών χαρτών/καναλιών. Βρίσκεται στην επάνω δεξιά γωνία (ακριβώς στα αριστερά του μενού λίστας Χαρτών UV ) του TEXTURE EDITOR.
Εφόσον το 3DCoat σάς επιτρέπει να δημιουργήσετε όσους χάρτες UV ενός αντικειμένου χρειάζεστε, επιλέξτε να προβάλετε και να εργαστείτε σε οποιοδήποτε από αυτά από το αναπτυσσόμενο μενού. Με έναν ενσωματωμένο επεξεργαστή υφής 2D, μπορείτε να σχεδιάζετε παράθυρα 2D και 3D ταυτόχρονα.
Μπορείτε να ζωγραφίσετε σε 3D και τα αποτελέσματα θα εμφανιστούν ταυτόχρονα σε ένα παράθυρο 2D και αντίστροφα. Μπορείτε να επιλέξετε ένα σύνολο UV στην αναπτυσσόμενη λίστα στην αριστερή κορυφή του παραθύρου του 2D Texture editor για να το ζωγραφίσετε.
Υπεύθυνος UV

Διαθέσιμο μόνο σε λειτουργία Microvertex : Ανοίξτε μια λίστα που περιέχει όλα τα σετ UV που σχετίζονται με το τρέχον αντικείμενο.
Ανάλυση πλέγματος και υφής

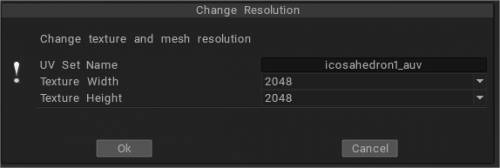
Ανάλυση πλέγματος και υφής : Εάν υπάρχουν πολλά αντικείμενα στη σκηνή, το ξεχωριστό αντικείμενο μπορεί να έχει ξεχωριστή UV. Χρησιμοποιήστε αυτήν την εντολή για να τα διαχειριστείτε. Μπορείτε να ομαδοποιήσετε πολλά υλικά (επιφάνειες) σε ένα σετ UV .
Αλλάζει τον αριθμό των πολυγώνων του αντικειμένου και το μέγεθος της υφής. Μπορείτε να αλλάξετε την ανάλυση πλέγματος πολλές φορές (όπως κάνουν συνήθως άλλα λογισμικά), αλλά μπορείτε επίσης σε ποσοστό, για παράδειγμα, 50%.
Εργαλείο Baking υφής

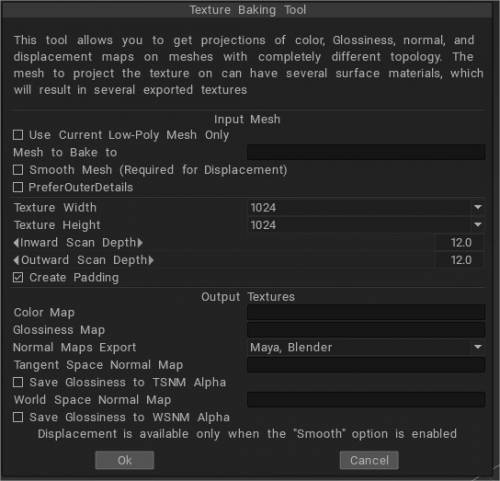
Εργαλείο Baking υφής : Ανοίγει το παράθυρο διαλόγου Baking υφής, το οποίο περιέχει όλες τις παραμέτρους που θα χρειαστείτε για τις πληροφορίες υφής Baking στο μοντέλο σας. Αυτό σας επιτρέπει να bake λεπτομέρειες σε έναν κανονικό ή displacement map. Αυτό μπορεί να χρησιμοποιηθεί ακόμα και όταν η τοπολογία επιφάνειας δεν ταιριάζει απόλυτα μεταξύ των δικτυωμάτων αναφοράς και των χαμηλών πολυδικτύων. Αυτό το εργαλείο είναι αρκετά λεπτομερές και έχει την ενότητα του παρακάτω. Ανατρέξτε σε αυτήν την ενότητα για περισσότερες πληροφορίες.
Υπολογισμός καμπυλότητας: Το στρώμα καμπυλότητας απαιτείται για τη χρήση κοιλότητας/καμπυλότητας ως προϋπόθεση για υλικά ή υπό συνθήκες βαφής. Η εντολή θα ενημερώσει το στρώμα κοιλότητας/καμπυλότητας χρησιμοποιώντας τρέχουσα μετατόπιση και normal map.
Προσέξτε ότι η καμπυλότητα αποτελείται από δύο στοιχεία. Πρώτα είναι η τοπική καμπυλότητα που επιτρέπει τον εντοπισμό μικρών λεπτομερειών, γρατσουνιών. Το δεύτερο είναι η καμπυλότητα μεγάλης εμβέλειας που ρέει ομαλά και επιτρέπει την ανίχνευση μεγάλων λεπτομερειών. Ρυθμίστε την ένταση και για τους δύο τύπους καμπυλότητας.
Υπολογισμός απόφραξης: Αυτό το εργαλείο υπολογίζει τον καθολικό φωτισμό από πολλά σποτάκια που κατανέμονται στη σφαίρα ή το ημισφαίριο. Ο υπολογισμός μπορεί να διαρκέσει πολύ
Τα V oxel δεν θα πρέπει να είναι ενεργοποιημένα εάν ετοιμάζετε χάρτες για ένα μοντέλο με χαρτογράφηση UV . Οι λεπτομέρειες για το AO και την Curvature λαμβάνονται από τον normal map.
Εργαλείο μετατόπισης: Όταν import ένα επίπεδο εικόνας για τη δημιουργία επίπεδης υφής (όπως βρίσκεται στο άνοιγμα διαλόγου 3DCoat ), έχετε την επιλογή να δημιουργήσετε μια υφή πλακιδίων (που επαναλαμβάνεται και τυλίγεται στην άλλη πλευρά της εικόνας). Χρησιμοποιήστε αυτό το εργαλείο για να σας βοηθήσει να ευθυγραμμίσετε την υφή έτσι ώστε να τυλίγεται με τον τρόπο που επιθυμείτε.
Θα πρέπει να φορτώνετε μόνο τετράγωνες εικόνες με αυτό το εργαλείο. Είναι χρήσιμο να δημιουργήσετε υφές με πλακάκια με το χτύπημα και το εντυπωσιακό. Μόλις φορτωθεί ένα τετράγωνο αντικείμενο, θα σας προσφερθεί το παράθυρο “Offset tool” όπου μπορούν να καθοριστούν οι τιμές μετατόπισης. U offset, V offset – η υφή μετατοπίζεται οριζόντια και κάθετα ανάλογα.
Αντίστροφη μετατόπιση: όταν είναι ενεργοποιημένη, η επιλογή επαναφέρει τη μετατόπιση.
Ελαφρύ εργαλείο Baking :
Ο χάρτης άμεσου φωτισμού μπορεί να δημιουργηθεί χρησιμοποιώντας αυτό το εργαλείο.
Για να bake ελαφρύ χωρίς περιβάλλον, επιλέξτε τον τύπο χάρτη Light από το Render Room για να bake σε ένα νέο στρώμα στο Paint Room οποιοδήποτε φως προστεθεί στο Render Room. (Μπορείτε επίσης να bake το Light από το Render Room χρησιμοποιώντας το Light και το Reflections σε λειτουργία επίπεδης σκίασης).
Χρησιμοποιήστε την προβολή Light & Reflection i n Smooth Shade, εάν θέλετε να bake κατοπτρική αντανάκλαση από επιλεγμένο χάρτη περιβάλλοντος.
Σημείωση: χρησιμοποιήστε την τιμή 400 ή περισσότερο εάν το bake σας είναι πολύ σκούρο.
 Ελληνικά
  English
 Українська
 Español
 Deutsch
 Français
 日本語
日本語 Русский
 한국어
한국어 Polski
 中文 (中国)
 Português
 Italiano
 Suomi
Suomi Svenska
 中文 (台灣)
 Dansk
Dansk Slovenčina
 Türkçe
 Nederlands
 Magyar
 ไทย
ไทย हिन्दी
 Tiếng Việt
 Lietuviškai
 Latviešu valoda
 Eesti
Eesti Čeština
 Română
 Norsk Bokmål