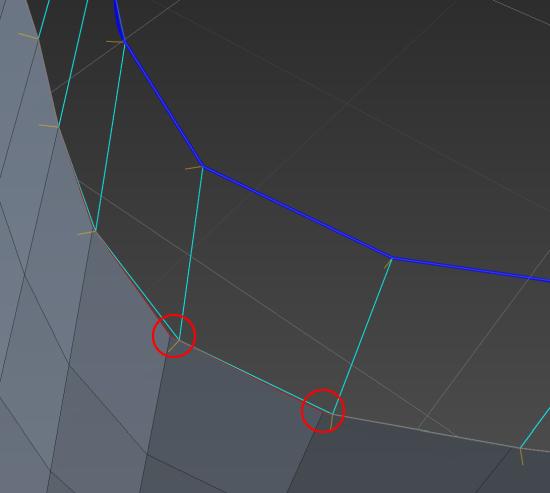
Κατάφερα να καταλάβω τη διαδικασία σύνδεσης με την υπάρχουσα γεωμετρία κατά τη γεφύρωση μεταξύ δύο άκρων. (έγινε λίγο πιο ξεκάθαρο μόλις συνειδητοποίησα ότι το επιλεγμένο άκρο που φαίνεται κάλυπτε την τρίτη καμπύλη που χρησιμοποιήθηκε στη λειτουργία της σοφίτας).

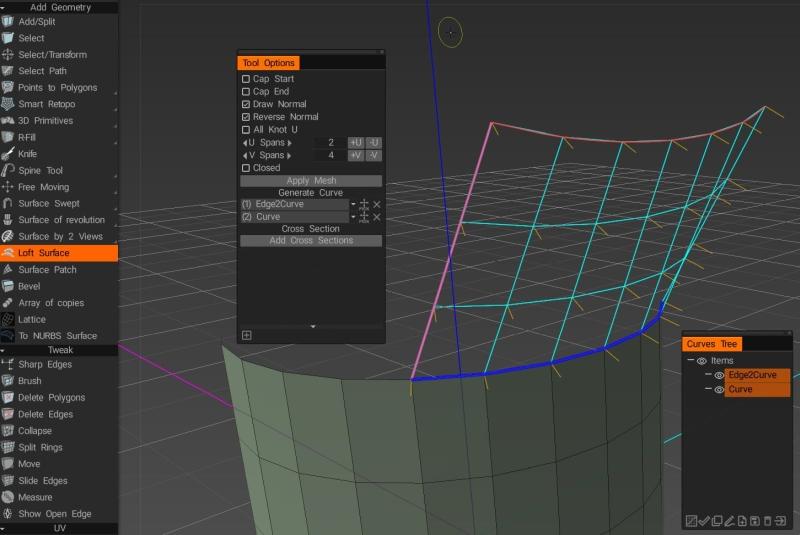
Αξίζει να σημειωθεί ότι η σειρά με την οποία εμφανίζονται οι δύο καμπύλες προφίλ στο παράθυρο Επιλογές εργαλείου μπορεί να επηρεάσει το πλέγμα που προκύπτει. Ο αριθμός των κόμβων στην πρώτη καμπύλη της λίστας (σε συνδυασμό με την τιμή που έχει οριστεί για το U Spans) καθορίζει τον αριθμό των πολυγώνων που δημιουργούνται και τη σειρά με την οποία εμφανίζονται οι καμπύλες, προσδιορίζοντας την κατεύθυνση των κανονικών κορυφών στο πλέγμα που προκύπτει. Επιπλέον, ας υποθέσουμε ότι η καμπύλη που ορίζει την άκρη που σκοπεύετε να δημιουργήσετε εμφανίζεται πρώτη στη λίστα. Σε αυτήν την περίπτωση, το αποτέλεσμα όταν πατήσετε Εφαρμογή μπορεί να μην ευθυγραμμίζεται σωστά με το υπάρχον πλέγμα σας (χωρίς να υπεισέλθω σε πολλές λεπτομέρειες, φαίνεται να έχει να κάνει με τον τρόπο με τον οποίο οι κανονικές κορυφές επηρεάζουν τον τρόπο με τον οποίο το 3D Coat δημιουργεί την ψηλή επιφάνεια).

Η προσθήκη της καμπύλης διατομής που δημιουργήθηκε στο Βήμα 3 φαίνεται να επιλύει το πρόβλημα ανεξάρτητα από τη σειρά στις καμπύλες προφίλ που αναφέρονται, ωστόσο, μερικές φορές μπορεί να αναστρέψει τις κανονικές κορυφές του προκύπτοντος πλέγματος, επομένως είναι καλή ιδέα να ενεργοποιήσετε την επιλογή Σχεδίαση Κανονικής και στη συνέχεια να μπορεί να αλλάξει τη ρύθμιση Reverse Normal εάν χρειάζεται.
Όπως είπα, δεν είμαι εξοικειωμένος με το εργαλείο Loft, αλλά αυτό φαίνεται σαν ένας αρκετά αξιόπιστος τρόπος για να ανακτήσετε το επιθυμητό αποτέλεσμα. Ωστόσο, προτιμώ το εργαλείο Smart Retopo , το οποίο μπορεί να επιτύχει παρόμοια αποτελέσματα χρησιμοποιώντας λιγότερες καμπύλες.
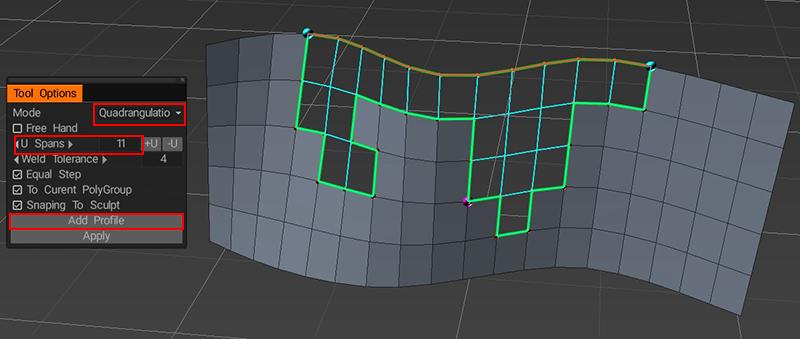
Το μόνο που χρειάζεται να κάνετε είναι να δημιουργήσετε μια καμπύλη για την άκρη που θέλετε να δημιουργήσετε και στη συνέχεια να ενεργοποιήσετε το εργαλείο Smart Retopo , να ορίσετε τη λειτουργία σε Τετραγωνοποίηση , να πατήσετε το κουμπί Προσθήκη προφίλ και να επιλέξετε την καμπύλη και, στη συνέχεια, να ορίσετε τον απαιτούμενο αριθμό U Spans . Ίσως χρειαστεί να τροποποιήσετε γρήγορα τη θέση κάθε άκρου της καμπύλης για να βεβαιωθείτε ότι θα κουμπώσει στις σωστές κορυφές στο υπάρχον πλέγμα, αλλά μόλις τοποθετηθούν σωστά και τα δύο άκρα, θα δείτε κάτι σαν αυτό…

(Στην αρχή, θα πρέπει να βλέπετε μόνο το πράσινο περίγραμμα, αλλά εάν πατήσετε το κουμπί Εφαρμογή, θα κάνει προεπισκόπηση των αποτελεσμάτων και εάν πατήσετε το κουμπί Εφαρμογή για δεύτερη φορά θα δημιουργήσει το πλέγμα).
Όπως μπορείτε να δείτε, το εργαλείο Smart Retopo μπορεί να γεμίσει ακανόνιστα σχήματα, τα οποία θα μπορούσαν ενδεχομένως να είναι προβληματικά ή/και χρονοβόρα χρησιμοποιώντας το εργαλείο Loft, αλλά θα συνιστούσα να μάθετε πώς να χρησιμοποιείτε και τα δύο. Όπως συμβαίνει με τα περισσότερα πράγματα στο 3DCoat, υπάρχουν πολλοί τρόποι για να επιτύχετε τα ίδια αποτελέσματα και ποια μέθοδος λειτουργεί καλύτερα εξαρτάται σε μεγάλο βαθμό από τις προσωπικές σας προτιμήσεις και τη συνολική ροή εργασίας. Ας ελπίσουμε ότι οι παραπάνω πληροφορίες θα σας βοηθήσουν να προσδιορίσετε ποια προσέγγιση λειτουργεί καλύτερα για εσάς. ![]()
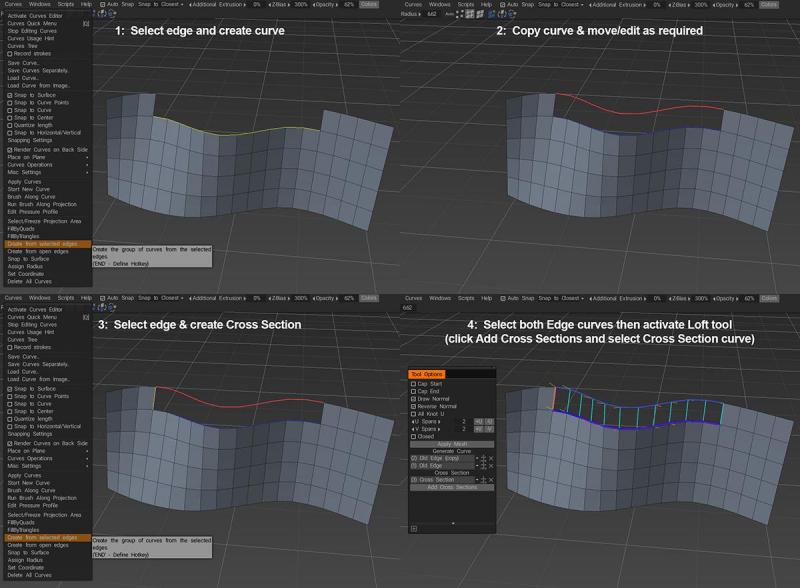
Ανακεφαλαιώνοντας, απλώς επιλέξτε την άκρη που θέλετε να τοποθετήσετε στη σοφίτα και επιλέξτε Δημιουργία από επιλεγμένες άκρες από το μενού Καμπύλες και, στη συνέχεια, επιλέξτε τη νέα καμπύλη και την αρχική σας καμπύλη και ενεργοποιήστε το εργαλείο Loft Surface στον πίνακα Προσθήκη γεωμετρίας …

… στη συνέχεια, απλώς ρυθμίστε τα V Spans, ελέγξτε ότι τα κανονικά σας δείχνουν προς το σωστό τρόπο και πατήστε Εφαρμογή πλέγματος.
 Ελληνικά
  English
 Українська
 Español
 Deutsch
 Français
 日本語
日本語 Русский
 한국어
한국어 Polski
 中文 (中国)
 Português
 Italiano
 Suomi
Suomi Svenska
 中文 (台灣)
 Dansk
Dansk Slovenčina
 Türkçe
 Nederlands
 Magyar
 ไทย
ไทย हिन्दी
 Tiếng Việt
 Lietuviškai
 Latviešu valoda
 Eesti
Eesti Čeština
 Română
 Norsk Bokmål