Οι σκίαστρες σε ένα πλέγμα σάς επιτρέπουν να βλέπετε γρήγορα μια ρεαλιστική ή ιμπρεσιονιστική προεπισκόπηση σε πραγματικό χρόνο του γλυπτού σας με διάφορα υλικά που εφαρμόζονται.
Πριν λίγο καιρό, το 3DCoat πρόσθεσε τη δυνατότητα χρήσης σκίαστρων PBR στο Sculpt Workspace. Αν και δεν προορίζονται για αντικατάσταση έξυπνων υλικών στο 3DCoat, τα νέα Physical Shaders προσφέρουν έναν εξαιρετικό τρόπο χρήσης του φωτισμού GGX και της φυσικής απόδοσης σε γλυπτά υψηλής πολυχρωμίας στο 3DCoat.
Ορισμένα Shaders μπορούν να ψηθούν στο διάχυτο στρώμα χρώματος ενός “Baked” Retopo mesh, απλοποιώντας έτσι τη διαδικασία δημιουργίας υφής σε ορισμένες περιπτώσεις.
Οι κύριες ιδιότητες του shader μπορούν να επεξεργαστούν και μπορούν να δημιουργηθούν εντελώς νέοι Shader από την αρχή, δίνοντάς σας ένα ισχυρό σύνολο επιλογών οπτικοποίησης.
Δημιουργία, χρήση και επεξεργασία shaders
Sculpt Room – Custom Viewport Materials : από τον Anton Tenitsky.
Κάνετε κλικ με το LMB για να επιλέξετε το shader που θα εφαρμοστεί στο τρέχον αντικείμενο. Εάν κάνετε κλικ στο RMB σε ένα shader, θα έχετε περισσότερες επιλογές.
Μετά την ανάθεση, μπορείτε να αλλάξετε τις ιδιότητες του shader, όπως το χρώμα της υφής στο μενού Sculpt Tree > RMB.
Διαγραφή: Αυτό θα διαγράψει το shader στο οποίο κάνατε κλικ.
Κοινή χρήση στοιχείου: Αποθηκεύστε το στοιχείο ως αρχείο 3dcpack για να το μοιραστείτε με άλλους χρήστες.
Κοινή χρήση φακέλου στοιχείων: Κοινή χρήση του φακέλου στοιχείων ως 3dcpack – αρχείο για κοινή χρήση με άλλους χρήστες.
Μετονομασία shader:
Κατασκευή νέου σκίαστρου: Κατασκευάστε ένα νέο σκίαστρο με βάση αυτό το σκίαστρο. Μπορείτε να δώσετε ένα νέο όνομα και να εκχωρήσετε νέες υφές και άλλες παραμέτρους.
Select as Default Shader: Αυτό θα εφαρμόσει το shader στο οποίο κάνατε κλικ ως το προεπιλεγμένο shader. Κάθε φορά που δημιουργείται ένα νέο αντικείμενο τόμου, θα εφαρμόζεται αυτή η νέα προεπιλογή.
Επεξεργασία των ρυθμίσεων Shader του τρέχοντος αντικειμένου: Επεξεργαστείτε τις ρυθμίσεις του shader που έχουν εκχωρηθεί στο τρέχον αντικείμενο.
Επεξεργασία ρυθμίσεων μόνιμης σκίασης: Εάν αλλάξετε εκεί τις ρυθμίσεις σκίασης, θα παραμείνουν αλλαγμένες για όλα τα μελλοντικά αντικείμενα όπου θα χρησιμοποιηθεί αυτός ο σκιαστής.
Ανανεώστε αυτήν την προεπισκόπηση:
Ανανέωση όλων των προεπισκοπήσεων: Αυτές οι δύο επιλογές απλώς ανανεώνουν την καρτέλα shader. Χρήσιμο εάν αντιμετωπίζετε πρόβλημα με το νέο shader που δημιουργήθηκε δεν εμφανίζεται ως επιλογή.
Εφαρμογή στο Visible:
Εφαρμογή στο υποδέντρο:
Μετακίνηση στοιχείων σε…:
Μικρό:
Κανονικός:
Μεγάλο:
Basic Shaders

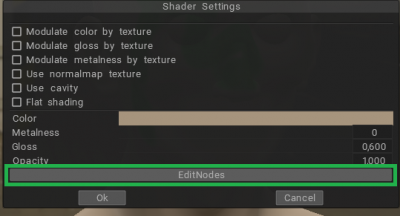
Το πιο βασικό είδος shader δεν έχει απολύτως καμία προσαρμοσμένη ρύθμιση (όπως το Default Shader). Είναι αυτό που είναι και δεν μπορούν να τροποποιηθούν.
Το δεύτερο είδος Basic Shader έχει ρυθμιζόμενες παραμέτρους, όπως φαίνεται στο παραπάνω παράθυρο διαλόγου – οι οποίες μπορούν να ληφθούν επιλέγοντας ένα Shader, κάνοντας δεξί κλικ στο εικονίδιο Shader και επιλέγοντας μία από τις εντολές “Edit” από το αναδυόμενο μενού.
Σύνθετα Shaders
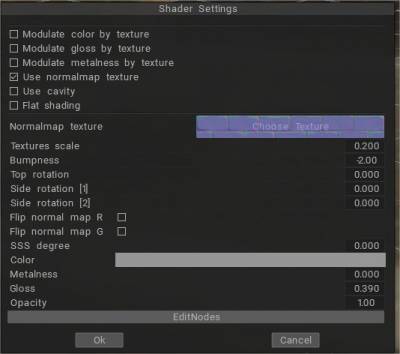
Αυτοί οι τύποι Shaders έχουν αρκετές πρόσθετες ιδιότητες που περιλαμβάνουν τη χρήση υφών (όχι υποχρεωτικές).
Παρακάτω εμφανίζεται ο κύριος “Διάλογος Επεξεργασίας”, ο οποίος περιλαμβάνει τη χρήση υφών για τον έλεγχο πραγμάτων όπως το Normal και το Bump, η Simulation, η Reflection simulation και η Cavity simulation.
Ο πειραματισμός είναι το κλειδί της επιτυχίας εδώ.
Πολλά νέα shader έχουν δημιουργηθεί από τους χρήστες με τα χρόνια και μπορούν να βρεθούν στο τμήμα “3DCoat Exchange Library” του φόρουμ μας.

– Στην έκδοση 2021, οι σκίαστρες PBR Sculpt ενημερώνονται. Εάν αντιστοιχίσετε έναν normal map, ο normal map εντοπίζεται αυτόματα. Επίσης, μπορείτε να περιστρέψετε κάθε ένα από τα τρία επίπεδα ξεχωριστά σε παραμέτρους shaders.
Αυτό καθιστά δυνατή, για παράδειγμα, τη σωστή σκίαση του τοίχου. Επίσης, είναι δυνατό να κάνετε flop R/G καναλιών των κανονικών χαρτών σε ρυθμίσεις shader.
Ο σκίαστρος PBR ψήνεται επίσης σωστά στην υφή.
Matcap Shaders
Αυτά τα ειδικά Shader παίρνουν τα χαρακτηριστικά τους από έναν συγκεκριμένο τύπο αρχείου Texture, το οποίο περιέχει ιδιότητες τεχνητού φωτισμού, χρώματος, κατοπτρισμού, διαφάνειας και σκίασης.
Απαιτείται ειδικό λογισμικό για τη δημιουργία αυτών των αρχείων Texture και συνδέσεις με το λογισμικό και τις τεχνικές για τη δημιουργία πειστικών υφών μπορείτε να βρείτε στο φόρουμ στην ενότητα “3DCoat Exchange Library”.
Διαδικαστικά shaders με χρήση του Node Editor

Το πρόγραμμα επεξεργασίας κόμβων σάς δίνει τη δυνατότητα να δημιουργήσετε οπτικά shaders HLSL. Αντί να γράφετε κώδικα, δημιουργείτε και συνδέετε κόμβους σε ένα πλαίσιο γραφήματος. Παρέχει άμεσα σχόλια που αντικατοπτρίζουν τις αλλαγές σας και είναι αρκετά απλό για χρήστες που είναι νέοι στη δημιουργία shader.
Περιγραφή επεξεργαστή κόμβου
Ένας κόμβος ορίζει μια είσοδο, έξοδο ή λειτουργία στον επεξεργαστή Shader, ανάλογα με τις διαθέσιμες θύρες του. Ένας Κόμβος μπορεί να έχει οποιονδήποτε αριθμό θυρών εισόδου και/ή εξόδου. Μπορείτε να δημιουργήσετε ένα γράφημα συνδέοντας αυτές τις θύρες με άκρες. Ένας κόμβος μπορεί επίσης να έχει οποιονδήποτε αριθμό στοιχείων ελέγχου. υπάρχουν στοιχεία ελέγχου στον Κόμβο που δεν έχουν Θύρες.
Μπορείτε να συμπτύξετε έναν Κόμβο κάνοντας κλικ στο κουμπί Σύμπτυξη στην επάνω δεξιά γωνία του κόμβου. Αυτό θα κρύψει όλες τις μη συνδεδεμένες θύρες.
Τα συστατικά ενός κόμβου είναι η θύρα και η άκρη.
Λιμάνι
Μια Θύρα ορίζει μια είσοδο ή έξοδο σε έναν Κόμβο . Η σύνδεση των άκρων σε μια θύρα επιτρέπει τη ροή δεδομένων μέσω του δικτύου κόμβων Shader Graph.
Κάθε Θύρα έχει έναν Τύπο δεδομένων που καθορίζει με ποιες άκρες μπορούν να συνδεθούν. Κάθε τύπος δεδομένων έχει ένα συσχετισμένο χρώμα για τον προσδιορισμό του τύπου του. Μόνο ένα Edge μπορεί να συνδεθεί σε οποιαδήποτε θύρα εισόδου, αλλά πολλές άκρες μπορούν να συνδεθούν σε μια θύρα εξόδου.
Μπορείτε να ανοίξετε ένα με βάση τα συμφραζόμενα Create Node Menu σύροντας ένα Edge από μια θύρα με το αριστερό κουμπί του ποντικιού και αφήνοντάς το σε μια κενή περιοχή χώρου εργασίας.
Προεπιλεγμένες είσοδοι: Κάθε θύρα εισόδου, μια θύρα στην αριστερή πλευρά ενός κόμβου που σημαίνει ότι προορίζεται για την εισαγωγή δεδομένων στον κόμβο, έχει μια προεπιλεγμένη είσοδο. Αυτό είναι ένα μικρό πεδίο που συνδέεται με τη Θύρα όταν δεν είναι συνδεδεμένο Edge. Αυτό το πεδίο θα εμφανίσει την είσοδο για τον Τύπο δεδομένων της θύρας, εκτός εάν η θύρα διαθέτει δέσμευση θύρας.
Εάν μια θύρα διαθέτει θύρα Binding, το προεπιλεγμένο πεδίο εισαγωγής μπορεί να εμφανίζει ένα ειδικό πεδίο, όπως ένα αναπτυσσόμενο μενού για την επιλογή καναλιών UV ή απλώς μια ετικέτα για να σας βοηθήσει να κατανοήσετε την επιθυμητή είσοδο, όπως ετικέτες χώρου συντεταγμένων για δεδομένα γεωμετρίας.
Ακρη
Ένα Edge ορίζει μια σύνδεση μεταξύ δύο Ports . Οι άκρες καθορίζουν τον τρόπο ροής δεδομένων μέσω του δικτύου κόμβων επεξεργασίας Shader. Μπορούν να συνδεθούν μόνο από μια θύρα εισόδου σε μια θύρα εξόδου.
Κάθε Edge έχει έναν τύπο δεδομένων που ορίζει σε ποιες θύρες μπορεί να συνδεθεί. Κάθε τύπος δεδομένων έχει ένα συσχετισμένο χρώμα για τον προσδιορισμό του τύπου του.
Μπορείτε να δημιουργήσετε ένα νέο Edge κάνοντας κλικ και σύροντας από μια θύρα με το αριστερό κουμπί του ποντικιού. Οι άκρες μπορούν να διαγραφούν με Delete (Windows), Command + Backspace (OSX) ή από το μενού περιβάλλοντος κάνοντας δεξί κλικ στον Κόμβο.
Μπορείτε να ανοίξετε ένα με βάση τα συμφραζόμενα Create Node Menu σύροντας ένα Edge από μια θύρα με το αριστερό κουμπί του ποντικιού και αφήνοντάς το σε μια κενή περιοχή χώρου εργασίας.
Υπάρχουν πολλοί διαθέσιμοι κόμβοι στο Shader Graph. Για μια πλήρη λίστα όλων των διαθέσιμων κόμβων, ανατρέξτε στη Βιβλιοθήκη κόμβων .
Φροντιστήριο
Δημιουργήστε διαδικαστικά shaders για αντικείμενα Sculpt χρησιμοποιώντας το πρόγραμμα επεξεργασίας γραφημάτων Node από την Alexn007.
Bake shader node
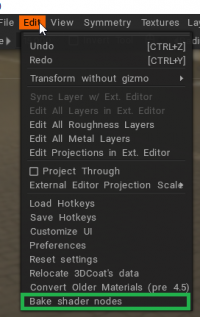
Μόλις λάβετε τον διαδικαστικό σας σκιερ, αυτή είναι η εντολή που χρησιμοποιείται για το bake διαδικαστικών στη γεωμετρία:

Bake shader nodes: Ψήστε διαδικαστικούς παραμορφωτές πλέγματος και υλικά από το πρόγραμμα επεξεργασίας Node στο πραγματικό χρώμα/μετατόπιση. Μπορεί να είναι χρήσιμο για την export.
Φροντιστήρια
Toon Shaders : Αυτό το βίντεο δείχνει τη χρήση των Toon Shaders που προστέθηκαν πρόσφατα στον χώρο εργασίας Sculpt του 3DCoat.
PBR Shaders : Αυτό το βίντεο ξεκινά την επίδειξη του νέου συστήματος PBR Shader στον χώρο εργασίας Sculpt του 3DCoat, συμπεριλαμβανομένου του νέου shader SKIN που αποδίδει αληθινό SSS (στον χώρο εργασίας Render).
Οι νέοι σκιαστήρες PBR περιλαμβάνουν ένα νέο σκίαστρο δέρματος που μπορεί να αποδώσει αληθινό SSS στον χώρο εργασίας απόδοσης του 3DCoat. Το σεμινάριο περιγράφει μερικές από τις πολλές επιλογές shader στον πίνακα και δείχνει πώς μπορείτε να αλλάξετε τους προεπιλεγμένους shader ή να κάνετε shader όταν εργάζεστε.
 Ελληνικά
  English
 Українська
 Español
 Deutsch
 Français
 日本語
日本語 Русский
 한국어
한국어 Polski
 中文 (中国)
 Português
 Italiano
 Suomi
Suomi Svenska
 中文 (台灣)
 Dansk
Dansk Slovenčina
 Türkçe
 Nederlands
 Magyar
 ไทย
ไทย हिन्दी
 Tiếng Việt
 Lietuviškai
 Latviešu valoda
 Eesti
Eesti Čeština
 Română
 Norsk Bokmål