Νέα δυνατότητα επεξεργασίας Curves. Μπορεί να χρησιμοποιηθεί σε όλους τους χώρους εργασίας, καθιστώντας το ένα ισχυρό και ευέλικτο εργαλείο.
Πρώτα, πρέπει να ενεργοποιήσετε τον επεξεργαστή καμπυλών. Χρησιμοποιήστε το πλήκτρο E και επιλέξτε τη λειτουργία καμπυλών ή ενεργοποιήστε το χρησιμοποιώντας αυτό το μενού.
Μπορείτε επίσης να ενεργοποιήσετε το πρόγραμμα επεξεργασίας καμπυλών χρησιμοποιώντας το πλήκτρο Q.
Στο πρόγραμμα επεξεργασίας καμπυλών χρησιμοποιήστε διαφορετικές λειτουργίες για να προσθέσετε και να τροποποιήσετε καμπύλες. Πατήστε το RMB πάνω από την καμπύλη για πρόσβαση στις ιδιότητες της καμπύλης ή για τροποποίηση.
Πατήστε ENTER για να εφαρμόσετε την καμπύλη για το τρέχον εργαλείο. Εάν η καμπύλη είναι κλειστή, συνήθως η περιοχή θα γεμίσει. Εάν δεν είναι κλειστό, η βούρτσα θα τρέξει κατά μήκος της καμπύλης.
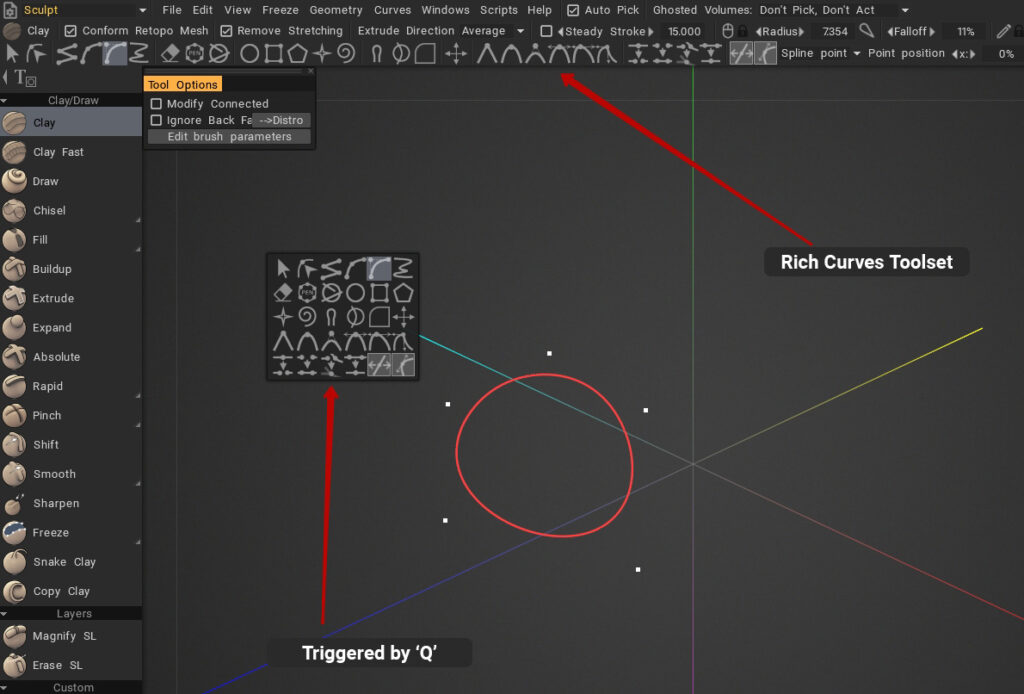
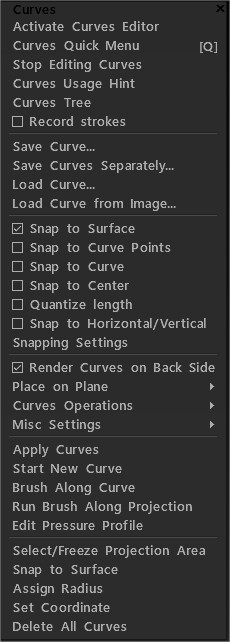
Ενεργοποίηση προγράμματος επεξεργασίας καμπυλών: ενεργοποιήστε τον επεξεργαστή καμπυλών.
Γρήγορες καμπύλες Μενού Q
Διακοπή επεξεργασίας καμπυλών: απενεργοποιήστε το πρόγραμμα επεξεργασίας καμπυλών.
Υπόδειξη χρήσης καμπυλών
Δέντρο καμπυλών: Πίνακας ιεραρχίας καμπυλών.
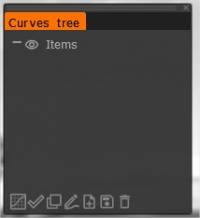
Κάτω εικονίδια (από αριστερά προς τα δεξιά):
Ενεργοποίηση Curves Editor
Εφαρμογή Καμπύλης
Αντίγραφο
Εφαρμόζει πινέλο κατά μήκος της καμπύλης με απόσταση και τρεμούλιασμα
Καμπύλη φόρτωσης που αποθηκεύτηκε προηγουμένως ως spline ή eps: import το EPS απευθείας από τον εικονογράφο έως την καμπύλη import ως πλέγμα.
Αποθήκευση καμπύλης που αποθηκεύτηκε προηγουμένως ως spline ή eps
Διαγραφή Αντικειμένου
Εγγραφή γραμμών : Εάν αυτή η επιλογή είναι ενεργοποιημένη, κάθε διαδρομή θα καταγράφεται ως αόρατη καμπύλη στον φάκελο Καμπύλες δέντρο “Περιγράμματα”.
Αποθήκευση καμπύλης: αποθήκευση της επιλεγμένης καμπύλης.
Αποθήκευση καμπυλών ξεχωριστά: Αποθηκεύστε κάθε καμπύλη σε ξεχωριστό αρχείο. Το όνομα αρχείου θα αποτελείται από το προσαρμοσμένο όνομα και το όνομα της καμπύλης σας.
Καμπύλη φόρτωσης: Καμπύλη φόρτωσης που αποθηκεύτηκε προηγουμένως ως spline ή eps.
Εάν αυτή η επιλογή είναι ενεργοποιημένη, κάθε διαδρομή θα καταγράφεται ως αόρατη καμπύλη στο φάκελο Curves Tree “Περιγράμματα”. Ανεβάστε μια ασπρόμαυρη εικόνα bitmap και το 3DC καταλαβαίνει αυτόματα ποιες ρυθμίσεις θα χρησιμοποιήσει και παρακολουθεί την εικόνα.
Κουμπί στην επιφάνεια: Κάθε σημείο που μετακινείται θα κουμπωθεί στην πλησιέστερη θέση στην επιφάνεια, ακόμα κι αν το σημείο βρίσκεται στην πίσω όψη.
Snap to curve points: Snap to curve points control.
Snap to curve: Snap στην πλησιέστερη καμπύλη εκτός από την τρέχουσα τροποποίηση.
Κουμπί στο κέντρο: Πιέστε στο κέντρο των πλαισίων που συνδέονται με καμπύλες.
Κβαντίστε το μήκος: Δείτε τη μονάδα μήκους στις «Ρυθμίσεις κουμπώματος».
Κλείσιμο σε οριζόντιες κατακόρυφες: Προσαρμόστε σε οριζόντιες και κάθετες προβολές άλλων σημείων αυτής της καμπύλης.
Ρυθμίσεις κουμπώματος: Ρυθμίστε τις απαιτούμενες τιμές για το κούμπωμα απόστασης και γωνίας. Για να χρησιμοποιήσετε το snapping, θα πρέπει επίσης να ενεργοποιήσετε το αντίστοιχο snapping στο μενού.
Αποδώστε καμπύλες στο πίσω μέρος
Βάλτε στο αεροπλάνο:
- Μέσο επίπεδο
- Κεντρική μάζα + YZ – επίπεδο
- Κεντρική μάζα + ZX – επίπεδο
- Κεντρική μάζα + XY – επίπεδο
- YZ – αεροπλάνο
- ZX – αεροπλάνο
- XY – αεροπλάνο
Λειτουργίες καμπυλών:
- Split Self Intersections
- Boolean Operations
- Απλοποίηση καμπύλης
- Καμπύλη εξομάλυνσης
- Subdivide Curve: Αυτή η εντολή θα προσθέσει ένα σημείο ανάμεσα σε κάθε δύο σημεία της καμπύλης.
- Αντίστροφη κατεύθυνση καμπύλης
- Εμφάνιση εναλλαγής μήκους: Ενεργοποιήστε/απενεργοποιήστε το μήκος των κομματιών καμπύλης.
Τροποποιητές:
- Αποσύνδεση τροποποιητών καμπύλης (επιλεγμένα)
- Αποσύνδεση και διαγραφή ματιών (επιλεγμένο)
- Επεξεργασία τροποποιητή καμπύλης (επιλεγμένο)
- Απόκρυψη επιλεγμένων τροποποιητών: Απόκρυψη ματιών για όλες τις επιλεγμένες καμπύλες με τροποποιητές.
- Απόκρυψη όλων των τροποποιητών: Απόκρυψη ματιών για όλες τις καμπύλες με τροποποιητές.
- Εμφάνιση όλων των τροποποιητών: Εμφάνιση όλων των κρυφών ματιών για όλες τις καμπύλες με τροποποιητές.
Εφαρμογή καμπυλών:
Έναρξη νέας καμπύλης: Τερματίστε την τρέχουσα καμπύλη και ξεκινήστε μια νέα.
Brush Along Curve: Εφαρμόζει το πινέλο κατά μήκος της καμπύλης με διάκενο και jitter.
Τρέξτε το πινέλο κατά μήκος της προβολής .
Επεξεργασία προφίλ πίεσης: Καθορίστε πώς θα κατανέμεται η πίεση κατά μήκος της διαδρομής.
Επιλογή/Πάγωμα περιοχής προβολής: Επιλογή/Πάγωμα περιοχής εντός προβολής κλειστών καμπυλών.
Επιλογή/Πάγωμα σε χώρο 3D: Επιλογή/πάγωμα περιοχής εντός κλειστών καμπυλών στον τρισδιάστατο χώρο.
Συμπλήρωση κατά ψηφιακά ψηφία: Γεμίστε την εσωτερική περιοχή της καμπύλης κατά ψηφία.
Πάγωμα επιλογής σε καμπύλη:
Κουμπί στην επιφάνεια: Κουμπώστε τις καμπύλες στην επιφάνεια..
Εκχώρηση ακτίνας: Εκχωρήστε την ίδια (τρέχουσα) ακτίνα σε όλα τα σημεία της καμπύλης.
SetCoordinate:
Διαγραφή όλων των καμπυλών:
Curves Editor

Εικονίδια (από αριστερά προς τα δεξιά):
Επιλογή ολόκληρης της καμπύλης: Επιλέξτε και χειριστείτε ολόκληρη την καμπύλη. Χρησιμοποιήστε τα SHIFT και CTRL για να προσθέσετε/αφαιρέσετε επιλογές. Τοποθετήστε ολόκληρη την καμπύλη με ένα ορθογώνιο για να επιλέξετε. Εάν μέρος της καμπύλης βρίσκεται έξω από το ορθογώνιο, η καμπύλη δεν θα επιλεγεί. Επιλέξτε και σύρετε για μετακίνηση. Εάν χρειάζεστε έναν ακριβή μετασχηματισμό, χρησιμοποιήστε τη λειτουργία μετασχηματισμού.
Επιλέξτε και χειριστείτε ένα σημείο ή ομάδα σημείων .
Κανόνες αυτής της λειτουργίας:
- 1) Κάντε διπλό κλικ για να εισαγάγετε ή να αφαιρέσετε ένα σημείο.
- 2) Το διπλό κλικ σε κενό χώρο καταργεί την επιλογή όλων.
- 3) Η επιλογή σημείων με κλικ ή ορθογώνιο θα εκτελείται μόνο πάνω από την επιλεγμένη καμπύλη. Μπορείτε να επιλέξετε άλλη καμπύλη με σημείο κλικ SHIFT.
- 4) Το RMB πάνω από το σημείο αλλάζει την ευκρίνεια/απαλότητά του, διαφορετικά ενεργοποιεί τις ιδιότητες καμπύλης.
Προσθήκη ευθύγραμμων τμημάτων στην καμπύλη: Πατήστε ESC για να ξεκινήσει η νέα καμπύλη. Κάντε κλικ στο πρώτο ή στο τελευταίο σημείο της καμπύλης για να την επεκτείνετε.
Προσθήκη τμημάτων Spline στην καμπύλη: Πατήστε ESC για να ξεκινήσει η νέα καμπύλη. Κάντε κλικ στο πρώτο ή στο τελευταίο σημείο της καμπύλης για να την επεκτείνετε. Κάντε κλικ σε οποιοδήποτε σημείο της κλειστής καμπύλης για να σπάσετε το κύκλωμα.
Προσθήκη BSpline: Προσθήκη τμημάτων BSpline στην καμπύλη.
Προσθήκη τμημάτων με ελεύθερο χέρι στην καμπύλη: Κάντε κλικ στο πρώτο ή στο τελευταίο σημείο της καμπύλης για να την επεκτείνετε.
- Συντελεστής απλοποίησης : Ο συντελεστής απλοποίησης για τη χάραξη μιας ελεύθερης καμπύλης. Αφού σχεδιάσετε μια ελεύθερη καμπύλη, το ποσοστό των πόντων που καθορίζεται σε αυτήν την παράμετρο αφαιρείται.
- Συντελεστής εξομάλυνσης : Συντελεστής εξομάλυνσης για ελεύθερο χέρι.
Τα πέντε εργαλεία -από αριστερά προς τα δεξιά- έχουν διευρυμένες επιλογές για καλύτερη δημιουργία/χειρισμό. Αυτοί είναι:
- Ορίστε τις επιλεγμένες κορυφές ώστε να είναι ευκρινείς.
- Ορίστε τα επιλεγμένα σημεία στην προεπιλεγμένη συμπεριφορά spline.
- Ορίστε τα επιλεγμένα σημεία σε σημεία B-spline.
- Λαβές μήκους ίσων εφαπτομένων σφηνών.
- Λαβές μήκους παράλληλων εφαπτομένων.
- Γενικές ανεξάρτητες λαβές μήκους εφαπτομένων.
- Σημείο διαίρεσης: Εάν το σημείο είναι συνδεδεμένο με άλλο σημείο, θα αποσυνδεθεί. η διαφορετικά καμπύλη θα χωριστεί σε δύο καμπύλες σε αυτό το σημείο.
- Συνένωση σημείων: Χρησιμοποιήστε το για να ενώσετε δύο καμπύλες, επιλέξτε δύο τελικά σημεία και χρησιμοποιήστε το σύνδεσμο.
- Συνδέστε πολλά σημεία μεταξύ τους: Τα συνδεδεμένα σημεία μπορούν να τοποθετηθούν σε ξεχωριστές καμπύλες. Μετά τη σύνδεση, θα μετακινούνται πάντα μαζί σε όλες τις λειτουργίες όταν δεν υπάρχει αντίφαση. Χρησιμοποιήστε το split για αποσύνδεση.
- Σύμπτυξη 2 σημείων σε ένα: Τα σημεία πρέπει να είναι διαδοχικά στην ίδια καμπύλη.
Μετακίνηση κορυφών: Εάν είναι ενεργό, το ποντίκι μετακινεί κορυφές.
Μετακίνηση εφαπτομένων: Εάν είναι ενεργή, το ποντίκι μετακινεί λαβές εφαπτομένων.
Επιλογές για εισαγωγή σημείου με διπλό κλικ:
- Spline point: Όταν επιλέγεται αυτό το στοιχείο, κάνοντας διπλό κλικ στην καμπύλη προσθέτουμε ένα σημείο spline.
- Αιχμηρό σημείο: Όταν επιλέγεται αυτό το στοιχείο, κάνοντας διπλό κλικ στην καμπύλη προσθέτουμε ένα αιχμηρό σημείο.
- Διατήρηση σχήματος: Όταν επιλέγεται αυτό το στοιχείο, κάνοντας διπλό κλικ στην καμπύλη προσθέτουμε μια αιχμηρή αιχμή. Η καμπύλη δεν αλλάζει το σχήμα της, αλλά όλα τα σημεία της καμπύλης γίνονται σημεία με παράλληλες εφαπτόμενες.
Θέση σημείου: προσαρμόστε τη θέση του σημείου στις συντεταγμένες XYZ.
Διαγραφή: Διαγράψτε τις καμπύλες κάτω από τον κύκλο του στυλό.
Pen Circle: Κάντε κλικ για να προσθέσετε έναν κύκλο με προεπιλεγμένες παραμέτρους.
- Ένας αριθμός κορυφών: Ποσότητα κορυφών που δημιουργήθηκαν.
Cut Slice: Κάντε κλικ, σύρετε το ποντίκι και αφήστε το. Η κομμένη φέτα θα μετατραπεί σε καμπύλη.
- Γωνία: Πατήστε το shift σε διακριτή γωνία.
- Σταθερή γωνία: Χρησιμοποιήστε μια σταθερή γωνία.
Προσθήκη Ellipse: Κάντε κλικ για να προσθέσετε έλλειψη με προεπιλεγμένες παραμέτρους. Σύρετε για να ορίσετε το προσαρμοσμένο μέγεθος. Κρατήστε πατημένο το SHIFT για να δημιουργήσετε έναν κύκλο. SHIFT/CTRL-κλικ σε άλλα primitives για επιλογή/απεπιλογή.
Προσθήκη ορθογωνίου: Κάντε κλικ για να προσθέσετε ένα ορθογώνιο με προεπιλεγμένες παραμέτρους. Σύρετε για να ορίσετε το προσαρμοσμένο μέγεθος. Κρατήστε πατημένο το SHIFT για να δημιουργήσετε το τετράγωνο. SHIFT/CTRL κάντε κλικ σε άλλα primitives για επιλογή/αποεπιλογή.
Προσθήκη N-Gon: Κάντε κλικ για να προσθέσετε n-gon με προεπιλεγμένες παραμέτρους. Σύρετε για να ορίσετε το προσαρμοσμένο μέγεθος. Κρατήστε πατημένο το SHIFT για να δημιουργήσετε ένα n-gon σε έναν γύρο. SHIFT/CTRL κάντε κλικ σε άλλα primitives για επιλογή/αποεπιλογή.
Προσθήκη αστεριού: Κάντε κλικ για να προσθέσετε αστέρι με προεπιλεγμένες παραμέτρους. Σύρετε για να ορίσετε το προσαρμοσμένο μέγεθος. Κρατήστε πατημένο το SHIFT για να δημιουργήσετε ένα αστέρι σε έναν γύρο. SHIFT/CTRL-κλικ σε άλλα primitives για επιλογή/απεπιλογή.
Προσθήκη σπιράλ: Κάντε κλικ για να προσθέσετε σπείρα με προεπιλεγμένες παραμέτρους. Σύρετε για να ορίσετε το προσαρμοσμένο μέγεθος. SHIFT/CTRL-κλικ σε άλλα primitives για επιλογή/απεπιλογή.
- Επιλογή παρόμοιου: Επιλογή αντικειμένων παρόμοιου τύπου και διαστάσεων.
- Ίδιος τύπος: Επιλέξτε αντικείμενα του ίδιου τύπου.
- Σε κανονική καμπύλη: Μετατρέψτε τις επιλεγμένες καμπύλες σε κανονικές καμπύλες. Σημαίνει ότι οι καμπύλες δεν θα προέρχονται από πρωτόγονα και μπορείτε να τις τροποποιήσετε χειροκίνητα. Γενικά, εάν προσθέσετε το σημείο με μη αυτόματο τρόπο ή μετακινήσετε ορισμένα σημεία με μη αυτόματο τρόπο, η καμπύλη θα γίνει αυτόματα η κανονική καμπύλη.
Εργαλείο για ομαλή κίνηση σημείων: Επιλέξτε καμπύλες ή σημεία για να ξεκινήσετε. Σύρετε σημεία που χωρίζονται από τον κέρσορα με απόσταση ακτίνας. Καθώς ο κέρσορας κινείται, τα σημεία που εμπίπτουν στο πεδίο δράσης αλλάζουν.
Εργαλείο για ομαλά σημεία που κινούνται κατά ακτίνα: Επιλέξτε καμπύλες ή σημεία για να ξεκινήσετε. Τα σημεία μεταφοράς υπόκεινται στα σημεία που χωρίζονται από τον κέρσορα με μια απόσταση ακτίνας όταν πατηθεί το αριστερό κουμπί του ποντικιού. Καθώς ο κέρσορας κινείται, τα σημεία που εμπίπτουν στο πεδίο δράσης δεν αλλάζουν.
- Βαθμός: Μεταφράστε την επιτάχυνση για ομαλά σημεία που κινούνται.
Μετασχηματισμός: Μετασχηματισμός επιλεγμένων καμπυλών/σημείων.
On Plane: Περιορίστε τις πινελιές σε ένα επίπεδο. Χρησιμοποιήστε το RMB για να ορίσετε ένα επίπεδο. Κάντε κλικ στην επιλογή Plane Opt. κουμπί για να επεξεργαστείτε περαιτέρω τον τρόπο λειτουργίας του αεροπλάνου.
Ιδιότητες καμπυλών
Πατήστε RMB πάνω από την καμπύλη ή πάνω από το επίπεδο καμπύλης στο δέντρο καμπυλών για πρόσβαση ή τροποποίηση των ιδιοτήτων καμπύλης.
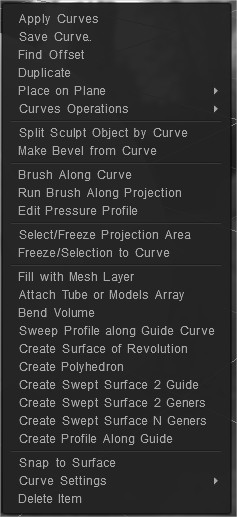
Εφαρμογή καμπυλών Εφαρμογή των επιλεγμένων καμπυλών.
Save Curve: Αποθηκεύστε την επιλεγμένη καμπύλη.
Σημεία Εξώθηση .
- Σχεδίαση πραγματικής μετατόπισης: Σχεδιάστε πραγματική μετατόπιση για εξώθηση.
- Κάντε τις γωνίες αιχμηρές: Κάντε τις γωνίες αιχμηρές.
- Αντίστροφη κατεύθυνση καμπύλης: Αντίστροφη κατεύθυνση καμπύλης.
Αντιγράψτε την επιλεγμένη καμπύλη.
Τοποθέτηση στο αεροπλάνο
- Μέσο επίπεδο
- Κεντρική μάζα + YZ – επίπεδο
- Κεντρική μάζα + ZX – επίπεδο
- Κεντρική μάζα + XY – επίπεδο
- YZ – αεροπλάνο
- ZX – αεροπλάνο
- XY – αεροπλάνο
Λειτουργίες καμπυλών
- Split Self Intersections: Αυτή η εντολή προσθέτει σημεία αυτο-τομής της καμπύλης. Η τομή ισχύει επίσης εάν τα σημεία στις καμπύλες στο χώρο είναι πιο κοντά από την τιμή ανοχής τομής. αλλάζοντας ποια, μπορείτε να λάβετε περισσότερα ή λιγότερα σημεία τομής.
Όταν επιλέγετε “Διαίρεση σε τμήματα”, λαμβάνετε μια υποδιαίρεση της καμπύλης σε διαδοχικά τμήματα. Όταν επιλέγετε “Διαίρεση σε συμπλέγματα”, λαμβάνετε μια υποδιαίρεση της καμπύλης σε κλειστά υποσυστήματα.
- Boolean Operations: Αυτή η εντολή εκτελεί τις πράξεις τομής, ένωσης και αφαίρεσης σε καμπύλες.
Πρώτα απ ‘όλα, εντοπίζονται τα σημεία τομής των καμπυλών και στη συνέχεια εκτελούνται οι πράξεις. Η ανοχή τομής ρυθμίζει τον αριθμό των σημείων τομής. Η τομή θεωρείται ότι είναι σημεία που βρίσκονται σε απόσταση μικρότερη από αυτή την τιμή.
- Simplify Curve: Αυτή η εντολή διαγράφει τα σημεία της καμπύλης έτσι ώστε η νέα καμπύλη να είναι όσο το δυνατόν πιο παρόμοια με την αρχική καμπύλη.
Ο αριθμός των σημείων ελέγχεται από την παράμετρο “πολλαπλασιαστής”, η οποία κυμαίνεται από 0 έως 1.
- Αφαιρέστε αιχμηρές γωνίες: Αυτό το εργαλείο αφαιρεί γωνίες καμπύλης διαφορετικές από 180 μοίρες, αντικαθιστώντας τις με ένα κυκλικό τόξο δεδομένης ακτίνας. Εάν επιλεγεί η επιλογή «Εφαρμογή μόνο σε επιλεγμένες κορυφές», η λειτουργία θα εκτελεστεί σε όλες τις επιλεγμένες κορυφές της καμπύλης, ανεξάρτητα από τη γωνία. Εάν αυτή η επιλογή δεν είναι επιλεγμένη, τότε η πράξη εκτελείται σε όλες τις κορυφές της καμπύλης, τις οποίες ο αλγόριθμος θεωρεί κατάλληλο.
- Subdivide Curve: Αυτόματη προσθήκη κορυφών στην καμπύλη. Αυτή η εντολή θα προσθέσει ένα σημείο ανάμεσα σε κάθε δύο σημεία της καμπύλης.
- Αντίστροφη κατεύθυνση καμπύλης: Αντιστροφή κατεύθυνσης καμπύλης.
Split Sculpt object by Curve
Κάντε Bevel από Curve
Brush κατά μήκος της καμπύλης: Εφαρμόζει το πινέλο κατά μήκος της καμπύλης με απόσταση και τρεμούλιασμα.
Τρέξτε το πινέλο κατά μήκος της προβολής:
Επεξεργασία προφίλ πίεσης: Καθορίστε πώς θα κατανέμεται η πίεση κατά μήκος της διαδρομής.
Επιλογή/Πάγωμα περιοχής προβολής: Επιλογή/Πάγωμα περιοχής εντός προβολής κλειστών καμπυλών.
Πάγωμα/Επιλογή σε καμπύλη:
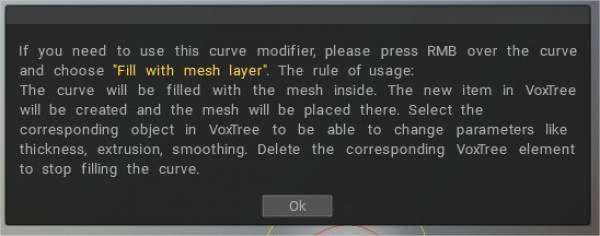
Γέμισμα με στρώμα πλέγματος: Η καμπύλη θα γεμίσει με το πλέγμα μέσα. Το νέο στοιχείο στο VoxTree θα δημιουργηθεί και το πλέγμα θα τοποθετηθεί εκεί. Επιλέξτε το αντίστοιχο αντικείμενο στο VoxTree για να μπορείτε να αλλάξετε παραμέτρους όπως πάχος, εξώθηση και εξομάλυνση. Διαγράψτε το αντίστοιχο στοιχείο VoxTree για να σταματήσετε να γεμίζετε την καμπύλη.
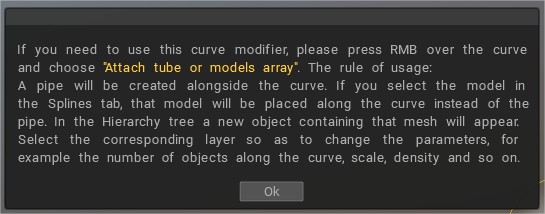
Συνδέστε τη διάταξη σωλήνα ή μοντέλων: Θα δημιουργηθεί ένας σωλήνας δίπλα στην καμπύλη .
Για να προσθέσετε νέα γεωμετρία στην επιφάνεια του πλέγματος > Επιλέξτε εργαλείο Tube/Array. Σχεδιάστε μια καμπύλη και επιλέξτε Προσάρτηση σωλήνα ή πίνακα μοντέλων.
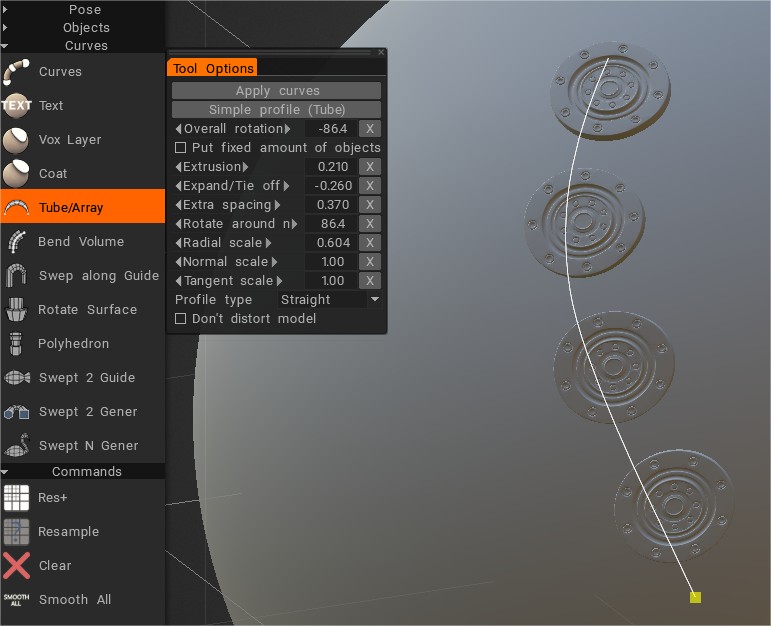
Τα Splines και επίσης τα μοντέλα Sculpt μπορούν να χρησιμοποιηθούν για γέμισμα με νέα γεωμετρία (προσάρτηση σωλήνα ή διάταξη μοντέλων).
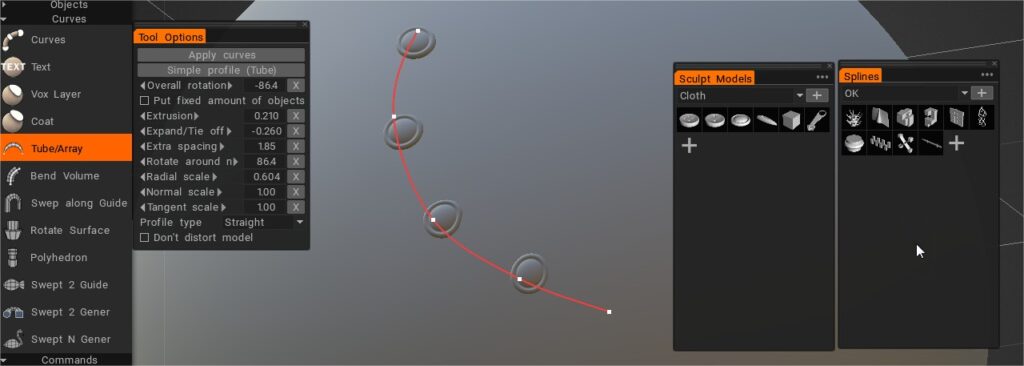
Εάν επιλέξετε το μοντέλο στην καρτέλα Splines, αυτό το μοντέλο θα τοποθετηθεί κατά μήκος της καμπύλης αντί του σωλήνα. Στο δέντρο Ιεραρχίας, θα εμφανιστεί ένα νέο αντικείμενο που περιέχει αυτό το πλέγμα. Επιλέξτε το αντίστοιχο επίπεδο για να αλλάξετε τις παραμέτρους, για παράδειγμα, τον αριθμό των αντικειμένων κατά μήκος της καμπύλης, την κλίμακα, την πυκνότητα κ.λπ.
Όγκος κάμψης: Λυγίστε το αντικείμενο γύρω από την καμπύλη.
Προφίλ σάρωσης κατά μήκος της καμπύλης οδηγού: Το προφίλ σάρωσης θα βρίσκεται κατά μήκος της επιλεγμένης καμπύλης οδηγού. Αφού εμφανιστεί το παράθυρο διαλόγου “Επιλογές εργαλείου”, Χρειάζεται να επιλέξετε προφίλ-καμπύλη. Το νέο στοιχείο στο VoxTree θα δημιουργηθεί και το πλέγμα θα τοποθετηθεί εκεί. Επιλέξτε το αντίστοιχο αντικείμενο στο VoxTree για να μπορείτε να αλλάξετε παραμέτρους όπως πάχος, γωνία, Twist-Angle, κ.λπ. Διαγράψτε το αντίστοιχο στοιχείο VoxTree για να σταματήσετε να γεμίζετε την καμπύλη.
Μπορείτε να αλλάξετε το σχήμα της καμπύλης χρησιμοποιώντας την επιλογή “Χρήση γραφήματος προφίλ”.
Create Rotate Surface: Η επιφάνεια περιστροφής θα δημιουργηθεί με περιστροφή του επιλεγμένου προφίλ γύρω από τον επιλεγμένο άξονα καμπύλης. Αφού εμφανιστεί το παράθυρο “Επιλογές εργαλείου”, πρέπει να επιλέξετε τον άξονα της καμπύλης. Το νέο στοιχείο στο VoxTree θα δημιουργηθεί και το πλέγμα θα τοποθετηθεί εκεί. Επιλέξτε το αντίστοιχο αντικείμενο στο VoxTree για να μπορείτε να αλλάξετε παραμέτρους όπως πάχος, γωνία, γωνία συστροφής κ.λπ. Διαγράψτε το αντίστοιχο στοιχείο VoxTree για να σταματήσετε να γεμίζετε την καμπύλη.
Δημιουργία Πολυέδρου: Το Πολύεδρο θα δημιουργηθεί με περιστροφή και μετακίνηση του επιλεγμένου προφίλ γύρω από τον επιλεγμένο άξονα καμπύλης. Αφού εμφανιστεί το παράθυρο “Επιλογές εργαλείου”, πρέπει να επιλέξετε τον άξονα της καμπύλης. Το νέο στοιχείο στο VoxTree θα δημιουργηθεί και το πλέγμα θα τοποθετηθεί εκεί. Επιλέξτε το αντίστοιχο αντικείμενο στο VoxTree για να μπορείτε να αλλάξετε παραμέτρους όπως πάχος, Ποσότητα όψεων και εξομάλυνση. Διαγράψτε το αντίστοιχο στοιχείο VoxTree για να σταματήσετε να γεμίζετε την καμπύλη.
Οδηγός δημιουργίας Swept Surface 2:
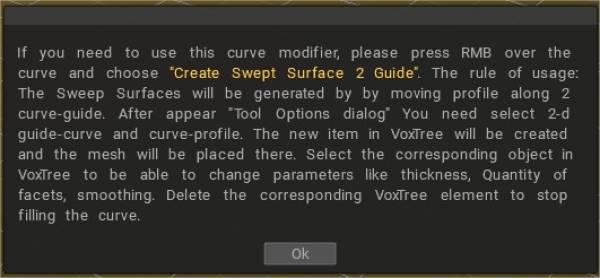
Οι επιφάνειες σάρωσης θα δημιουργηθούν μετακινώντας το προφίλ κατά μήκος δύο οδηγών καμπυλών. Μετά την εμφάνιση του διαλόγου “Επιλογές εργαλείου”, πρέπει να επιλέξετε 2-d guide-curve και curve-profile.
Το νέο στοιχείο στο VoxTree θα δημιουργηθεί και το πλέγμα θα τοποθετηθεί εκεί. Επιλέξτε το αντίστοιχο αντικείμενο στο VoxTree για να μπορείτε να αλλάξετε παραμέτρους όπως πάχος, Ποσότητα όψεων και εξομάλυνση. Διαγράψτε το αντίστοιχο στοιχείο VoxTree για να σταματήσετε να γεμίζετε την καμπύλη.
Μπορείτε επίσης να αλλάξετε το σχήμα της καμπύλης χρησιμοποιώντας την επιλογή «Χρήση γραφήματος προφίλ».
Create Swept Surface 2 Geners: Το Sweep Surface θα δημιουργηθεί μετακινώντας 2 προφίλ κατά μήκος της επιλεγμένης καμπύλης οδηγού. Αφού εμφανιστεί το “Επιλογές διαλόγου εργαλείου”, πρέπει να επιλέξετε το προφίλ καμπύλης. Το νέο στοιχείο στο VoxTree θα δημιουργηθεί και το πλέγμα θα τοποθετηθεί εκεί. Επιλέξτε το αντίστοιχο αντικείμενο στο VoxTree για να μπορείτε να αλλάξετε παραμέτρους όπως πάχος, Ποσότητα όψεων και εξομάλυνση. Διαγράψτε το αντίστοιχο στοιχείο VoxTree για να σταματήσετε να γεμίζετε την καμπύλη.
Δημιουργία Swept Surface N Geners: Οι Sweep Surfaces θα δημιουργηθούν μετακινώντας N προφίλ κατά μήκος δύο οδηγών καμπυλών.
Αφού εμφανιστεί το παράθυρο διαλόγου “Επιλογές εργαλείου”, χρειάζεστε να επιλέξετε δισδιάστατα προφίλ οδηγού και καμπυλών. Το νέο στοιχείο στο VoxTree θα δημιουργηθεί και το πλέγμα θα τοποθετηθεί εκεί.
Επιλέξτε το αντίστοιχο αντικείμενο στο VoxTree για να μπορείτε να αλλάξετε παραμέτρους όπως πάχος, Ποσότητα όψεων και εξομάλυνση. Διαγράψτε το αντίστοιχο στοιχείο VoxTree για να σταματήσετε να γεμίζετε την καμπύλη.
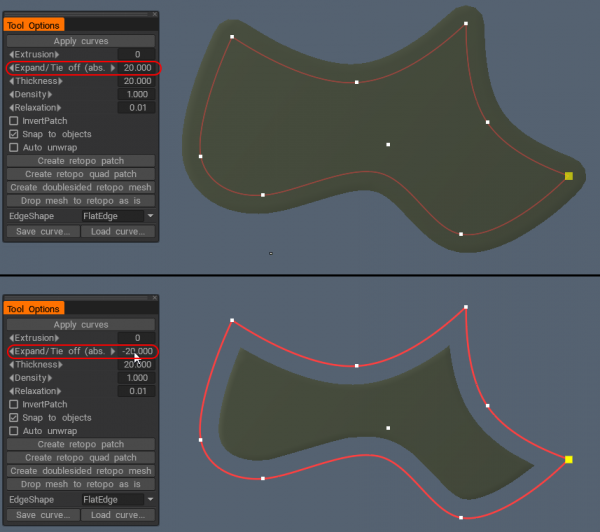
– Τώρα με πολύ καλύτερη ποιότητα “Expand/tie off” για μπαλώματα και σωλήνες για τροποποιητές καμπυλών.
Κουμπί στην επιφάνεια: Κουμπώστε τις καμπύλες στην επιφάνεια.
Ρυθμίσεις καμπύλης:
- Κλειστή καμπύλη: Σχεδιάστε μια κλειστή καμπύλη.
- Εμφάνιση ακτίνων
- Ακτίνα κλειδώματος
- Εμφάνιση κανονικών
- Εμφάνιση σημείων
- Snap To Surfaces
- Μείνετε στο αεροπλάνο
- Εμφάνιση μήκους
- Εκχώρηση ακτίνας: Εκχωρήστε την ίδια (τρέχουσα) ακτίνα σε όλα τα σημεία της καμπύλης..
- Αλλαγή χρώματος καμπύλης
Διαγραφή στοιχείου: Διαγραφή επιλεγμένης καμπύλης.
Εργαλείο “Bend volume” για την κάμψη αντικειμένων στη σκηνή κατά μήκος της καμπύλης που προστέθηκε .
Φροντιστήρια
Απαιτήσεις για το μοντέλο που θα χρησιμοποιηθεί στον πίνακα Splines
- Θα ακολουθήσουμε τα βήματα για το πώς να φτιάξετε ένα προσαρμοσμένο σχοινί με κόμπους που μπορεί να χρησιμοποιηθεί με το εργαλείο Curves μέσα στο 3DCoat (από την Industry Tuts )
Swept Surface 1 : Δημιουργία μιας σαρωμένης επιφάνειας χρησιμοποιώντας μία καμπύλη οδηγό και μία καμπύλη προφίλ.
Swept Surface 2 : Δημιουργήστε μια σαρωμένη επιφάνεια χρησιμοποιώντας δύο καμπύλες οδηγούς και μία καμπύλη προφίλ.
Swept Surface 3 : Δημιουργία μιας σαρωμένης επιφάνειας χρησιμοποιώντας μια καμπύλη οδηγού και δύο καμπύλες προφίλ.
Bird 3D : Δημιουργία μιας σαρωμένης επιφάνειας χρησιμοποιώντας μια καμπύλη οδηγό και μια καμπύλη προφίλ.
Dolfine 3D : Δημιουργία σαρωμένης επιφάνειας χρησιμοποιώντας καμπύλη οδηγού και καμπύλη προφίλ.
Περιστροφή επιφάνειας : Δημιουργία επιφάνειας περιστροφής.
 Ελληνικά
  English
 Українська
 Español
 Deutsch
 Français
 日本語
日本語 Русский
 한국어
한국어 Polski
 中文 (中国)
 Português
 Italiano
 Suomi
Suomi Svenska
 中文 (台灣)
 Dansk
Dansk Slovenčina
 Türkçe
 Nederlands
 Magyar
 ไทย
ไทย हिन्दी
 Tiếng Việt
 Lietuviškai
 Latviešu valoda
 Eesti
Eesti Čeština
 Română
 Norsk Bokmål