Αυτό το κεφάλαιο σάς δείχνει πώς να προσαρμόσετε πλήρως το 3DCoat . Αν και οι επιλογές είναι εκτενείς, η πραγματική προσαρμογή είναι μια γρήγορη και απλή διαδικασία.
Σε αυτήν τη σειρά βίντεο, ο Rygaard δείχνει πώς μπορείτε να κατακτήσετε το All About Amazing Customizations.
Στην έκδοση 2022, η διεπαφή χρήστη τροποποιήθηκε σημαντικά.
Πλήρης προσαρμογή διεπαφής χρήστη μέσω σεναρίων ή μη αυτόματης προσθήκης, Δημιουργία των δικών σας προσαρμοσμένων δωματίων και χώρων εργασίας, δυνατότητα εργασίας σε απλοποιημένη ή πλήρη λειτουργικότητα ενεργοποιημένη.
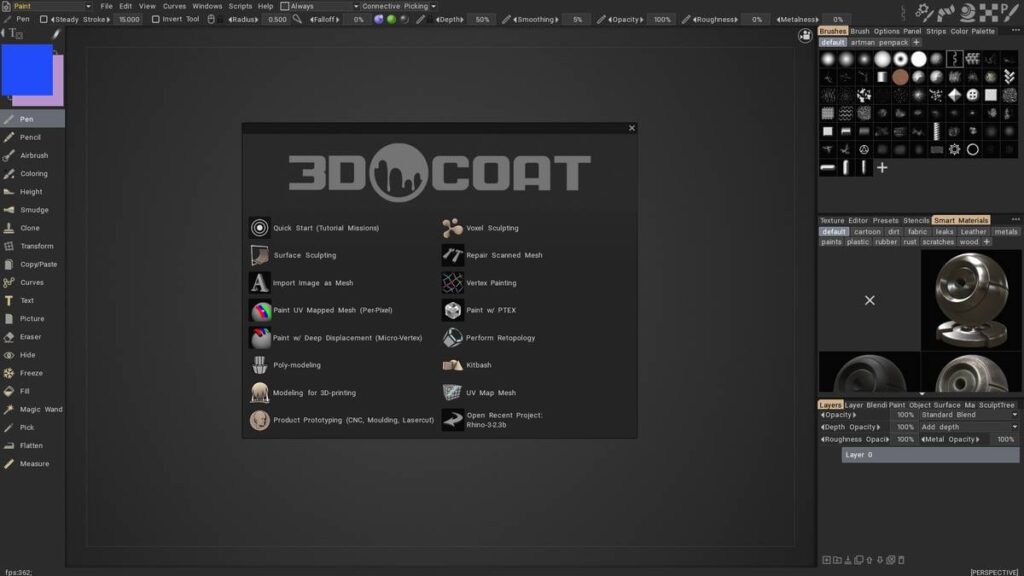
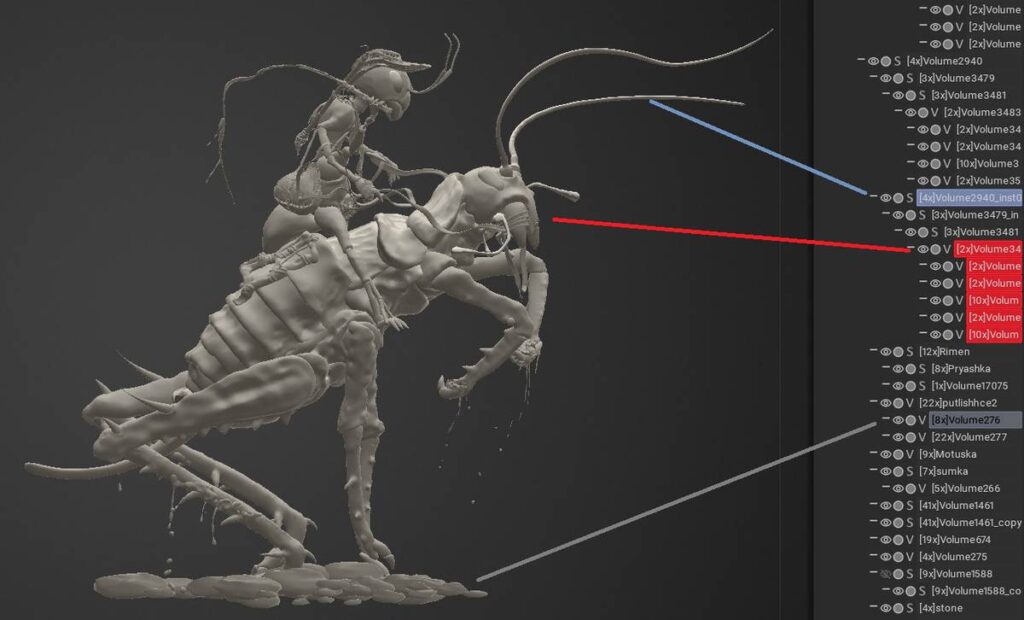
Χρωματισμός όλων των στρωμάτων
Στο παράθυρο του δέντρου αντικειμένων, μπορείτε να αντιστοιχίσετε χρώματα στο αντικείμενο ή στην ομάδα αντικειμένων. Αυτή η λειτουργία θα σας επιτρέψει να βρείτε γρήγορα τη θέση τους, ειδικά ανάμεσα σε μεγάλο αριθμό αντικειμένων:
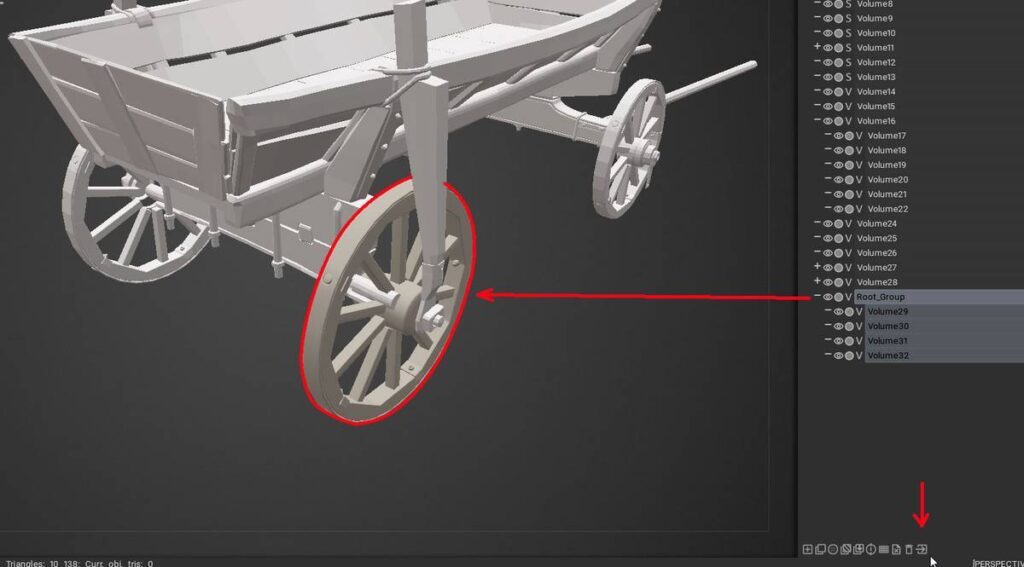
Ομαδοποίηση όλων των επιπέδων
Ομαδοποιήστε επιλεγμένα αντικείμενα με ένα κουμπί:
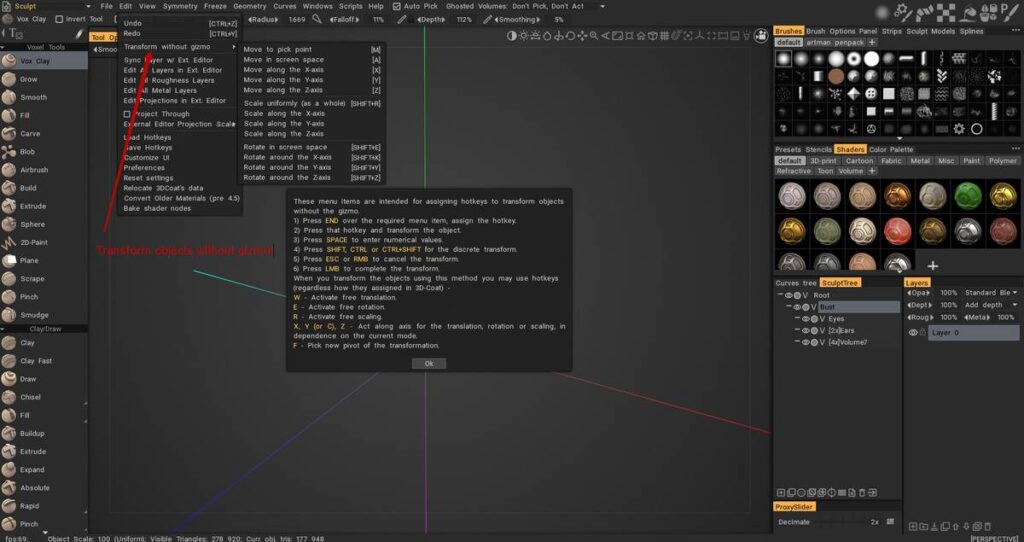
Gizmo-less Transforms
Για τον γρήγορο μετασχηματισμό αντικειμένων χωρίς gizmo: μετακίνηση, κλίμακα και περιστροφή:
Απόκρυψη στοιχείων από τη διεπαφή
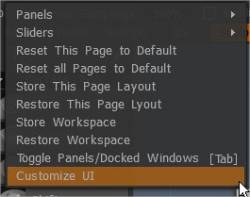
Από το μενού “Επεξεργασία”, επιλέξτε “Προσαρμογή διεπαφής χρήστη”. Θα παρατηρήσετε ότι τα περισσότερα στοιχεία μενού (κάθε κατηγορίας) και εργαλεία έχουν ένα πλαίσιο ελέγχου δίπλα τους, που σημαίνει ότι μπορούν να γίνουν ορατά ή όχι στη διεπαφή.
Ορισμένοι χρήστες χρησιμοποιούν μόνο το 3DCoat για πολύ συγκεκριμένες εργασίες, οπότε θα ήταν λογικό να αποκρύψουν πολλά στοιχεία διεπαφής για να μειώσουν τη συνολική ακαταστασία των περιττών λειτουργιών και επιλογών.
Απλώς αποκρύψτε εκείνα τα στοιχεία της διεπαφής που σας αποσπούν την προσοχή και χρησιμοποιήστε συντομεύσεις πληκτρολογίου που σας δίνουν πρόσβαση στα εργαλεία που χρειάζεστε μόνο όταν τα χρειάζεστε.
Ένας από τους πιο βολικούς πίνακες εργαλείων “Pop-Up” είναι ο πίνακας “Tool/Color”. Περιέχει όλα τα Εργαλεία Painting από τον αριστερό πίνακα εργαλείων, εκτός από έναν εύχρηστο τροχό χρωμάτων.
Χρήση και προσαρμογή της διεπαφής χρήστη : Από τον Javis Jones.
Κρύψτα όλα
Χρησιμοποιήστε το TAB εάν θέλετε να ζωγραφίζετε και να δημιουργείτε υφή με όσο “κενό” χώρο στην οθόνη μπορούν να πάρουν και ακαταστασία πολλών στοιχείων διεπαφής. Το 3DCoat σάς επιτρέπει να εργάζεστε ακριβώς με αυτόν τον τρόπο.
Ζωγραφίστε και υφή ελεύθερα και πατήστε το “Spacebar” όταν θέλετε να αλλάξετε σε διαφορετικό εργαλείο ή χρώμα Paint.
Για να αποκτήσετε πρόσβαση στον πίνακα “Κύρια Λειτουργίες Ζωγραφικής”, απλώς πατήστε “~” στο πληκτρολόγιό σας για να το μεταφέρετε στο μπροστινό μέρος του χώρου εργασίας σας, ακριβώς στη θέση του δρομέα σας.
Αναδυόμενοι πίνακες των Windows με καρτέλες
Όπως πολλές άλλες εφαρμογές, το 3DCoat σάς επιτρέπει να προσαρμόσετε τον χώρο εργασίας σας για να ταιριάζει στις ανάγκες σας. Μπορείτε να αποκρύψετε ή να εμφανίσετε παράθυρα, να μετακινήσετε τα αναδυόμενα παράθυρα με καρτέλες, ακόμη και να τα συνδέσετε/αποσυνδέσετε ή να τα μετατρέψετε σε αιωρούμενα παράθυρα. Εάν δεν χρειάζεστε ή θέλετε να δείτε ένα συγκεκριμένο παράθυρο, απλώς κλείστε το.
Μπορείτε πάντα να το επαναφέρετε στη διεπαφή μέσω του μενού Παράθυρο ανά πάσα στιγμή. Η προσαρμογή του χώρου εργασίας σας κάνει το 3DCoat να λειτουργεί με τον τρόπο που ταιριάζει καλύτερα στις ανάγκες και τη ροή εργασίας σας.
Χρησιμοποιήστε αυτό το μενού για να επιλέξετε ποιοι πίνακες λειτουργιών θέλετε να εμφανίζονται στο συνολικό σχήμα διεπαφής.
Αυτοί οι πίνακες μπορούν να επιπλέουν ελεύθερα ή να συνδεθούν σε οποιοδήποτε τμήμα της διεπαφής απλά σύροντας τη γραμμή τίτλου και αφήνοντας το πλαίσιο αφού δείτε την επισημασμένη προεπισκόπηση της νέας του θέσης.
Οποιαδήποτε διάταξη μπορεί να αποθηκευτεί και να φορτωθεί ξανά.
Ας ρίξουμε μια ματιά στο πώς μπορείτε να εργαστείτε με τη διεπαφή. Θα ξεκινήσουμε μετακινώντας τα αναδυόμενα παράθυρα με καρτέλες. Θα συζητήσουμε πώς να αποσυνδέσετε και να συνδέσετε παράθυρα με καρτέλες και ακόμη και πώς να δημιουργήσετε αιωρούμενα παράθυρα.
Τα παράθυρα με καρτέλες είναι ευέλικτα καθώς μπορείτε να αλλάξετε το πλάτος και το μήκος τους, καθώς και τη θέση τους. Αυτό μπορεί να είναι χρήσιμο εάν χρησιμοποιείτε το 3DCoat σε φορητό υπολογιστή και πρέπει να αποκτήσετε όσο το δυνατόν περισσότερη ακίνητη περιουσία οθόνης για να μοντελοποιήσετε ή να κάνετε εργασίες υφής.
Τοποθετήστε το ποντίκι σας κατά μήκος της άκρης ή του περιγράμματος ενός παραθύρου με καρτέλες. Όταν ο κέρσορας σας μετατραπεί σε βέλος διπλής κεφαλής, σύρετε το ποντίκι σας για να αλλάξετε το μέγεθος του παραθύρου.
Μεταβείτε στο μενού Παράθυρο για να εμφανίσετε μια καρτέλα που μπορεί να έχετε κλείσει ή εξερευνήστε τις διαθέσιμες καρτέλες. Από εδώ, μπορείτε να επιλέξετε μια καρτέλα που θα εμφανιστεί στη διεπαφή. Ένας πολύ καλός τρόπος για να μάθετε για τα εργαλεία του 3DCoat είναι να ανοίξετε τα παράθυρα και να εξερευνήσετε όλες τις λειτουργίες που περιέχονται σε αυτό.
Η μετακίνηση ενός παραθύρου με καρτέλες σε μια νέα θέση είναι εύκολη. Μπορεί να θέλετε να μετακινήσετε ένα παράθυρο με καρτέλες σε ένα άλλο σύμπλεγμα καρτελών. Ένα καλό παράδειγμα μπορεί να είναι να σύρετε όλα τα παράθυρα που ασχολούνται με χρώματα ή στυλό σε ένα σύμπλεγμα, ώστε να μπορείτε να τα βρείτε γρήγορα.
Τοποθετήστε το ποντίκι σας πάνω από την καρτέλα και σύρετέ το σε μια νέα θέση.

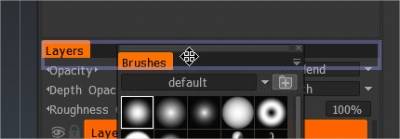
Αφήστε το ποντίκι όταν δείτε ένα μπλε περίγραμμα. Η θέση του περιγράμματος θα καθορίσει ποιο μέρος του παραθύρου θα καταλάβει η καρτέλα. Αφήστε το ποντίκι και το παράθυρο με καρτέλες θα συνδεθεί στο σημείο που εμφανίστηκε το μπλε περίγραμμα.

Μην ανησυχείτε αν το τοποθετήσατε σε λάθος τοποθεσία. Μπορείτε πάντα να επανατοποθετήσετε τα παράθυρα με καρτέλες μέχρι να είστε ικανοποιημένοι με τις τοποθεσίες τους.
Εάν θέλετε, μπορείτε να δημιουργήσετε ένα αιωρούμενο παράθυρο σύροντας την καρτέλα μακριά από την ομάδα παραθύρων με καρτέλες που κάποτε καταλάμβανε. Αφήστε το ποντίκι και θα επιπλέει ως το δικό του ανεξάρτητο παράθυρο.
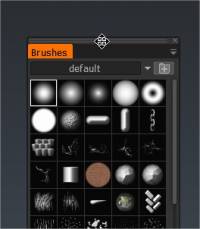
Μπορείτε να συνδέσετε ένα αιωρούμενο παράθυρο ξανά σε οποιοδήποτε σύμπλεγμα παραθύρων σύροντας και αφήνοντας το παράθυρο όταν βλέπετε τη μπλε γραμμή.
Μενού αναδυόμενων παραθύρων
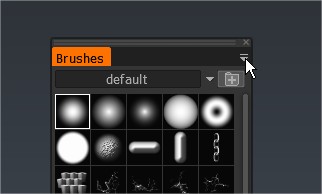
Πολλά μενού στο 3DCoat έχουν ένα μικρό βέλος που δείχνει προς τα κάτω στην επάνω δεξιά γωνία τους.
Όταν κάνετε κλικ και κρατάτε πατημένο τον κέρσορα του ποντικιού πάνω τους, ανοίγουν για να αποκαλύψουν επιλογές για το μενού.
Ας πούμε ότι προτιμάτε μεγαλύτερα εικονίδια όταν προβάλλετε στυλό. Ανοίξτε το αναδυόμενο μενού στο παράθυρο με την καρτέλα στυλό και επιλέξτε Μεγάλο για να αλλάξετε το μέγεθος εμφάνισης των εικονιδίων προεπισκόπησης.
Παρουσιάστηκε η γραμμή δραστηριότητας επάνω δεξιά
Δείχνει την τρέχουσα κατάσταση μάσκας/υλικού/shader/vertexture κ.λπ. Αυτή είναι μια δυνατότητα Προεπισκόπησης/Beta που ενεργοποιείται μέσω των Preferences/Beta.

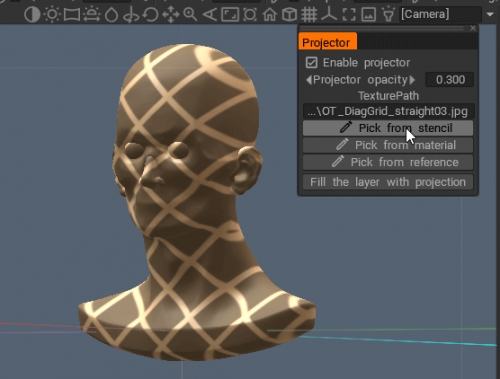
Εργαλείο προβολέα
Δείτε το εικονίδιο του φωτός του Πίνακα πλοήγησης.
Το εργαλείο σάς επιτρέπει να προβάλλετε οποιαδήποτε υφή σε ολόκληρη τη σκηνή, ακριβώς όπως μια εικόνα φωτισμένη από προβολέα. Αυτό είναι βολικό όταν εργάζεστε με αναφορές, το εργαλείο δεν επηρεάζει τις ιδιότητες χρώματος ή υλικού.
Εργαλείο προβολής θύρας προβολής : Μπορείτε να προβάλλετε οποιαδήποτε υφή σε ολόκληρη τη σκηνή, παρόμοια με τον προβολέα. Αυτό είναι απλώς για αναφορά, δεν επηρεάζει τις ιδιότητες χρώματος ή υλικού.
Προσθήκη συντομεύσεων πληκτρολογίου (πλήκτρα πρόσβασης)
Όταν επιλέγετε ένα εργαλείο ή ένα στοιχείο μενού από ένα από τα δωμάτια, μπορείτε να ενεργοποιήσετε την επιλογή εμφάνισης σύντομων ή μεγάλων “Συμβουλών”. Αυτά εμφανίζονται καθώς τοποθετείτε το ποντίκι σας πάνω από το εργαλείο ή τη λειτουργία που σας ενδιαφέρει και θα δείτε στο τέλος της υπόδειξης τα εξής:
“(“ΤΕΛΟΣ” – Ορίστε το πλήκτρο πρόσβασης). Μπορείτε να αντιστοιχίσετε συντομεύσεις ενός και πολλαπλών κουμπιών σε σχεδόν οποιαδήποτε λειτουργία ή εργαλείο 3DCoat απευθείας στη διεπαφή χρήστη. Απλώς πατήστε το πλήκτρο ΤΕΛΟΣ του πληκτρολογίου ενώ μετακινείτε το ποντίκι πάνω από οποιοδήποτε στοιχείο, ακολουθούμενο από τη συντόμευση πληκτρολογίου της επιλογής σας.
Εάν έχει ήδη εκχωρηθεί ένα πλήκτρο πρόσβασης, θα ερωτηθείτε εάν θέλετε:
Εκχωρήστε ξανά το κλειδί με το νέο εργαλείο/λειτουργία.
Στοιβάξτε το εργαλείο/τη λειτουργία με τυχόν προηγούμενα εργαλεία/λειτουργίες, επιτρέποντάς σας να κάνετε εναλλαγή μεταξύ όλων των εργαλείων με ένα πλήκτρο πρόσβασης.
Αφαιρέστε τυχόν εργαλεία/λειτουργίες που έχουν εκχωρηθεί σε αυτό το κλειδί.
Καθορισμός πλήκτρων πρόσβασης : Δείχνει πώς να ρυθμίσετε προσαρμοσμένα πλήκτρα πρόσβασης, χρησιμοποιώντας στοίβαξη πλήκτρων πρόσβασης ή πλήρη επανασύνδεση από τον Javis Jones.
Προσθήκη εργαλείων στο τρέχον δωμάτιο.
Προσθήκη SmartRetopo στο Modeling : Πώς να προσθέσετε ένα εργαλείο από την αίθουσα Retopo στην αίθουσα μοντελοποίησης στο 3DCoat.
Φροντιστήρια
Προσαρμογή διεπαφής χρήστη : Αυτό το βίντεο δείχνει τη χρήση της δυνατότητας “Προσαρμογή διεπαφής χρήστη” στο 3DCoat. επιτρέποντας στον χρήστη να εμφανίζει μόνο τα εργαλεία που θέλει ή χρειάζεται.
Γρήγορη συμβουλή_ Χρήση διπλών οθονών : Αυτό το βίντεο είναι μια σύντομη επίδειξη της ικανότητας επέκτασης της διεπαφής χρήστη του 3DCoat σε δύο οθόνες ως παρόμοια εναλλακτική λύση στη ρητή υποστήριξη διπλής οθόνης, η οποία προς το παρόν δεν είναι διαθέσιμη.
Γρήγορη συμβουλή: Εκχώρηση πλήκτρων πρόσβασης σε καρτέλες χώρου εργασίας
Επεξεργασία κειμένου στη διεπαφή χρήστη : Θέλετε να αλλάξετε το όνομα ενός εργαλείου ή πινέλου για να ταιριάζει καλύτερα στις προτιμήσεις σας, να διορθώσετε ένα τυπογραφικό λάθος που ενδέχεται να βρείτε σε ένα μενού ή περιγραφή εργαλείου…ή να επαναδιατυπώσετε κάτι; Το παράθυρο διαλόγου Επεξεργασία ετικετών κειμένου θα σας επιτρέψει να το κάνετε αμέσως και να υποβάλετε τυχόν αλλαγές στο Pilgway, πιστεύετε ότι πρέπει να αντικατοπτρίζονται στην προεπιλεγμένη εφαρμογή.
Βελτιωμένες προσαρμογές διεπαφής χρήστη στο Voxel Room : Αυτό το βίντεο δείχνει μερικές από τις νέες βελτιώσεις/αλλαγές στην προσαρμογή διεπαφής χρήστη στον χώρο εργασίας του Voxel στο 3DCoat… συμπεριλαμβανομένης της δυνατότητας συμπερίληψης προεπιλογών στον πίνακα εργαλείων.
Απλοποίηση του αριστερού πίνακα με χρήση απόκρυψης: Σε αυτό το βίντεο, ο Rygaard πρόκειται να σας δείξει κάτι που θα σας βοηθήσει πολύ να απλοποιήσετε το αριστερό πλαίσιο της διεπαφής 3DCoat σύμφωνα με τις ανάγκες σας.
 Ελληνικά
  English
 Українська
 Español
 Deutsch
 Français
 日本語
日本語 Русский
 한국어
한국어 Polski
 中文 (中国)
 Português
 Italiano
 Suomi
Suomi Svenska
 中文 (台灣)
 Dansk
Dansk Slovenčina
 Türkçe
 Nederlands
 Magyar
 ไทย
ไทย हिन्दी
 Tiếng Việt
 Lietuviškai
 Latviešu valoda
 Eesti
Eesti Čeština
 Română
 Norsk Bokmål