Αυτή η δυνατότητα λειτουργεί μόνο σε λειτουργία επιφάνειας, επομένως πρέπει να μεταβείτε στη λειτουργία επιφάνειας και μπορείτε να δείτε ότι έχουν εμφανιστεί νέα κουμπιά στη γραμμή εργαλείων.

UP Ανεβείτε με την πολλαπλή ανάλυση και προσθέστε το νέο επίπεδο υποδιαίρεσης εάν βρίσκεστε στο υψηλότερο επίπεδο.
ΚΑΤΩ Βήμα ΚΑΤΩ με την πολλαπλή ανάλυση (αν υπάρχει).
Αν κάνουμε κλικ σε ένα από αυτά, το 3DCoat μας προσφέρει να ανοίξουμε τον πίνακα πολλαπλών αναλύσεων.
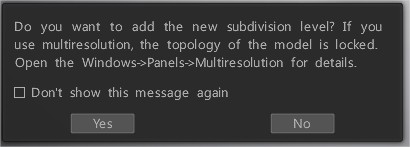
Εάν κάνουμε κλικ στο ναι, τότε θα ανοίξει ο πίνακας πολλαπλών αναλύσεων και επίσης μπορείτε να βρείτε αυτόν τον πίνακα στο μενού των Windows> καρτέλα Πίνακες.
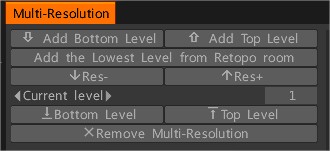
Έτσι σε αυτό το πλαίσιο βλέπουμε τα βέλη πάνω και κάτω (προσθήκη κάτω/πάνω επιπέδου), χρησιμοποιώντας αυτά τα βέλη μπορούμε να προσθέσουμε επίπεδα ανάλυσης.
Μπορούμε να δούμε εικονίδια που εμφανίστηκαν στη μέση του πίνακα και τα βέλη που εμφανίστηκαν στο κάτω μέρος του πίνακα.
Χρησιμοποιήστε αυτά τα βέλη για να αλλάξετε τα δημιουργημένα επίπεδα ανάλυσης και κάτω από τις τιμές του τρέχοντος επιπέδου μπορούμε να χρησιμοποιήσουμε τα κάτω βέλη για εναλλαγή από το χαμηλότερο στο υψηλότερο επίπεδο ή αντίστροφα.

Αλλά το πιο ενδιαφέρον είναι ότι αν δημιουργήσετε οποιαδήποτε περίπλοκη λεπτομέρεια στο υψηλότερο επίπεδο και επιστρέψετε στο χαμηλότερο και μετά επιστρέψετε ξανά στο υψηλότερο επίπεδο, μπορώ να διατηρήσω τις σύνθετες λεπτομέρειες ακόμα κι αν παραμορφώσετε το μοντέλο στο χαμηλότερο επίπεδο, οπότε μην χάνετε τις μικρές λεπτομέρειες.
Μπορούμε επίσης να δημιουργήσουμε ένα low poly mesh στο retopo room ή στο modeling room και να το χρησιμοποιήσουμε ως το χαμηλότερο επίπεδο στην πολυ-ανάλυση, αλλά δεν συνιστάται το πλέγμα να είναι πολύ low poly.

Τώρα πρέπει να πατήσουμε προσθήκη του χαμηλότερου επιπέδου από το δωμάτιο Retopo και μπορούμε να δούμε ότι το χαμηλότερο επίπεδο είναι τώρα αυτό που δημιουργήσαμε στην πολυγωνική μοντελοποίηση.
Προσθήκη κατώτατου επιπέδου: Ορίστε το κατώτατο/χαμηλό επίπεδο Πολλαπλής Ανάλυσης (μέσω Decimation 2x).
Προσθήκη ανώτατου επιπέδου: Προσθέστε το κορυφαίο επίπεδο πολλαπλής ανάλυσης (μέσω της Υποδιαίρεσης βρόχου).
Προσθήκη του χαμηλότερου επιπέδου από το δωμάτιο Retopo : Χρησιμοποιήστε το ορατό πλέγμα retopo ως το χαμηλότερο επίπεδο πολλαπλής ανάλυσης. Δεν συνιστάται η χρήση πλέγματος πολύ χαμηλής ποιότητας σε σύγκριση με το τρέχον επειδή τα πλέγματα παρεμβάλλονται γραμμικά και έτσι οι παραμορφώσεις μπορεί να οδηγήσουν σε περιττές αιχμηρές άκρες.
Res-: Υποχωρήστε (αν είναι δυνατόν).
Res+: Αύξηση πολλαπλών αναλύσεων. Δεν θα προσθέσει νέο επίπεδο εάν φτάσετε στο κορυφαίο επίπεδο πολλαπλής ανάλυσης.
Τρέχον επίπεδο: μετάβαση σε οποιοδήποτε επίπεδο που δημιουργήθηκε.
Κάτω επίπεδο: Μεταβείτε στο χαμηλότερο επίπεδο πολλαπλής ανάλυσης.
Ανώτατο επίπεδο: Μεταβείτε στο ανώτερο επίπεδο Πολλαπλής Ανάλυσης.
Remove Multi-Resolution: Αφαιρέστε τα δεδομένα Multi-Resolution για να μπορέσετε να αλλάξετε την τοπολογία του μοντέλου.
Εάν επιλέξετε την καρτέλα Προτιμήσεις > Εργαλεία, τώρα μπορείτε να δείτε ότι η παλιά μέθοδος προσωρινής αποθήκευσης/λειτουργίας διακομιστή μεσολάβησης είναι απενεργοποιημένη από προεπιλογή.
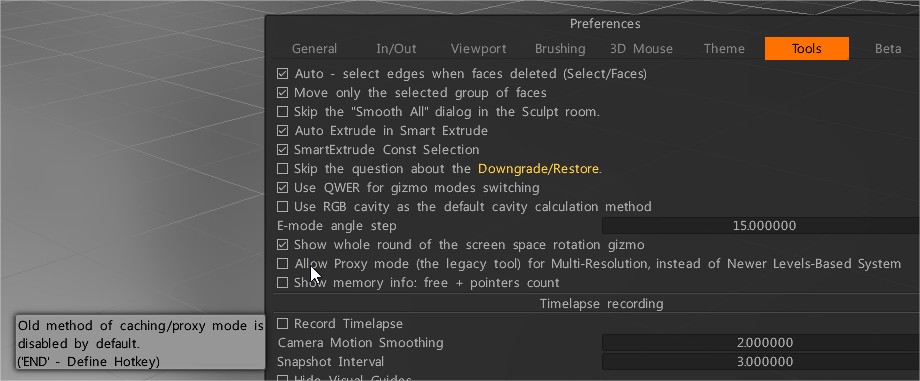
Εάν το ενεργοποιήσετε, επιτρέπει τη λειτουργία Proxy (το εργαλείο παλαιού τύπου) για Πολλαπλή Ανάλυση, αντί για νεότερο Σύστημα Βασισμένο σε Πολλά Επίπεδα (μέσω Υποδιαίρεσης βρόχου).
Αλγόριθμοι υποδιαίρεσης Loop και Catmull-Clark
Οι κανόνες υποδιαίρεσης βρόχου βασίζονται σε τριγωνικές όψεις στο πλέγμα ελέγχου. Οι όψεις με περισσότερες από τρεις κορυφές είναι τριγωνικές στην αρχή. Σε κάθε βήμα υποδιαίρεσης, όλα τα πρόσωπα χωρίζονται σε τέσσερα παιδικά πρόσωπα.
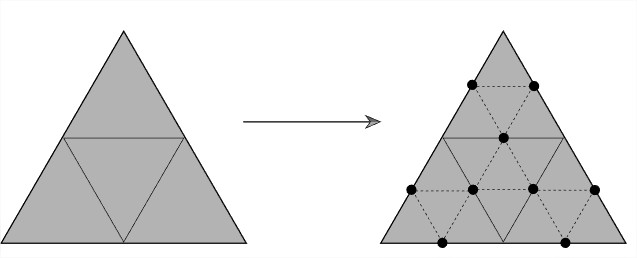
Βασική διαδικασία βελτίωσης για την υποδιαίρεση βρόχου. (αριστερά) Το πλέγμα ελέγχου πριν από την υποδιαίρεση. (σωστά)
Το νέο πλέγμα μετά από ένα βήμα υποδιαίρεσης. Κάθε τριγωνική όψη του πλέγματος έχει υποδιαιρεθεί σε τέσσερις νέες όψεις χωρίζοντας κάθε μία από τις άκρες και συνδέοντας τις νέες κορυφές με νέες άκρες.
Η υποδιαίρεση Catmull-Clark είναι μια μέθοδος για την εξομάλυνση μιας τρισδιάστατης επιφάνειας πλέγματος πολυγώνων διαιρώντας τα πολύγωνα της επιφάνειας σε μικρότερα πολύγωνα, επανατοποθετώντας τις προηγούμενες κορυφές με βάση τις γειτονικές κορυφές.
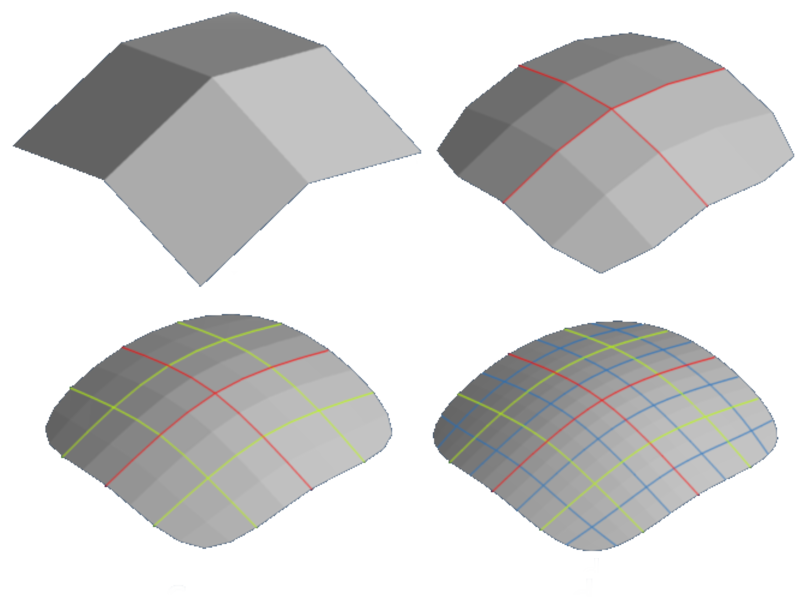
Η μέθοδος παίρνει κάθε πρωτόγονο πολύγωνο που περιέχεται στο πλέγμα και διαιρεί το πολύγωνο σε τετράπλευρα, κατασκευάζοντας νέες κορυφές με βάση τους μέσους όρους και προσαρμόζοντας τις προηγούμενες κορυφές του αρχικού πολυγώνου με βάση το περιβάλλον περιβάλλον.
 Ελληνικά
  English
 Українська
 Español
 Deutsch
 Français
 日本語
日本語 Русский
 한국어
한국어 Polski
 中文 (中国)
 Português
 Italiano
 Suomi
Suomi Svenska
 中文 (台灣)
 Dansk
Dansk Slovenčina
 Türkçe
 Nederlands
 Magyar
 ไทย
ไทย हिन्दी
 Tiếng Việt
 Lietuviškai
 Latviešu valoda
 Eesti
Eesti Čeština
 Română
 Norsk Bokmål