• 日本語
  • 3DCoatドキュメント
  • Chapters
    • 3DCoatの紹介
    • 入門
    • インターフェイスとナビゲーション
    • Brushコンポーネント
    • Node System
    • GPU Texturing
    • ワークスペース ルーム
    • ScriptingとCore API
    • 質問と回答
    • Licensing
  • Learn
    • Getting Started
    • Painting
    • Sculpt
    • Modeling
    • Retopology
    • UV
    • Smart Materials
    • Nodes
    • Photogrammetry
    • Render
    • Print
    • Learning
    • トレーニング チュートリアル
  • Blog
    • 2026 Key Features and Improvements
    • Texturing with nodes
    • Shader Nodes VS. a Material Nodes
    • Multiple UV Tiles/UDIMs to one single UV set ?
    • I want to create geometry only with displacement to be manufactured with a CNC machine
    • Creating 3D Character Using 3DCoat
    • DAZ Genesis models into 3DCoat
    • Cavity and Curvature maps
    • Types of normal maps
    • Texture painting pipeline
    • Load new UV layout After Model Changes
    • Import Zbrush Polygroups for UV mapping
  • Products
    • 3DCoat
    • 3DCoatTextura
    • 3DCoatPrint
    • PBRLibrary
  • Store
  • Pilgway
  • 日本語 日本語
    • 多言語スイッチャー
    • 多言語スイッチャー
    • 多言語スイッチャー
    • 多言語スイッチャー
    • 多言語スイッチャー
    • 多言語スイッチャー
    • 多言語スイッチャー
    • 多言語スイッチャー
    • 多言語スイッチャー
    • 多言語スイッチャー
    • 多言語スイッチャー
    • 多言語スイッチャー
    • 多言語スイッチャー
    • 多言語スイッチャー
    • 多言語スイッチャー
    • 多言語スイッチャー
    • 多言語スイッチャー
    • 多言語スイッチャー
    • 多言語スイッチャー
    • 多言語スイッチャー
    • 多言語スイッチャー
    • 多言語スイッチャー
    • 多言語スイッチャー
    • 多言語スイッチャー
    • 多言語スイッチャー
    • 多言語スイッチャー
    • 多言語スイッチャー
    • 多言語スイッチャー
    • 多言語スイッチャー
  • 3DCoatドキュメント
  • Chapters
    • 3DCoatの紹介
    • 入門
    • インターフェイスとナビゲーション
    • Brushコンポーネント
    • Node System
    • GPU Texturing
    • ワークスペース ルーム
    • ScriptingとCore API
    • 質問と回答
    • Licensing
  • Learn
    • Getting Started
    • Painting
    • Sculpt
    • Modeling
    • Retopology
    • UV
    • Smart Materials
    • Nodes
    • Photogrammetry
    • Render
    • Print
    • Learning
    • トレーニング チュートリアル
  • Blog
    • 2026 Key Features and Improvements
    • Texturing with nodes
    • Shader Nodes VS. a Material Nodes
    • Multiple UV Tiles/UDIMs to one single UV set ?
    • I want to create geometry only with displacement to be manufactured with a CNC machine
    • Creating 3D Character Using 3DCoat
    • DAZ Genesis models into 3DCoat
    • Cavity and Curvature maps
    • Types of normal maps
    • Texture painting pipeline
    • Load new UV layout After Model Changes
    • Import Zbrush Polygroups for UV mapping
  • Products
    • 3DCoat
    • 3DCoatTextura
    • 3DCoatPrint
    • PBRLibrary
  • Store
  • Pilgway
  • 日本語 日本語
    • 多言語スイッチャー
    • 多言語スイッチャー
    • 多言語スイッチャー
    • 多言語スイッチャー
    • 多言語スイッチャー
    • 多言語スイッチャー
    • 多言語スイッチャー
    • 多言語スイッチャー
    • 多言語スイッチャー
    • 多言語スイッチャー
    • 多言語スイッチャー
    • 多言語スイッチャー
    • 多言語スイッチャー
    • 多言語スイッチャー
    • 多言語スイッチャー
    • 多言語スイッチャー
    • 多言語スイッチャー
    • 多言語スイッチャー
    • 多言語スイッチャー
    • 多言語スイッチャー
    • 多言語スイッチャー
    • 多言語スイッチャー
    • 多言語スイッチャー
    • 多言語スイッチャー
    • 多言語スイッチャー
    • 多言語スイッチャー
    • 多言語スイッチャー
    • 多言語スイッチャー
    • 多言語スイッチャー
Expand All Collapse All
  • 3DCoatの紹介
  • 入門
    • System requirements
    • Why 3DCoat is Unique?
    • 3DCoatの有効化
    • 起動エラー
      • Startup error Mac
    • Color management
    • Upgrading permanent license
    • Linux Setup
      • Linux initial setup per-user installation
      • Linux initial setup for system
      • Tablet setup
      • To GTK3 from GTK2
      • Error libicuuc.so.70
    • フォルダ構造
      • Custom documents folder
    • さまざまな形の「解決」
    • Tablet on Window
    • Import&Export
    • 3DCoatのApplinks
      • Blenderアプリリンク
        • Blender with the Applink in Linux
      • Blender 4.2/3/4/5 applink
      • Max Applink
      • Houdini applink
      • Lightwave uplink
  • Navigation
    • オープニングダイアログ(クイックスタートメニュー)
    • ナビゲーションパネル
    • カメラとナビゲーション
      • Customize Navigation as Blender
    • Left tool panel
    •  Activity Bar
    • 3DConnexion デバイスを使用したナビゲーション
      • How to compile Spacenavd on non Ubuntu distro
    • Quick Access Menu
    • Stylus doesn’t work in sculpting
    • ホットキー
  • インターフェイスとナビゲーション
    • ファイルメニュー
    • 編集メニュー
      • Bake Geometry Info
      • Calculate Occlusion
      • Calculate Curvature
      • Light Baking Tool
      • 環境設定
    • メニューを見る
    • 対称
    • Textures
    • Calculate
    • レイヤーメニュー
    • フリーズメニュー
    • Hide
    • Bake
    • カーブス 2022
      • 曲線メニュー
      • Curves Properties RMB
      • メッシュレイヤーで塗りつぶす
      • Scale of imported curves
    • ウィンドウ メニュー
      • タブ付き Windows ポップアップ パネル
      • スライダー
    • Scripts
    • Addons
    • Capture
    • ヘルプメニュー
    • カスタマイズ
    • ルームの変更または新規作成
  • Brushコンポーネント
    • Brushトップバー
    • ブラシの一般的な使用
      • ブラシとデカールを作成する
      • 現在のスカルプトからアルファを作成する
      • 3D オブジェクトからBrushを作成する
      • Create brushes based on Curves
      • Load photoshop .abr brushes
    • ストローク
      • 曲線ポップアップメニュー
    • Brushオプション
    • 条件リミッター
    • ストリップパネル
    • ステンシル パネル
    • スマートマテリアル
      • 新しい画像や素材を追加する
      • スマートマテリアルをレイヤーにアタッチする
      • Import Quixel Megascans
    • Brushのプリセットを作成する方法
  • Node System
    • Node Editor
    • Node & Object Inspectors
    • Node Graph
    • NodeGraph Language (NGL)
    • GPU Nodes
      • Color
      • GeometryIn
      • In
      • Layer
      • Material
      • Math
      • Noise
      • Noise3D
      • Out
      • Pattern
      • Pattern3D
      • Shape
      • Texture
      • Tilable
      • UV
    • Filters
    • Masks
    • Materials
    • Modifiers
    • Volumes
  • 無料の3DCoatPrint
  • GPU Texturing
    • PBM Channels
    • Per-Pixel Painting
  • ワークスペース ルーム
    • Painting
      • テクスチャPaintingとモード
        • Per-PixelのPainting
        • ディスプレイスメントPainting(マイクロ頂点)
        • PtexPainting
        • 表面Painting(ポリペイント)
      • Paintingルームにインポートする
        • Initial CC subdivision
        • UV Set smoothing
        • Sharp (hard) edge
        • 法線をロックする
        • モデル変更後に新しいUVレイアウトをロードする
        • DAZ Genesis models into 3DCoat
        • ID map
      • Paintingワークスペースのメニュー
        • Edit menu
        • テクスチャメニュー
          • テクスチャBakingツール
        • 隠れる
        • Bake Paintのメニュー
        • カラーピッカー
      • Surface Materials
      • Paintingのトップバー
      • レイヤーパネル
        • ブレンディングパネル
        • Layer and Clipping Masks
      • Painting室ツール
      • 不透明度 - 透明度
      • ワークスペースを調整する
        • 微調整ツールセット
        • Tweak Room からのエクスポート
      • マスク/マテリアル プレビュー パネル
      • Paintingルームからのエクスポート
    • UVワークスペース
      • UVトップバー
      • UV左ツール パネル
      • UVプレビュー パネル
      • UVワークフローの例
      • UVルームへのインポート
      • UVルームからのエクスポート
    • リトポロジー
      • Retopoへのインポート
      • Retopo Mesh メニューと Bake メニュー
        • 仮想ミラーモード
      • Bake menu
        • Treat Poly Groups as Paint Objects
        • Baking guide
      • リトポロジーのストローク ツール
      • トップバー
        • ジオメトリを選択
      • リトポロジー ルームの左ツール パネル
        • 全体的な目的と機能
        • ジオメトリを追加
        • Retopo微調整ツール
        • UVツール
        • リトポロジ ルームのコマンド
      • オートレトポ
        • Autopo guide
      • ポリ グループ
    • スカルプ
      • Sculpt Layer
      • スカルプト ツリー
      • スカルプトBrushのオプション
      • Top Bar
      • Brushエンジン
      • 形状サブメニュー
      • スカルプトの「右クリック」メニュー
      • シェーダー
      • Voxelモード
        • ピュアVoxelスカルプティング
        • 密度と解像度
        • クレイエンジン
        • Voxelツール
        • ボクセルのサーフェス ツール
        • Voxel調整ツール
        • ボリュメトリックPainting
        • Voxelオブジェクト ツール
      • 表面モード
        • サーフェスツール
        • サーフェス カスタム ツール
        • Surface Layer
        • 表面調整ツール
        • 表面Painting
        • マルチレベル解像度
          • Multires tools
          • Multires adjust
          • Multires commands
      • スカルプト カーブ
        • スプライン曲線
        • Splines model creation
      • ベクトル変位
      • サーフェス変換ツール
        • Voxel変換ツール
        • Instancer
        • Move
        • Pose
        • Fit
        • Reproject
        • Surface Array
      • VoxelプリミティブとImportツール
        • Hollow Box
      • ライブブール値
      • スカルプト ルームのコマンド
      • スカルプト ルームにImport
      • スカルプト ルームからのエクスポート
    • 与える
      • Comparison of different roughness values
      • レンダリング パネル関数
      • ターンテーブル
      • ライティングをフェイクベイクする -non PBR-
    • Factures
      • ワークフロー
    • 最も単純な
    • モデリング
      • Mesh Menu
      • モデリング ルームの左ツール パネル
        • ジオメトリの追加
          • Make Joints
          • 選択済み
        • 微調整
        • Smart Hybrid
        • UV
          • コマンド
        • メッシュ全体
      • Fluffyによるロフト面の例
      • ポエボイによるブロックアウト
      • Import Zbrush Polygroups for UV mapping
    • Kitbash - クイック 3D モデル作成
      • Create kitbash
      • Left tool panel Kitbash
    • 3DPrint
    • Photogrammetry
      • How to install Reality Capture
      • Reality Capture doesn’t show up ?
    • NURBS ルームへのメッシュ
    • Nodes
      • Texturing with nodes
      • スカルプト シェーダ ノード ライブラリ
      • Open PBR
  • ScriptingとCore API
    • Core API
    • Python API
    • Extensions and Addons

UV Set smoothing

2185 views 0

Written by Carlos
December 5, 2023

When you import a “model for pixel painting ” with 3DCoat, the setting window for import opens.
Among them, there is an item called “Smooth UV set”.
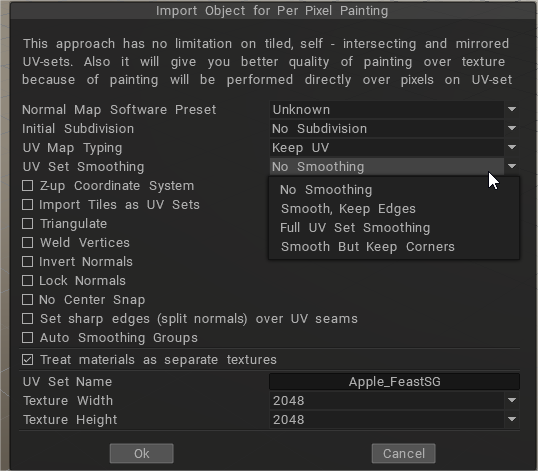
image.png

It is cut off in the image above, but when you try to select this item, the following warning will be displayed.

image.png

So if you select “Not subdivided” in the “Initial subdivision (number of polygons)” of the item above 2, you can choose “No smoothing” here.

Do you “subdivide” this?
Is it assumed that the CG model you are trying to import into 3D-COAT uses a subdivision surface (SDS)?.
And if you paste UV texture in SDS model, you will use “Smoothing interpolation of UV” function.

See also this article for “Initial subdivision (Number of polygons)“.
See also this article about “Smoothing Interpolation of UVs”

“Smoothing UV set” is asking what kind of “UV smoothing interpolation” is performed in the rendering software that uses it after creating a texture with 3DCoat.
So, before importing to 3DCoat, it is necessary to check the distortion using a checker map texture in the rendering software, and create an optimal interpolation method. You must decide what to do.

This is a correspondence option in between softwares.
there is a similar function in other software, so it would be good to check in advance.
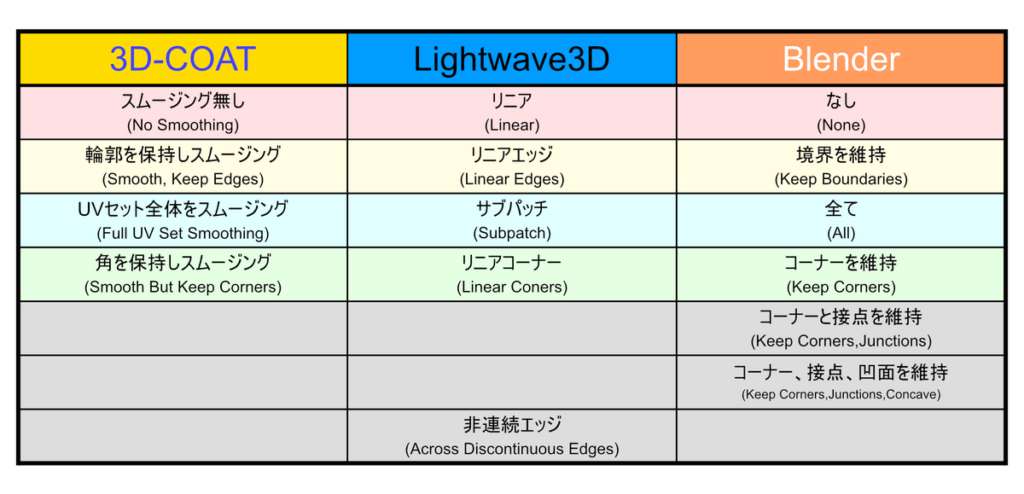

In the case of Lightwave, the setting location is the item “Interpolation” of the texture name you are using in the “Texture” open in the “Vertex map” panel.

Select “Subdivision Surface” in the “Advanced Settings” in the “Modeler” field and open the “Subdivision Surface” Modeler in the “Modeler” field.UV smooth”
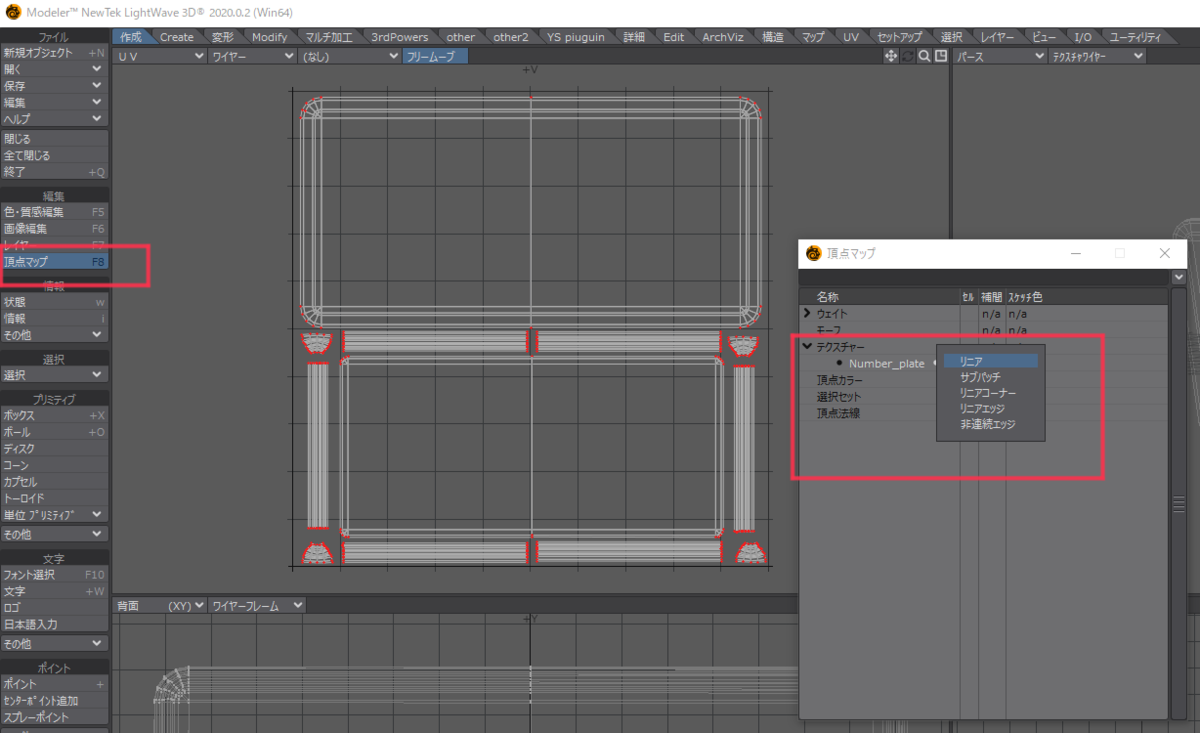

In the case of Blender, select “UV Smooth” in “Detailed Settings” with the ” Subdivision Surface ” modifier applied from the modifier item:
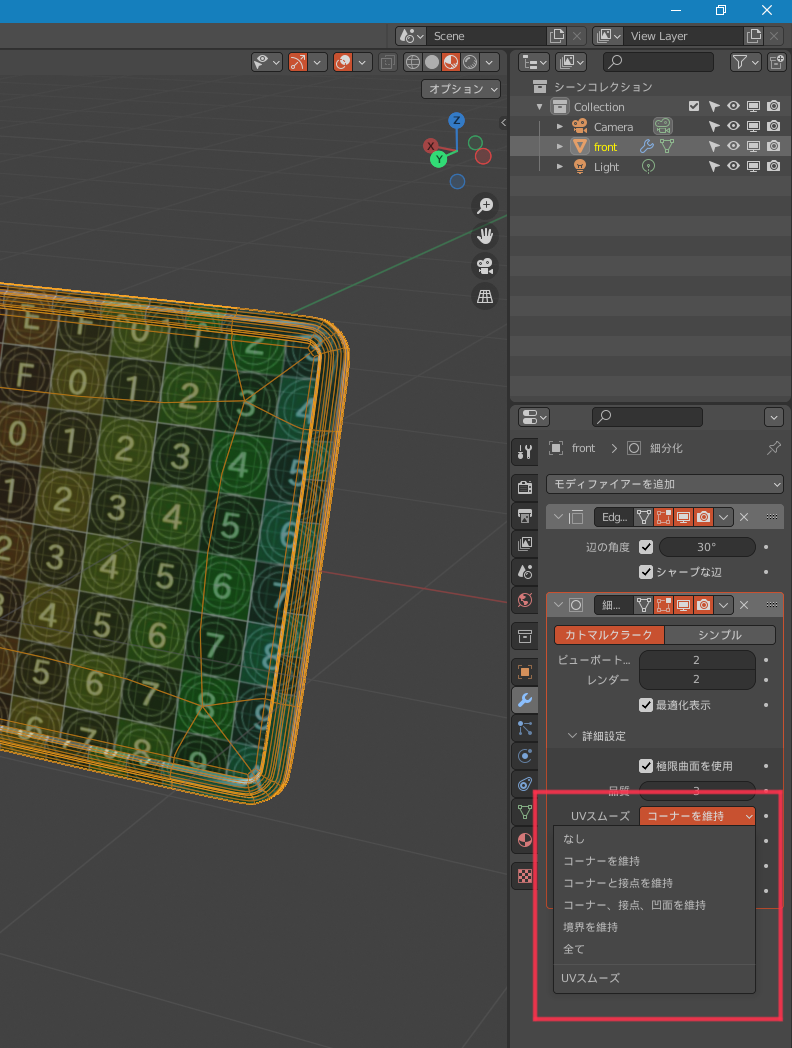
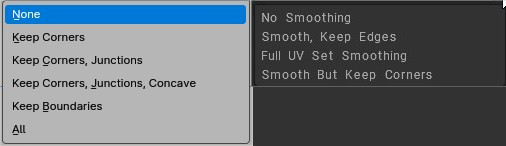
None / No Smoothing: UVs remain unchanged. UVs are not smoothed, boundaries are keep sharp.
Keep Corners / Smooth but keep corners: UV islands are smoothed, but their boundary (limits) remain unchanged.
Keep Corners, Junctions: UVs are smoothed, corners on discontinuous boundary and junctions of three or more regions are kept sharp.
Keep Corners, Junctions, Concave: UVs are smoothed, corners on discontinuous boundary, junctions of three or more regions and darts and concave corners are kept sharp.
Keep Boundaries / Smooth, Keep Edges: UVs are smoothed, boundaries (UV limits) are kept sharp.
All / Full UV Set Smoothing: UVs and their boundaries (UV limits) are smoothed.


Import for PPP using Uv Set Smoothing options

  • The initial subdivision (number of polygons) is “2604” (second from the top, equivalent to CC division level 2).
  • Smooth UV Set is “Preserve Corners and Smooth”
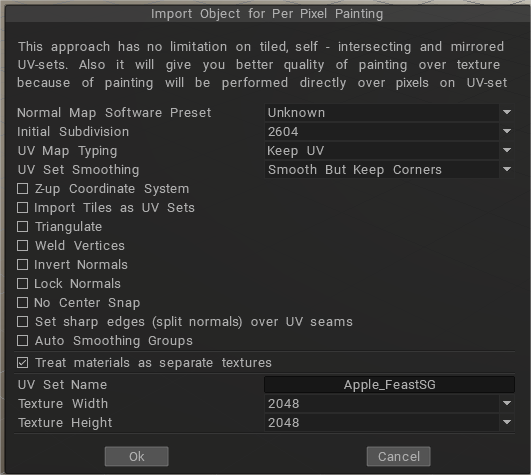
image.png

Then, the model of the mesh to which the SDS was applied is displayed first.
If you check the item “Low Resolution model” from the “View” menu, the model of the mesh before the model is replaced and the SDS is applied is displayed.If you do not have an account, you will be prompted to log in to your account.
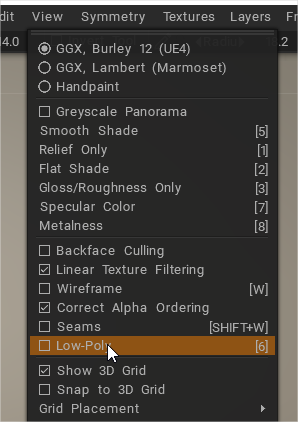
image.png

This function is assigned “6” on the character key side as the default shortcut, and the model is replaced every time you press it.

It is just like pressing the tab key in Lightwave.
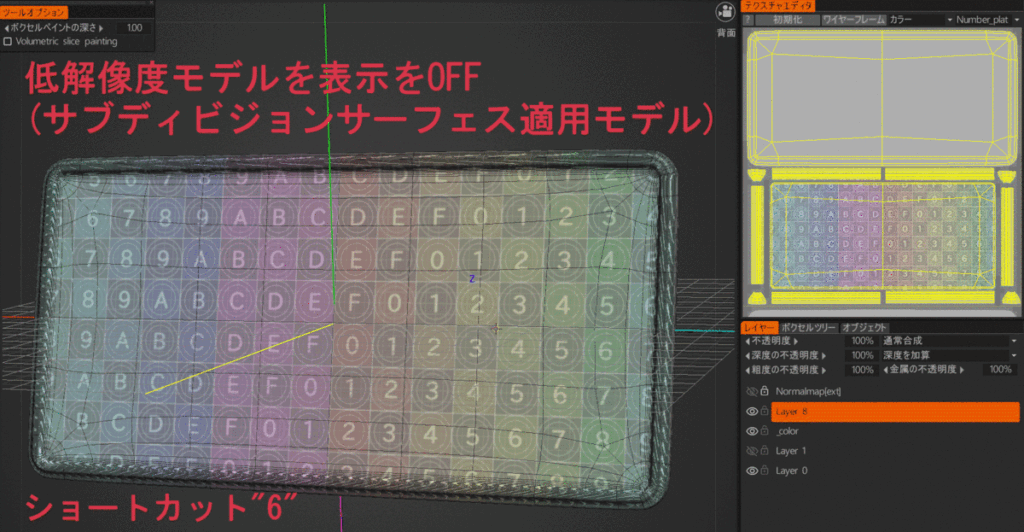
3DCoat seems to treat the former as “medium resolution mesh” and the latter as “low resolution mesh”.
This is indicated in the settings when exporting the model.
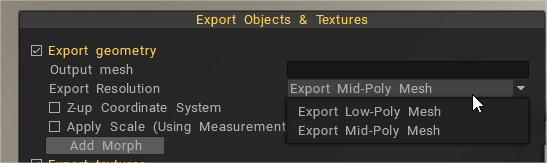
image.png

Painting is done with a medium resolution mesh displayed.

The export will be the flow of selecting the low resolution mesh.


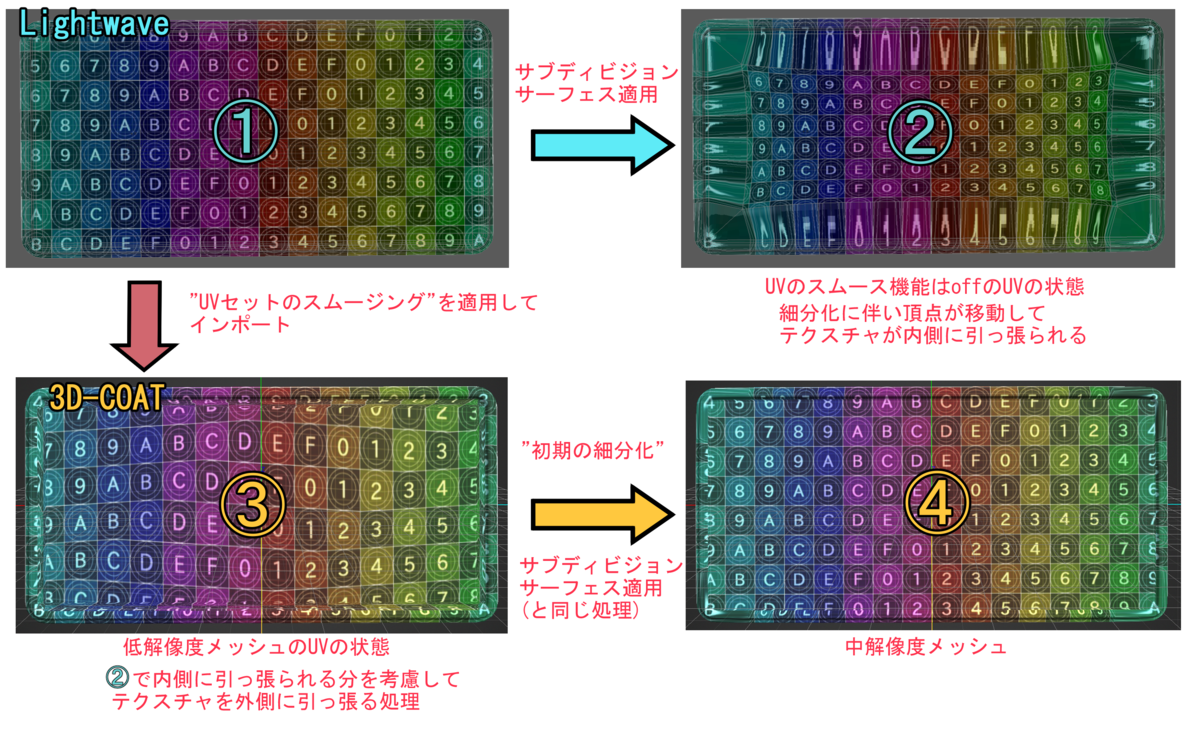
What is UV set smoothing doing?

It is speculation that I saw the processing result to the last.The vertex moves along with the subdivision of the SDS and the texture is distorted, but when it is distorted in the opposite direction to the distortion at the import stage and SDS is applied, the distortion will not occur.I think that it is such a theory that it is corrected.

UV Stitching problem between 3DCoat and Blender

If you have an UV Stitching problem between 3DCoat and Blender, I mean, if in 3DCoat texture looks correctly, but when exporting to Blender, Textures looks stitched or distorted, the solution is to Triangulate the faces of the model before importing it from Blender to 3DCoat.

You can triangulate the whole model inside Blender selecting all faces and pressing CTRL + T or you can triangulate it in the import panel inside 3DCoat checking “Triangulate” option.
Also you can triangulate the model after you have done your texturing work, when you bring the model again into Blender from 3DCoat you can do CTRL + T inside Blender, and the Textures will look fine, as seen inside 3DCoat.

It seems that 3DCoat internally triangulates Blender´s Model, so that if you do (6) to look Low Poly Mesh inside 3DCoat it will appear the model before it is subdivided or triangulate inside 3DCoat so the UV Stitching will appear, but it looks fine when the Mid Poly Mesh is seen because it shows the triangulated model

So it seems that paint work in 3DCoat need tris, and to look it correctly inside Blender you also need Tris.

I hope this saves you lots of headaches as I had suffered with this Issue.

Tags:UV set smoothing

Was this helpful?

Yes  No
Related Articles
  • Noise3D
  • Noise
  • Bake Geometry Info
  • Make Joints
  • Texturing with nodes
  • Hollow Box
Previously
Initial CC subdivision
Up Next
Sharp (hard) edge
AI:
Hi! How can I help you?
Attention: This is a beta version of AI chat. Some answers may be wrong. See full version of AI chat