• Українська
  • Документація 3DCoat
  • Chapters
    • Знайомство з 3DCoat
    • Починаємо
    • Інтерфейс і навігація
    • Компоненти Brush
    • Node System
    • GPU Texturing
    • Робочі місця Кімнати
    • Scripting та Core API
    • Питання/Відповіді
    • Licensing
  • Learn
    • Getting Started
    • Painting
    • Sculpt
    • Modeling
    • Retopology
    • UV
    • Smart Materials
    • Nodes
    • Photogrammetry
    • Render
    • Print
    • Learning
    • Навчальні посібники
  • Blog
    • 2026 Key Features and Improvements
    • Texturing with nodes
    • Shader Nodes VS. a Material Nodes
    • Multiple UV Tiles/UDIMs to one single UV set ?
    • I want to create geometry only with displacement to be manufactured with a CNC machine
    • Creating 3D Character Using 3DCoat
    • DAZ Genesis models into 3DCoat
    • Cavity and Curvature maps
    • Types of normal maps
    • Texture painting pipeline
    • Load new UV layout After Model Changes
    • Import Zbrush Polygroups for UV mapping
  • Products
    • 3DCoat
    • 3DCoatTextura
    • 3DCoatPrint
    • PBRLibrary
  • Store
  • Pilgway
  • Українська Українська
    • Багатомовний перемикач
    • Багатомовний перемикач
    • Багатомовний перемикач
    • Багатомовний перемикач
    • Багатомовний перемикач
    • Багатомовний перемикач
    • Багатомовний перемикач
    • Багатомовний перемикач
    • Багатомовний перемикач
    • Багатомовний перемикач
    • Багатомовний перемикач
    • Багатомовний перемикач
    • Багатомовний перемикач
    • Багатомовний перемикач
    • Багатомовний перемикач
    • Багатомовний перемикач
    • Багатомовний перемикач
    • Багатомовний перемикач
    • Багатомовний перемикач
    • Багатомовний перемикач
    • Багатомовний перемикач
    • Багатомовний перемикач
    • Багатомовний перемикач
    • Багатомовний перемикач
    • Багатомовний перемикач
    • Багатомовний перемикач
    • Багатомовний перемикач
    • Багатомовний перемикач
    • Багатомовний перемикач
  • Документація 3DCoat
  • Chapters
    • Знайомство з 3DCoat
    • Починаємо
    • Інтерфейс і навігація
    • Компоненти Brush
    • Node System
    • GPU Texturing
    • Робочі місця Кімнати
    • Scripting та Core API
    • Питання/Відповіді
    • Licensing
  • Learn
    • Getting Started
    • Painting
    • Sculpt
    • Modeling
    • Retopology
    • UV
    • Smart Materials
    • Nodes
    • Photogrammetry
    • Render
    • Print
    • Learning
    • Навчальні посібники
  • Blog
    • 2026 Key Features and Improvements
    • Texturing with nodes
    • Shader Nodes VS. a Material Nodes
    • Multiple UV Tiles/UDIMs to one single UV set ?
    • I want to create geometry only with displacement to be manufactured with a CNC machine
    • Creating 3D Character Using 3DCoat
    • DAZ Genesis models into 3DCoat
    • Cavity and Curvature maps
    • Types of normal maps
    • Texture painting pipeline
    • Load new UV layout After Model Changes
    • Import Zbrush Polygroups for UV mapping
  • Products
    • 3DCoat
    • 3DCoatTextura
    • 3DCoatPrint
    • PBRLibrary
  • Store
  • Pilgway
  • Українська Українська
    • Багатомовний перемикач
    • Багатомовний перемикач
    • Багатомовний перемикач
    • Багатомовний перемикач
    • Багатомовний перемикач
    • Багатомовний перемикач
    • Багатомовний перемикач
    • Багатомовний перемикач
    • Багатомовний перемикач
    • Багатомовний перемикач
    • Багатомовний перемикач
    • Багатомовний перемикач
    • Багатомовний перемикач
    • Багатомовний перемикач
    • Багатомовний перемикач
    • Багатомовний перемикач
    • Багатомовний перемикач
    • Багатомовний перемикач
    • Багатомовний перемикач
    • Багатомовний перемикач
    • Багатомовний перемикач
    • Багатомовний перемикач
    • Багатомовний перемикач
    • Багатомовний перемикач
    • Багатомовний перемикач
    • Багатомовний перемикач
    • Багатомовний перемикач
    • Багатомовний перемикач
    • Багатомовний перемикач
Expand All Collapse All
  • Знайомство з 3DCoat
  • Починаємо
    • System requirements
    • Why 3DCoat is Unique?
    • Активація 3DCoat
    • Помилка запуску
      • Startup error Mac
    • Color management
    • Upgrading permanent license
    • Linux Setup
      • Linux initial setup per-user installation
      • Linux initial setup for system
      • Tablet setup
      • To GTK3 from GTK2
      • Error libicuuc.so.70
    • Структура папок
      • Custom documents folder
    • Різні форми «резолюції»
    • Tablet on Window
    • Import та Export
    • Applinks в 3DCoat
      • Посилання на додаток Blender
        • Blender with the Applink in Linux
      • Blender 4.2/3/4/5 applink
      • Max Applink
      • Houdini applink
      • Lightwave uplink
  • Navigation
    • Відкриття діалогового вікна (меню швидкого запуску)
    • Панель навігації
    • Камера та навігація
      • Customize Navigation as Blender
    • Left tool panel
    •  Activity Bar
    • Навігація за допомогою пристроїв 3DConnexion
      • How to compile Spacenavd on non Ubuntu distro
    • Quick Access Menu
    • Stylus doesn’t work in sculpting
    • Гарячі клавіші
  • Інтерфейс і навігація
    • Меню «Файл».
    • Меню редагування
      • Bake Geometry Info
      • Calculate Occlusion
      • Calculate Curvature
      • Light Baking Tool
      • Уподобання
    • Перегляд меню
    • Симетрія
    • Textures
    • Calculate
    • Меню шарів
    • Заморозити меню
    • Hide
    • Bake
    • Криві 2022
      • Меню кривих
      • Curves Properties RMB
      • Заповніть сітчастим шаром
      • Scale of imported curves
    • Меню Windows
      • Спливаючі панелі Windows із вкладками
      • Повзунки
    • Scripts
    • Addons
    • Capture
    • Меню довідки
    • Налаштування
    • Змінити або створити нову кімнату
  • Компоненти Brush
    • Верхня панель Brush
    • Щітки загального користування
      • Створюйте пензлі та наклейки
      • Створення альфа-версії з поточного скульпту
      • Створіть Brush із тривимірного об’єкта
      • Create brushes based on Curves
      • Load photoshop .abr brushes
    • Штрихи
      • Криві спливаюче меню
    • Варіанти Brush
    • Обмежувач умов
    • Смуги панелі
    • Панель трафаретів
    • Розумні матеріали
      • Додайте нові зображення або матеріали
      • Приєднайте розумний матеріал до шару
      • Import Quixel Megascans
    • Як створити стилі для Brush
  • Node System
    • Node Editor
    • Node & Object Inspectors
    • Node Graph
    • NodeGraph Language (NGL)
    • GPU Nodes
      • Color
      • GeometryIn
      • In
      • Layer
      • Material
      • Math
      • Noise
      • Noise3D
      • Out
      • Pattern
      • Pattern3D
      • Shape
      • Texture
      • Tilable
      • UV
    • Filters
    • Masks
    • Materials
    • Modifiers
    • Volumes
  • Безкоштовний 3DCoatPrint
  • GPU Texturing
    • PBM Channels
    • Per-Pixel Painting
  • Робочі місця Кімнати
    • Painting
      • Painting текстур і режими
        • Per-Pixel Painting
        • Painting зміщення (мікровершина)
        • Painting Ptex
        • Painting поверхні (поліфарбування)
      • Імпорт до кімнати Painting
        • Initial CC subdivision
        • UV Set smoothing
        • Sharp (hard) edge
        • Блокування нормалей
        • Завантажити новий макет UV після зміни моделі
        • DAZ Genesis models into 3DCoat
        • ID map
      • Меню робочої області Painting
        • Edit menu
        • Меню текстур
          • Інструменти для Baking текстури
        • Сховати
        • Меню для Bake Paint
        • Вибір кольорів
      • Surface Materials
      • Верхня панель для Painting
      • Панель шарів
        • Панель змішування
        • Layer and Clipping Masks
      • Інструменти для Painting кімнати
      • Opacity – Прозорість
      • Налаштуйте робочу область
        • Набір інструментів налаштування
        • Експорт із кімнати налаштування
      • Панель попереднього перегляду маски/матеріалу
      • Експорт із кімнати Painting
    • Робоча область UV
      • Верхня UV панель
      • Ліва панель інструментів UV
      • Панель попереднього перегляду UV
      • Приклад робочого процесу UV
      • Імпорт в UV кімнату
      • Експорт з UV кімнати
    • Ретопологія
      • Імпорт до кімнати Retopo
      • Меню Retopo Mesh і меню випікання
        • Режим віртуального дзеркала
      • Bake menu
        • Treat Poly Groups as Paint Objects
        • Baking guide
      • Інструмент «Обведення» в ретопології
      • Верхня панель
        • Виберіть геометрію
      • Ліва панель інструментів у кімнаті ретопології
        • Загальне призначення та функції
        • Додайте геометрію
        • Інструменти налаштування Retopo
        • UV інструменти
        • Команди для кабінету ретопології
      • АВТОРЕТОПО
        • Autopo guide
      • Групи Poly
    • Ліпити
      • Sculpt Layer
      • Ліпити дерево
      • Параметри Brush для скульптури
      • Top Bar
      • Brush двигун
      • Підменю Геометрія
      • Скульптуйте меню «Клацання правою кнопкою миші».
      • Шейдери
      • Voxel режим
        • Чиста Voxel скульптура
        • Щільність і роздільна здатність
        • Clay Engine
        • Voxel інструменти
        • Інструменти поверхні на вокселях
        • Інструменти налаштування Voxel
        • Об'ємний Painting
        • Інструменти Voxel Objects
      • Поверхневий режим
        • Поверхневі інструменти
        • Поверхневі спеціальні інструменти
        • Surface Layer
        • Інструменти для регулювання поверхні
        • Painting поверхні
        • Багаторівнева роздільна здатність
          • Multires tools
          • Multires adjust
          • Multires commands
      • Ліпити криві
        • Сплайн-криві
        • Splines model creation
      • Векторне зміщення
      • Інструменти трансформації поверхні
        • Інструменти Voxel перетворення
        • Instancer
        • Move
        • Pose
        • Fit
        • Reproject
        • Surface Array
      • Voxel примітиви та інструменти Import
        • Hollow Box
      • Живі логічні значення
      • Команди для Sculpt room
      • Import до Sculpt Room
      • Експорт із кімнати скульптур
    • Рендер
      • Comparison of different roughness values
      • Функції панелі візуалізації
      • Поворотний стіл
      • Fakebake освітлення - не PBR-
    • Factures
      • робочий процес
    • Найпростіший
    • Моделювання
      • Mesh Menu
      • Ліва панель інструментів у кімнаті моделювання
        • Додайте геометрію
          • Make Joints
          • Вибране
        • Твік
        • Smart Hybrid
        • UV
          • Команди
        • Ціла сітка
      • Приклад поверхні лофт від Fluffy
      • Блокування від Poeboi
      • Import Zbrush Polygroups for UV mapping
    • Kitbash - швидке створення 3D моделей
      • Create kitbash
      • Left tool panel Kitbash
    • 3DPrint
    • Photogrammetry
      • How to install Reality Capture
      • Reality Capture doesn’t show up ?
    • Сітка до кімнати NURBS
    • Nodes
      • Texturing with nodes
      • Бібліотека вузлів шейдерів скульптури
      • Open PBR
  • Scripting та Core API
    • Core API
    • API Python
    • Extensions and Addons

UV Set smoothing

2190 views 0

Written by Carlos
December 5, 2023

When you import a “model for pixel painting ” with 3DCoat, the setting window for import opens.
Among them, there is an item called “Smooth UV set”.
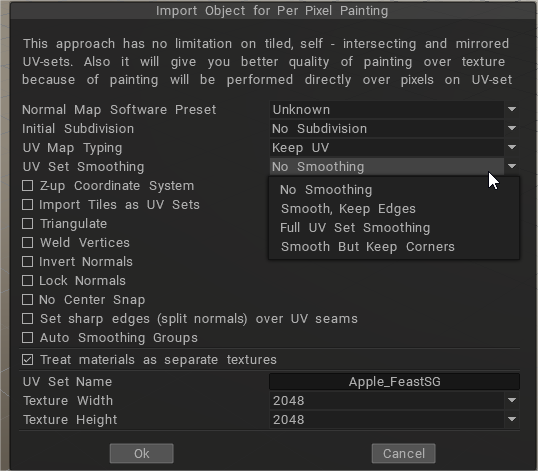
image.png

It is cut off in the image above, but when you try to select this item, the following warning will be displayed.

image.png

So if you select “Not subdivided” in the “Initial subdivision (number of polygons)” of the item above 2, you can choose “No smoothing” here.

Do you “subdivide” this?
Is it assumed that the CG model you are trying to import into 3D-COAT uses a subdivision surface (SDS)?.
And if you paste UV texture in SDS model, you will use “Smoothing interpolation of UV” function.

See also this article for “Initial subdivision (Number of polygons)“.
See also this article about “Smoothing Interpolation of UVs”

“Smoothing UV set” is asking what kind of “UV smoothing interpolation” is performed in the rendering software that uses it after creating a texture with 3DCoat.
So, before importing to 3DCoat, it is necessary to check the distortion using a checker map texture in the rendering software, and create an optimal interpolation method. You must decide what to do.

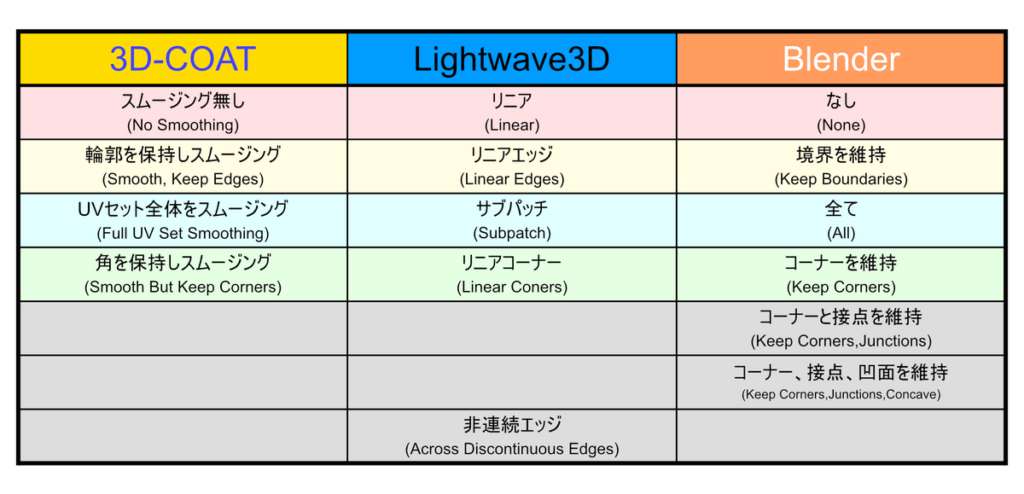
This is a correspondence option in between softwares.
there is a similar function in other software, so it would be good to check in advance.

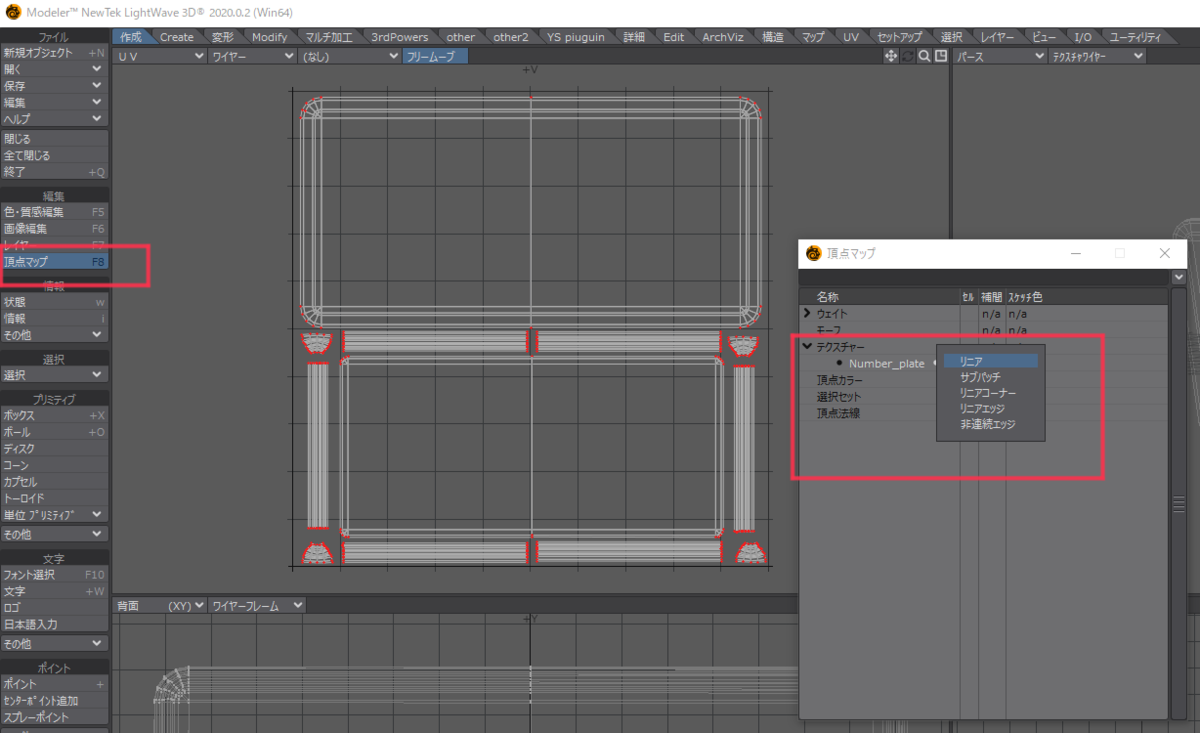
In the case of Lightwave, the setting location is the item “Interpolation” of the texture name you are using in the “Texture” open in the “Vertex map” panel.

Select “Subdivision Surface” in the “Advanced Settings” in the “Modeler” field and open the “Subdivision Surface” Modeler in the “Modeler” field.UV smooth”

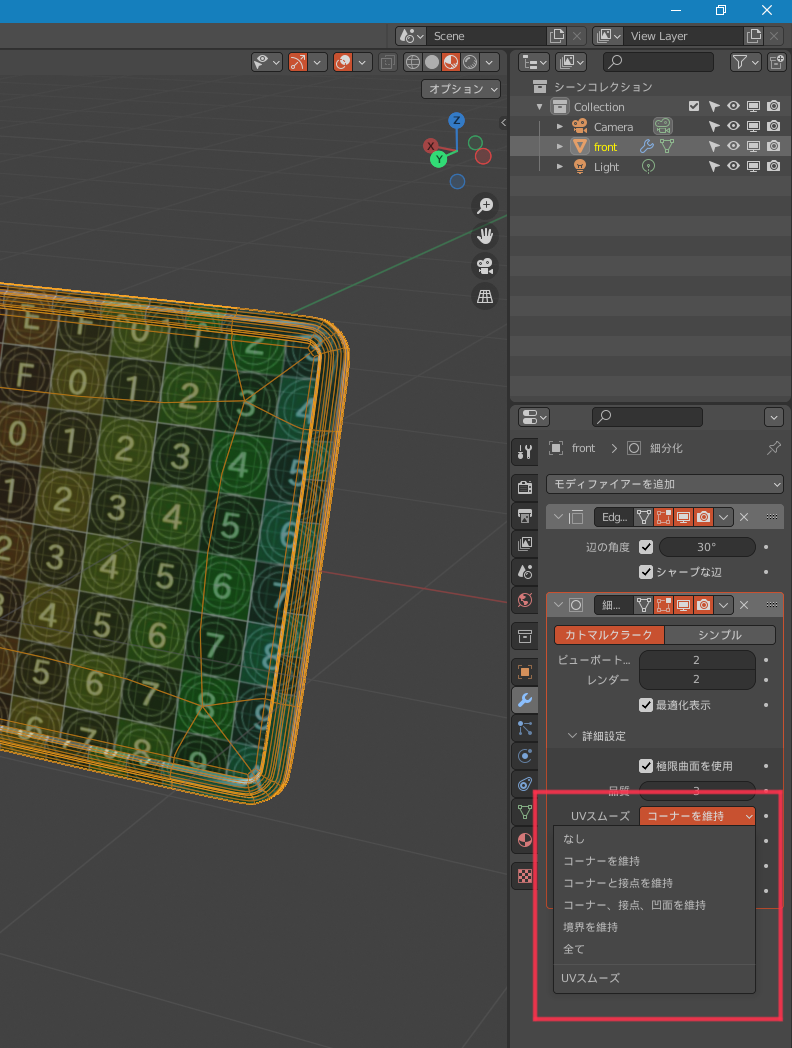
In the case of Blender, select “UV Smooth” in “Detailed Settings” with the ” Subdivision Surface ” modifier applied from the modifier item:
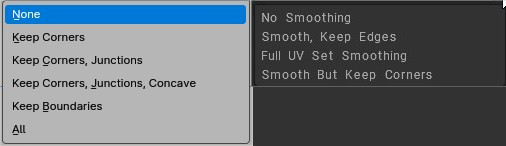
None / No Smoothing: UVs remain unchanged. UVs are not smoothed, boundaries are keep sharp.
Keep Corners / Smooth but keep corners: UV islands are smoothed, but their boundary (limits) remain unchanged.
Keep Corners, Junctions: UVs are smoothed, corners on discontinuous boundary and junctions of three or more regions are kept sharp.
Keep Corners, Junctions, Concave: UVs are smoothed, corners on discontinuous boundary, junctions of three or more regions and darts and concave corners are kept sharp.
Keep Boundaries / Smooth, Keep Edges: UVs are smoothed, boundaries (UV limits) are kept sharp.
All / Full UV Set Smoothing: UVs and their boundaries (UV limits) are smoothed.


Import for PPP using Uv Set Smoothing options

  • The initial subdivision (number of polygons) is “2604” (second from the top, equivalent to CC division level 2).
  • Smooth UV Set is “Preserve Corners and Smooth”
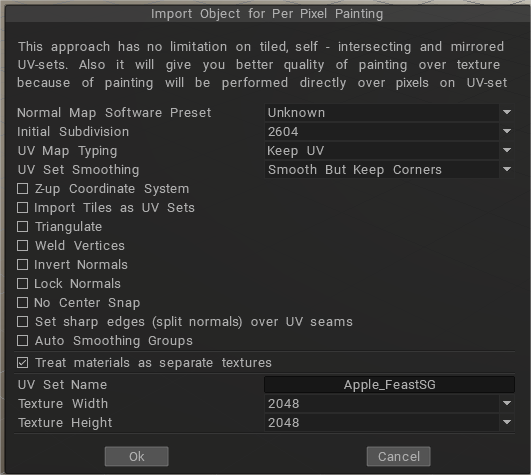
image.png

Then, the model of the mesh to which the SDS was applied is displayed first.
If you check the item “Low Resolution model” from the “View” menu, the model of the mesh before the model is replaced and the SDS is applied is displayed.If you do not have an account, you will be prompted to log in to your account.
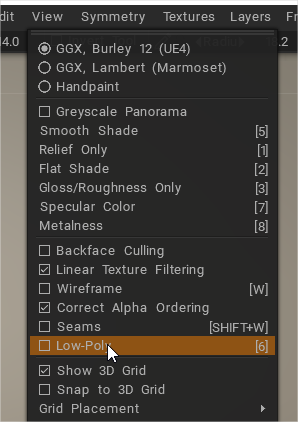
image.png

This function is assigned “6” on the character key side as the default shortcut, and the model is replaced every time you press it.

It is just like pressing the tab key in Lightwave.
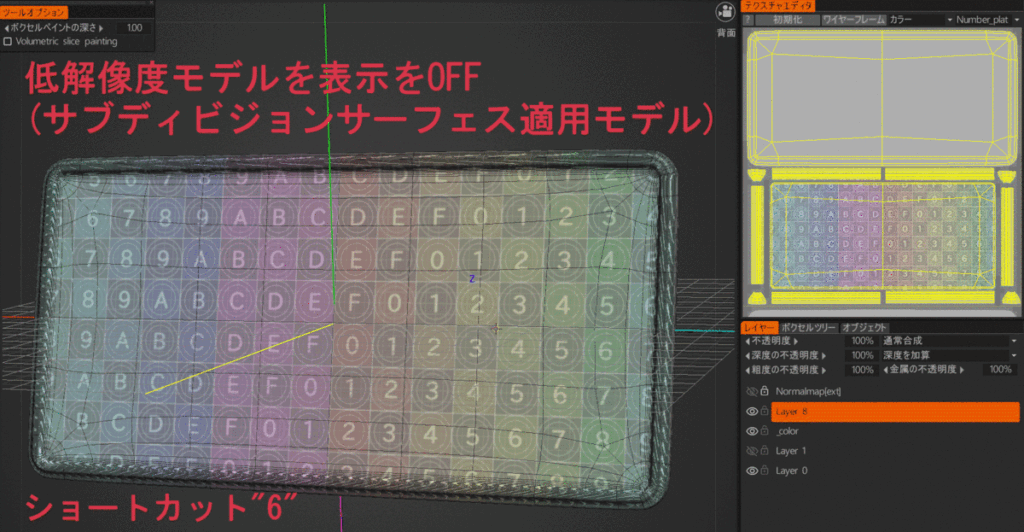
3DCoat seems to treat the former as “medium resolution mesh” and the latter as “low resolution mesh”.
This is indicated in the settings when exporting the model.
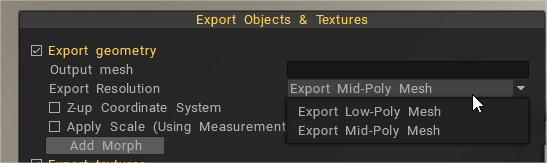
image.png

Painting is done with a medium resolution mesh displayed.

The export will be the flow of selecting the low resolution mesh.


What is UV set smoothing doing?

It is speculation that I saw the processing result to the last.The vertex moves along with the subdivision of the SDS and the texture is distorted, but when it is distorted in the opposite direction to the distortion at the import stage and SDS is applied, the distortion will not occur.I think that it is such a theory that it is corrected.
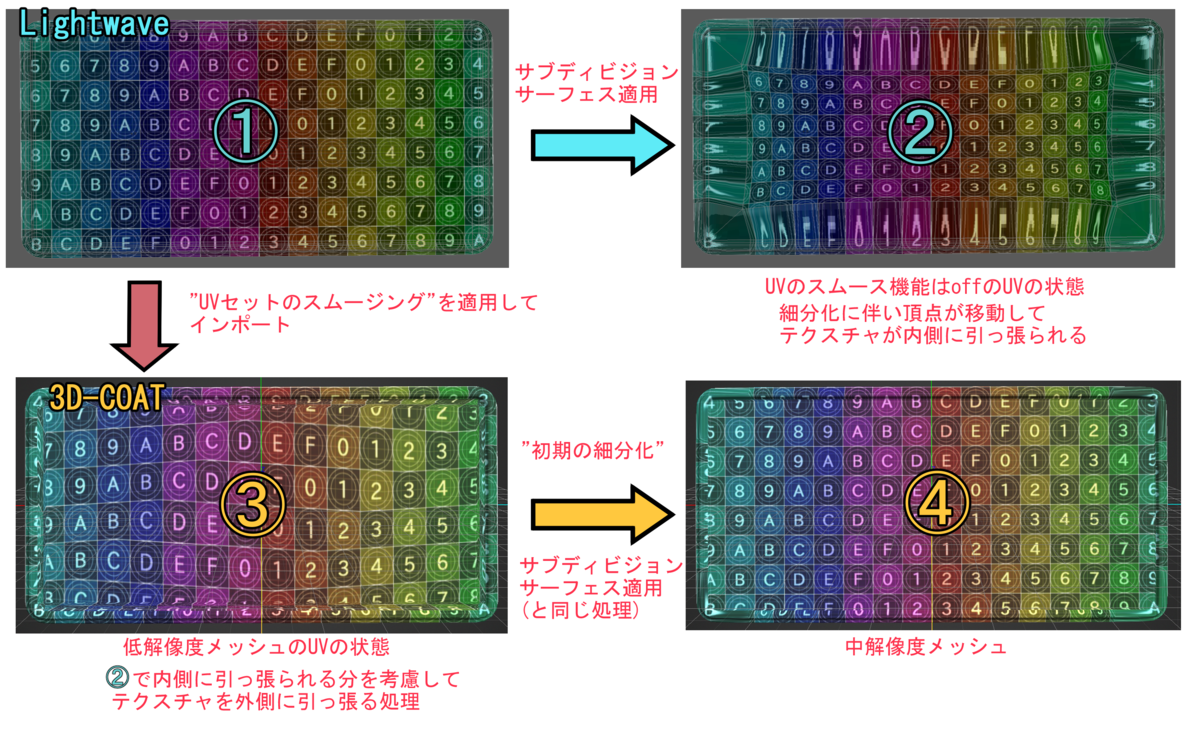

UV Stitching problem between 3DCoat and Blender

If you have an UV Stitching problem between 3DCoat and Blender, I mean, if in 3DCoat texture looks correctly, but when exporting to Blender, Textures looks stitched or distorted, the solution is to Triangulate the faces of the model before importing it from Blender to 3DCoat.

You can triangulate the whole model inside Blender selecting all faces and pressing CTRL + T or you can triangulate it in the import panel inside 3DCoat checking “Triangulate” option.
Also you can triangulate the model after you have done your texturing work, when you bring the model again into Blender from 3DCoat you can do CTRL + T inside Blender, and the Textures will look fine, as seen inside 3DCoat.

It seems that 3DCoat internally triangulates Blender´s Model, so that if you do (6) to look Low Poly Mesh inside 3DCoat it will appear the model before it is subdivided or triangulate inside 3DCoat so the UV Stitching will appear, but it looks fine when the Mid Poly Mesh is seen because it shows the triangulated model

So it seems that paint work in 3DCoat need tris, and to look it correctly inside Blender you also need Tris.

I hope this saves you lots of headaches as I had suffered with this Issue.

Tags:UV set smoothing

Was this helpful?

Yes  No
Related Articles
  • Noise3D
  • Noise
  • Bake Geometry Info
  • Make Joints
  • Texturing with nodes
  • Hollow Box
Previously
Initial CC subdivision
Up Next
Sharp (hard) edge
AI:
Hi! How can I help you?
Attention: This is a beta version of AI chat. Some answers may be wrong. See full version of AI chat