• हिन्दी
  • 3DCoat प्रलेखन
  • Chapters
    • 3DCoat का परिचय
    • शुरू करना
    • इंटरफ़ेस और नेविगेशन
    • Brush अवयव
    • कार्यक्षेत्र के कमरे
    • Scripting और Core API
    • प्रश्न और उत्तर
    • licensing
    • प्रशिक्षण ट्यूटोरियल
  • Pilgway
  • Products
    • 3DCoat
    • 3DCoatTextura
    • 3DCoatPrint
    • PBRLibrary
  • Blog Posts
  • Store
  • हिन्दी हिन्दी
    • English English
    • Українська Українська
    • Español Español
    • Deutsch Deutsch
    • Français Français
    • 日本語 日本語
    • Русский Русский
    • 한국어 한국어
    • Polski Polski
    • 中文 (中国) 中文 (中国)
    • Português Português
    • Italiano Italiano
    • Suomi Suomi
    • Svenska Svenska
    • 中文 (台灣) 中文 (台灣)
    • Dansk Dansk
    • Slovenčina Slovenčina
    • Türkçe Türkçe
    • Nederlands Nederlands
    • Magyar Magyar
    • ไทย ไทย
    • Ελληνικά Ελληνικά
    • Tiếng Việt Tiếng Việt
    • Lietuviškai Lietuviškai
    • Latviešu valoda Latviešu valoda
    • Eesti Eesti
    • Čeština Čeština
    • Română Română
    • Norsk Bokmål Norsk Bokmål
  • Creating 3D Character Using 3DCoat
Expand All Collapse All
  • 3DCoat का परिचय
  • शुरू करना
    • System requirements
    • Why 3DCoat is Unique?
    • 3DCoat सक्रिय कर रहा है
    • स्टार्टअप त्रुटि
      • Startup error Mac
    • Color management
    • Upgrading permanent license
    • Linux Setup
      • Linux initial setup per-user installation
      • Linux initial setup for system
      • Tablet setup
      • To GTK3 from GTK2
    • फ़ोल्डर संरचना
      • Custom documents folder
    • "संकल्प" के विभिन्न रूप
    • Tablet on Window
    • Import और Export
    • 3DCoat में Applinks
      • Blender ऐपलिंक
        • Blender with the Applink in Linux
      • Blender 4.2/3/4/5 applink
      • Max Applink
      • Houdini applink
      • Lightwave uplink
  • Navigation
    • ओपनिंग डायलॉग (क्विक स्टार्ट मेन्यू)
    • नेविगेशन पैनल
    • कैमरा और नेविगेशन
      • Customize Navigation as Blender
    • Viewport Navigation Gizmo
    • Left tool panel
    •  Activity Bar
    • 3DConnection उपकरणों का उपयोग करके नेविगेशन
      • How to compile Spacenavd on non Ubuntu distro
    • Stylus doesn’t work in sculpting
    • हॉटकी
  • इंटरफ़ेस और नेविगेशन
    • फ़ाइल मेनू
    • संपादन मेनू
      • Calculate Curvature
      • Calculate Occlusion
      • Light Baking Tool
      • पसंद
    • मेनू देखें
    • समरूपता
    • Textures
    • Calculate
    • परत मेनू
    • फ्रीज मेनू
    • Hide
    • Bake
    • कर्व्स 2022
      • घटता मेनू
      • Curves Properties RMB
      • जालीदार परत से भरें
      • Scale of imported curves
    • विंडोज मेनू
      • टैब्ड विंडोज पॉपअप पैनल
      • स्लाइडर्स
    • Scripts
    • Addons
    • Capture
    • सहायता मेनू
    • अनुकूलन
    • संशोधित करें या नया कक्ष बनाएँ
  • Brush अवयव
    • Brush टॉप बार
    • ब्रश सामान्य उपयोग
      • ब्रश और डीकैल बनाएं
      • वर्तमान मूर्तिकला से अल्फा बनाना
      • 3डी ऑब्जेक्ट से Brush बनाएं
      • Create brushes based on Curves
      • Load photoshop .abr brushes
    • स्ट्रोक्स
      • वक्र पॉपअप मेनू
    • Brush विकल्प
    • शर्तें सीमक
    • स्ट्रिप्स पैनल
    • स्टेंसिल पैनल
    • स्मार्ट सामग्री
      • नई छवियां या सामग्रियां जोड़ें
      • एक परत में स्मार्ट सामग्री संलग्न करें
      • Import Quixel Material
    • Brush के लिए प्रीसेट कैसे बनाएं
  • कार्यक्षेत्र के कमरे
    • Painting
      • बनावट Painting और मोड
        • Per-Pixel Painting
        • विस्थापन Painting (माइक्रो-वर्टेक्स)
        • Ptex Painting
        • भूतल Painting (पॉलीपेंटिंग)
      • Painting कक्ष में आयात करना
        • Initial CC subdivision
        • UV Set smoothing
        • Sharp (hard) edge
        • सामान्य लॉक करें
        • मॉडल परिवर्तन के बाद नया UV लेआउट लोड करें
        • DAZ Genesis models into 3DCoat
      • Painting कार्यक्षेत्र का मेनू
        • Edit menu
        • बनावट मेनू
          • बनावट Baking उपकरण
        • छिपाना
        • Bake Paint के लिए मेनू
        • रंग बीनने वाला
      • Painting के लिए टॉप बार
      • परत पैनल
        • सम्मिश्रण पैनल
        • Layer and Clipping Masks
      • Painting कक्ष उपकरण
      • अपारदर्शिता - पारदर्शिता
      • कार्यक्षेत्र को ट्वीक करें
        • ट्वीक टूलसेट
        • ट्वीक रूम से निर्यात
      • मास्क/सामग्री पूर्वावलोकन पैनल
      • Painting कक्ष से निर्यात
    • UV कार्यक्षेत्र
      • UV टॉप बार
      • UV लेफ्ट टूल पैनल
      • UV पूर्वावलोकन पैनल
      • UV वर्कफ़्लो उदाहरण
      • UV कक्ष में आयात करना
      • UV रूम से निर्यात करना
    • रेटोपोलॉजी
      • Retopo कक्ष में आयात करना
      • Retopo मेश मेनू और बेक मेनू
        • वर्चुअल मिरर मोड
      • Bake menu
        • Treat Poly Groups as Paint Objects
        • Baking guide
      • शीश पट्टी
        • ज्यामिति का चयन करें
      • रेटोपोलॉजी रूम में लेफ्ट टूल पैनल
        • समग्र उद्देश्य और कार्य
        • ज्यामिति जोड़ें
          • रेटोपोलॉजी में स्ट्रोक टूल
        • Retopo ट्वीक टूल्स
        • UV उपकरण
        • रेटोपोलॉजी रूम के लिए कमांड
      • ऑटोरेटोपो
        • Autopo guide
      • पाली समूह
    • नकाशी
      • Sculpt Layer
      • मूर्ति वृक्ष
      • मूर्तिकला Brush विकल्प
      • Top Bar
      • Brush इंजन
      • ज्यामिति सबमेनू
      • मूर्तिकला "राइट-क्लिक" मेनू
      • शेडर्स
      • Voxel मोड
        • प्योर Voxel स्कल्प्टिंग
        • घनत्व और संकल्प
        • मिट्टी का इंजन
        • Voxel टूल्स
        • वोक्सल्स पर भूतल उपकरण
        • Voxel समायोजन उपकरण
        • वॉल्यूमेट्रिक Painting
        • Voxel ऑब्जेक्ट्स टूल्स
      • भूतल मोड
        • भूतल उपकरण
        • भूतल कस्टम उपकरण
        • भूतल समायोजन उपकरण
        • भूतल Painting
        • भूतल वस्तु उपकरण
        • बहुस्तरीय संकल्प
          • Multires tools
          • Multires adjust
          • Multires commands
      • मूर्तिकला वक्र
        • तख़्ता घटता है
        • Splines model creation
      • वेक्टर विस्थापन
      • भूतल रूपांतरण उपकरण
        • Voxel ट्रांसफ़ॉर्म टूल
        • Instancer
        • Move
        • Pose
        • Fit
        • Reproject
        • Surface Array
      • Voxel आदिम और Import उपकरण
      • लाइव बूलियन्स
      • मूर्तिकला कक्ष के लिए आदेश
      • मूर्तिकला कक्ष में Import
      • मूर्तिकला कक्ष से निर्यात
    • प्रदान करना
      • Comparison of different roughness values
      • रेंडर पैनल फ़ंक्शंस
      • टर्नटेबल
      • लाइटिंग को नकली बनाना - गैर PBR-
    • Factures
      • कार्यप्रवाह
    • सरल
    • मोडलिंग
      • Mesh Menu
      • मॉडलिंग रूम में लेफ्ट टूल पैनल
        • ज्यामिति जोड़ें
          • चयनित
        • सुधार
        • Smart Hybrid
        • UV
          • आदेश
        • संपूर्ण जाल
      • फ्लफी द्वारा मचान सतह का उदाहरण
      • पोएबोई द्वारा ब्लॉकआउट
      • Import Zbrush Polygroups for UV mapping
    • Kitbash - त्वरित 3D मॉडल निर्माण
      • Create kitbash
      • Left tool panel Kitbash
    • 3DPrint
    • Photogrammetry
      • How to install Reality Capture
      • Reality Capture doesn’t show up ?
    • NURBS कक्ष में जाली
    • Nodes
      • मूर्तिकला शेडर्स नोड्स लाइब्रेरी
  • Scripting और Core API
    • Scripting
    • Core API
    • पायथन एपीआई
  • नि:शुल्क 3DCoatPrint

UV Set smoothing

1060 views 0

Written by Carlos
December 5, 2023

When you import a “model for pixel painting ” with 3DCoat, the setting window for import opens.
Among them, there is an item called “Smooth UV set”.

image.png

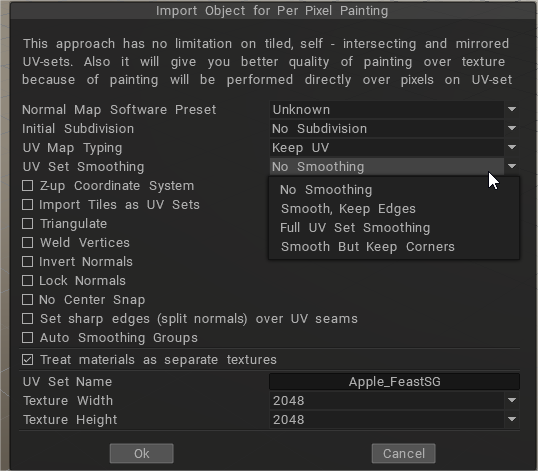
It is cut off in the image above, but when you try to select this item, the following warning will be displayed.

image.png

So if you select “No subdivision” for “Initial subdivision (number of polygons)” two items above , you will select “No smoothing” here.

Do you want to “subdivide” this? Is it assumed that the CG model you are trying to import into 3DCoat uses a subdivision surface (SDS) ?
That’s what I mean. And if you put UV textures on the SDS model, you will use the “UV smoothing interpolation” function.

“Smoothing UV set” is asked what kind of “UV smoothing interpolation” is performed in the rendering software that uses it after creating a texture with 3DCoat.
Therefore, before importing to 3DCoat, it is necessary to check the distortion using a checker map texture etc. with the rendering software and decide the optimal interpolation method.

This is a correspondence option in between softwares.
In the case of Blender , “UV Smooth” in “Detailed Settings” with the ” Subdivision Surface ” modifier applied from the modifier item:

None / No Smoothing: UVs remain unchanged. UVs are not smoothed, boundaries are keep sharp.
Keep Corners / Smooth but keep corners: UV islands are smoothed, but their boundary (limits) remain unchanged.
Keep Corners, Junctions: UVs are smoothed, corners on discontinuous boundary and junctions of three or more regions are kept sharp.
Keep Corners, Junctions, Concave: UVs are smoothed, corners on discontinuous boundary, junctions of three or more regions and darts and concave corners are kept sharp.
Keep Boundaries / Smooth, Keep Edges: UVs are smoothed, boundaries (UV limits) are kept sharp.
All / Full UV Set Smoothing: UVs and their boundaries (UV limits) are smoothed.

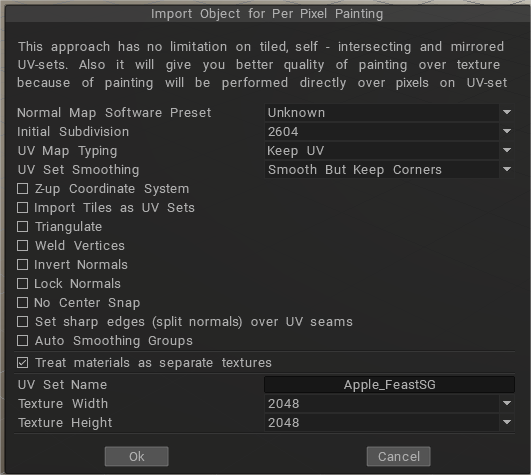
Import for PPP using Uv Set Smoothing options


The initial subdivision (number of polygons) is “2604” (second from the top, equivalent to CC division level 2)
Smooth UV Set is “Preserve Corners and Smooth”

image.png

Then, the mesh model to which SDS is applied is displayed first. If you check the item “Low resolution model” from the “View” menu, the model will be replaced and the mesh model before SDS is applied will be displayed.

image.png

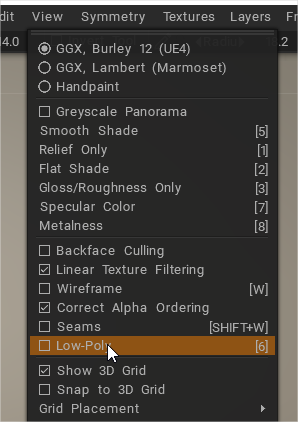
This function is assigned the default shortcut “6” on the character key side, and the model is replaced each time it is pressed.

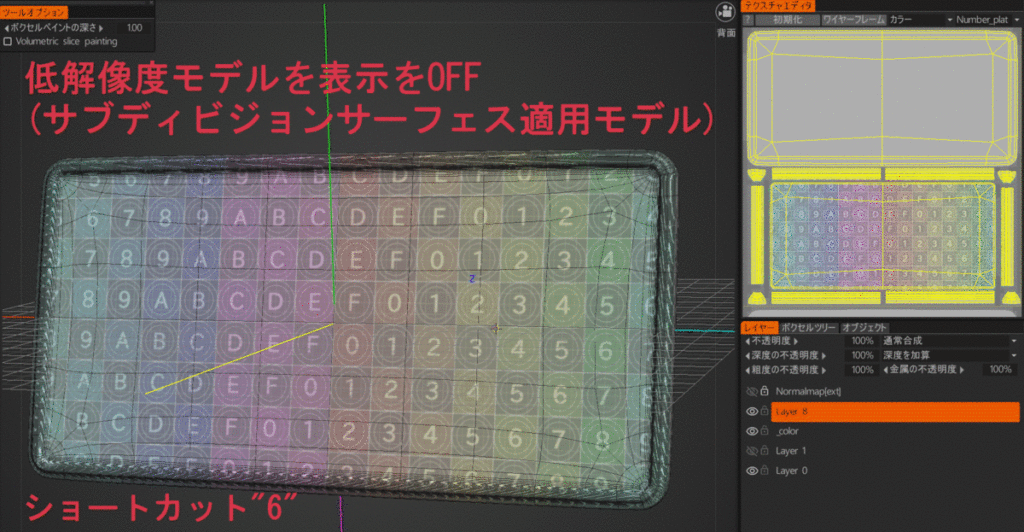
3DCoat seems to treat the former as “medium resolution mesh” and the latter as “low resolution mesh”. This is indicated in the settings when exporting the model.

image.png

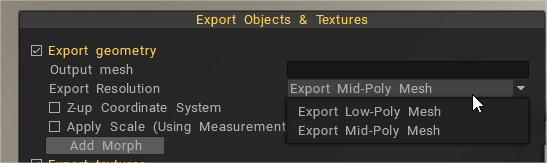
Painting is done with a medium resolution mesh displayed.

The export will be the flow of selecting the low resolution mesh.

What is UV set smoothing doing?

As SDS is subdivided, the vertices move and the texture is distorted, but the theory is that it is distorted in the opposite direction to the distortion at the import stage, and then the distortion is corrected when SDS is applied.

UV Stitching problem between 3DCoat and Blender


If you have an UV Stitching problem between 3DCoat and Blender, I mean, if in 3DCoat texture looks correctly, but when exporting to Blender, Textures looks stitched or distorted, the solution is to Triangulate the faces of the model before importing it from Blender to 3DCoat.

You can triangulate the whole model inside Blender selecting all faces and pressing CTRL + T or you can triangulate it in the import panel inside 3DCoat checking “Triangulate” option.
Also you can triangulate the model after you have done your texturing work, when you bring the model again into Blender from 3DCoat you can do CTRL + T inside Blender, and the Textures will look fine, as seen inside 3DCoat.

It seems that 3DCoat internally triangulates Blender´s Model, so that if you do (6) to look Low Poly Mesh inside 3DCoat it will appear the model before it is subdivided or triangulate inside 3DCoat so the UV Stitching will appear, but it looks fine when the Mid Poly Mesh is seen because it shows the triangulated model

So it seems that paint work in 3DCoat need tris, and to look it correctly inside Blender you also need Tris.

I hope this saves you lots of headaches as I had suffered with this Issue.

Tags:UV set smoothing

Was this helpful?

Yes  No
Related Articles
  • Surface Array
  • Top Bar
  • Curves Properties RMB
  • Left tool panel Kitbash
  • Create kitbash
  • Color management
Previously
Initial CC subdivision
Up Next
Sharp (hard) edge
AI:
Hi! How can I help you?
Attention: This is a beta version of AI chat. Some answers may be wrong. See full version of AI chat