• हिन्दी
  • 3DCoat प्रलेखन
  • Chapters
    • 3DCoat का परिचय
    • शुरू करना
    • इंटरफ़ेस और नेविगेशन
    • Brush अवयव
    • Node System
    • GPU Texturing
    • कार्यक्षेत्र के कमरे
    • Scripting और Core API
    • प्रश्न और उत्तर
    • licensing
    • प्रशिक्षण ट्यूटोरियल
  • Pilgway
  • Products
    • 3DCoat
    • 3DCoatTextura
    • 3DCoatPrint
    • PBRLibrary
  • Blog Posts
    • Creating 3D Character Using 3DCoat
  • Store
  • हिन्दी हिन्दी
    • English English
    • Українська Українська
    • Español Español
    • Deutsch Deutsch
    • Français Français
    • 日本語 日本語
    • Русский Русский
    • 한국어 한국어
    • Polski Polski
    • 中文 (中国) 中文 (中国)
    • Português Português
    • Italiano Italiano
    • Suomi Suomi
    • Svenska Svenska
    • 中文 (台灣) 中文 (台灣)
    • Dansk Dansk
    • Slovenčina Slovenčina
    • Türkçe Türkçe
    • Nederlands Nederlands
    • Magyar Magyar
    • ไทย ไทย
    • Ελληνικά Ελληνικά
    • Tiếng Việt Tiếng Việt
    • Lietuviškai Lietuviškai
    • Latviešu valoda Latviešu valoda
    • Eesti Eesti
    • Čeština Čeština
    • Română Română
    • Norsk Bokmål Norsk Bokmål
  • 3DCoat प्रलेखन
  • Chapters
    • 3DCoat का परिचय
    • शुरू करना
    • इंटरफ़ेस और नेविगेशन
    • Brush अवयव
    • Node System
    • GPU Texturing
    • कार्यक्षेत्र के कमरे
    • Scripting और Core API
    • प्रश्न और उत्तर
    • licensing
    • प्रशिक्षण ट्यूटोरियल
  • Pilgway
  • Products
    • 3DCoat
    • 3DCoatTextura
    • 3DCoatPrint
    • PBRLibrary
  • Blog Posts
    • Creating 3D Character Using 3DCoat
  • Store
  • हिन्दी हिन्दी
    • English English
    • Українська Українська
    • Español Español
    • Deutsch Deutsch
    • Français Français
    • 日本語 日本語
    • Русский Русский
    • 한국어 한국어
    • Polski Polski
    • 中文 (中国) 中文 (中国)
    • Português Português
    • Italiano Italiano
    • Suomi Suomi
    • Svenska Svenska
    • 中文 (台灣) 中文 (台灣)
    • Dansk Dansk
    • Slovenčina Slovenčina
    • Türkçe Türkçe
    • Nederlands Nederlands
    • Magyar Magyar
    • ไทย ไทย
    • Ελληνικά Ελληνικά
    • Tiếng Việt Tiếng Việt
    • Lietuviškai Lietuviškai
    • Latviešu valoda Latviešu valoda
    • Eesti Eesti
    • Čeština Čeština
    • Română Română
    • Norsk Bokmål Norsk Bokmål
Expand All Collapse All
  • 3DCoat का परिचय
  • शुरू करना
    • System requirements
    • Why 3DCoat is Unique?
    • 3DCoat सक्रिय कर रहा है
    • स्टार्टअप त्रुटि
      • Startup error Mac
    • Color management
    • Upgrading permanent license
    • Linux Setup
      • Linux initial setup per-user installation
      • Linux initial setup for system
      • Tablet setup
      • To GTK3 from GTK2
      • Error libicuuc.so.70
    • फ़ोल्डर संरचना
      • Custom documents folder
    • "संकल्प" के विभिन्न रूप
    • Tablet on Window
    • Import और Export
    • 3DCoat में Applinks
      • Blender ऐपलिंक
        • Blender with the Applink in Linux
      • Blender 4.2/3/4/5 applink
      • Max Applink
      • Houdini applink
      • Lightwave uplink
  • Node System
    • Node Editor
    • Node & Object Inspectors
    • Node Graph
    • NodeGraph Language (NGL)
    • GPU Nodes
      • Color
      • GeometryIn
      • In
      • Layer
      • Material
      • Out
      • Pattern
      • Pattern3D
      • ShaderToy
      • Shape
      • Texture
      • Tilable
      • UV
      • Vector
    • Filters
    • Masks
    • Materials
    • Modifiers
    • Volumes
  • GPU Texturing
    • PBM Channels
    • Per-Pixel Painting
  • Navigation
    • ओपनिंग डायलॉग (क्विक स्टार्ट मेन्यू)
    • नेविगेशन पैनल
    • कैमरा और नेविगेशन
      • Customize Navigation as Blender
    • Viewport Navigation Gizmo
    • Left tool panel
    •  Activity Bar
    • 3DConnection उपकरणों का उपयोग करके नेविगेशन
      • How to compile Spacenavd on non Ubuntu distro
    • Space Bar Menu
    • Stylus doesn’t work in sculpting
    • हॉटकी
  • इंटरफ़ेस और नेविगेशन
    • फ़ाइल मेनू
    • संपादन मेनू
      • Calculate Curvature
      • Calculate Occlusion
      • Light Baking Tool
      • पसंद
    • मेनू देखें
    • समरूपता
    • Textures
    • Calculate
    • परत मेनू
    • फ्रीज मेनू
    • Hide
    • Bake
    • कर्व्स 2022
      • घटता मेनू
      • Curves Properties RMB
      • जालीदार परत से भरें
      • Scale of imported curves
    • विंडोज मेनू
      • टैब्ड विंडोज पॉपअप पैनल
      • स्लाइडर्स
    • Scripts
    • Addons
    • Capture
    • सहायता मेनू
    • अनुकूलन
    • संशोधित करें या नया कक्ष बनाएँ
  • Brush अवयव
    • Brush टॉप बार
    • ब्रश सामान्य उपयोग
      • ब्रश और डीकैल बनाएं
      • वर्तमान मूर्तिकला से अल्फा बनाना
      • 3डी ऑब्जेक्ट से Brush बनाएं
      • Create brushes based on Curves
      • Load photoshop .abr brushes
    • स्ट्रोक्स
      • वक्र पॉपअप मेनू
    • Brush विकल्प
    • शर्तें सीमक
    • स्ट्रिप्स पैनल
    • स्टेंसिल पैनल
    • स्मार्ट सामग्री
      • नई छवियां या सामग्रियां जोड़ें
      • एक परत में स्मार्ट सामग्री संलग्न करें
      • Import Quixel Megascans
    • Brush के लिए प्रीसेट कैसे बनाएं
  • कार्यक्षेत्र के कमरे
    • Painting
      • बनावट Painting और मोड
        • Per-Pixel Painting
        • विस्थापन Painting (माइक्रो-वर्टेक्स)
        • Ptex Painting
        • भूतल Painting (पॉलीपेंटिंग)
      • Painting कक्ष में आयात करना
        • Initial CC subdivision
        • UV Set smoothing
        • Sharp (hard) edge
        • सामान्य लॉक करें
        • मॉडल परिवर्तन के बाद नया UV लेआउट लोड करें
        • DAZ Genesis models into 3DCoat
        • ID map
      • Painting कार्यक्षेत्र का मेनू
        • Edit menu
        • बनावट मेनू
          • बनावट Baking उपकरण
        • छिपाना
        • Bake Paint के लिए मेनू
        • रंग बीनने वाला
      • Surface Materials
      • Painting के लिए टॉप बार
      • परत पैनल
        • सम्मिश्रण पैनल
        • Layer and Clipping Masks
      • Painting कक्ष उपकरण
      • अपारदर्शिता - पारदर्शिता
      • कार्यक्षेत्र को ट्वीक करें
        • ट्वीक टूलसेट
        • ट्वीक रूम से निर्यात
      • मास्क/सामग्री पूर्वावलोकन पैनल
      • Painting कक्ष से निर्यात
    • UV कार्यक्षेत्र
      • UV टॉप बार
      • UV लेफ्ट टूल पैनल
      • UV पूर्वावलोकन पैनल
      • UV वर्कफ़्लो उदाहरण
      • UV कक्ष में आयात करना
      • UV रूम से निर्यात करना
    • रेटोपोलॉजी
      • Retopo कक्ष में आयात करना
      • Retopo मेश मेनू और बेक मेनू
        • वर्चुअल मिरर मोड
      • Bake menu
        • Treat Poly Groups as Paint Objects
        • Baking guide
      • रेटोपोलॉजी में स्ट्रोक टूल
      • शीश पट्टी
        • ज्यामिति का चयन करें
      • रेटोपोलॉजी रूम में लेफ्ट टूल पैनल
        • समग्र उद्देश्य और कार्य
        • ज्यामिति जोड़ें
        • Retopo ट्वीक टूल्स
        • UV उपकरण
        • रेटोपोलॉजी रूम के लिए कमांड
      • ऑटोरेटोपो
        • Autopo guide
      • पाली समूह
    • नकाशी
      • Sculpt Layer
      • मूर्ति वृक्ष
      • मूर्तिकला Brush विकल्प
      • Top Bar
      • Brush इंजन
      • ज्यामिति सबमेनू
      • मूर्तिकला "राइट-क्लिक" मेनू
      • शेडर्स
      • Voxel मोड
        • प्योर Voxel स्कल्प्टिंग
        • घनत्व और संकल्प
        • मिट्टी का इंजन
        • Voxel टूल्स
        • वोक्सल्स पर भूतल उपकरण
        • Voxel समायोजन उपकरण
        • वॉल्यूमेट्रिक Painting
        • Voxel ऑब्जेक्ट्स टूल्स
      • भूतल मोड
        • भूतल उपकरण
        • भूतल कस्टम उपकरण
        • Surface Layer
        • भूतल समायोजन उपकरण
        • भूतल Painting
        • भूतल वस्तु उपकरण
        • बहुस्तरीय संकल्प
          • Multires tools
          • Multires adjust
          • Multires commands
      • मूर्तिकला वक्र
        • तख़्ता घटता है
        • Splines model creation
      • वेक्टर विस्थापन
      • भूतल रूपांतरण उपकरण
        • Voxel ट्रांसफ़ॉर्म टूल
        • Instancer
        • Move
        • Pose
        • Fit
        • Reproject
        • Surface Array
      • Voxel आदिम और Import उपकरण
      • लाइव बूलियन्स
      • मूर्तिकला कक्ष के लिए आदेश
      • मूर्तिकला कक्ष में Import
      • मूर्तिकला कक्ष से निर्यात
    • प्रदान करना
      • Comparison of different roughness values
      • रेंडर पैनल फ़ंक्शंस
      • टर्नटेबल
      • लाइटिंग को नकली बनाना - गैर PBR-
    • Factures
      • कार्यप्रवाह
    • सरल
    • मोडलिंग
      • Mesh Menu
      • मॉडलिंग रूम में लेफ्ट टूल पैनल
        • ज्यामिति जोड़ें
          • चयनित
        • सुधार
        • Smart Hybrid
        • UV
          • आदेश
        • संपूर्ण जाल
      • फ्लफी द्वारा मचान सतह का उदाहरण
      • पोएबोई द्वारा ब्लॉकआउट
      • Import Zbrush Polygroups for UV mapping
    • Kitbash - त्वरित 3D मॉडल निर्माण
      • Create kitbash
      • Left tool panel Kitbash
    • 3DPrint
    • Photogrammetry
      • How to install Reality Capture
      • Reality Capture doesn’t show up ?
    • NURBS कक्ष में जाली
    • Nodes
      • मूर्तिकला शेडर्स नोड्स लाइब्रेरी
      • Open PBR
  • Scripting और Core API
    • Core API
    • पायथन एपीआई
    • Extensions and Addons
  • नि:शुल्क 3DCoatPrint

Nodes

943 views 0

Written by Carlos
March 21, 2025

Nodes let you to generate textures from procedural patterns within node-based graphics.

Is Non-destructive texturing (Node-Based Workflow) No more limitations of classic pixel painting!
Now you can create materials, masks, and effects using a visual editor (Node Editor).
Any element — rust intensity, base color, glossiness, or scratches — remains editable at any stage of work. Change parameters and instantly observe the result on the 3D model in real time.

– High-performance GPU nodes (NGL) Under the hood of the new system, dynamic compilation of nodes into optimized shaders based on NodeGraph Language (NGL) is working. All procedural magic, mathematical operations, and noise generators are calculated directly on the graphics card (GPU).

– A new generation of smart materials, masks, and other presets:

  • NGMaterials: Procedural smart materials that perfectly adapt to the curvature, shading (Ambient Occlusion), and other properties of your model.
  • NGMasks: Procedural “smart” masks for generating realistic wear, dirt, scratches, etc.
  • NGModifiers and NGFilters: Powerful tools for geometry deformation and procedural post-processing of current layers.

– These materials support approximately 30 channels; you can read more about them in the documentation, in the PBM Channels section.

– You can find more detailed documentation on these features in the Node System and GPU Texturing  sections; the documentation will be updated.

Updated User Interface New windows have been added for convenient work


Node Editor (the main space for building logic), Node Inspector, and Object Inspector.
You can pin any node parameters (using the “eye” icon) in the general object or layer parameters and easily change them via the Object Inspector.
This allows for configuring complex materials with convenient sliders without constantly diving into the node graph.
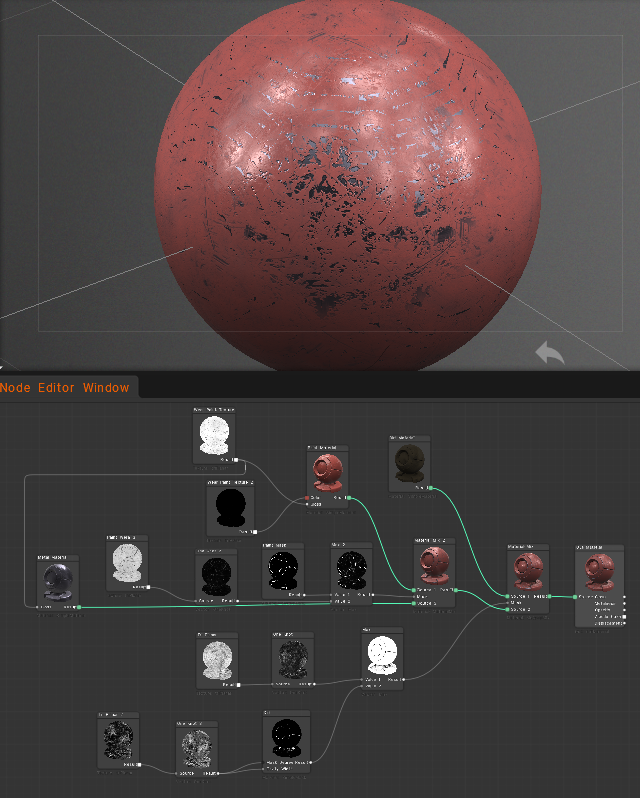
On v2025 nodes will only work with sculpted objects. On v2026 work on Sculpted and Painted Objects.

New features found on version 2026+:

  • the node system has been updated to prevent links between incompatible properties.
  • The material preview renderer has been updated.
  • A button for inverting input channels has been added.
  • Required maps, such as Ambient Occlusion and Curvature, are now automatically calculated.
  • The ability to use input channel correction curves in the node source code has been added.

Here are the steps


  • Switch to the “Nodes” workspace.
  • Create a new node graph.
  • Add a “Voxel Displacement” node to your graph.
  • Connect the necessary input nodes, such as texture maps or procedural textures, to define the displacement pattern.
  • Adjust the parameters of the “Voxel Displacement” node to control the intensity and direction of the displacement.
  • Apply the node graph to your voxel object to see the displacement effect.

This process allows you to create complex displacement patterns using a visual node-based approach.
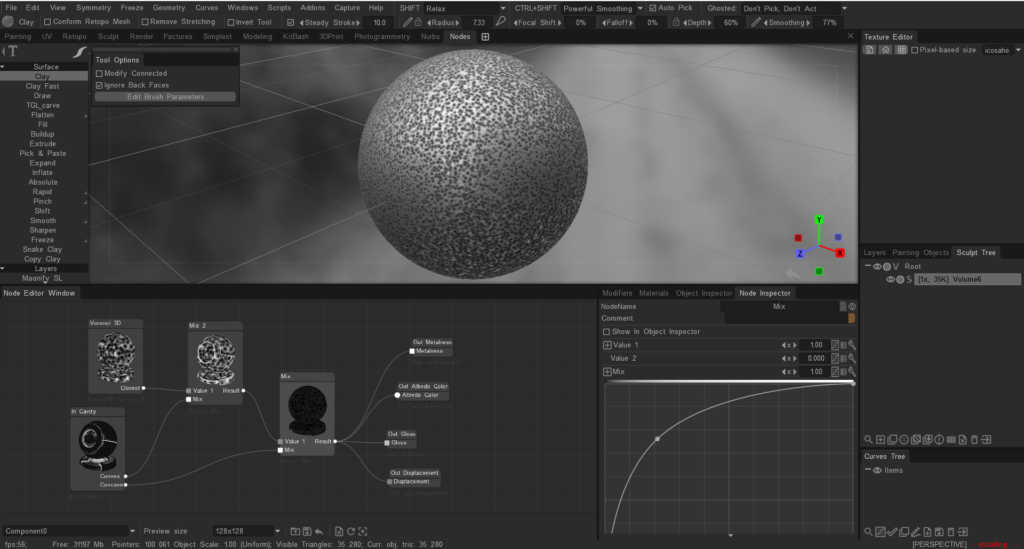
Node system for painting


The node system for painting is available an v2026 as it is primarily used for creating shaders and procedural textures for Materials.

Painting in 3DCoat is typically done using the tools and features available in the Paint Room, such as brushes, layers, and smart materials.

If you are looking to create complex textures or effects, you can use the existing painting tools and techniques, but the node system is not used for painting directly.

Tutorials


3DCoat 2026 GPU version Intro: A short video demonstrating the main functions.

3DCoat Nodal Network Introduction (for Sculpt Objects): This video is a very brief introduction to the Nodal Network, first available for dense Voxel or High Poly objects within the Sculpt workspace, using shaders as the base.
Once the user is satisfied with the results, they can later bake those shaders to a material.
In the 2026 Release, this nodal network will be available for the Paint workspace (via PPP/Per Pixel Painting mode), offering an unprecedented combination of powerful Texture Painting tools and Nodal Material creation.

Was this helpful?

Yes  No
Related Articles
  • GPU Texturing
  • Vector
  • Volumes
  • Modifiers
  • Materials
  • Masks
Previously
NURBS कक्ष में जाली
Up Next
मूर्तिकला शेडर्स नोड्स लाइब्रेरी
AI:
Hi! How can I help you?
Attention: This is a beta version of AI chat. Some answers may be wrong. See full version of AI chat