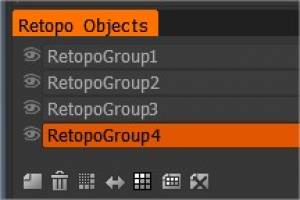
Το 3DCoat διαθέτει σύστημα Layer για επανατοπολογία ματιών. Αυτό διευκολύνει την επανατοπολογία των ματιών σας με προβληματικές περιοχές και την ύπαρξη πολλαπλών εκδόσεων ρετοπολογίας του ίδιου αντικειμένου. Όπως όλες οι άλλες καρτέλες Layer στο 3dcoat, λειτουργούν όπως τα Layers στο Photoshop. Μπορείτε να κάνετε κλικ και να σύρετε Επίπεδα για να τα αναδιατάξετε, να τα σύρετε στο εικονίδιο του Κάδου για να τα διαγράψετε, να τα αποκρύψετε και να τα εμφανίσετε με το εικονίδιο Ορατότητα κ.λπ.
Μπορείτε να δημιουργήσετε πολλά αντικείμενα στο Retopo Room, το καθένα με τη γεωμετρία του. Αυτό σας επιτρέπει να επανατοπολογείτε μέρη ανεξάρτητα το ένα από το άλλο ή να έχετε πολλαπλές εκδόσεις του ίδιου αντικειμένου με διαφορετικές τοπολογίες. Μπορεί επίσης να διευκολύνει την επανατοπολογία των ματιών σας σε προβληματικές περιοχές. Μπορείτε να RMB και να σύρετε το Object για να τα αναδιατάξετε, στο εικονίδιο του Κάδου για να τα διαγράψετε, να αλλάξετε την ορατότητα με το εικονίδιο Visibility κ.λπ. Κάνοντας διπλό κλικ σε ένα Retopo Object θα μπορείτε να το μετονομάσετε. Ας ρίξουμε μια ματιά στον πίνακα Poly Groups:

Επίπεδα: Όπως βλέπετε στο στιγμιότυπο οθόνης, μπορείτε να έχετε περισσότερα από ένα στρώματα για επανατοπολογία, εάν το επιθυμείτε. Μπορούν να αναδιαταχθούν με μεταφορά και απόθεση. μπορούν να συρθούν στα σκουπίδια εάν δεν τα χρειάζεστε πλέον. Κάνοντας διπλό κλικ σε ένα επίπεδο θα μπορείτε να το μετονομάσετε.
Ορατότητα: Κάθε επίπεδο έχει το εικονίδιο ορατότητας, που σας επιτρέπει να το ενεργοποιήσετε ή να το απενεργοποιήσετε.
Υπάρχουν επίσης εικονίδια στο κάτω μέρος της καρτέλας και είναι:
New Layer: Δημιουργεί ένα νέο επίπεδο.
Κάδος απορριμμάτων: Διαγράφει το επιλεγμένο επίπεδο.
Subdivide : Αυτό σας επιτρέπει να υποδιαιρέσετε ολόκληρο το επιλεγμένο Επίπεδο.
Συμμετρικό αντίγραφο: Δημιουργήστε ένα συμμετρικό αντίγραφο του επιπέδου. Η συμμετρία θα πρέπει να είναι ενεργοποιημένη για αυτήν την εντολή.
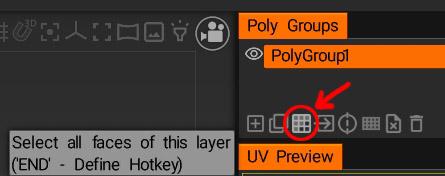
Επιλογή: Επιλέξτε όλα τα πρόσωπα αυτού του επιπέδου.
Μετακίνηση: Μετακίνηση επιλεγμένων προσώπων στο τρέχον επίπεδο.
Διαγραφή: Διαγραφή όλων των πολυγώνων από το τρέχον επίπεδο.
Τα backfaces φαίνονται λίγο πιο σκούρα από το υπόλοιπο μοντέλο. ξέρετε κάποιον τρόπο να διορθώσω μονόπλευρα πολύγωνα και να τα κάνουμε διπλής όψης ;
Χνουδωτά: Ο λόγος που οι πίσω όψεις στα πολύγωνα φαίνονται πιο σκούρες σε σύγκριση με τις μπροστινές όψεις είναι ότι οι πίσω όψεις είναι στη σκιά, καθώς είναι στραμμένες προς τα μέσα και όχι προς την πηγή φωτός.
Τα πολύγωνα μονής όψης δεν είναι ακριβώς κάτι που μπορείτε να “διορθώσετε”, καθώς το να τα κάνετε διπλής όψης είναι μια διαδικασία που συμβαίνει σε οποιοδήποτε renderer/πλατφόρμα σκοπεύετε να χρησιμοποιήσετε το τελικό μοντέλο (μερικά θα υποστηρίζουν όψεις διπλής όψης και άλλα κέρδισαν ‘t).
Το πιο σημαντικό, το να κάνετε τα πολύγωνα διπλής όψης δεν θα σας επιτρέψει να προσθέσετε υφές και στις δύο πλευρές. Όποιες υφές υπάρχουν στην μπροστινή πλευρά του πολυγώνου θα εμφανίζονται αντικατοπτρισμένες στην πίσω όψη, καθώς και οι δύο πλευρές μοιράζονται τον ίδιο χώρο UV .
Για να δημιουργήσετε πολύγωνα διπλής όψης που μπορούν να δημιουργήσουν υφή και στις δύο πλευρές ανεξάρτητα, θα χρειαστεί να προσθέσετε επιπλέον πολύγωνα στο μοντέλο. Δεν χρησιμοποιώ το Blender, αλλά εδώ είναι μερικοί τρόποι με τους οποίους μπορείτε να το κάνετε μέσω του δωματίου Retopo σε 3D Coat.
Αρχικά, θα χρειαστεί να χρησιμοποιήσετε την επιλογή “Take mesh from Paint room” (δείτε την προηγούμενη ανάρτηση) ή απλώς να import ένα αντίγραφο του μοντέλου σας στο repo room. Μόλις έχετε το μοντέλο σας στην αίθουσα Retopo , επιλέξτε όλα τα πρόσωπα χρησιμοποιώντας το κουμπί Επιλογή όλων των προσώπων στον πίνακα Poly Groups.

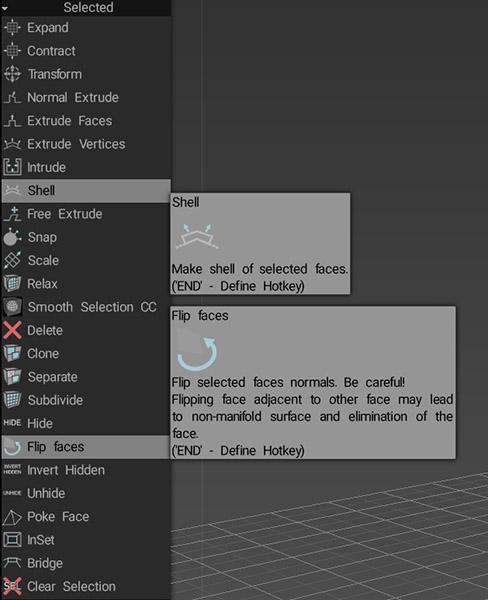
Εάν θέλετε τα πρόσωπα να έχουν όγκο/πάχος, τότε μπορείτε να χρησιμοποιήσετε το εργαλείο Shell, διαφορετικά χρησιμοποιήστε το εργαλείο Flip Faces (και τα δύο βρίσκονται στην ενότητα Επιλεγμένα του πίνακα Εργαλεία στην αριστερή πλευρά)

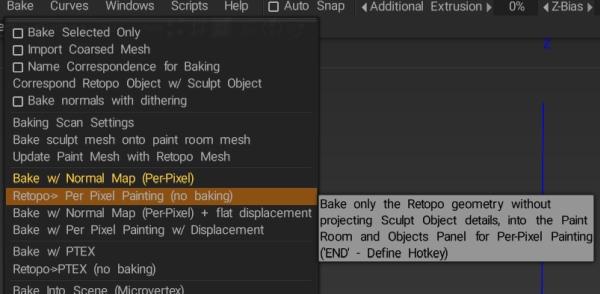
Εάν χρησιμοποιείτε το εργαλείο Shell , τότε θα χρειαστεί να ξετυλίξετε με UV τα πρόσφατα δημιουργημένα πρόσωπα και στη συνέχεια να χρησιμοποιήσετε την επιλογή Ενημέρωση Πλέγματος Ζωγραφικής με Πλέγμα Retopo (δείτε την προηγούμενη ανάρτηση) για να αντικαταστήσετε το αρχικό σας μοντέλο στο δωμάτιο Ζωγραφικής, ενώ εάν χρησιμοποιείτε το Το εργαλείο Flip Faces το μόνο που χρειάζεται να κάνετε, χρησιμοποιήστε την επιλογή Retopo > Per Pixel Painting (χωρίς ψήσιμο) (δείτε παρακάτω) στο μενού Bake για να import την αναποδογυρισμένη έκδοση του μοντέλου σας στην αίθουσα Paint μαζί με την αρχική έκδοση (μην ξεχάσετε να μετονομάστε το σετ UV σας, ώστε να μην καταλήξετε με πολλά σετ UV με πανομοιότυπα ονόματα). Μόλις έχετε την αναποδογυρισμένη έκδοση του μοντέλου σας στο δωμάτιο Paint μαζί με την αρχική έκδοση, μπορείτε απλώς να κάνετε εναλλαγή μεταξύ των δύο σετ UV ανάλογα με την πλευρά των προσώπων που θέλετε να εργαστείτε.

 Ελληνικά
  English
 Українська
 Español
 Deutsch
 Français
 日本語
日本語 Русский
 한국어
한국어 Polski
 中文 (中国)
 Português
 Italiano
 Suomi
Suomi Svenska
 中文 (台灣)
 Dansk
Dansk Slovenčina
 Türkçe
 Nederlands
 Magyar
 ไทย
ไทย हिन्दी
 Tiếng Việt
 Lietuviškai
 Latviešu valoda
 Eesti
Eesti Čeština
 Română
 Norsk Bokmål