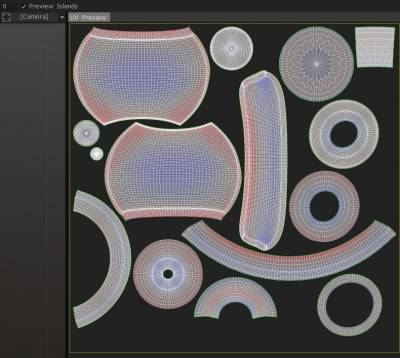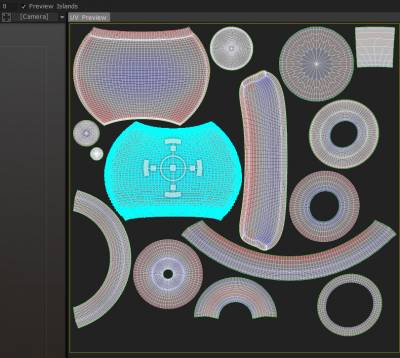
Μέσα στο παράθυρο προεπισκόπησης UV , μπορείτε επίσης να χειριστείτε τα νησιά UV σας και πιο άμεσα. Θα δείτε ένα gizmo χειριστή κάνοντας κλικ στο LMB σε ένα νησί. Στη συνέχεια, τα επιλεγμένα νησιά θα επισημάνουν όλες τις άκρες των αντίστοιχων πολυγώνων τους εντός της θύρας προβολής 3D.
Επιπλέον, τα προηγμένα εργαλεία για την επεξεργασία των χαρτών σας με UV βρίσκονται στο τμήμα “Επιλεγμένο” των εργαλείων ρετοπολογίας. Όλα αυτά τα εργαλεία απαιτούν μια επιλογή στο παράθυρο Προεπισκόπηση UV . Για να επιλέξετε ένα σύμπλεγμα (ή νησί), κάντε κλικ σε ένα με το LMB.
Χειριστής προεπισκόπησης UV

Περαιτέρω προηγμένα εργαλεία για την άμεση επεξεργασία των χαρτών σας με UV βρίσκονται στο “Επιλεγμένο” τμήμα των εργαλείων ρετοπολογίας. Όλα αυτά τα εργαλεία απαιτούν μια επιλογή στο παράθυρο Προεπισκόπηση UV . Για να επιλέξετε ένα σύμπλεγμα (ή νησί), κάντε κλικ σε ένα με το LMB.
Βρίσκεται στο παράθυρο Προεπισκόπηση UV , αυτό το gizmo 2D Transform σάς επιτρέπει να κλιμακώνετε, να τεντώνετε, να περιστρέφετε και να μεταφράζετε όποιο νησί έχετε επιλέξει.
Μπορείτε να τοποθετήσετε τα συμπλέγματά σας με μη αυτόματο τρόπο όπως σας ταιριάζει πριν τα συσκευάσετε (Βελτιστοποιημένο ξετύλιγμα) σε έναν χάρτη UV . Πρέπει να έχετε ενεργοποιημένο το πλαίσιο επιλογής “Χειριστής” για να το χρησιμοποιήσετε. βρίσκεται στο Top Bar. Χρησιμοποιήστε αυτό το gizmo για να μετατρέψετε κορυφές, άκρες, όψεις, νησιά και οποιαδήποτε επιλογή τους (πολλαπλά νησιά, κ.λπ.) μέσα στο παράθυρο Προεπισκόπηση UV .
Χρησιμοποιήστε αυτό το gizmo για να χειριστείτε κορυφές, άκρες, όψεις και ολόκληρα νησιά μέσα στο παράθυρο Προεπισκόπηση UV .
Στο επιλεγμένο μπλοκ, θα βρείτε ένα σύνολο εντολών που σχετίζονται με τις επιλογές που έγιναν στο παράθυρο Προεπισκόπηση UV . Μετά την εφαρμογή της εντολής Unwrap που βρίσκεται στο Retopo Room, ίσως θελήσετε να επεξεργαστείτε νησίδες UV στο παράθυρο Προεπισκόπηση UV πριν συγχωνεύσετε το πλέγμα σας στο Paint Room.
Rotate CW: Αυτό θα περιστρέψει το επιλεγμένο νησί δεξιόστροφα.
Περιστροφή CCW: Αυτό θα περιστρέψει το επιλεγμένο νησί αριστερόστροφα.
Αναστροφή U: Αυτό θα ανατρέψει το U του χάρτη UV .
Αναστροφή U: Αυτό θα ανατρέψει το V του χάρτη UV .
Relax: Εφαρμόζει ελαφριά εξομάλυνση σε όλο το επιλεγμένο σύμπλεγμα (ή νησί) για να ανακουφίσει το τέντωμα ή το τσίμπημα.
Επεξεργασία
Γρήγορη εκκίνηση UV Layout Tools Pt1
Γρήγορη εκκίνηση UV Layout Tools Pt2
Υποτμήμα Πυκνότητα Texel (Λόγος Πυκνότητας Texel/Pixel)
από τον ALEX MEISTER
Το 3DCoat χρησιμοποιεί ένα συνδυασμό χρωμάτων θερμικού χάρτη για να οπτικοποιήσει την πυκνότητα του texel.
Εάν δεν είστε εξοικειωμένοι με τον όρο “πυκνότητα texel”, είναι απλώς η αναλογία των εικονοστοιχείων που χρησιμοποιούνται για την πλήρωση ενός καθορισμένου μεγέθους μονάδας στην τρισδιάστατη σκηνή.
Ο γενικός στόχος είναι να κλιμακωθούν όλα τα νησιά UV σύμφωνα με αυτή την αναλογία. Εν ολίγοις, τα μικρότερα αντικείμενα στη σκηνή θα πρέπει να χρησιμοποιούν λιγότερα pixel από τα μεγαλύτερα αντικείμενα.
Εάν ένα νησί UV κλιμακωθεί σωστά σύμφωνα με το μέγεθός του στη σκηνή, το 3DCoat θα χρωματίσει το νησί με γκρι χρώμα. Τα νησιά που χρησιμοποιούν περισσότερα εικονοστοιχεία από ό,τι θα έπρεπε έχουν κόκκινο χρώμα και τα νησιά που χρησιμοποιούν λιγότερα από ό,τι θα έπρεπε έχουν μπλε χρώμα.
Texel Density vs Scaling Texel
Το Texel Density, όπως αναφέρεται στο τμήμα του Unwrap, διασφαλίζει ότι κάθε μέρος του μοντέλου σας έχει αρκετό χώρο στην UV για μια υφή. τις περισσότερες φορές, αυτό ακριβώς θέλετε.
Αλλά ορισμένα μοντέλα, ειδικά με μία μόνο υφή, βασίζονται σε περισσότερες λεπτομέρειες σε ένα συγκεκριμένο μέρος. Μπορείτε να το αποκτήσετε επιλέγοντας την UV που θέλετε να είναι μεγαλύτερη στην προεπισκόπηση UV και κλιμακώνοντάς την. (θα γίνει κόκκινο και τα υπόλοιπα θα γίνουν μπλε)
Κάθε φορά μετά την πραγματοποίηση προσαρμογών στην κλίμακα της νησίδας UV , μπορείτε να πατήσετε «Συσκευασία UV» για να αφήσετε το πρόγραμμα να οργανώσει την καλύτερη δυνατή εφαρμογή για όλα τα νησιά. Τώρα έχετε ένα μέρος που είναι μεγαλύτερο για περισσότερο χώρο υφής, για ένα στολίδι ή απλώς κάτι που χρειάζεται περισσότερες λεπτομέρειες από τα υπόλοιπα, καθώς θα ήταν πιο κοντά στην κάμερα.
Ως παράδειγμα αυτού, όπου μείωσα τα δύο μπλε μέρη, καθώς δεν έχουν σχεδόν καμία πραγματική σημασία, και η λεπτομέρεια αργότερα, η μείωσή του θα σας δείξει, φυσικά, ότι όλα τα άλλα αντικείμενα είναι πολύ μεγάλα σε σύγκριση. Ο απλούστερος τρόπος για να το κάνετε αυτό είναι να μειώσετε τα εξαρτήματα για τα οποία δεν χρειάζεστε τόσες πολλές πληροφορίες και μετά να επιλέξετε PackUV2.
Βασική ροή εργασίας
Για να ανακεφαλαιώσετε τη βασική ροή εργασίας για τη λήψη ενός πλέγματος από το Voxel Room στο Paint Room – και τελικά στο σημείο “Εξαγωγή” δεδομένων τόσο πλέγματος όσο και υφής:
- Σμιλέψτε το μοντέλο σας σε λειτουργία Voxel Room και Surface Mode.
- Προσθέστε προσαρμοσμένη τοπολογία μέσω του AUTOPO ή χειροκίνητα μέσα στο Retopo Room.
- Σημειώστε τις ραφές και ξετυλίξτε το πλέγμα Retopo σας.
- Χειριστείτε τα στοιχεία του χάρτη UV και βελτιστοποιήστε τον χάρτη UV (στο δωμάτιο Retopo )
- Ξετυλίξτε το πλέγμα Retopo και βελτιστοποιήστε τον χάρτη UV σας «Συσκευάζοντάς τον».
- Ψήστε το πλέγμα Retopo σας στο Paint Room (και στο πλαίσιο “Objects”) και εφαρμόστε τις υφές σας.
- Επιλέξτε “Αρχείο/Μοντέλο Export ” – εξοικονομώντας όλα τα δεδομένα πλέγματος και υφής σύμφωνα με τις παραμέτρους που έχετε επιλέξει.
Γρήγορη συμβουλή για 3D-Coat: Επιλέξτε UV-Islands απευθείας στο παράθυρο προβολής (από τον Christoph Werner)
 Ελληνικά
  English
 Українська
 Español
 Deutsch
 Français
 日本語
日本語 Русский
 한국어
한국어 Polski
 中文 (中国)
 Português
 Italiano
 Suomi
Suomi Svenska
 中文 (台灣)
 Dansk
Dansk Slovenčina
 Türkçe
 Nederlands
 Magyar
 ไทย
ไทย हिन्दी
 Tiếng Việt
 Lietuviškai
 Latviešu valoda
 Eesti
Eesti Čeština
 Română
 Norsk Bokmål