 Eesti
Eesti  English
 Українська
 Español
 Deutsch
 Français
 日本語
日本語 Русский
 한국어
한국어 Polski
 中文 (中国)
 Português
 Italiano
 Suomi
Suomi Svenska
 中文 (台灣)
 Dansk
Dansk Slovenčina
 Türkçe
 Nederlands
 Magyar
 ไทย
ไทย हिन्दी
 Ελληνικά
 Tiếng Việt
 Lietuviškai
 Latviešu valoda
 Čeština
 Română
 Norsk Bokmål
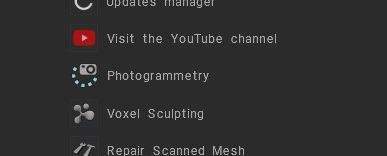
The Photogrammetry room can be launched from Quick start menu
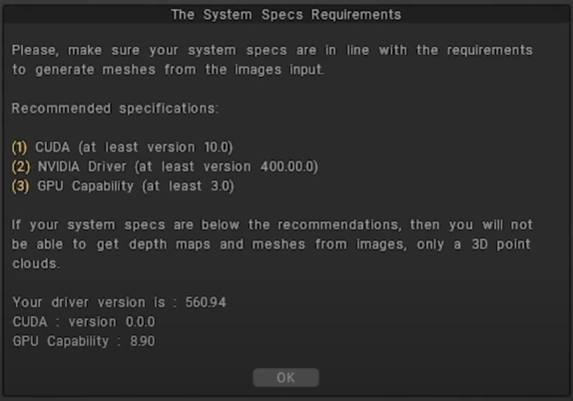
To start ensure that all the necessary conditions for Photogrammetry to work correctly are met.
Photogrammetry Left Tool Panel
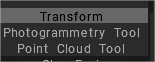
- Transform: Transform the object as an entire. Click on the object to transform. Choose a rectangle or lasso mode to select multiple objects at once and transform them. Use SHIFT, CTRL CRTL+SHIFT to add, subtract or intersect selection.
- Photogrammetry tool: Аutomatic Image-based 3D reconstruction tool from images.
3DC use external library of software for photogrammetry processing: Image-based 3D reconstruction are based on Colmap and Reality Capture.
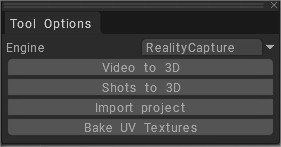
Reality Capture engine
- Video to 3D: Extract sharp frames from a video and create a 3D model from them.
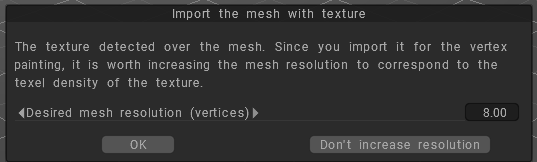
3D Coat, unlike Reality Capture, selects the sharpest frames rather than just any at the same time interval, but this process should take several minutes. - Shots to 3D: Make a 3D model from photos. Once the process is finished a popup panel ask to increase or not the texture resolution for better reconstruction.
– Import Project: Create a new object linked to an existing photogrammetry project.
– Bake UV Textures: Bake texture from source photos into PPP model.
The PPP model must match the transform with the associated photogrammetry project.
Colmap engine
Аutomatic reconstruction tool that simply takes a folder of input images and produces a sparse and dense reconstruction in a workspace folder.
The output is written to the workspace folder.
For example, if your images are located in path/to/project/images, you could select path/to/project as a workspace folder.
Point Cloud tool
3DCoat have built-in point cloud-to-mesh conversion tools under development on Photogrammetry Room.
Point Cloud tool: Use this tool to create meshes from the point clouds and convert the LAS point cloud to 3D TIN file using Poisson reconstruction algorithms.
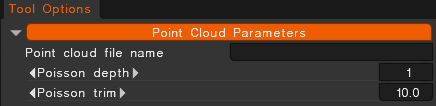
Point cloud file name: Select the point cloud file to begin the conversion.
Poisson depth: This integer is the maximum depth of the tree that will be used for surface reconstruction.
Poisson trim: This floating point values specifies the value for mesh trimming.
“Poisson depth” is a key parameter in the Poisson surface reconstruction algorithm. It refers to the octree depth used to discretize the 3D space and store the reconstructed surface mesh.
- Function: The Poisson reconstruction method uses an adaptive octree to partition the space and solve the Poisson equation, which determines an implicit indicator function (a function that is 1 inside the object and 0 outside).
- Resolution: The
depthparameter controls the resolution of the resulting 3D mesh. A higher octree depth creates a finer, more detailed surface mesh but requires exponentially more memory and computation time. - Impact:
- Low depth: Results in a coarse, less detailed mesh.
- High depth: Results in a high-resolution, detailed mesh, but increases computational load and memory usage.
- Practical Use: Users typically adjust the
depthvalue to balance the desired quality of the reconstructed surface with available computational resource
“Poisson depth trim” refers to the process of using a density threshold to trim away “excess” surfaces or artifacts in regions of low point cloud density after the initial reconstruction process.
Explanation
- Poisson Surface Reconstruction: The Poisson algorithm works by creating a smooth, watertight (completely closed) 3D mesh from an oriented point cloud. This process can create surfaces that fill in actual holes in the data, but it can also generate unwanted floating artifacts or extraneous surfaces in areas where the original point cloud data was sparse or missing.
- Density Information: During the Poisson reconstruction, a density value is calculated for each vertex in the resulting mesh. This value indicates the level of support from the original input points for that specific part of the reconstructed surface. A low density value means the vertex is in an area with few or no nearby input points.
- Trimming: The “trim” part of the process involves a post-processing step where a user-defined threshold is applied to these density values. Any vertices, and their connected triangles, with a density value below this specified threshold are removed from the mesh.
- Result: This effectively “cuts away” the unwanted, low-support surfaces while preserving the main object, which is supported by a high density of points.
The term “depth” is a reference to the octree depth parameter used in the Poisson algorithm itself, which controls the maximum resolution of the reconstruction grid. While related to the reconstruction quality, the “depth trim” specifically relates to using the density output from the reconstruction to trim the final mesh.
At current stage of development it is not as effective as solution found on other apps.
To create a 3D model from a point cloud in 3DCoat, you will first need to use another application to generate the mesh from the point cloud.
Once you have a mesh file (e.g., .obj, .fbx, .ply), you can import it into 3DCoat. In 3DCoat, you can then clean up the mesh, retopologize it to create a lower-polygon model with cleaner topology, and then use 3DCoat’s tools for sculpting, texturing, and painting on the new mesh.
Step 1: Generate a mesh from the point cloud in another program
Preprocess the point cloud: Use a program like CloudCompare, MeshLab, or others to clean up the point cloud by removing noise and non-essential points.
Create the mesh: Generate a mesh from the cleaned point cloud using the program’s built-in tools. Some programs have algorithms like Poisson reconstruction or surface reconstruction that can create a surface from the points.
Export the mesh: Export the generated mesh as a standard 3D file format like .obj or .fbx.
This video demonstrates how to create a 3D mesh from point clouds in another application:
Step 2: Import the mesh into 3DCoat
In 3DCoat, use the File > Import to load the mesh file you exported in the previous step.
You may be prompted with an import dialog; adjust any settings as needed and click OK to bring the mesh into your 3DCoat scene.
Step 3: Refine the mesh in 3DCoat
Retopologize the mesh: The mesh generated from a point cloud often has a very high polygon count and can be difficult to work with. Use 3DCoat’s retopology tools to create a new, lower-polygon, clean mesh that wraps around the high-resolution scan data.
Paint: After retopologizing, you can use 3DCoat’s paint and texturing tools to refine the model further and paint details onto the new mesh.
Export the final model: Once you are finished, export the final, optimized model in a format suitable for your needs.
Tutorials
Photogrammetry introduction: Introducing the updated 3D Coat with a powerful photogrammetry feature! In this video, we showcase an easy and efficient way to create 3D models from regular video with the help of RealityCapture.
Easy Polishing of 3D scans with voxel sculpting, convenient retopology, UV unwrapping, baking, and refining the textures- all inside 3DCoat now ! Starting from the 3DCoat 2024.29 version.
How to merge two photogrammetry Reality Capture projects into one in 3DCoat: In this video, we’ll show you how to solve a common problem in photogrammetry. The issue arises when you photograph an object, and the final result is missing information on the side where the object was resting on a surface because the camera can’t capture enough photos from that angle.
Create 3D Models in a Few Steps with the Help of RealityCapture inside: Introducing the updated 3D Coat with a powerful photogrammetry feature!
In this video, we showcase an easy and efficient way to create 3D models from regular photos or videos with the help of RealityCapture.
Easy Polishing of 3D scans with voxel sculpting, convenient retopology, UV unwrapping, and baking the textures, all inside 3DCoat now !
Starting from the 3DCoat 2024.29 version.
Photogrammetry Basics
This course is an introduction to photogrammetry.
The sections within this course discuss the core principles of photogrammetry.
An Introduction to Photogrammetry
Digital space has evolved from pixelated representations of real-world objects to exact photorealistic digital copies.
The methods to create digital objects and scenery has evolved as well.
To design a single realistic digital object of life-like quality often requires hours and hours of modeling and texturing.
What if there was another way? What if the object could instead be scanned into the computer, capturing its exact shape and texture?
