Είναι ένα από τα πιο ισχυρά εργαλεία στο οπλοστάσιο voxel, καθώς σας επιτρέπει να τοποθετείτε σημεία spline απευθείας στη σκηνή σας με το LMB.
Για να επεξεργαστείτε ένα υπάρχον σημείο, απλώς κάντε κλικ με το LMB. Για να ολοκληρώσετε την επεξεργασία ενός σημείου, πατήστε το πλήκτρο ESC. Αυτό το εργαλείο χρησιμοποιεί επίσης ένα gizmo για μετασχηματισμούς. Τα βέλη θα μεταφραστούν, τα πλαίσια θα κλιμακωθούν ή θα τεντωθούν και ο εσωτερικός λευκός δακτύλιος θα μεταφραστεί σε όλους τους άξονες.
Όταν χρησιμοποιείτε τη λειτουργία Εφαρμογή σε ολόκληρη την καμπύλη, θα υπάρχει ένας εξωτερικός λευκός δακτύλιος που επιτρέπει περιστροφές με βάση το παράθυρο προβολής. Εκτός από τα τυπικά εργαλεία καμπύλης που περιγράφονται παραπάνω, υπάρχουν τώρα τέσσερις λειτουργίες:
- Extrude: Αυτό σας επιτρέπει να εξωθήσετε νέες ιεραρχίες από το υπάρχον σημείο καμπύλης. Απλώς κάντε κλικ και κρατήστε πατημένο το LMB,
στη συνέχεια σύρετε προς την κατεύθυνση που θέλετε να δημιουργήσετε την εξώθηση. Κρατώντας πατημένο το SHIFT, θα είναι προεπιλεγμένη η νέα λειτουργία Περιστροφής. Μπορεί επίσης να ενεργοποιηθεί με το πλήκτρο «Q».
- Μετακίνηση: Αυτό σας επιτρέπει να μετακινήσετε μεμονωμένα σημεία μιας καμπύλης. Η προσθήκη του κλειδιού SHIFT θα μετακινήσει την ιεραρχία του παιδιού ή του γονέα, ανάλογα με την κατεύθυνση του βέλους του χειριστή. Μπορεί επίσης να ενεργοποιηθεί με το πλήκτρο «W».
- Περιστροφή: Αυτό σας επιτρέπει να περιστρέψετε τη θυγατρική ή γονική ιεραρχία ενός σημείου με περιστροφές που βασίζονται σε θύρα προβολής. Μπορεί επίσης να ενεργοποιηθεί με το πλήκτρο «R».
- Κλίμακα: Αυτό σας επιτρέπει να κλιμακώσετε την ιεραρχία του παιδιού ή του γονέα ενός σημείου. Μπορεί επίσης να ενεργοποιηθεί με το πλήκτρο “E”.
ΣΗΜΕΙΩΣΗ: Πρέπει να κάνετε κλικ στο LMB για να επεξεργαστείτε ένα σημείο και στο “Esc” για να σταματήσετε την επεξεργασία ενός σημείου. Όταν χρησιμοποιείτε μία από τις τέσσερις νέες λειτουργίες επεξεργασίας, δεν χρειάζεται να έχετε επιλεγμένο σημείο. Απλώς κρατήστε πατημένο το SHIFT (ή ενεργοποιήστε την ενέργεια Invert SHIFT) και θα δείτε πράσινους κώνους – σας επιτρέπουν να επεξεργαστείτε το σημείο και την ιεραρχία του. Τέλος, η επηρεαζόμενη κατεύθυνση της ιεραρχίας είναι η μεγαλύτερη πλευρά του πράσινου κώνου.
Αυτά τα εργαλεία επιτρέπουν πολλά πράγματα, όπως σωλήνες, αλυσίδες, βασικούς χαρακτήρες ή σχήματα και σώματα πλασμάτων κ.λπ. Ακολουθούν ορισμένες από τις παραμέτρους αυτού του εργαλείου:
- Fill Inside: Γεμίζει ολόκληρο το διάστημα μεταξύ όλων των σημείων για να δημιουργηθεί ένα αντικείμενο συμπαγούς όγκου σε ολόκληρο το διάστημα.
- Εκτέλεση βούρτσας κατά μήκος της καμπύλης : Αυτό σας επιτρέπει να κάνετε τέλεια εσοχή ή να προεξέχουν περιοχές κατά μήκος της ράχης. Έχει αρκετές επιλογές.
που είναι όλα αυτονόητα? εξερευνήστε αυτές τις ρυθμίσεις.
- Συμμόρφωση: Αναγκάζει τα σημεία της καμπύλης σας να περιοριστούν στην επιφάνεια ενός αντικειμένου όγκου που σύρετε κατά μήκος.
- Οδοντωτή γραμμή: Από προεπιλογή, το εργαλείο καμπυλών θα δημιουργήσει μια ομαλή spline TCB. Αλλά με αυτήν την επιλογή, μπορείτε να δημιουργήσετε ένα γραμμικό spline, δημιουργώντας ουσιαστικά «αιχμηρές» διασταυρώσεις.
- Προσαρμογή στο επίπεδο συμμετρίας: Όταν κάνετε κλικ στο επίπεδο ή κοντά στο επίπεδο, αναγκάζει να δημιουργηθούν νέα σημεία στο επίπεδο συμμετρίας.
- Ενέργεια Invert Shift: Αυτό επηρεάζει αποκλειστικά τις τέσσερις νέες λειτουργίες καμπύλης. Από προεπιλογή, σε οποιαδήποτε από αυτές τις λειτουργίες, πρέπει
κρατήστε πατημένο το SHIFT για να εκτελέσετε τις εναλλακτικές λειτουργίες τους. Αυτή η επιλογή θα αντιστρέψει αυτήν τη ρύθμιση έτσι ώστε από προεπιλογή να χρησιμοποιείτε τις εναλλακτικές λειτουργίες και οι κανονικές προεπιλεγμένες μέθοδοι απαιτούν να κρατάτε πατημένο το πλήκτρο SHIFT.
Εξώθηση της ίδιας ακτίνας: Στη λειτουργία Extrude, αυτή η επιλογή δημιουργεί ένα νέο σημείο με το ίδιο μέγεθος με το σημείο από το οποίο πραγματοποιήσατε εξώθηση. Από προεπιλογή, ένα σημείο που δημιουργήθηκε πρόσφατα είναι το μέγεθος του δρομέα της πένας σας.
- Νέα καμπύλη: Προσθέτει μια άλλη καμπύλη στη σκηνή σας και στις υπάρχουσες καμπύλες σας.
- Tube: Επαναφέρει την καμπύλη στην προεπιλεγμένη της κατάσταση.
- Επαναφορά κλίμακας/γωνιών: Αυτά τα δύο εργαλεία θα επαναφέρουν τυχόν κλιμάκωση ή περιστροφές που έχετε εφαρμόσει στην επιλεγμένη καμπύλη.
- Σκληρότητα: Για να το χρησιμοποιήσετε, πρέπει να επιλέξετε ένα σημείο σε μια καμπύλη. Στη συνέχεια, πατώντας αυτό το κουμπί, το επιλεγμένο σημείο θα γίνει αιχμηρό και μυτερό.
- Κλειστό: Κλείνει την καμπύλη spline μεταξύ του πρώτου και του τελευταίου σημείου του spline. Μπορείτε, φυσικά, να συνεχίσετε, να προσθέσετε ή να αφαιρέσετε σημεία ενώ χρησιμοποιείτε αυτήν τη λειτουργία.
- Κλειδί ΔΙΑΓΡΑΦΗ:
- Εκκαθάριση όλων: Διαγράφει όλες τις καμπύλες από τη σκηνή.
- Αποθήκευση/Φόρτωση: Μπορείτε να αποθηκεύσετε και να φορτώσετε ολόκληρα σετ καμπυλών για χρήση αργότερα ή διανομή σε άλλους χρήστες.
- Προφίλ: Αυτή η αναπτυσσόμενη λίστα περιέχει πολλά προφίλ, καθένα από τα οποία αλλάζει το συνολικό σχήμα της καμπύλης spline.
- Εφαρμογή σε ολόκληρη την καμπύλη: Με αυτό, οποιεσδήποτε περιστροφές, κλιμάκωση ή μετάφραση θα εφαρμοστούν σε ολόκληρη την καμπύλη στο κέντρο από το τρέχον επιλεγμένο σημείο στη λωρίδα. Το gizmo για το σημείο θα αλλάξει, προσθέτοντας έναν νέο μεγάλο, λευκό κύκλο γύρω από το υπόλοιπο gizmo.
Αυτός ο νέος κύκλος θα επιτρέπει περιστροφές βάσει θυρών προβολής.
- Προεπιλογές Spline: Αυτό το εργαλείο έχει άλλες, ελπίζουμε αυτονόητες, ρυθμίσεις. Αλλά ένα πράγμα που πρέπει να εξερευνήσετε είναι οι προεπιλογές spline.
Αυτά σας επιτρέπουν να εκτελέσετε πολλές μοναδικές τεχνικές και στυλ voxel sculpting . Μπορείτε επίσης να προσθέσετε τα δικά σας χρησιμοποιώντας εξωτερικά αρχεία σε μορφές .OBJ ή .LWO.
Πώς να δημιουργήσετε ένα spline για το μενού spline
Αυτό το άρθρο εξηγεί πώς να καθορίσετε ένα τμήμα “αρχή-μέσο-τέλος” ενός spline.
Απαιτήσεις για το μοντέλο που θα χρησιμοποιηθεί στην παλέτα Splines
Το μοντέλο που θα χρησιμοποιηθεί απρόσκοπτα πάνω από το spline θα πρέπει να αποτελείται από 3 αντικείμενα, τα οποία ονομάζονται Top, Bottom και Middle. Το μεσαίο αντικείμενο είναι αυτό που θα τοποθετείται συνεχώς σε πλακάκια κατά μήκος της καμπύλης. Έχει κορυφές περίπου στην περιοχή [0..1] κατά μήκος του άξονα Υ. Το επάνω και το κάτω μέρος του αντικειμένου Μέσης πρέπει να είναι ανοιχτά και οι θέσεις των απέναντι κορυφών πρέπει να διαφέρουν ακριβώς κατά μία κατά μήκος του Y. Ακολουθεί ένα παράδειγμα του αντικειμένου Μέσης:
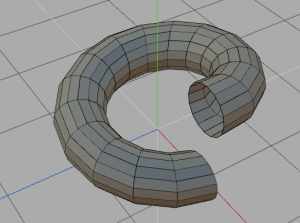
Μπορεί να υπάρχουν πολλά αντικείμενα με το όνομα “Middle_anything”. Θα πρέπει να έχουν πανομοιότυπες ανοιχτές άκρες, αλλά η γεωμετρία μπορεί να είναι διαφορετική στη μέση. Το 3DCoat θα χρησιμοποιήσει τυχαία μεσαία αντικείμενα για να τα τοποθετήσει κατά μήκος της καμπύλης. Το αντικείμενο Top τοποθετείται ακριβώς πάνω από το Μεσαίο αντικείμενο και έχει κατά προσέγγιση [1..2] εύρος συντεταγμένων Υ. Αυτό το αντικείμενο είναι ανοιχτό στο κάτω μέρος. οι κορυφές πρέπει να έχουν τις ίδιες τιμές με τις μεσαίες κορυφές κορυφής. Ένα παράδειγμα του αντικειμένου Top, με κόκκινο χρώμα:
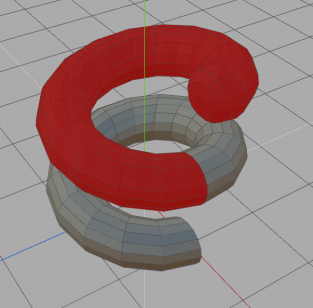
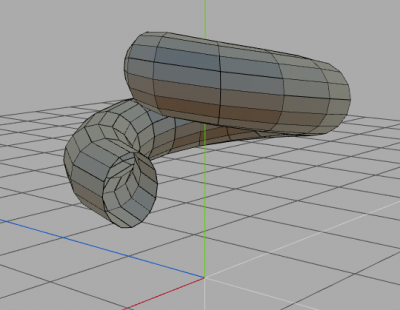
Το αντικείμενο Bottom τοποθετείται ακριβώς κάτω από το Μεσαίο αντικείμενο και έχει περίπου [-1..0] εύρος συντεταγμένων Υ. Αυτό το αντικείμενο είναι ανοιχτό στην κορυφή. οι κορυφές πρέπει να έχουν τις ίδιες τιμές με τις μεσαίες κάτω κορυφές. Ακολουθεί ένα παράδειγμα του αντικειμένου Bottom με κόκκινο χρώμα:
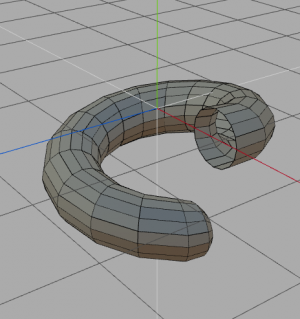
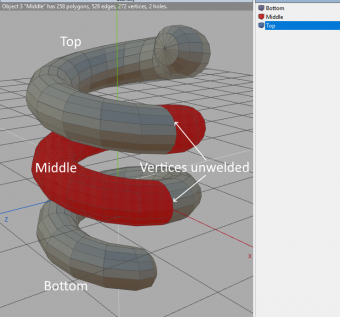
Ολόκληρη η καμπύλη θα καλυφθεί με μεσαία τμήματα. το πρώτο τμήμα είναι το κάτω μέρος και το τελευταίο είναι το επάνω. Εάν η καμπύλη είναι κλειστή, θα χρησιμοποιηθούν μόνο τα μεσαία τμήματα. Οι ανοιχτές άκρες θα συγκολληθούν με κοντινά τμήματα, έτσι ολόκληρο το αντικείμενο θα κλείσει εάν τα κάνατε όλα σωστά. Έτσι, το τελικό μοντέλο μοιάζει με αυτό:
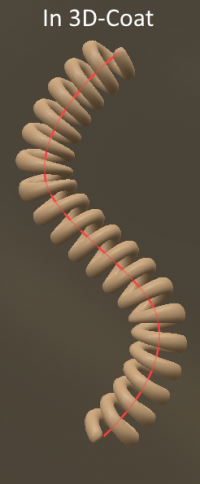
Αποτέλεσμα:
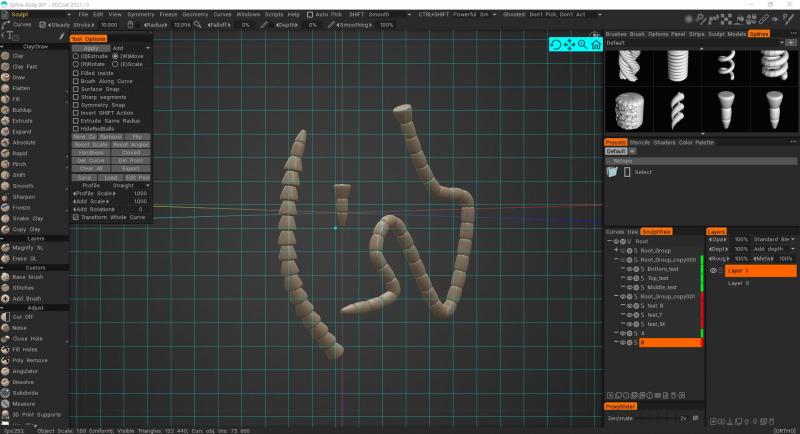
Πώς το έκανες; Μπορώ να χρησιμοποιήσω μόνο μία ρύθμιση αρχείου τη φορά και δεν μπορώ να ρυθμίσω ταυτόχρονα το επάνω, το μεσαίο και το κάτω μέρος. Μπορείτε να μου πείτε τη λύση;
Επιλέξτε τα επάνω/μεσαία/κάτω αντικείμενα ταυτόχρονα και σύρετέ τα και αποθέστε τα στον πίνακα Splines ή στο μενού RMB → Export → Saves to Splines Panel.
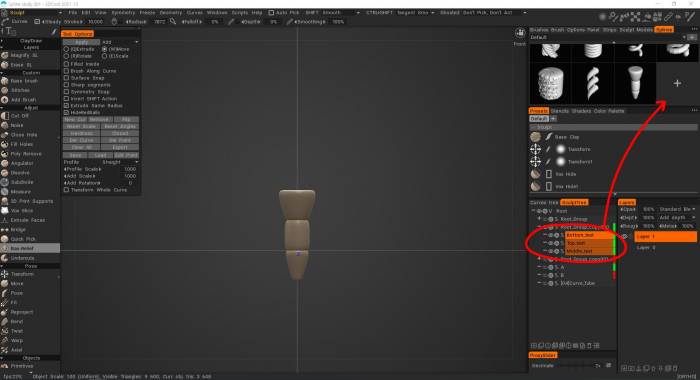
Αυτή τη στιγμή, φαίνεται ότι δεν αναγνωρίζεται σωστά, αλλά εάν πατήσετε OK μετά τη ρύθμιση του χώρου, το μεσαίο τμήμα αναγνωρίζεται σωστά.
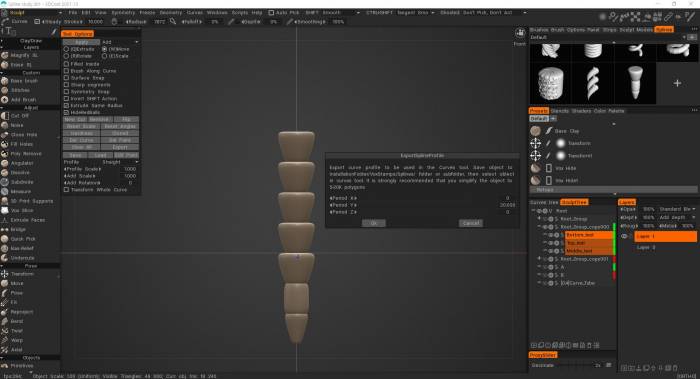
Εάν το μεσαίο τμήμα του μοντέλου δεν επαναλαμβάνεται, ελέγξτε τα παρακάτω
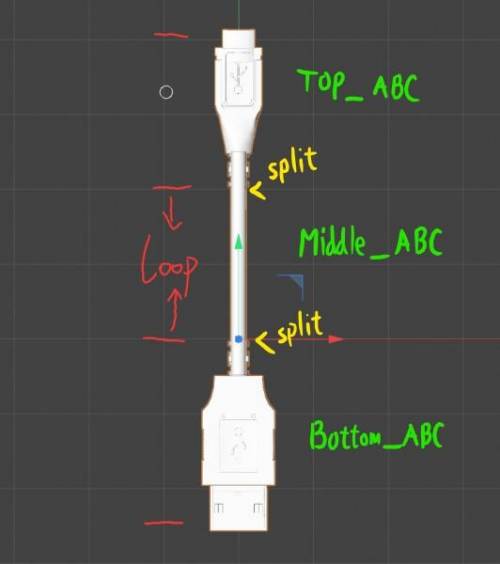
1. Το αντικείμενο ονομάζεται ως εξής;
– Μπλουζα_@@@
– Μέση_@@@
– Κάτω μέρος_@@@
2. Είναι το τμήμα σύνδεσης του αντικειμένου ‘Open edge’;
– Οι οδηγίες του Spline λένε ότι το πάνω-μεσαίο-κάτω μέρος πρέπει να είναι ανοιχτό
3. Αυτό είναι για παν ενδεχόμενο, αλλά το έχετε κάνει εγγραφή και δοκιμή αντί για προεπισκόπηση στο στάδιο της δημιουργίας;
– Δεν φαίνεται να επαναλαμβάνεται στην προεπισκόπηση, αλλά αν ακολουθήσετε σωστά τα βήματα 1 και 2, το αποτέλεσμα θα επαναληφθεί κανονικά στα μεσαία μέρη.
Εκμάθηση βίντεο
Αντιγραφή αντικειμένων στην επιφάνεια μοντέλου : Αυτό το βίντεο ξεκινά μια επίδειξη διαφόρων τεχνικών που μπορεί κανείς να χρησιμοποιήσει για να δημιουργήσει ένα αντικείμενο σε 3DCoat και είτε να δημιουργήσει ένα 3D Brush alpha από αυτό είτε να αναπαραγάγει παρουσίες του κατά μήκος της επιφάνειας ενός άλλου αντικειμένου.
Brush along Curve in 3DCoat : Αυτό το βίντεο δείχνει την ικανότητα να βουρτσίζετε κατά μήκος μιας καμπύλης, κυρίως στο Voxel Sculpting Room, χρησιμοποιώντας το εργαλείο Curves. Περιλαμβάνει επίσης τη δημιουργία ενός 3D Brush Alpha από ένα αντικείμενο/αρχείο OBJ.
 Ελληνικά
  English
 Українська
 Español
 Deutsch
 Français
 日本語
日本語 Русский
 한국어
한국어 Polski
 中文 (中国)
 Português
 Italiano
 Suomi
Suomi Svenska
 中文 (台灣)
 Dansk
Dansk Slovenčina
 Türkçe
 Nederlands
 Magyar
 ไทย
ไทย हिन्दी
 Tiếng Việt
 Lietuviškai
 Latviešu valoda
 Eesti
Eesti Čeština
 Română
 Norsk Bokmål